2017 MERCEDES-BENZ GLC SUV Electric
[x] Cancel search: ElectricPage 314 of 374
To avoid damage to the vehicle, deactivate
DISTRONIC PLUS and the HOLD function in
the following or similar situations:
Rwhen towing the vehicle
Rin the car wash
!Never clean your vehicle in a Touchless
Automatic Car Wash as these use special
cleaning agents. These cleaning agents can
damage the paintwork or plastic parts.
!Make sure that:
Rthe side windows and sliding sunroof are
closed completely
Rthe blower is switched off
Rthe windshield wiper switch is in position 0
Rthe 360° camera or the rear view camera is
deactivated
The vehicle may otherwise be damaged.
!If the SmartKey is within the rear detection
range of KEYLESS-GO, the following situa-
tions, for example, could lead to the uninten-
tional opening of the tailgate:
Rusing a car wash
Rusing a power washer
Make sure that the SmartKey is at least 3 m
away from the vehicle.
!If the SmartKey is within the rear detection
range of KEYLESS-GO, the following situa-
tions, for example, could lead to the uninten-
tional opening of the tailgate:
Rusing a car wash
Rusing a power washer
Make sure that the SmartKey is at least 10 ft (3 m) away from the vehicle.
!Make sure that the automatic transmission
is in neutral position iwhen washing your
vehicle in a tow-through car wash. The vehicle
may otherwise be damaged.
ROperating with the SmartKey:
Do not remove the SmartKey from the igni-
tion lock. Do not open the driver's door
when the engine is switched off or at very
low speeds. Otherwise, when in transmis-
sion position hork, the automatic
transmission will automatically switch to
park position jand block the wheels.
ROperating with the Start/Stop button:
Do not open the driver's door when the
engine is switched off or at very low speeds. Otherwise, when in transmission
position
hork, the automatic transmis-
sion will automatically switch to park posi-
tion jand block the wheels.
Observe the following to make sure that the
automatic transmission stays in neutral position
i:
Operating with the SmartKey and Start/Stop
button:
XMake sure that the ignition is switched on.
XMake sure that the vehicle is stationary.
XDepress and hold the brake pedal.
Operating with the Start/Stop button only:
XEngage park position j.
XRelease the brake pedal.
XRemove Start/Stop button from ignition lock
(Ypage 133).
XInsert the SmartKey into the ignition lock.
XSwitch on the ignition.
XDepress and hold the brake pedal.
Operating with the SmartKey and Start/Stop
button:
XShift to neutral i.
XRelease the brake pedal.
XRelease the electric parking brake, if neces-
sary.
XSwitch off the ignition and leave the SmartKey
in the ignition lock.
You can wash the vehicle in an automatic car
wash from the very start.
If the vehicle is very dirty, pre-wash it before
cleaning it in an automatic car wash.
After using an automatic car wash, wipe off wax
from the windshield and the wiper blades. This
will prevent smears and reduce wiping noises
caused by residue on the windshield.
Washing by hand
In some countries, washing by hand is only
allowed at specially equipped washing bays.
Observe the legal requirements in each country.
XDo not use hot water and do not wash the
vehicle in direct sunlight.
XUse a soft sponge to clean.
XUse a mild cleaning agent, such as a car
shampoo approved by Mercedes-Benz.
312Care
Maintenance and care
Page 315 of 374
XThoroughly hose down the vehicle with a gen-
tle jet of water.
XDo not point the water jet directly towards the
air inlet.
XUse plenty of water and rinse out the sponge
frequently.
XRinse the vehicle with clean water and dry
thoroughly with a chamois.
XDo not let the cleaning agent dry on the paint-work.
Carefully remove all deposits of road salt as
soon as possible when driving in winter.
Power washers
GWARNING
The water jet from a circular jet nozzle (dirt
blasters) can cause invisible exterior damage
to the tires or chassis components. Compo-
nents damaged in this way may fail unexpect-
edly. There is a risk of an accident.
Do not use power washers with circular jet
nozzles to clean the vehicle. Have damaged
tires or chassis components replaced imme-
diately.
!Always maintain a distance of at least
11.8 in (30 cm) between the vehicle and the
power washer nozzle. Information about the
correct distance is available from the equip-
ment manufacturer.
Move the power washer nozzle around when
cleaning your vehicle.
Do not aim directly at any of the following:
RTires
RDoor gaps, roof gaps, joints, etc.
RElectrical components
RBattery
RConnectors
RLamps
RSeals
RTrim
RVentilation slots
Damaged seals or electrical components can
lead to leaks or failures.
!Vehicles with decorative film: parts of your
vehicle are covered with a decorative film.
Maintain a distance of at least 27.5 in (70 cm) between the parts of the vehicle covered with
the film and the nozzle of the high pressure
cleaner.
Information about the correct distance is
available from the equipment manufacturer.
Move the power washer nozzle around when
cleaning your vehicle.
!If the SmartKey is within the rear detection
range of KEYLESS-GO, the following situa-
tions, for example, could lead to the uninten-
tional opening of the tailgate:
Rusing a car wash
Rusing a power washer
Make sure that the SmartKey is at least 3 m
away from the vehicle.
!If the SmartKey is within the rear detection
range of KEYLESS-GO, the following situa-
tions, for example, could lead to the uninten-
tional opening of the tailgate:
Rusing a car wash
Rusing a power washer
Make sure that the SmartKey is at least 10 ft
(3 m) away from the vehicle.
Cleaning the paintwork
!Do not affix:
Rstickers
Rfilms
Rmagnetic plates or similar items
to painted surfaces. You could otherwise
damage the paintwork.
Scratches, corrosive deposits, areas affected by
corrosion and damage caused by inadequate
care cannot always be completely repaired. In
such cases, visit a qualified specialist workshop.
XRemove dirt immediately, where possible,
while avoiding rubbing too hard.
XSoak insect remains with insect remover and
rinse off the treated areas afterwards.
XSoak bird droppings with water and rinse off
the treated areas afterwards.
XRemove coolant, brake fluid, tree resin, oils,
fuels and greases by rubbing gently with a
cloth soaked in petroleum ether or lighter
fluid.
XUse tar remover to remove tar stains.
XUse silicone remover to remove wax.
Care313
Maintenance and care
Z
Page 329 of 374
In order for the battery to achieve the maximum
possible service life, it must always be suffi-
ciently charged.
Like other batteries, the vehicle battery may
discharge over time if you do not use the vehicle.
In this case, have the battery disconnected at a
qualified specialist workshop. You can also
charge the battery with a charger recommended
by Mercedes-Benz. Contact a qualified special-
ist workshop for further information.
Have the battery condition of charge checked
more frequently if you use the vehicle mainly for
short trips or if you leave it standing idle for a
lengthy period. Consult a qualified specialist
workshop if you wish to leave your vehicle
parked for a long period of time.
Remove the SmartKey if you park the vehicle
and do not require any electrical consumers.
The vehicle will then use very little energy, thus
conserving battery power.
Charging the 12 V battery
Vehicles with a lithium-ion battery:
!Only use battery chargers with a maximum
charging voltage of 14.4 V.
All vehicles except vehicles with a lithium-
ion battery:
!Only use battery chargers with a maximum
charging voltage of 14.8 V.
GWARNING
During charging and jump-starting, explosive
gases can escape from the battery. There is a risk of an explosion.
Particularly avoid fire, open flames, creating
sparks and smoking. Ensure there is sufficient
ventilation while charging and jump-starting.
Do not lean over a battery.
GWARNING
Battery acid is caustic. There is a risk of injury.
Avoid contact with skin, eyes or clothing. Do
not inhale any battery gases. Do not lean over
the battery. Keep children away from batter-
ies. Wash away battery acid immediately with
plenty of clean water and seek medical atten-
tion.
GWARNING
A discharged battery can freeze at tempera-
tures below freezing point. When jump-start-
ing the vehicle or charging the battery, gases can escape from the battery. There is a risk of
an explosion.
Allow the frozen battery to thaw out before
charging it or jump-starting.
All vehicles:
!Only charge the battery using the jump-
starting connection point.
The jump-starting connection point is in the
engine compartment (
Ypage 328).
XOpen the hood.
XConnect the battery charger to the positive
terminal and ground point in the same order
as when connecting the donor battery in the
jump-starting procedure (
Ypage 328).
Keep away from fire and open flames. Do not
lean over a battery. Never charge the battery if it
is still installed in the vehicle, unless you use a
battery charger which has been tested and
approved by Mercedes-Benz. A battery charger
unit specially adapted for Mercedes-Benz vehi-
cles and tested and approved by Mercedes-
Benz is available as an accessory. It permits the
charging of the battery in its installed position.
Contact an authorized Mercedes-Benz Center
for further information and availability. Read the
battery charger's operating instructions before
charging the battery.
All vehicles except vehicles with a lithium-
ion battery: if the warning and indicator lamps
on the instrument cluster do not light up at low
temperatures, it is very likely that the dis-
charged battery has frozen. In this case you may
neither jump-start the vehicle nor charge the
battery. The service life of a thawed-out battery
may be shorter. The starting characteristics can
be impaired, particularly at low temperatures.
Have the thawed-out battery checked at a quali-
fied specialist workshop.
Vehicles with a lithium-ion battery: at low
temperatures, do not charge a battery which has
been removed using a battery charger. Allow the
battery to warm up gently first, if necessary.
Otherwise, the service life can be shortened and
the starting characteristics impaired, especially
at low temperatures.
Battery (vehicle)327
Breakdown assistance
Z
Page 331 of 374
Do not start the vehicle using a rapid charging device. If your vehicle's battery is discharged, the
engine can be jump-started from another vehicle or from a second battery using jumper cables.
Observe the following points:
RThe battery is not accessible in all vehicles. If the other vehicle's battery is not accessible, jump-
start the vehicle using a second battery or a jump-starting device.
RVehicles with a gasoline engine: only jump-start the vehicle when the engine and exhaust
system are cold.
RAll vehicles except vehicles with a lithium-ion battery: do not start the engine if the battery
is frozen. Let the battery thaw first.
RJump-starting may be performed only using batteries with a nominal voltage of 12 V.
ROnly use jumper cables which have a sufficient cross-section and insulated terminal clamps.
RIf the battery is fully discharged, leave the battery that is being used to jump-start connected for
a few minutes before attempting to start. This charges the battery slightly.
RMake sure that the two vehicles do not touch.
Make sure that:
RThe jumper cables are not damaged.
RBare parts of the terminal clamp do not come into contact with other metal parts while the jumper
cables are connected to the battery.
RThe jumper cables cannot come into contact with parts that can move when the engine is running,
such as the V-belt pulley or the fan.
XSecure the vehicle by applying the electric parking brake.
XShift the transmission to position j.
XMake sure that the ignition is switched off. All indicator lamps in the instrument cluster must be
off. When using the SmartKey, turn the SmartKey to position uin the ignition lock and remove it
(
Ypage 132).
XSwitch off all electrical consumers, e.g. rear window defroster, lighting, etc.
XOpen the hood.
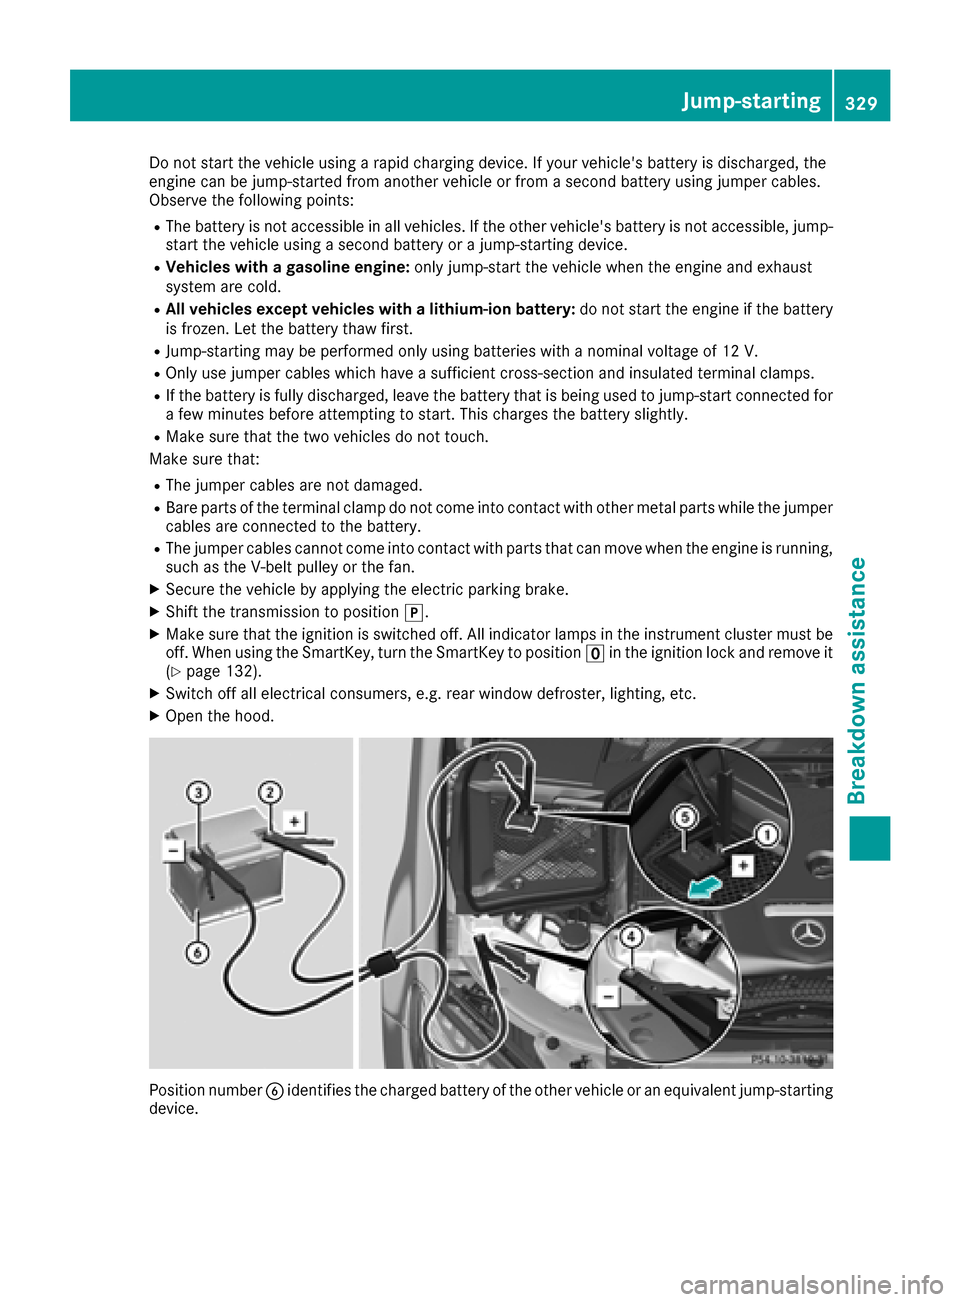
Position number Bidentifies the charged battery of the other vehicle or an equivalent jump-starting
device.
Jump-starting329
Breakdown assistance
Z
Page 332 of 374
XSlide coverAof positive terminal :in the direction of the arrow.
XConnect positive terminal :on your vehicle to positive terminal ;of donor battery Busing the
jumper cable, Always begin with positive terminal :on your own vehicle first.
XStart the engine of the donor vehicle and run it at idling speed.
XConnect negative terminal =of donor battery Cto ground point ?of your vehicle using the
jumper cable, connecting the jumper cable to battery of other vehicle Bfirst.
XStart the engine.
XBefore disconnecting the jumper cables, let the engine run for several minutes.
XFirst, remove the jumper cables from ground point ?and negative terminal =, then from pos-
itive clamp :and positive terminal ;. Begin each time at the contacts on your own vehicle first.
XClose coverAof positive terminal :after removing jumper cables.
XHave the battery checked at a qualified specialist workshop.
Jump-starting is not considered to be a normal operating condition.
iJumper cables and further information regarding jump-starting can be obtained at any qualified
specialist workshop.
Towing and tow-starting
Important safety notes
GWARNING
Functions relevant to safety are restricted or
no longer available if:
Rthe engine is not running.
Rthe brake system or the power steering is
malfunctioning.
Rthere is a malfunction in the voltage supply or the vehicle's electrical system.
If your vehicle is being towed, much more
force may be necessary to steer or brake.
There is a risk of an accident.
In such cases, use a tow bar. Before towing,
make sure that the steering moves freely.
GWARNING
You can no longer steer the vehicle if the
steering wheel lock has been engaged. There
is a risk of an accident.
Always switch off the ignition when towing the
vehicle with a tow cable or a tow bar.
GWARNING
When towing or tow-starting another vehicle
and its weight is greater than the permissible
gross weight of your vehicle, the:
Rthe towing eye could detach itself
Rthe vehicle/trailer combination could roll-
over.
There is a risk of an accident.
When towing or tow-starting another vehicle,
its weight should not be greater than the per- missible gross weight of your vehicle.
Details on the permissible gross vehicle weight
of your vehicle can be found on the vehicle iden-
tification plate (
Ypage 363).
!When Active Brake Assist, Distance Pilot
DISTRONIC or the HOLD function is activated,
the vehicle brakes automatically in certain
situations.
To avoid damage to the vehicle, deactivate
these systems in the following or similar sit-
uations:
Rwhen towing the vehicle
Rin the car wash
!Make sure that the electric parking brake is
released. If the electric parking brake is faulty,
visit a qualified specialist workshop.
!Only secure the tow rope or tow bar at the
towing eyes, or the trailer tow hitch, if availa-
ble. You could otherwise damage the vehicle.
330Towing and tow-starting
Breakdown assistance
Page 333 of 374
!Do not use the trailer tow hitch for recovery
or towing. Do not use the towing eye for
recovery. this could damage the vehicle. If in
doubt, have the vehicle recovered using a
crane.
!When towing, pull away slowly and
smoothly. If the tractive power is too high, the
vehicles could be damaged.
!Shift the automatic transmission to position
i and do not open the driver's or front pas-
senger's door during towing. The automatic
transmission may otherwise shift to position
j, which could damage the transmission.
!Do not tow with sling-type equipment. This
could damage the vehicle.
!The vehicle can be towed a maximum of
30 miles (50km). The towing speed of 30 mph (50 km/h) must not be exceeded.
If the vehicle has to be towed more than
30 miles (50km), the entire vehicle must be
raised and transported.
It is better to have the vehicle transported than
to have it towed away.
If the vehicle has suffered transmission damage,
have it transported on a transporter or trailer.
The automatic transmission must be in position i when the vehicle is being towed. If the auto-
matic transmission cannot be shifted to position
i, have the vehicle transported on a trans-
porter or trailer.
The battery must be connected and charged.
Otherwise, you:
Rcannot turn the SmartKey to position 2in
the ignition lock
Rcannot release the electric parking brake
Rcannot shift the automatic transmission to
position i
Disarm the automatic locking feature before the
vehicle is towed (
Ypage 84). You could other-
wise be locked out when pushing or towing the
vehicle.
Installing/removing the towing eye
Installing the towing eye
GWARNING
The exhaust tail pipe may be very hot. There is
a risk of burns when removing the rear cover.
Do not touch the exhaust pipe. Take particular
care when removing the rear cover.
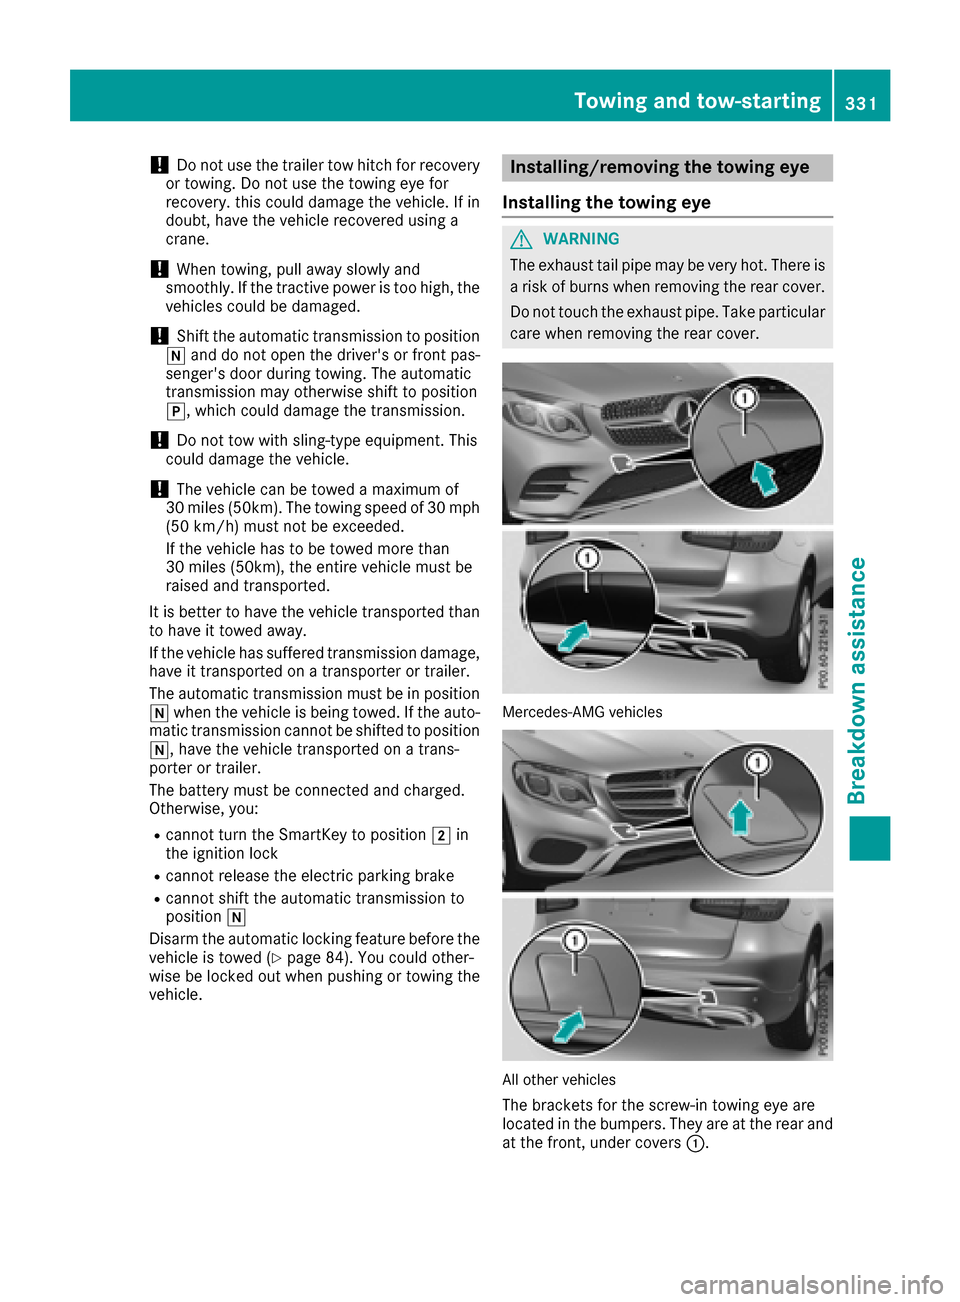
Mercedes-AMG vehicles
All other vehicles
The brackets for the screw-in towing eye are
located in the bumpers. They are at the rear and
at the front, under covers :.
Towing and tow-starting331
Breakdown assistance
Z
Page 334 of 374

XRemove thetowin geye from th eretainer
(Ypage 320).
XMercedes-AM Gvehicles: useasuitable
object, e.g. ascrewdriver, to pry off cover :
on th efron tbumper from underneath. Tak e
th ecover from th eopening ,but do no t
remove it .
Press th emar kon cover :on th erear
bumper inward and remove .
XAll other vehicles:press themar kon
cover :inward and remove .
XScrew in thetowin geye clockwise as far as it
will go and tighten it .
Vehicles wit h atrailer to whitch do no thav e a
bracke tfor th escrew-in towin geye at th eback.
Connect th etowbar to th etrailer to whitch
(
Ypage 204).
Removing the towing eye
XUnscrew and remove th etowin geye.
XAttac hcover :to th ebumper and press until
it engages.
Towing a vehicle with both axles on
the ground
The automatic transmission automatically shifts
to position jwhen you open th edriver' sor
front-passenger door or when you remove th e
SmartKey from th eignition lock. It is essential to
observ eth efollowin gsteps to ensur ethat th e
automatic transmission remain sin position i
during towing.
XMak esur ethat th evehicl eis stationary.
XTurn th eSmartKey to position 2in th eigni-
tion lock.
XDepress and hold th ebrak epedal .
XShift th eautomatic transmission to position
i.
XLeav eth eSmartKey in position 2in th eigni-
tion lock.
XReleas eth ebrak epedal .
XReleas eth eelectric parking brake.
XSwitc hon th ehazard warning lamp s
(Ypage 113).
In order to signal achang eof direction when
towin gth evehicl ewit hth ehazard warning
lamp sswitched on ,use th ecombination switch
as usual. In this case, only th eindicator lamp sfor th
edirection of travel flash. Afte rresetting
th ecombination switch ,th ehazard warning
lamp start sflashin gagain .
Transporting the vehicle
General notes
!When th evehicl eis loade dfor transport, th e
fron tand rear axles mus tbe stationary and on
th esam etransportation vehicle. Positioning
ove rth econnection poin tof th etranspor t
vehicl eis no tpermitted. The driv etrain may
otherwise be damaged.
!You may only secure th evehicl eby th e
wheels, no tby part sof th evehicl esuc has
axl eor steering components. Otherwise, th e
vehicl ecould be damaged.
The towin geye or trailer to whitch can be used
to pull th evehicl eonto atrailer or transporte rif
you wish to transpor tit.
XTurn th eSmartKey to position 2in th eigni-
tion lock.
XShift th eautomatic transmission to position
i.
As soon as th evehicle ha sbeen loaded:
XPreven tth evehicl efrom rollin gaway by
applyin gth eelectric parking brake.
XShift th eautomatic transmission to position
j.
XTurn th eSmartKey to position uin th eigni-
tion loc kand remove it .
XSecureth evehicle.
332Towing and tow-starting
Breakdown assistance
Page 335 of 374
Notes on 4MATIC vehicles
!
Vehicles with 4MATIC must not be towed
with either the front or the rear axle raised, as
doing so will damage the transmission.
Vehicles with 4MATIC may either be towed away with both axles on the ground or be loaded up
and transported.
If the vehicle's transmission, front, or rear axle is
damaged, have the vehicle transported on a
truck or trailer.
In the event of damage to the electrical sys-
tem: if the battery is defective, the automatic
transmission will be locked in position P. To shift
the automatic transmission to position N, you
must provide power to the vehicle's electrical
system in the same way as when jump-starting
(
Ypage 328).
Have the vehicle transported on a transporter or
trailer.
Tow-starting (emergency engine
starting)
!
Vehicles with automatic transmission must
not be tow-started. You could otherwise dam-
age the automatic transmission.
iYou can find information on "Jump-starting"
under (Ypage 328).
Fuses
Important safety notes
GWARNING
If you manipulate or bridge a faulty fuse or if
you replace it with a fuse with a higher amper- age, the electric cables could be overloaded.
This could result in a fire. There is a risk of an
accident and injury.
Always replace faulty fuses with the specified
new fuses having the correct amperage.
Blown fuses must be replaced with fuses of the
same rating, which you can recognize by the
color and value. The fuse ratings are listed in the
fuse allocation chart.
The fuse allocation chart is on the fuse box in the
cargo compartment (
Ypage 334). If a newly inserted fuse also blows, have the
cause traced and rectified at a qualified special-
ist workshop, e.g. an authorized Mercedes-Benz Center.
!Only use fuses that have been approved for
Mercedes-Benz vehicles and which have the
correct fuse rating for the system concerned.
Otherwise, components or systems could be
damaged.
!Make sure that no moisture can enter the
fuse box when the cover is open.
!When closing the cover, make sure that it is
lying correctly on the fuse box. Moisture seep-
ing i
n or dirt could otherwise impair the oper-
ation of the fuses.
The fuses in your vehicle serve to close down
faulty circuits. If a fuse blows, all the compo-
nents on the circuit and their functions stop
operating.
Before changing a fuse
Observe the important safety notes
(Ypage 333)
XSwitch off the engine.
XSwitch off all electrical consumers.
XMake sure that the ignition is switched off
(Ypage 133).
or
XWhen using the SmartKey, turn the SmartKey
to position uin the ignition lock and remove
it (
Ypage 132).
XSecure the vehicle against rolling away
(Ypage 154).
All indicator lamps in the instrument cluster
must be off.
The fuses are located in various fuse boxes:
RFuse box on the driver's side of the dashboard
RFuse box in the front-passenger footwell
RFuse box in the engine compartment on the
driver's side
RFuse box under the cargo compartment floor on the right-hand side of the vehicle, when
viewed in the direction of travel
Fuses333
Breakdown assistance
Z