2017 MERCEDES-BENZ GLC SUV tires
[x] Cancel search: tiresPage 164 of 374

braking maneuvers. Do not use the cruise con-
trol or DISTRONIC PLUS.
If the vehicle threatens to skid or cannot be
stopped when moving at low speed:
XShift the transmission to positioni.
The outside temperature indicator is not
designed to serve as an ice-warning device and is therefore unsuitable for that purpose.
Changes in the outside temperature are dis-
played after a short delay.
Indicated temperatures just above the freezing
point do not guarantee that the road surface is
free of ice. The road may still be icy, especially in
wooded areas or on bridges. The vehicle could
skid if you fail to adapt your driving style. Always
adapt your driving style and drive at a speed to
suit the prevailing weather conditions.
You should pay special attention to road condi-
tions when temperatures are around freezing
point.
For more information on driving with snow
chains, see (
Ypage 338).
For more information on driving with summer
tires, see (
Ypage 338).
Observe the notes in the "Winter operation" sec-
tion (
Ypage 338).
Driving systems
Mercedes-Benz Intelligent Drive
Mercedes-Benz Intelligent Drive stands for inno-
vative driver assistance and safety systems
which enhance comfort and support the driver in
critical situations. With these intelligent co-ordi- nated systems Mercedes-Benz has set a mile-
stone on the path towards autonomous driving.
Mercedes-Benz Intelligent Drive embraces all
elements of active and passive safety in one well
thought out system – for the safety of the vehi-
cle occupants and that of other road users.
Further information on driving safety systems
(
Ypage 64).
Cruise control
General notes
Cruise control maintains a constant road speed
for you. It brakes automatically in order to avoid exceeding the set speed. Change into a lower gear in good time on long and steep downhill
gradients. This is especially important if the
vehicle is laden or towing a trailer. By doing so,
you will make use of the braking effect of the
engine. This relieves the load on the brake sys-
tem and prevents the brakes from overheating
and wearing too quickly.
Use cruise control only if road and traffic con-
ditions make it appropriate to maintain a steady
speed for a prolonged period. You can store any
road speed above 20 mph (30 km/h).
Important safety notes
Cruise control can neither reduce the risk of an
accident if you fail to adapt your driving style nor override the laws of physics. Cruise control can-
not take into account the road, traffic and
weather conditions. Cruise control is only an
aid. You are responsible for maintaining a safe
distance to the vehicle in front, for vehicle
speed, for braking in good time and for staying in
lane.
Do not use cruise control:
Rin road and traffic conditions which do not
allow you to maintain a constant speed, e.g. in
heavy traffic or on winding roads
Ron slippery road surfaces. Braking or accel-
erating could cause the drive wheels to lose
traction and the vehicle could then skid
Rwhen there is poor visibility, e.g. due to fog,
heavy rain or snow
If there is a change of drivers, advise the new
driver of the speed stored.
iThe speed indicated in the speedometer
may differ slightly from the speed stored.
Cruise control lever
:Activates or increases speed
;Activates or reduces speed
162Driving systems
Driving and parking
Page 177 of 374

Sport mode
The firmer setting of the suspension tuning in
Sport mode ensures even better contact with
the road. Select this mode when employing a
sporty driving style, e.g. on winding country
roads.
XPress button:.
Indicator lamp =lights up. You have selected
Sport mode.
The AMG Suspension System SPORT
mes-
sage appears on the multifunction display.
Sport + mode
The very firm setting of the suspension setting in
Sport + mode ensures the best possible contact
with the road. Select this mode only when driv-
ing on race circuits.
If indicator lamps ;and =are off:
XPress button :twice.
Indicator lamps ;and =light up. You have
selected Sport + mode.
The AMG
SuspensionSystemSPORT +mes-
sage appears on the multifunction display.
If indicator lamp =lights up:
XPress button :once.
Second indicator lamp ;lights up. You have
selected Sport + mode.
The AMG
SuspensionSystemSPORT +mes-
sage appears on the multifunction display.
Comfort mode
In Comfort mode, the driving characteristics of
your vehicle are more comfortable. Select this
mode if you favor a more comfortable driving
style, but also when driving fast on straight
roads, e.g. highways.
XPress button :repeatedly until indicator
lamps ;and =go out.
You have selected Comfort mode.
The AMG
SuspensionSystemCOMFORTmes-
sage appears on the multifunction display.
4MATIC (permanent four-wheel drive)
4MATIC ensures permanent drive for all four
wheels. Together with ESP®, it improves the
traction of your vehicle whenever a drive wheel
spins due to insufficient grip.
If you fail to adapt your driving style or if you are inattentive, 4MATIC can neither reduce the risk
of an accident nor override the laws of physics.
4MATIC does not take into account
Rthe road and weather conditions
Rthe traffic situation
4MATIC is only an aid. You are responsible for
the distance to the vehicle in front, for vehicle
speed, for braking in good time and for staying in
your lane.
If a drive wheel spins due to insufficient grip:
ROnly depress the accelerator pedal as far as
necessary when pulling away.
RAccelerate less when driving.
!Never tow the vehicle with one axle raised.
This may damage the transfer case. Damage
of this sort is not covered by the Mercedes-
Benz Limited Warranty. All wheels must
remain either on the ground or be fully raised.
Observe the instructions for towing the vehi-
cle with all wheels in full contact with the
ground.
iIn wintry driving conditions, the maximum
effect of 4MATIC can only be achieved if you
use winter tires (M+S tires), with snow chains
if necessary.
PARKTRONIC
Important safety notes
PARKTRONIC is an electronic parking aid with
ultrasonic sensors. It monitors the area around
your vehicle using six sensors in the front
bumper and six sensors in the rear bumper.
PARKTRONIC indicates visually and audibly the
distance between your vehicle and an object.
Driving systems175
Driving and parking
Z
Page 180 of 374

Problems with PARKTRONIC
ProblemPossible causes/consequences andMSolutions
Only the red segments in
the PARKTRONIC warn-
ing displays are lit. You
also hear a warning tone
for approximately two
seconds.
PARKTRONIC is then
deactivated and the indi-
cator lamp on the
PARKTRONIC button
lights up.PARKTRONIC has malfunctioned and has switched off.
XIf problems persist, have PARKTRONIC checked at a qualified spe-
cialist workshop.
Only the red segments in
the PARKTRONIC warn-
ing displays are lit.
PARKTRONIC is then
deactivated.The PARKTRONIC sensors are dirty or there is interference.
XClean the PARKTRONIC sensors (Ypage 315).
XSwitch the ignition back on.
The problem may be caused by an external source of radio or ultra-
sound waves.
XSee if PARKTRONIC functions in a different location.
Active Parking Assist
General notes
Active Parking Assist is an electronic parking aid
with ultrasound. It measures the road on both
sides of the vehicle. A parking symbol indicates a suitable parking space. Active steering inter-
vention and brake application can assist you
during parking and when exiting a parking
space. You may also use PARKTRONIC
(
Ypage 175).
Important safety notes
Active Parking Assist is merely an aid. It is not a
replacement for your attention to your immedi-
ate surroundings. You are always responsible
for safe maneuvering, parking and exiting a
parking space. Make sure that no persons, ani-
mals or objects are in the maneuvering range.
When PARKTRONIC is switched off, Active Park-
ing Assist is also unavailable.
For vehicles with a trailer tow hitch installed, the
minimum length for parking spaces is slightly
longer.
If you have attached a trailer to your vehicle, you
should not use Active Parking Assist. Once the
electrical connection is established between your vehicle and the trailer, Active Parking
Assist is no longer available. PARKTRONIC is
deactivated for the rear area.
GWARNING
While parking or pulling out of a parking
space, the vehicle swings out and can drive
onto areas of the oncoming lane. This could
result in a collision with another road user.
There is a risk of an accident.
Pay attention to other road users. Stop the
vehicle if necessary or cancel the Active Park- ing Assist parking procedure.
!If unavoidable, you should drive over obsta-
cles such as curbs slowly and not at a sharp
angle. Otherwise, you may damage the
wheels or tires.
Active Parking Assist may possibly indicate
parking spaces which are not suitable for park-
ing, for example:
Rwhere parking or stopping is prohibited
Rin front of driveways or entrances and exits
Ron unsuitable surfaces
178Driving systems
Driving and parking
Page 186 of 374
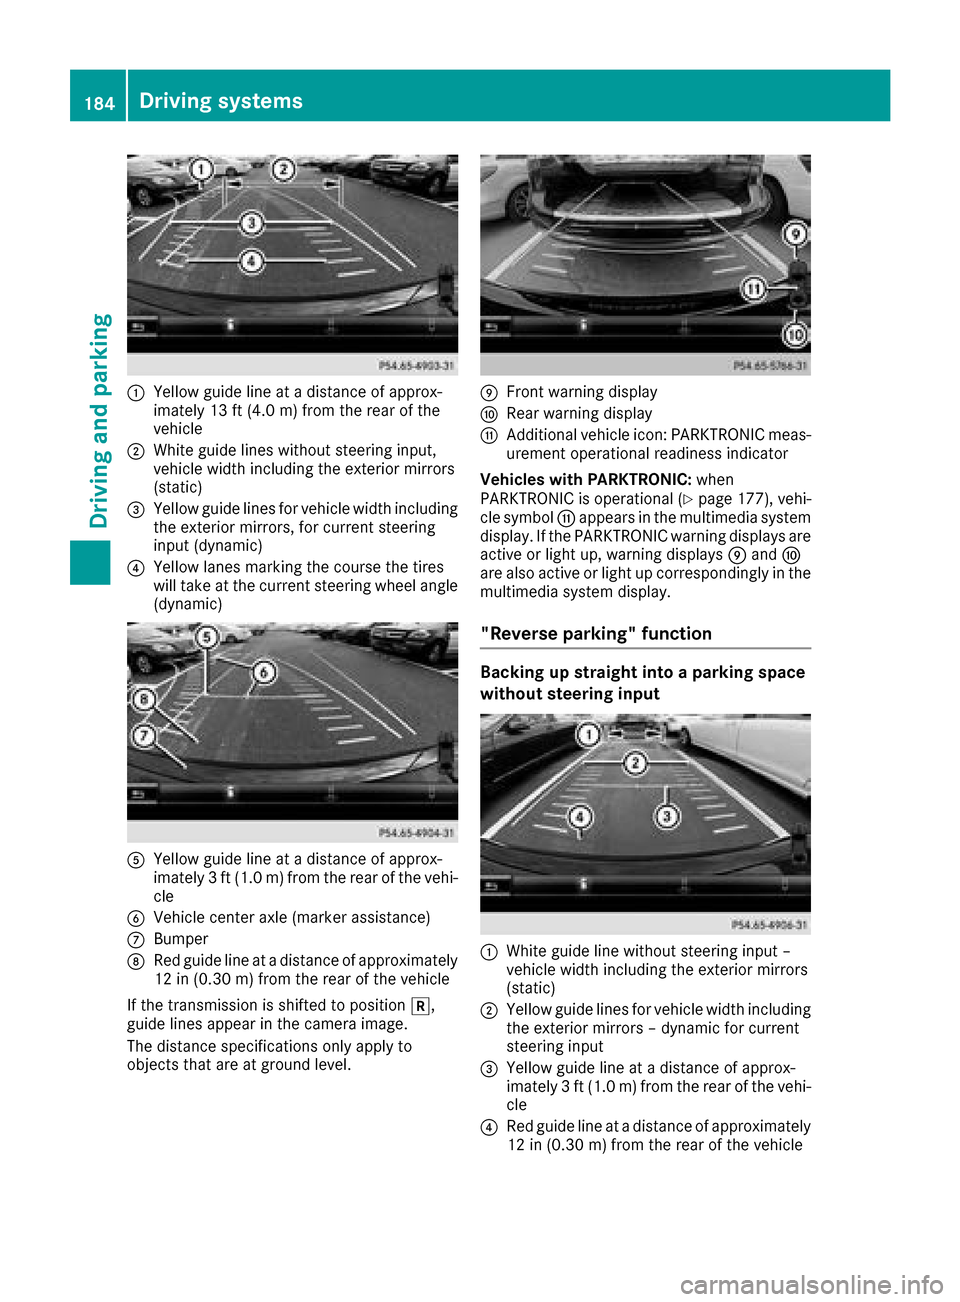
:Yellow guide line at a distance of approx-
imately 13 ft (4.0 m) from the rear of the
vehicle
;White guide lines without steering input,
vehicle width including the exterior mirrors
(static)
=Yellow guide lines for vehicle width including
the exterior mirrors, for current steering
input (dynamic)
?Yellow lanes marking the course the tires
will take at the current steering wheel angle
(dynamic)
AYellow guide line at a distance of approx-
imately 3 ft (1.0 m) from the rear of the vehi-
cle
BVehicle center axle (marker assistance)
CBumper
DRed guide line at a distance of approximately
12 in (0.30 m) from the rear of the vehicle
If the transmission is shifted to position k,
guide lines appear in the camera image.
The distance specifications only apply to
objects that are at ground level.
EFront warning display
FRear warning display
GAdditional vehicle icon: PARKTRONIC meas-
urement operational readiness indicator
Vehicles with PARKTRONIC: when
PARKTRONIC is operational (
Ypage 177), vehi-
cle symbol Gappears in the multimedia system
display. If the PARKTRONIC warning displays are
active or light up, warning displays Eand F
are also active or light up correspondingly in the
multimedia system display.
"Reverse parking" function
Backing up straight into a parking space
without steering input
:White guide line without steering input –
vehicle width including the exterior mirrors
(static)
;Yellow guide lines for vehicle width including
the exterior mirrors – dynamic for current
steering input
=Yellow guide line at a distance of approx-
imately 3 ft (1.0 m) from the rear of the vehi-
cle
?Red guide line at a distance of approximately
12 in (0.30 m)from the rear of the vehicle
184Driving systems
Driving and parking
Page 191 of 374
Rvery close to the exterior mirrors
Rin the transitional areas between the various
cameras in the virtual top view
!Objects not at ground level may appear to
be further away than they actually are, e.g.:
Rthe bumper of a parked vehicle
Rthe drawbar of a trailer
Rthe ball coupling of a trailer tow hitch
Rthe rear section of an HGV
Ra slanted post
Use the guidelines only for orientation.
Approach objects no further than the bottom-
most guideline.
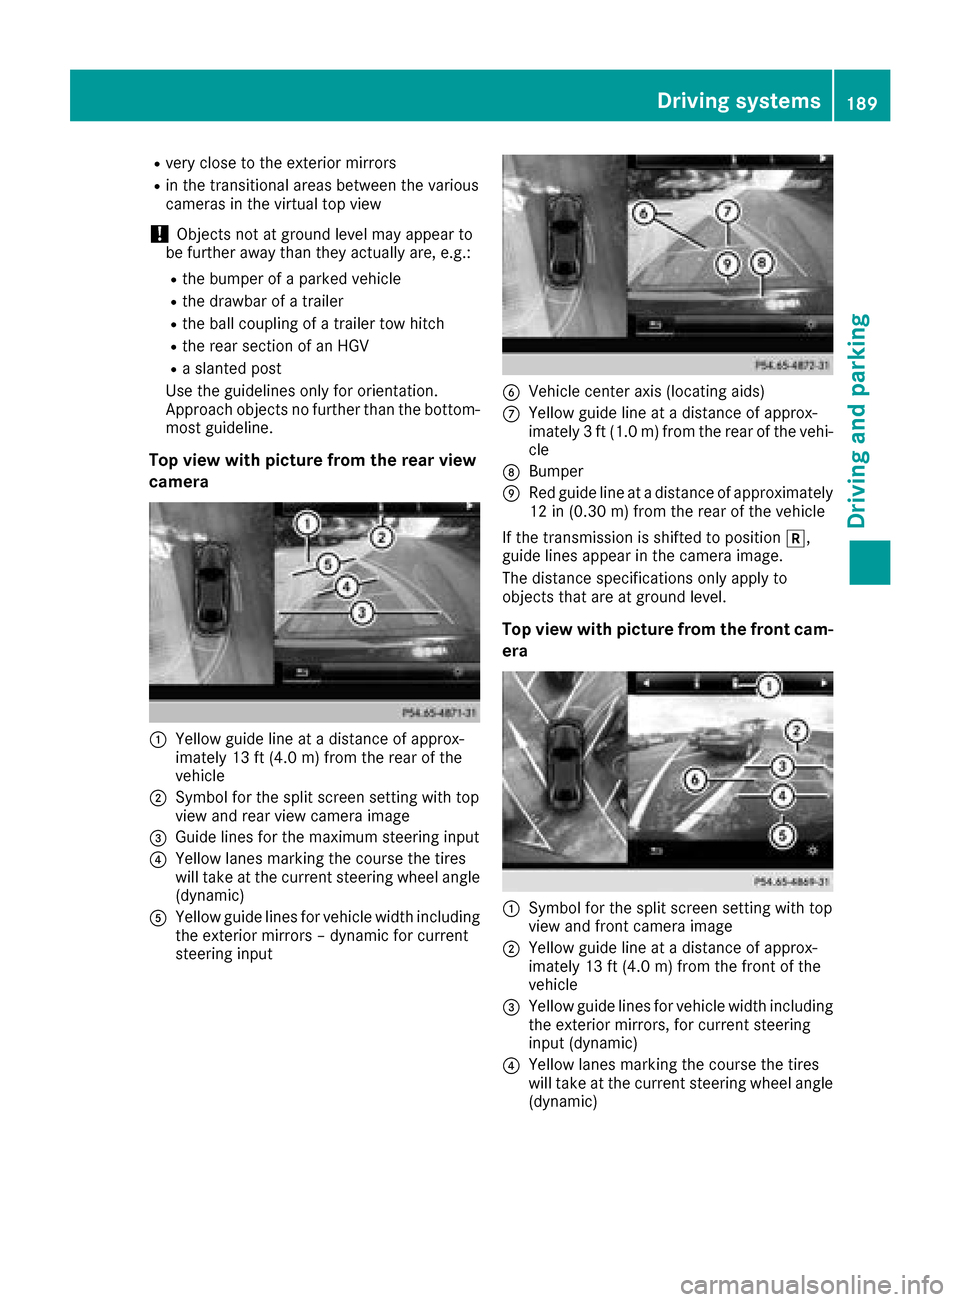
Top view with picture from the rear view
camera
:Yellow guide line at a distance of approx-
imately 13 ft (4.0 m) from the rear of the
vehicle
;Symbol for the split screen setting with top
view and rear view camera image
=Guide lines for the maximum steering input
?Yellow lanes marking the course the tires
will take at the current steering wheel angle
(dynamic)
AYellow guide lines for vehicle width including
the exterior mirrors – dynamic for current
steering input
BVehicle center axis (locating aids)
CYellow guide line at a distance of approx-
imately 3 ft (1.0 m) from the rear of the vehi-
cle
DBumper
ERed guide line at a distance of approximately
12 in (0.30 m) from the rear of the vehicle
If the transmission is shifted to position k,
guide lines appear in the camera image.
The distance specifications only apply to
objects that are at ground level.
Top view with picture from the front cam-
era
:Symbol for the split screen setting with top
view and front camera image
;Yellow guide line at a distance of approx-
imately 13 ft (4.0 m) from the front of the
vehicle
=Yellow guide lines for vehicle width including
the exterior mirrors, for current steering
input (dynamic)
?Yellow lanes marking the course the tires
will take at the current steering wheel angle
(dynamic)
Driving systems189
Driving and parking
Z
Page 207 of 374
XSwitch off the engine.
XClose the doors and tailgate.
XCouple up the trailer.
XEstablish the electrical connection between
the vehicle and the trailer.
XCheck that the trailer lighting system is work-
ing.
XPush the combination switch upwards/down-wards and check whether the corresponding
turn signal on the trailer flashes.
A trailer that is connected is recognized only
when the electrical connection is established
correctly and when the lighting system is work-
ing properly. The function of other systems also
depends on this, for example:
RESP®
RPARKTRONIC
RActive Parking Assist
RActive Blind Spot Assist
RActive Lane Keeping Assist
Vehicles with AIR BODY CONTROL: if you couple
up a trailer, the vehicle always remains at high-
way level. Observe the following note when cou-
pling up a trailer:
RUnless highway level has been set manually,
the vehicle is automatically lowered to high-
way level. If a speed of 5 mph (8 km/h) has
been reached, this may be the case.
These restrictions apply to accessories that are
supplied with power via the trailer socket in your
vehicle, e.g. a rear bicycle rack.
Observe the maximum permissible trailer
dimensions (width and length).
Most U.S. states and all Canadian provinces
require by law:
RSafety chains between the towing vehicle and
the trailer. The chains should be cross-wound
under the trailer drawbar. They must be fas-
tened to the vehicle's trailer coupling, not to
the bumper or the axle.
Leave enough play in the chains to make tight
cornering possible.
RA separate brake system for certain types of
trailer.
RSafety switch for braked trailers. Check the
specific legal requirements applicable to your state.
If the trailer becomes detached from the tow-
ing vehicle, the safety feature applies the
trailer brakes.
Towing a trailer
There are several legal requirements for towing
a trailer, e.g. the maximum permissible speed.
Make sure that your car/trailer combination
complies with the local regulations:
Rin your place of residence
Rat your destination
The police and local authorities can provide reli- able information.
To accumulate driving experience and accustom
yourself to the new handling characteristics,
practice the following at a location where there
is no traffic:
RCornering
RStopping
RBacking up
Check the following before the journey:
RTrailer tow hitch
RSafety switch for braked trailers
RSafety chains
RElectrical connections
RLighting system
RWheels and tires
RLoad securing
Adjust the exterior mirrors so that you have a
clear view of the rear section of the trailer.
If the trailer is equipped with electronically con-
trolled brakes, pull away carefully in the car/
trailer combination. Brake manually using the
brake controller and check whether the brakes
function correctly.
Regularly check that the load is secure.
When towing a trailer, your vehicle's handling
characteristics will be different in comparison
with when driving without a trailer.
The vehicle/trailer combination:
Ris heavier
Ris restricted in its acceleration and gradient-
climbing capability
Rhas an increased braking distance
Ris affected more by strong crosswinds
Rdemands more sensitive steering
Rhas a larger turning circle
Avoid sudden steering movements.
Avoid braking abruptly. If possible, brake gently
at first to allow the trailer to run on. Then,
increase the braking force rapidly.
Towing a trailer205
Driving and parking
Z
Page 208 of 374
When overtaking, pay particular attention to the
extended length of your vehicle/trailer combi-
nation.
Due to the length of the vehicle/trailer combi-
nation, you require additional road space when
overtaking before you can change back to the
original lane.
If the automatic transmission repeatedly shifts
between gears on uphill or downhill gradients,
shift to a lower gear.
Driving in a lower gear and at a reduced speed
decreases the risk of engine damage.
If the coolant temperature increases signifi-
cantly when climate control is switched on,
switch climate control off.
Coolant heat can also be dissipated by opening
the windows and switching the ventilation
blower and the interior temperature to the high-
est level.
Decoupling a trailer
GWARNING
If you uncouple a trailer with the overrun
brake engaged, you could trap your hand
between the vehicle and the trailer drawbar.
There is a risk of injury.
Do not uncouple a trailer if the overrun brake
is engaged.
GWARNING
Vehicles with level control:
The vehicle is lowered as soon as you discon-
nect the trailer cable. This could result in your
limbs or those of other people that are
between the vehicle body and tires or under-
neath the vehicle being trapped. There is a
risk of injury.
Make sure that nobody is in the immediate
vicinity of the wheel housings or under the
vehicle when you disconnect the trailer cable.
!Do not disconnect a trailer with an engaged
overrun brake. Otherwise, your vehicle could
be damaged by the rebounding of the overrun
brake.
XApply the vehicle's parking brake manually.
XShift the transmission to position j.
XClose all doors and the tailgate.
XSwitch off the engine.
XSecure the vehicle and trailer against rolling
away.
XRemove the trailer cable.
XRemove the safety chains, if there are any.
XUncouple the trailer.
Removing the ball coupling
XObserve the manufacturer's installation
instructions.
XPress the protective cap into the ball coupling
recess.
XMake sure that the protective cap is firmly in
place.
Observe the loading guidelines (
Ypage 278)
and the safety notes regarding stowage spaces
(
Ypage 278).
Information on cleaning and care of the trailer
tow hitch (
Ypage 316).
Trailer power supply
!
Accessories with a maximum power con-
sumption of 180 W can be connected to the
permanent power supply.
You must not charge a trailer battery using the
power supply.
The trailer socket of your vehicle is equipped at
the factory with a permanent power supply.
The permanent power supply is supplied via
trailer socket pin 4.
The trailer's permanent power supply is
switched off in the event of low vehicle supply
voltage and after six hours at the latest.
A qualified specialist workshop can provide
more information about installing the trailer
electrics.
Permissible trailer loads and trailer
drawbar noseweights
Weight specifications
The gross trailer weight is calculated as the
weight of the trailer plus the weight of the load
and the trailer's equipment.
206Towing a trailer
Driving and parking
Page 246 of 374
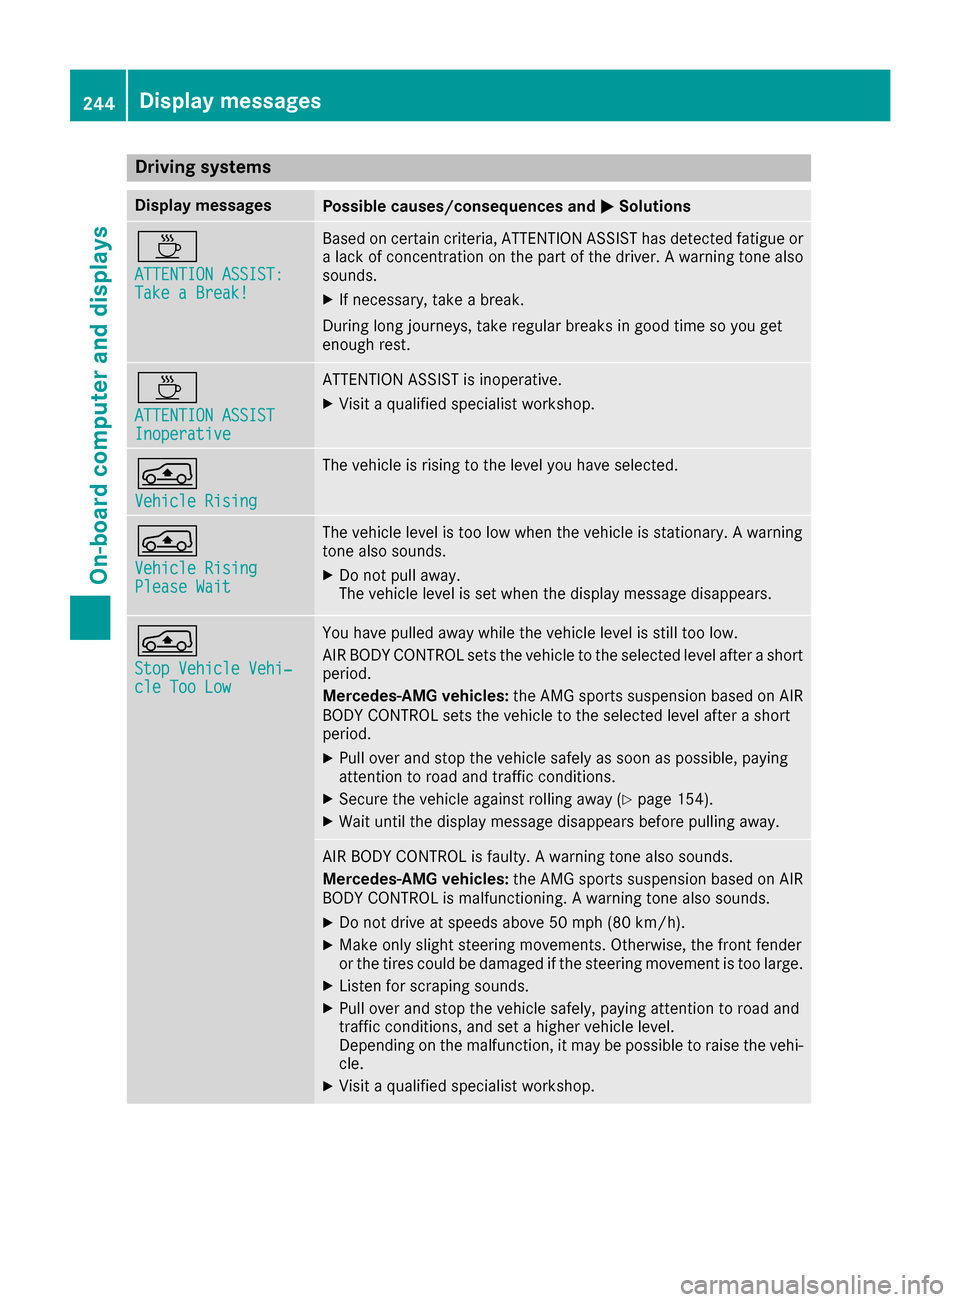
Drivingsystems
Display messagesPossible causes/consequences an dMSolutions
À
ATTENTION ASSIST :Take a Break!
Based on certain criteria, ATTENTION ASSIST has detecte dfatigue or
a lac kof concentration on th epar tof th edriver . Awarnin gtone also
sounds.
XIf necessary, take abreak .
Durin glon gjourneys, take regular break sin goo dtime so you get
enough rest.
À
ATTENTION ASSISTInoperative
ATTENTION ASSIST is inoperative .
XVisitaqualified specialis tworkshop .
Á
VehicleRising
The vehicle is risin gto th elevel you hav eselected.
Á
Vehicl eRisingPlease Wai t
The vehicle level is to olow when th evehicle is stationary. Awarnin g
tone also sounds.
XDo no tpull away.
The vehicle level is set when th edisplay messag edisappears .
Á
StopVehicl eVehi‐cle Too Low
You hav epulle daway whil eth evehicle level is still to olow.
AI RBODY CONTROL set sth evehicle to th eselecte dlevel after ashort
period.
Mercedes-AMG vehicles :th eAM Gsport ssuspensio nbase don AI R
BODY CONTROL set sth evehicle to th eselecte dlevel after ashort
period.
XPull over and stop th evehicle safely as soo nas possible, payin g
attention to road and traffic conditions.
XSecur eth evehicle against rollin gaway (Ypage 154).
XWait until th edisplay messag edisappears befor epulling away.
AI R BODY CONTROL is faulty. Awarnin gtone also sounds.
Mercedes-AMG vehicles :th eAM Gsport ssuspensio nbase don AI R
BODY CONTROL is malfunctioning. Awarnin gtone also sounds.
XDo no tdrive at speeds abov e50 mph (80 km/h).
XMak eonly slight steerin gmovements .Otherwise ,th efron tfender
or th etires could be damaged if th esteerin gmovemen tis to olarge.
XListe nfo rscrapin gsounds.
XPull over and stop th evehicle safely, payin gattention to road and
traffic conditions, and set ahigher vehicle level.
Dependin gon th emalfunction ,it may be possible to rais eth evehi-
cle.
XVisit aqualified specialis tworkshop .
244Display messages
On-board computer and displays