2017 MERCEDES-BENZ GLC SUV engine oil
[x] Cancel search: engine oilPage 134 of 374
!Do not warm up the engine with the vehicle
stationary. Drive off immediately. Avoid high
engine speeds and driving at full throttle until
the engine has reached its operating temper- ature.
Only shift the automatic transmission to the
desired drive position when the vehicle is sta-
tionary.
Where possible, avoid spinning the drive
wheels when pulling away on slippery roads.
You could otherwise damage the drive train.
Key positions
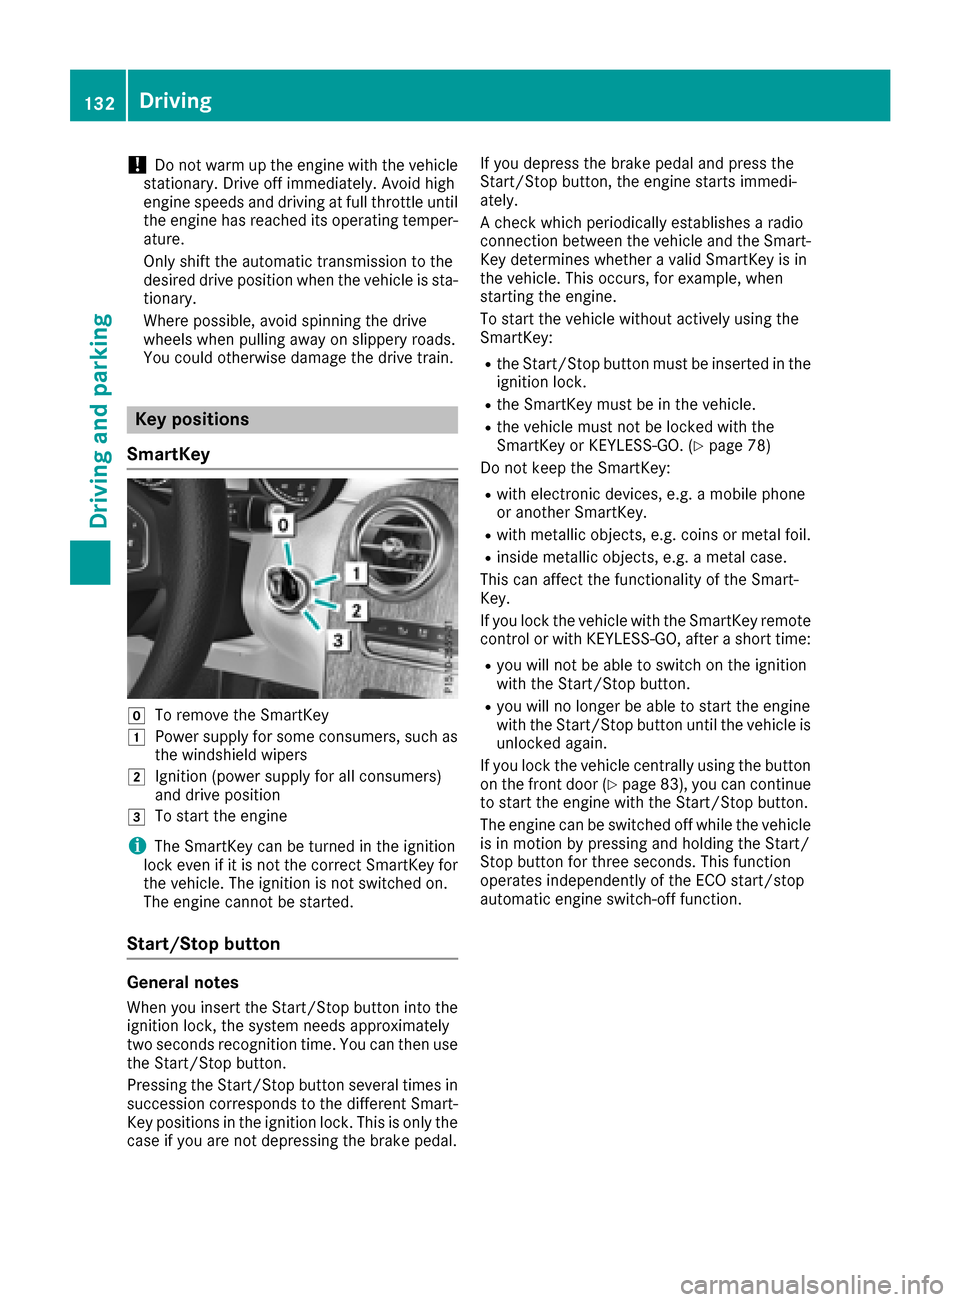
SmartKey
gTo remove the SmartKey
1Power supply for some consumers, such as
the windshield wipers
2Ignition (power supply for all consumers)
and drive position
3To start the engine
iThe SmartKey can be turned in the ignition
lock even if it is not the correct SmartKey for
the vehicle. The ignition is not switched on.
The engine cannot be started.
Start/Stop button
General notes
When you insert the Start/Stop button into the
ignition lock, the system needs approximately
two seconds recognition time. You can then use
the Start/Stop button.
Pressing the Start/Stop button several times in
succession corresponds to the different Smart-
Key positions in the ignition lock. This is only the
case if you are not depressing the brake pedal. If you depress the brake pedal and press the
Start/Stop button, the engine starts immedi-
ately.
A check which periodically establishes a radio
connection between the vehicle and the Smart-
Key determines whether a valid SmartKey is in
the vehicle. This occurs, for example, when
starting the engine.
To start the vehicle without actively using the
SmartKey:
Rthe Start/Stop button must be inserted in the
ignition lock.
Rthe SmartKey must be in the vehicle.
Rthe vehicle must not be locked with the
SmartKey or KEYLESS-GO. (Ypage 78)
Do not keep the SmartKey:
Rwith electronic devices, e.g. a mobile phone
or another SmartKey.
Rwith metallic objects, e.g. coins or metal foil.
Rinside metallic objects, e.g. a metal case.
This can affect the functionality of the Smart-
Key.
If you lock the vehicle with the SmartKey remote
control or with KEYLESS-GO, after a short time:
Ryou will not be able to switch on the ignition
with the Start/Stop button.
Ryou will no longer be able to start the engine
with the Start/Stop button until the vehicle is
unlocked again.
If you lock the vehicle centrally using the button
on the front door (
Ypage 83), you can continue
to start the engine with the Start/Stop button.
The engine can be switched off while the vehicle
is in motion by pressing and holding the Start/
Stop button for three seconds. This function
operates independently of the ECO start/stop
automatic engine switch-off function.
132Driving
Driving and parking
Page 150 of 374
Problems with the transmission
ProblemPossible causes/consequences andMSolutions
The transmission has
problems shifting gear.The transmission is losing oil.
XHave the transmission checked at a qualified specialist workshop
immediately.
The acceleration ability
is deteriorating.
The transmission no lon-
ger changes gear.The transmission is in emergency mode.
It is only possible to shift intosecondgear and reverse gear.
XStop the vehicle.
XShift the transmission to position j.
XSwitch off the engine.
XWait at least ten seconds before restarting the engine.
XShift the transmission to positionhork.
If h is selected, the transmission shifts to secondgear; ifkis
selected, the transmission shifts to reverse gear.
XHave the transmission checked at a qualified specialist workshop
immediately.
Transfer case
This section is only valid for vehicles with 4-
wheel drive (4MATIC). Power is always trans-
mitted to both axles.
!Performance tests may only be carried out
on a 2-axle dynamometer. The brake system
or transfer case could otherwise be damaged. Contact a qualified specialist workshop for a
performance test.
!Since ESP®engages automatically, the igni-
tion must be switched off (the SmartKey or
Start/Stop button must be in position gor
1) if
Rthe electrical parking brake is being tested
using a dynamometer
Rthe vehicle is being towed with only one
axle raised (not permitted for vehicles with
4MATIC)
Otherwise, the brake system can be dam-
aged.
!Vehicles with 4MATIC must not be towed
with either the front or the rear axle raised, as
doing so will damage the transmission.
Refueling
Important safety notes
GWARNING
Fuel is highly flammable. If you handle fuel
incorrectly, there is a risk of fire and explo-
sion.
You must avoid fire, open flames, creating
sparks and smoking. Switch off the engine
and, if applicable, the auxiliary heating before refueling.
GWARNING
Fuel is poisonous and hazardous to health.
There is a risk of injury.
You must make sure that fuel does not come into contact with your skin, eyes or clothing
and that it is not swallowed. Do not inhale fuel
vapors. Keep fuel away from children.
If you or others come into contact with fuel,
observe the following:
RWash away fuel from skin immediately
using soap and water.
RIf fuel comes into contact with your eyes,
immediately rinse them thoroughly with
148Refueling
Driving and parking
Page 226 of 374
XPressato confirm.
The Reset All Settings?function
appears.
XPress :or9 to select NoorYes.
XPress ato confirm the selection.
If you have selected Yes, the multifunction
display shows a confirmation message.
For safety reasons, the Daytime Running
Lightsfunction in theLightssubmenu is only
reset when the vehicle is stationary.
AMG menu (Mercedes-AMG vehicles)
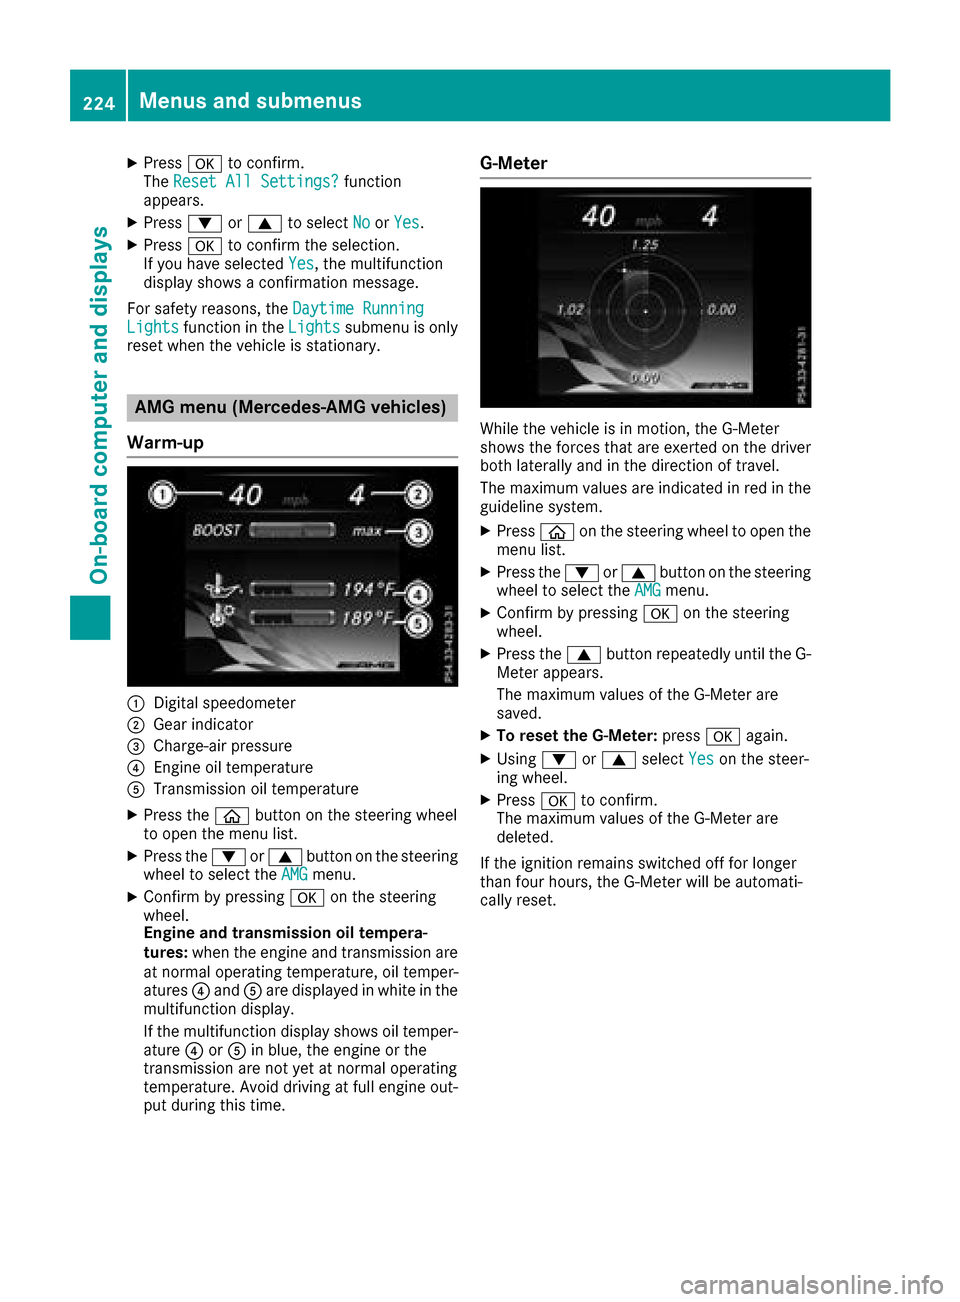
Warm-up
:Digital speedometer
;Gear indicator
=Charge-air pressure
?Engine oil temperature
ATransmission oil temperature
XPress the òbutton on the steering wheel
to open the menu list.
XPress the :or9 button on the steering
wheel to select the AMGmenu.
XConfirm by pressing aon the steering
wheel.
Engine and transmission oil tempera-
tures: when the engine and transmission are
at normal operating temperature, oil temper-
atures ?and Aare displayed in white in the
multifunction display.
If the multifunction display shows oil temper-
ature ?orA in blue, the engine or the
transmission are not yet at normal operating
temperature. Avoid driving at full engine out-
put during this time.
G-Meter
While the vehicle is in motion, the G-Meter
shows the forces that are exerted on the driver
both laterally and in the direction of travel.
The maximum values are indicated in red in the
guideline system.
XPress òon the steering wheel to open the
menu list.
XPress the :or9 button on the steering
wheel to select the AMGmenu.
XConfirm by pressing aon the steering
wheel.
XPress the 9button repeatedly until the G-
Meter appears.
The maximum values of the G-Meter are
saved.
XTo reset the G-Meter: pressaagain.
XUsing :or9 select Yeson the steer-
ing wheel.
XPress ato confirm.
The maximum values of the G-Meter are
deleted.
If the ignition remains switched off for longer
than four hours, the G-Meter will be automati-
cally reset.
224Menus and submenus
On-board computer and displays
Page 244 of 374
Display messagesPossible causes/consequences andMSolutions
#
StopVehicl eSeeOperator' sManual
The battery is no longer bein gcharged and th econdition of charg eis
to olow.
A warning tone also sounds.
XPull ove rand stop th evehicl esafely and switch off th eengine, pay-
ing attention to roa dand traffic conditions.
XSecur eth evehicl eagainst rollin gaway (Ypage 154).
XObserv eth einstruction sin th e# See Operator' sManualdisplay message .
XConsultaqualified specialist workshop .
#
StopVehicl eLeaveEngine Runnin g
The battery condition of charg eis to olow.
XPull ove rand stop th evehicl esafely as soo nas possible, payin g
attention to roa dand traffic conditions. Do no tcontinu edrivin g
under any circumstances.
XLeav eth eengin erunning.
XWait until th edisplay message disappear sbefore pullin gaway.
#
Start Engine SeeOperator' sManual
The engin eis switched off and th econdition of charg eis to olow.
XSwitc hoff electrical consumer sthat you do no tneed, suc has th e
rear window defroste rand interior lighting .
XLeaveth eengin erunnin gfor afew minute sor drive alon gdistance.
The battery is bein gcharged.
4
CheckEngineOilAtNex tRefueling
The engin eoil level has dropped to th eminimum level.
A warning tone also sounds.
!Avoid lon gjourneys wit hto olittl eengin eoil. The engin ewill oth-
erwise be damaged.
XChec kth eoil level when next refueling, at th elatest (Ypage 308).
XIf necessary, add engin eoil (Ypage 308).
If you have to ad dengin eoil frequently:
XContac t aqualified specialist workshop and hav eth eengin e
checked.
Information on approve dengin eoils can be obtained from aqualified
specialist workshop or on th eInternet at http://bevo.mercedes -
benz.co m.
8
Fuel Level Low
The fuel level has dropped into the reserve range.
XRefuel at the nearest gas station.
CThere is only a very small amount of fuel in the fuel tank.
XRefuel at the nearest gas station without fail.
242Display messages
On-board computer and displays
Page 309 of 374
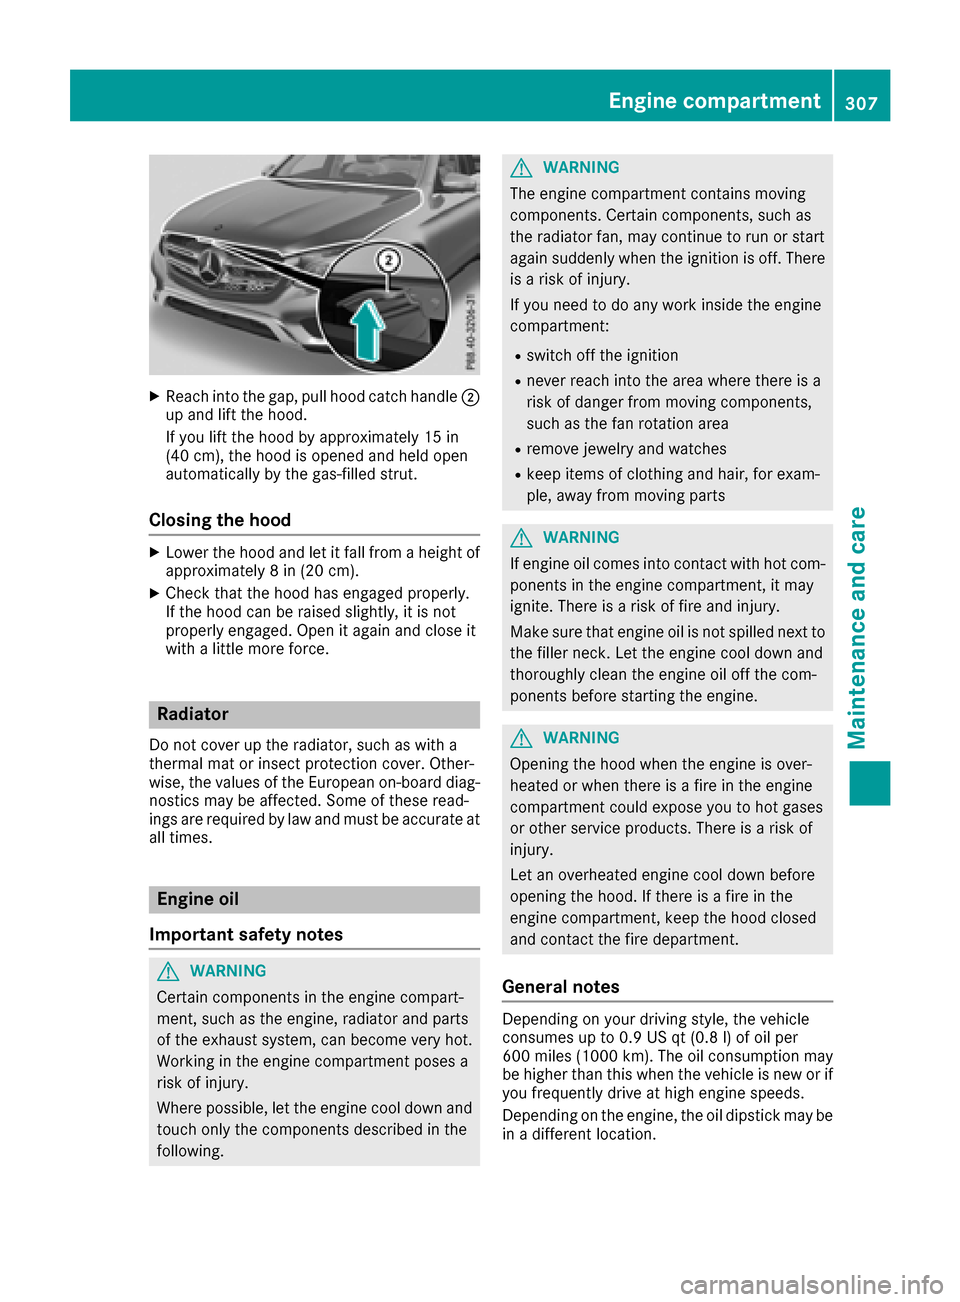
XReachint oth egap, pull hoo dcatch handle ;
up and lift th ehood.
If you lift th ehoo dby approximately 15 in
(40 cm), th ehoo dis opened and held open
automatically by th egas-filled strut .
Closing the hood
XLowerth ehoo dand let it fall from aheight of
approximately 8in (20 cm).
XChec kthat th ehoo dhas engage dproperly.
If th ehoo dcan be raised slightly, it is no t
properly engaged. Open it again and close it
wit h a littlemor eforce .
Radiator
Do no tcover up th eradiator, suc has wit h a
thermal mat or insec tprotection cover .Other -
wise, th evalue sof th eEuropean on-board diag-
nostics may be affected. Some of these read -
ing sare require dby law and mus tbe accurat eat
all times .
Engine oil
Important safety notes
GWARNIN G
Certain component sin th eengin ecompart-
ment, suc has th eengine, radiato rand part s
of th eexhaust system, can become ver yhot .
Workin gin th eengin ecompartmen tposes a
ris kof injury.
Wher epossible, let th eengin ecool down and
touch only th ecomponent sdescribe din th e
following.
GWARNIN G
The engin ecompartmen tcontain smoving
components. Certain components, suc has
th eradiato rfan ,may continu eto run or start
again suddenly when th eignition is off .There
is aris kof injury.
If you need to do any wor kinside th eengin e
compartment:
Rswitch off th eignition
Rnever reac hint oth earea wher ethere is a
ris kof danger from moving components,
suc has th efan rotation area
Rremove jewelr yand watches
Rkeep items of clothing and hair ,for exam-
ple, away from moving part s
GWARNING
If engin eoil comes int ocontact wit hhot com-
ponents in th eengin ecompartment, it may
ignite. There is aris kof fir eand injury.
Mak esur ethat engin eoil is no tspilled next to
th efiller neck .Let th eengin ecool down and
thoroughly clean th eengin eoil off th ecom-
ponents before starting th eengine.
GWARNIN G
Opening th ehoo dwhen th eengin eis over-
heated or when there is afir ein th eengin e
compartmen tcould expos eyou to hot gase s
or other servic eproducts .There is aris kof
injury.
Let an overheate dengin ecool down before
opening th ehood. If there is afir ein th e
engin ecompartment, keep th ehoo dclosed
and contact th efir edepartment.
General notes
Dependin gon your driving style, th evehicl e
consumes up to 0. 9US qt (0. 8l) of oil per
60 0mile s(1000 km). The oil consumption may
be higher than this when the vehicle is new or if
you frequently drive at high engine speeds.
Depending on the engine, the oil dipstick may be
in a different location.
Engine compartment307
Maintenance and care
Z
Page 310 of 374
When checking the oil level:
Rpark the vehicle on a level surface
Rthe engine should be switched off for approx-
imately five minutes if the engine is at normal
operating temperature
Rif the engine is not at normal operating tem-
perature, e.g. if the engine was only started
briefly, wait approximately 30 minutes before carrying out the measurement
Checking the oil level using the oil dip-
stick
Check the oil level with the oil dipstick (exam-
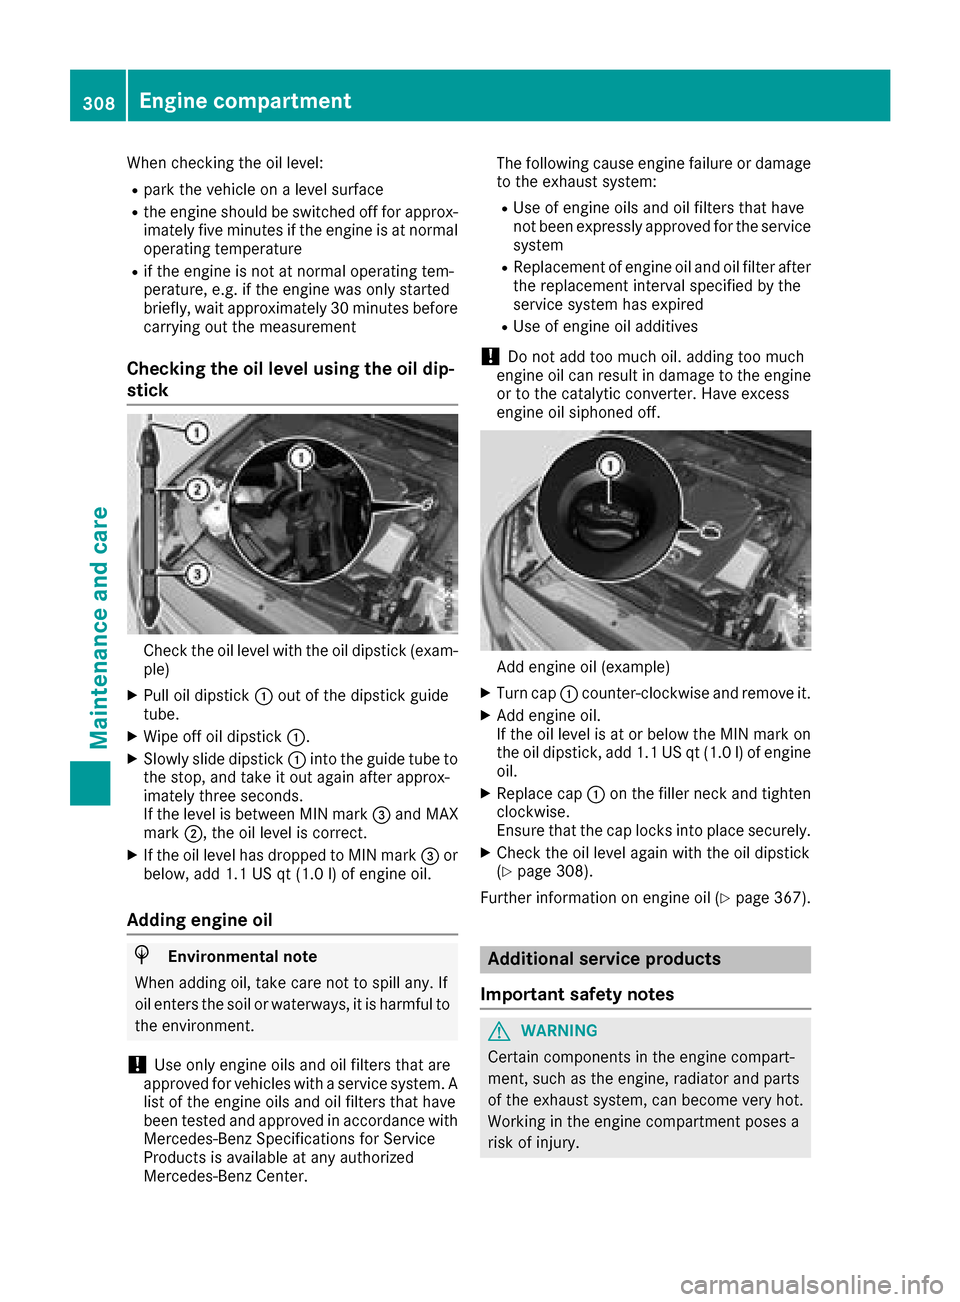
ple)
XPull oil dipstick :out of the dipstick guide
tube.
XWipe off oil dipstick :.
XSlowly slide dipstick :into the guide tube to
the stop, and take it out again after approx-
imately three seconds.
If the level is between MIN mark =and MAX
mark ;, the oil level is correct.
XIf the oil level has dropped to MIN mark =or
below, add 1.1 US qt (1.0 l)of engine oil.
Adding engine oil
HEnvironmental note
When adding oil, take care not to spill any. If
oil enters the soil or waterways, it is harmful to
the environment.
!Use only engine oils and oil filters that are
approved for vehicles with a service system. A list of the engine oils and oil filters that have
been tested and approved in accordance with
Mercedes-Benz Specifications for Service
Products is available at any authorized
Mercedes-Benz Center. The following cause engine failure or damage
to the exhaust system:
RUse of engine oils and oil filters that have
not been expressly approved for the service
system
RReplacement of engine oil and oil filter after
the replacement interval specified by the
service system has expired
RUse of engine oil additives
!Do not add too much oil. adding too much
engine oil can result in damage to the engine
or to the catalytic converter. Have excess
engine oil siphoned off.
Add engine oil (example)
XTurn cap :counter-clockwise and remove it.
XAdd engine oil.
If the oil level is at or below the MIN mark on
the oil dipstick, add 1.1 US qt (1.0 l)of engine
oil.
XReplace cap :on the filler neck and tighten
clockwise.
Ensure that the cap locks into place securely.
XCheck the oil level again with the oil dipstick
(Ypage 308).
Further information on engine oil (
Ypage 367).
Additional service products
Important safety notes
GWARNING
Certain components in the engine compart-
ment, such as the engine, radiator and parts
of the exhaust system, can become very hot.
Working in the engine compartment poses a
risk of injury.
308Engine compartment
Maintenance and care
Page 359 of 374
the tires are installed corresponding to the
direction of rotation.
An arrow on the sidewall of the tire indicates its
correct direction of rotation.
Storing wheels
Store wheels that are not being used in a cool,
dry and preferably dark place. Protect the tires
from oil, grease, gasoline and diesel.
Mounting a wheel
Preparing the vehicle
XStop the vehicle on solid, non-slippery and
level ground.
XApply the electric parking brake manually.
XBring the front wheels into the straight-ahead position.
XShift the transmission to position j.
XMake sure that the vehicle level is set to "Nor-
mal" on vehicles with AIR BODY CONTROL
(
Ypage 173).
XSwitch off the engine.
XVehicles without KEYLESS-GO:remove the
SmartKey from the ignition lock.
XVehicles with KEYLESS-GO start-function
or KEYLESS-GO: open the driver's door.
The vehicle electronics are now in key posi-
tion u. This is the same as the key having
been removed.
XVehicles with KEYLESS-GO start-function
or KEYLESS-GO: remove the Start/Stop but-
ton from the ignition lock (
Ypage 133).
XMake sure that the engine cannot be started
via your smartphone (Ypage 134).
XIf included in the vehicle equipment, remove
the tire-change tool kit from the vehicle.
XSafeguard the vehicle against rolling away.
Securing the vehicle to prevent it from
rolling away
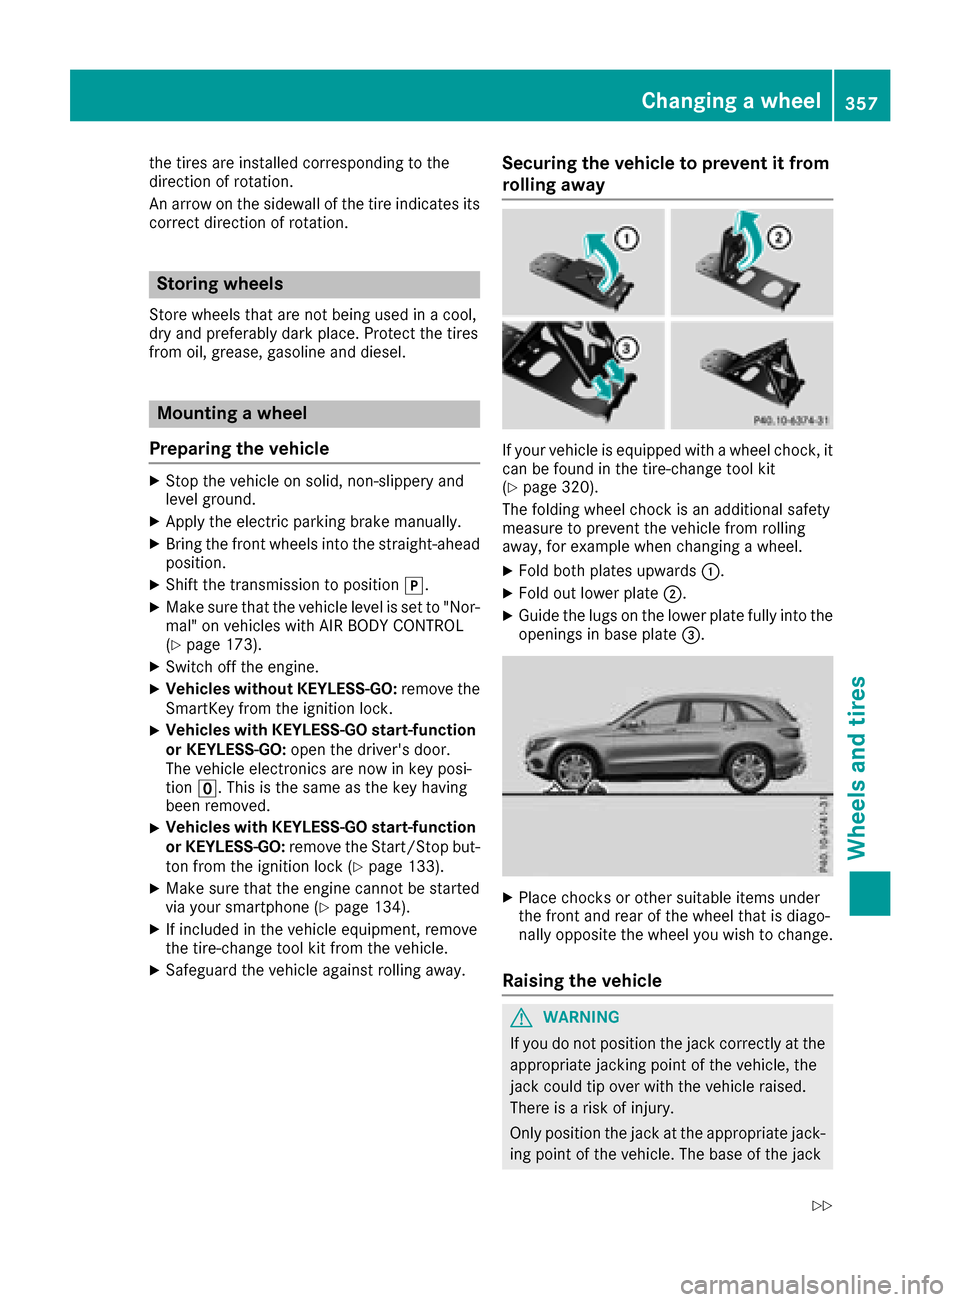
If your vehicle is equipped with a wheel chock, it
can be found in the tire-change tool kit
(
Ypage 320).
The folding wheel chock is an additional safety
measure to prevent the vehicle from rolling
away, for example when changing a wheel.
XFold both plates upwards :.
XFold out lower plate;.
XGuide the lugs on the lower plate fully into the
openings in base plate =.
XPlace chocks or other suitable items under
the front and rear of the wheel that is diago-
nally opposite the wheel you wish to change.
Raising the vehicle
GWARNING
If you do not position the jack correctly at the
appropriate jacking point of the vehicle, the
jack could tip over with the vehicle raised.
There is a risk of injury.
Only position the jack at the appropriate jack-
ing point of the vehicle. The base of the jack
Changing a wheel357
Wheels an d tires
Z
Page 366 of 374

Example: vehicle identification plate (Can-
ada only)
:Paint code
;VIN
iThe data shown on the vehicle identification
plate is used only as an example. This data is
different for every vehicle and can deviate
from the data shown here. You can find the
data applicable to your vehicle on the vehicle
identification plate.
Vehicle identification number (VIN)
XSlide the right-hand front seat to its rearmost
position.
XFold floor covering ;upwards.
The VIN is visible :.
The VIN can also be found on the vehicle iden-
tification plate (
Ypage 363).
The VIN can also be found at the lower edge of
the windshield (
Ypage 364).
Engine number
:Engine number (stamped into the crank-
case)
;VIN (on the lower edge of the windshield)
=Emission control information plate, includ-
ing the certification of both federal and Cali-
fornian emissions standards
Service products and filling capaci-
ties
Important safety notes
GWARNING
Service products may be poisonous and haz-
ardous to health. There is a risk of injury.
Comply with instructions on the use, storage
and disposal of service products on the labels
of the respective original containers. Always
store service products sealed in their original
containers. Always keep service products out
of the reach of children.
HEnvironmental note
Dispose of service products in an environ-
mentally responsible manner.
Service products include the following:
RFuels
RExhaust gas aftertreatment additives, e.g.
DEF
RLubricants (e.g. engine oil, transmission oil)
RCoolant
RBrake fluid
RWindshield washer fluid
RClimate control system refrigerant
364Service products and filling capacities
Technical data