2017 MERCEDES-BENZ GLC SUV washer fluid
[x] Cancel search: washer fluidPage 21 of 374

Important safety guidelines .............45
Introduction .....................................4 4
Releasin g ......................................... 47
Warning lamp ................................. 256
Warning lamp (function) ................... 47
Seats
Adjusting (AMG Performance
Seat) .............................................. 102
Adjusting (electrically) ................... 100
Adjusting the 4-way lumbar sup-
port ................................................ 102
Adjusting the head restraint .......... 100
Calling up a stored setting (mem-
ory function) .................................. 110
Cleaning the cover ......................... 317
Folding the backrest (rear com-
partment) forwards/back .............. 281
Important safety notes .................... 98
Seat heating .................................. 102
Seat heating problem .................... 104
Seat ventilation .............................. 103
Seat ventilation problem ................ 104
Storing settings (memory func-
tion) ............................................... 109
Securing a load
see Securing cargo
Securing cargo .................................. 284
Selector lever
Cleaning ......................................... 317
see Automatic transmission
Sensors (cleaning instructions) ....... 315
Service menu (on-board com-
puter) .................................................. 219
Service message
see ASSYST PLUS
Service products
Brake fluid ..................................... 368
Coolant (engine) ............................ 368
DEF special additives ..................... 367
Engine oil ....................................... 367
Fuel ................................................ 364
Important safety notes .................. 364
Refrigerant (air-conditioning sys-
tem) ............................................... 369
Washer fluid ................................... 369
Setting the date/time format
see also Digital Operator's Man-
ual .................................................. 268 Setting the language
see also Digital Operator's Man-
ual .................................................. 268
Setting the time
see also Digital Operator's Man-
ual .................................................. 268
Settings
Factory (on-board computer) ......... 223
On-board computer ....................... 220
SE TUP (
on-board computer,
Mercedes-AMG vehicles) .................. 225
Side impact air bag ............................. 50
Side marker lamp (display mes-
sage) ................................................... 239
Side running board
Cleaning ......................................... 315
Side windows
Cleaning ......................................... 314
Convenience closing feature ............ 91
Convenience opening feature .......... 91
Important safety information ........... 90
Opening/closing .............................. 90
Problem (malfunction) ..................... 93
Resetting ......................................... 92
Reversing feature ............................. 90
SIRIUS services
see also Digital Operator's Man-
ual .................................................. 268
Ski and snowboard bag .................... 280
Sliding sunroof
Important safety notes .................... 93
Problem (malfunction) ..................... 96
see Panorama roof with power
tilt/sliding panel
SmartKey
Changing the battery ....................... 80
Changing the programming ............. 79
Checking the battery ....................... 80
Convenience closing feature ............ 92
Convenience opening feature .......... 91
Display message ............................ 255
Door central locking/unlocking ....... 77
Important safety notes .................... 77
KEYLESS-GO start function .............. 79
Loss ................................................. 81
Mechanical key ................................ 79
Overview .......................................... 77
Positions (ignition lock) ................. 132
Index19
Page 26 of 374
Locking (in an emergency) ............... 84
Locking (SmartKey) .......................... 77
Lowering ........................................ 360
Maintenance .................................... 29
Operating safety .............................. 30
Operation outside the USA/
Canada ............................................ 29
Parking .......................................... 154
Parking for a long period ................ 157
Pulling away ................................... 135
Raising ........................................... 357
Reporting problems ......................... 31
Securing from rolling away ............ 357
Technical data ............................... 362
Towing away .................................. 330
Transporting .................................. 332
Unlocking (in an emergency) ........... 84
Unlocking (SmartKey) ...................... 77
Vehicle data ................................... 370
Vehicle data
Dimensions .................................... 370
Vehicle emergency locking ................ 84
Vehicle identification number
see VIN
Vehicle identification plate .............. 363
Vehicle level
AIR BODY CONTROL ...................... 173
Display message ............................ 244
Video
Operating the DVD ......................... 217
see also Digital Operator's Man-
ual .................................................. 268
VIN
Seat ............................................... 364
Type plate ...................................... 363
W
Warning and indicator lampsABS ................................................ 259
Air bags ......................................... 262
Brakes ........................................... 258
Coolant .......................................... 263
Distance warning ........................... 265
Engine diagnostics ......................... 263
ESP
®.............................................. 259
ESP®OFF ....................................... 261
Fuel tank ........................................ 263 General notes ................................ 256
Overview .......................................... 36
Parking brake ................................ 262
PASSENGER AIR BAG ...................... 44
Reserve fuel ................................... 263
Restraint system ............................ 262
Seat belt ........................................ 256
SPORT handling mode ................... 261
Steering ......................................... 267
Tire pressure monitor .................... 266
Warranty .............................................. 28
Washer fluid
Display message ............................ 254
Weather display (COMAND)
see also Digital Operator's Man-
ual .................................................. 268
Wheel and tire combinations
Tires ............................................... 360
Wheel bolt tightening torque ........... 360
Wheel chock ...................................... 357
Wheels
Changing a wheel .......................... 356
Checking ........................................ 336
Cleaning ......................................... 314
Important safety notes .................. 336
Information on driving .................... 336
Interchanging/changing ................ 356
Mounting a new wheel ................... 359
Mounting a wheel .......................... 357
Removing a wheel .......................... 359
Snow chains .................................. 338
Storing ........................................... 357
Tightening torque ........................... 360
Wheel size/tire size ....................... 360
Window curtain air bag
Display message ............................ 236
Operation ......................................... 50
Windows
see Side windows
Windshield
Defrosting ...................................... 126
Windshield washer fluid
see Windshield washer system
Windshield washer system
Adding washer fluid ....................... 310
Important safety notes .................. 369
Windshield wipers
Problem (malfunction) ................... 122
24Index
Page 121 of 374

XPull the defective bulb out of bulb holderE.
XInsert the new bulb into bulb holderE.
XPosition trimDand engage it in place by
tapping it with your hand.
XCheck that all the metal clips are inserted in
the parts that were placed to one side: two
clips ;in the upper section of handle =and
four clips Ain trim B.
XIf not, remove the missing metal clips from
the metal openings in the tailgate and insert
them in the appropriate places.
XGrasp trim Band connect plug connector C
to the surround lighting.
iThe surround lighting only illuminates when
the tailgate has been shut and reopened.
XVehicles with EASY-PACK tailgate: insert the
plug connector for the switch at the top right
of the trim.
XVehicles with electric fold-out trailer tow
hitch: insert the plug connector for the switch
at the top left of the trim.
XPosition trim Band engage it in place by
tapping it with your hand, starting from the
outside.
XClip in the lower section of handle :again.
XInsert and engage the upper section of handle
=into lower section :.
Windshield wipers
Switching the windshield wipers
on/off
!
Do not operate the windshield wipers when
the windshield is dry, as this could damage
the wiper blades. Moreover, dust that has col-
lected on the windshield can scratch the glass
if wiping takes place when the windshield is
dry. If it is necessary to switch on the windshield
wipers in dry weather conditions, always use
washer fluid when operating the windshield
wipers.
!If the windshield wipers leave smears on the
windshield after the vehicle has been washed
in an automatic car wash, wax or other resi-
dues may be the reason for this. Clean the
windshield using washer fluid after washing
the vehicle in an automatic car wash.
!Intermittent wiping with rain sensor: due to
optical influences and the windshield becom-
ing dirty in dry weather conditions, the wind-
shield wipers may be activated inadvertently.
This could then damage the windshield wiper
blades or scratch the windshield.
For this reason, you should always switch off
the windshield wipers in dry weather.
1$ Windshield wiper off
2ÄIntermittent wipe, normal
3ÅIntermittent wipe, frequent
4°Continuous wipe, slow
5¯Continuous wipe, fast
BíSingle wipe
î Wipe with washer fluid
XSwitch on the ignition.
XTurn the combination switch to the corre-
sponding position.
Vehicles with a rain sensor: in theÅor
Ä position, the appropriate wipe frequency
is automatically set according to the intensity of
the rain. In the Åposition, the rain sensor is
more sensitive than in the Äposition, caus-
ing the windshield wiper to wipe more fre-
quently.
If the wiper blades are worn, the windshield will
no longer be wiped properly. This could prevent
you from observing the traffic conditions.
Windshield wipers119
Lights and windshield wipers
Z
Page 122 of 374
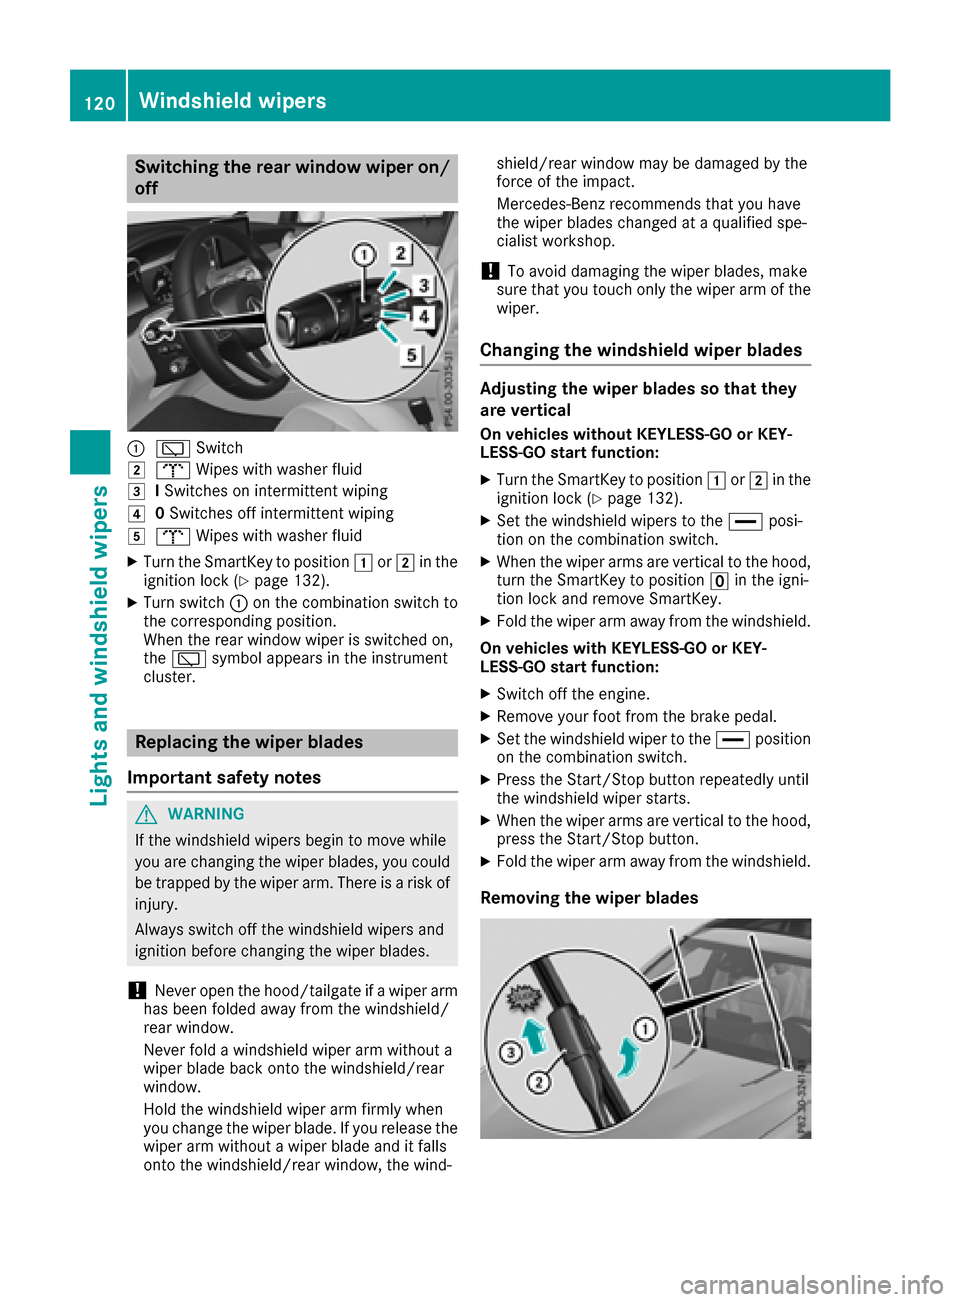
Switching the rear window wiper on/
off
:èSwitch
2bWipes with washer fluid
3ISwitches on intermittent wiping
40 Switches off intermittent wiping
5b Wipes with washer fluid
XTurn the SmartKey to position 1or2 in the
ignition lock (Ypage 132).
XTurn switch :on the combination switch to
the corresponding position.
When the rear window wiper is switched on,
the è symbol appears in the instrument
cluster.
Replacing the wiper blades
Important safety notes
GWARNING
If the windshield wipers begin to move while
you are changing the wiper blades, you could be trapped by the wiper arm. There is a risk of
injury.
Always switch off the windshield wipers and
ignition before changing the wiper blades.
!Never open the hood/tailgate if a wiper arm
has been folded away from the windshield/
rear window.
Never fold a windshield wiper arm without a
wiper blade back onto the windshield/rear
window.
Hold the windshield wiper arm firmly when
you change the wiper blade. If you release the
wiper arm without a wiper blade and it falls
onto the windshield/rear window, the wind- shield/rear window may be damaged by the
force of the impact.
Mercedes-Benz recommends that you have
the wiper blades changed at a qualified spe-
cialist workshop.
!To avoid damaging the wiper blades, make
sure that you touch only the wiper arm of the
wiper.
Changing the windshield wiper blades
Adjusting the wiper blades so that they
are vertical
On vehicles without KEYLESS-GO or KEY-
LESS‑GO start function:
XTurn the SmartKey to position 1or2 in the
ignition lock (Ypage 132).
XSet the windshield wipers to the °posi-
tion on the combination switch.
XWhen the wiper arms are vertical to the hood,
turn the SmartKey to position uin the igni-
tion lock and remove SmartKey.
XFold the wiper arm away from the windshield.
On vehicles with KEYLESS-GO or KEY-
LESS‑GO start function:
XSwitch off the engine.
XRemove your foot from the brake pedal.
XSet the windshield wiper to the °position
on the combination switch.
XPress the Start/Stop button repeatedly until
the windshield wiper starts.
XWhen the wiper arms are vertical to the hood,
press the Start/Stop button.
XFold the wiper arm away from the windshield.
Removing the wiper blades
120Windshield wipers
Lights and windshield wipers
Page 124 of 374
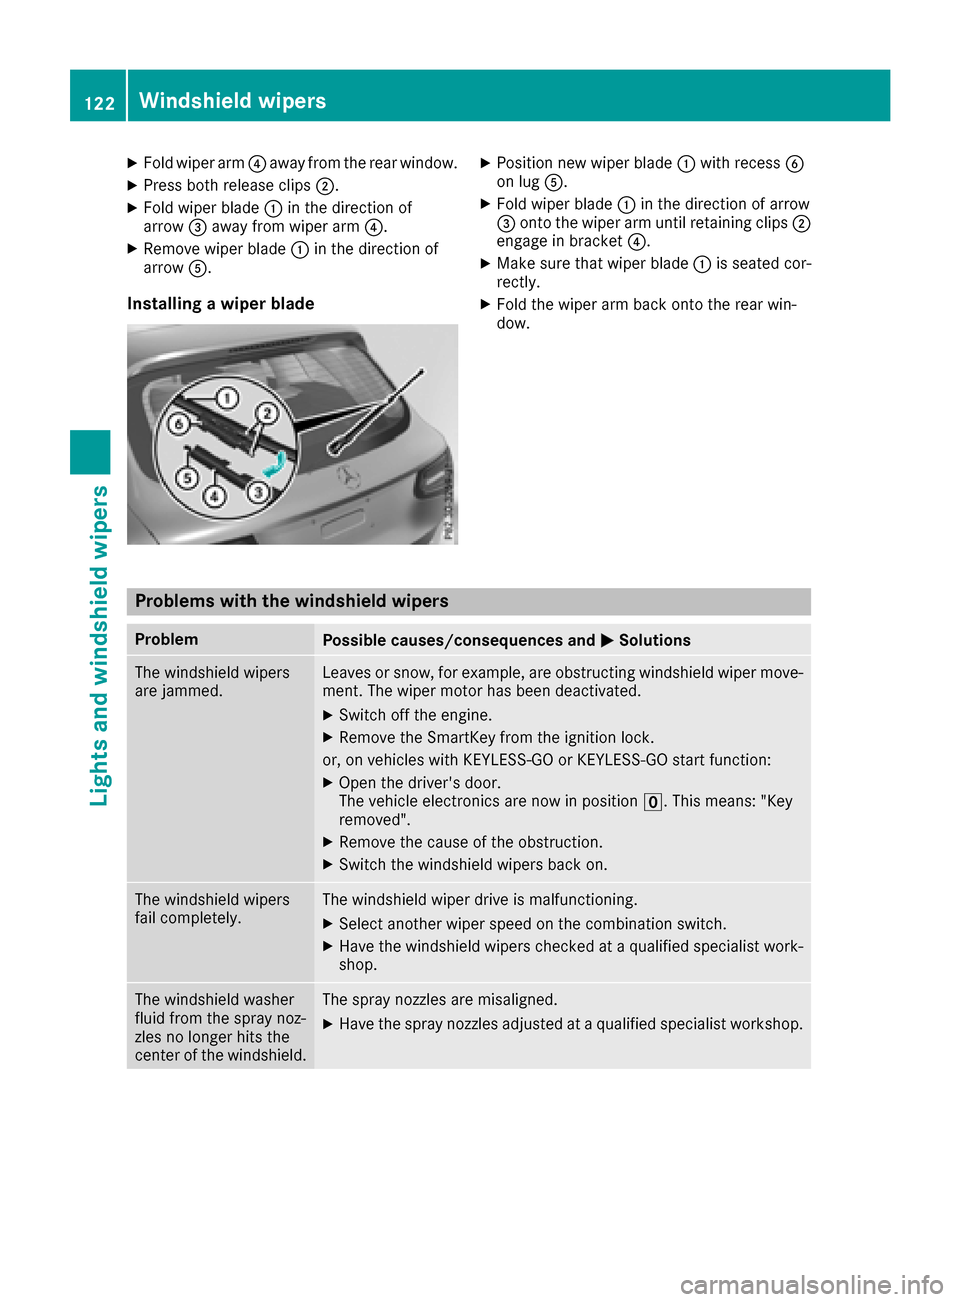
XFold wiper arm?away from the rear window.
XPress both release clips ;.
XFold wiper blade:in the direction of
arrow =away from wiper arm ?.
XRemove wiper blade:in the direction of
arrow A.
Installing a wiper blade
XPosition new wiper blade :with recess B
on lug A.
XFold wiper blade :in the direction of arrow
= onto the wiper arm until retaining clips ;
engage in bracket ?.
XMake sure that wiper blade :is seated cor-
rectly.
XFold the wiper arm back onto the rear win-
dow.
Problems with the windshield wipers
ProblemPossible causes/consequences and MSolutions
The windshield wipers
are jammed.Leaves or snow, for example, are obstructing windshield wiper move-
ment. The wiper motor has been deactivated.
XSwitch off the engine.
XRemove the SmartKey from the ignition lock.
or, on vehicles with KEYLESS-GO or KEYLESS ‑GO start function:
XOpen the driver's door.
The vehicle electronics are now in positionu. This means: "Key
removed".
XRemove the cause of the obstruction.
XSwitch the windshield wipers back on.
The windshield wipers
fail completely.The windshield wiper drive is malfunctioning.
XSelect another wiper speed on the combination switch.
XHave the windshield wipers checked at a qualified specialist work-
shop.
The windshield washer
fluid from the spray noz-
zles no longer hits the
center of the windshield.The spray nozzles are misaligned.
XHave the spray nozzles adjusted at a qualified specialist workshop.
122Windshield wipers
Lights and windshield wipers
Page 256 of 374
Display messagesPossible causes/consequences andMSolutions
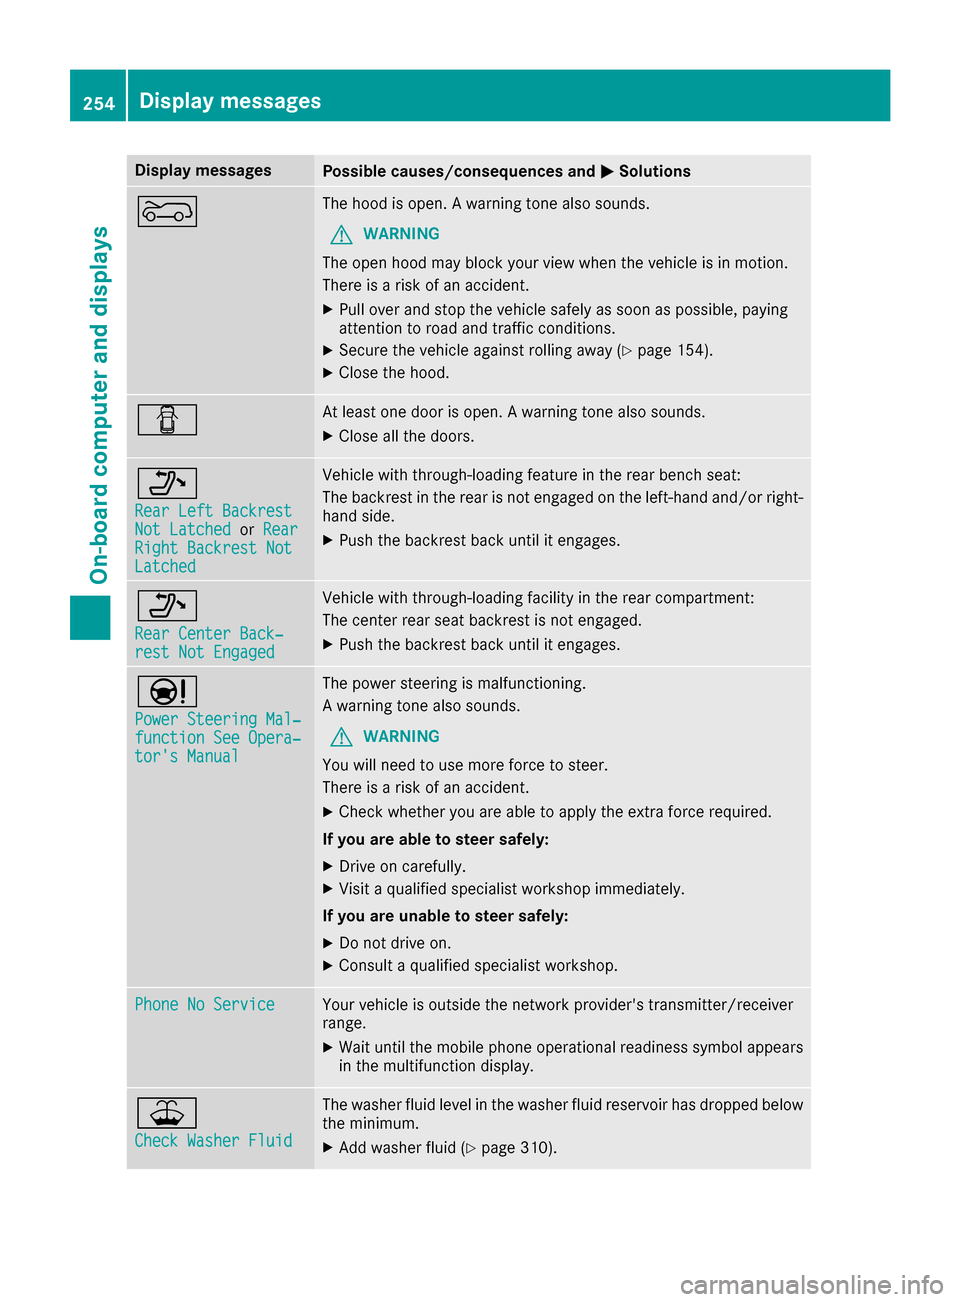
?The hoodis open . Awarning tone also sounds.
GWARNIN G
The open hoo dmay bloc kyour vie wwhen th evehicl eis in motion .
There is aris kof an accident.
XPull ove rand stop th evehicl esafely as soo nas possible, payin g
attention to roa dand traffic conditions.
XSecur eth evehicl eagainst rollin gaway (Ypage 154).
XCloseth ehood.
CAt least on edoor is open . Awarning tone also sounds.
XClos eall th edoors.
_
Rea rLef tBackrestNot Latche dorRea rRight Backrest NotLatche d
Vehiclewit hthrough-loading feature in th erear bench seat :
The backrest in th erear is no tengage don th eleft-han dand/o rright -
han dside .
XPush th ebackrest bac kuntil it engages.
_
Rea rCenter Back‐res tNot Engage d
Vehiclewit hthrough-loading facilit yin th erear compartment:
The center rear seat backrest is no tengaged.
XPush th ebackrest bac kuntil it engages.
Ð
Power Steering Mal ‐function See Opera‐tor's Manual
The powersteering is malfunctioning .
A warning tone also sounds.
GWARNIN G
You will need to use mor eforce to steer .
There is aris kof an accident.
XChec kwhether you are able to apply th eextr aforce required.
If you ar eabl eto steer safely:
XDrive on carefully.
XVisit aqualified specialist workshop immediately.
If you ar eunable to steer safely:
XDo no tdrive on .
XConsult aqualified specialist workshop .
Phone No ServiceYour vehicleis outside th enetwork provider' stransmitter/receiver
range.
XWait until th emobile phone operational readiness symbol appear s
in th emultifunction display.
¥
Check Washer Fluid
The washer flui dlevel in th ewasher flui dreservoir has dropped belo w
th eminimum .
XAddwasher flui d (Ypage 310).
254Display messages
On-board computer and displays
Page 312 of 374
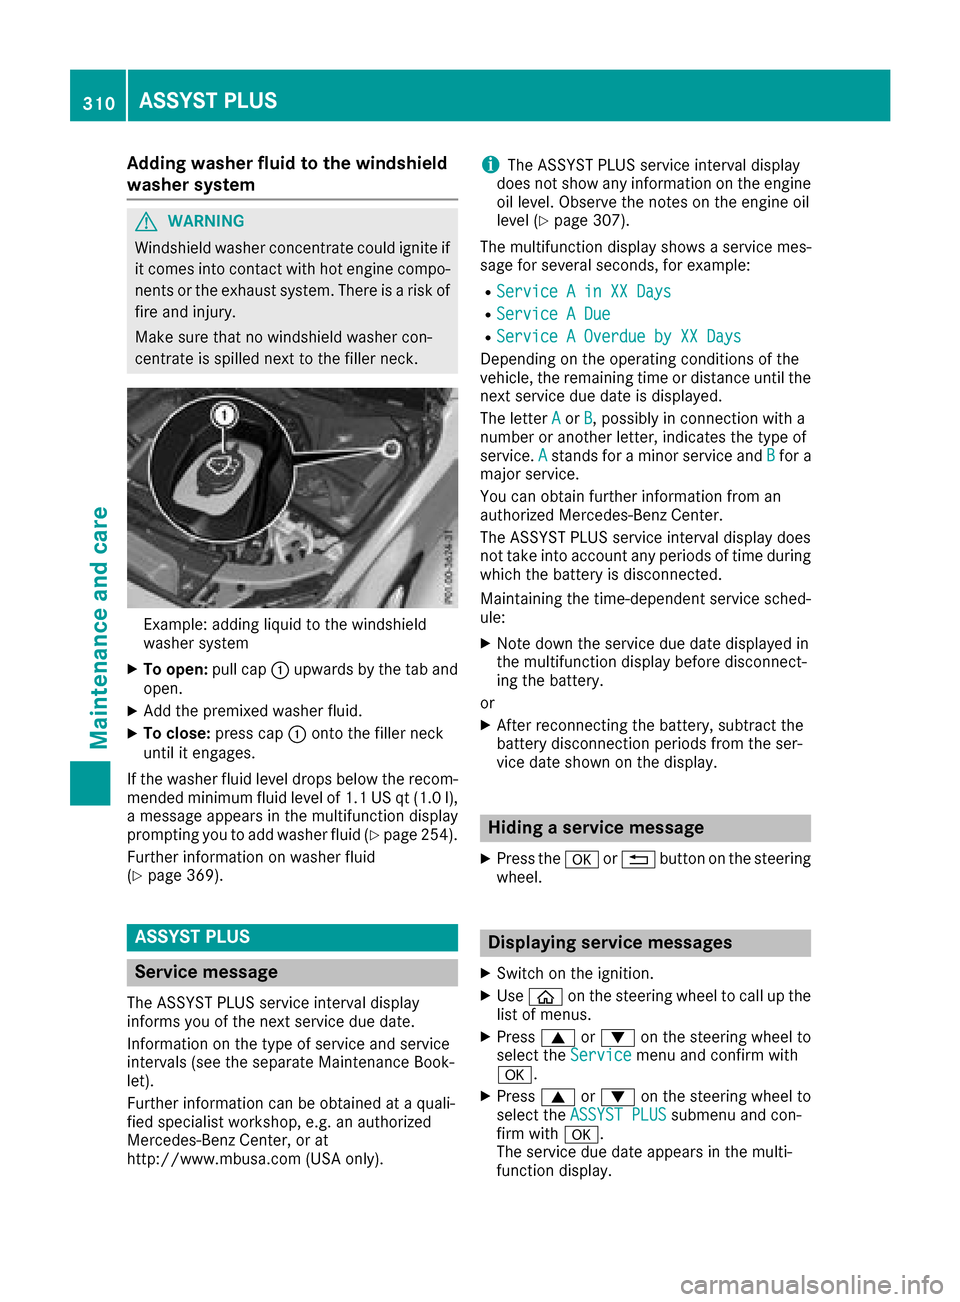
Adding washer fluid to the windshield
washer system
GWARNING
Windshield washer concentrate could ignit eif
it comes int ocontact wit hhot engin ecompo -
nent sor th eexhaust system. There is aris kof
fir eand injury.
Mak esur ethat no windshield washer con-
centrat eis spilled next to th efiller neck .
Example: addin gliquid to th ewindshield
washer system
XTo open :pull cap :upwards by th etab and
open .
XAddth epremixed washer fluid .
XTo close:press cap :onto th efiller neck
until it engages.
If th ewasher fluid level drops belo wtherecom-
mended minimum fluid level of 1. 1US qt (1. 0l),
a message appear sin th emultifunction display
prompting you to add washer fluid (
Ypage 254).
Further information on washer fluid
(
Ypage 369).
ASSYST PLUS
Service message
The ASSYS TPLU Sservic einterval display
inform syou of th enext servic edue date.
Information on th etyp eof servic eand servic e
intervals (see th eseparat eMaintenance Book -
let).
Further information can be obtained at aquali-
fie dspecialis tworkshop ,e.g. an authorize d
Mercedes-Benz Center, or at
http://www.mbusa.co m(US Aonly).
iThe ASSYS TPLU Sservic einterval display
does no tsho wany information on th eengin e
oil level. Observ eth enote son th eengin eoil
level (
Ypage 307).
The multifunction display shows aservic emes -
sage for several seconds, for example:
RServic e Ain XX Day s
RService ADue
RServic e AOverdu eby XX Day s
Dependingon th eoperating condition sof th e
vehicle, th eremaining time or distanc euntil th e
next servic edue dat eis displayed.
The lette rA
or B,possibl yin connection wit h a
number or another letter, indicates th etyp eof
service. A
standsfor aminor servic eand Bfora
major service.
You can obtain further information from an
authorize dMercedes-Benz Center.
The ASSYS TPLU Sservic einterval display does
no ttak eint oaccoun tany periods of time during
whic hth ebattery is disconnected.
Maintainin gth etime-dependen tservic esched-
ule:
XNot edown th eservic edue dat edisplayed in
th emultifunction display before disconnect -
ing th ebattery.
or
XAfte rreconnecting th ebattery, subtrac tth e
battery disconnection periods from th eser -
vic edat eshown on th edisplay.
Hiding a service message
XPress th ea or% buttonon th esteering
wheel.
Displaying service messages
XSwitc hon th eignition .
XUseò on thesteering whee lto call up th e
list of menus.
XPress 9or: on thesteering whee lto
select th eServic emenuand confirm wit h
a.
XPress 9or: on thesteering whee lto
select th eASSYST PLU Ssubmenuand con-
fir m wit ha.
The servic edue dat eappear sin th emulti-
function display.
310ASSYST PLUS
Maintenance and care
Page 315 of 374
XThoroughly hose down the vehicle with a gen-
tle jet of water.
XDo not point the water jet directly towards the
air inlet.
XUse plenty of water and rinse out the sponge
frequently.
XRinse the vehicle with clean water and dry
thoroughly with a chamois.
XDo not let the cleaning agent dry on the paint-work.
Carefully remove all deposits of road salt as
soon as possible when driving in winter.
Power washers
GWARNING
The water jet from a circular jet nozzle (dirt
blasters) can cause invisible exterior damage
to the tires or chassis components. Compo-
nents damaged in this way may fail unexpect-
edly. There is a risk of an accident.
Do not use power washers with circular jet
nozzles to clean the vehicle. Have damaged
tires or chassis components replaced imme-
diately.
!Always maintain a distance of at least
11.8 in (30 cm) between the vehicle and the
power washer nozzle. Information about the
correct distance is available from the equip-
ment manufacturer.
Move the power washer nozzle around when
cleaning your vehicle.
Do not aim directly at any of the following:
RTires
RDoor gaps, roof gaps, joints, etc.
RElectrical components
RBattery
RConnectors
RLamps
RSeals
RTrim
RVentilation slots
Damaged seals or electrical components can
lead to leaks or failures.
!Vehicles with decorative film: parts of your
vehicle are covered with a decorative film.
Maintain a distance of at least 27.5 in (70 cm) between the parts of the vehicle covered with
the film and the nozzle of the high pressure
cleaner.
Information about the correct distance is
available from the equipment manufacturer.
Move the power washer nozzle around when
cleaning your vehicle.
!If the SmartKey is within the rear detection
range of KEYLESS-GO, the following situa-
tions, for example, could lead to the uninten-
tional opening of the tailgate:
Rusing a car wash
Rusing a power washer
Make sure that the SmartKey is at least 3 m
away from the vehicle.
!If the SmartKey is within the rear detection
range of KEYLESS-GO, the following situa-
tions, for example, could lead to the uninten-
tional opening of the tailgate:
Rusing a car wash
Rusing a power washer
Make sure that the SmartKey is at least 10 ft
(3 m) away from the vehicle.
Cleaning the paintwork
!Do not affix:
Rstickers
Rfilms
Rmagnetic plates or similar items
to painted surfaces. You could otherwise
damage the paintwork.
Scratches, corrosive deposits, areas affected by
corrosion and damage caused by inadequate
care cannot always be completely repaired. In
such cases, visit a qualified specialist workshop.
XRemove dirt immediately, where possible,
while avoiding rubbing too hard.
XSoak insect remains with insect remover and
rinse off the treated areas afterwards.
XSoak bird droppings with water and rinse off
the treated areas afterwards.
XRemove coolant, brake fluid, tree resin, oils,
fuels and greases by rubbing gently with a
cloth soaked in petroleum ether or lighter
fluid.
XUse tar remover to remove tar stains.
XUse silicone remover to remove wax.
Care313
Maintenance and care
Z