2017 MERCEDES-BENZ GLC steering wheel
[x] Cancel search: steering wheelPage 74 of 374
Only deactivate ESP ®
in the situations descri-
bed in the following.
! Avoid spinning the driven wheels for an
extended period with ESP ®
deactivated. You
could otherwise damage the drivetrain.
In the following situations, it may be better to
activate SPORT handling mode or deactivate
ESP ®
:R
when using snow chains R
in deep snow R
on sand or gravel R
on specially designated roads when the vehi-
cle's own oversteering and understeering
characteristics are desired
Spinning the wheels results in a cutting action
which provides better grip.
Driving in SPORT handling mode or without
ESP ®
requires an extremely qualified and expe-
rienced driver.
i Activate ESP ®
as soon as the situations
described above no longer apply. ESP ®
will
otherwise not be able to stabilize the vehicle if
the vehicle starts to skid or a wheel starts to
spin.
Deactivating/activating ESP ®
X
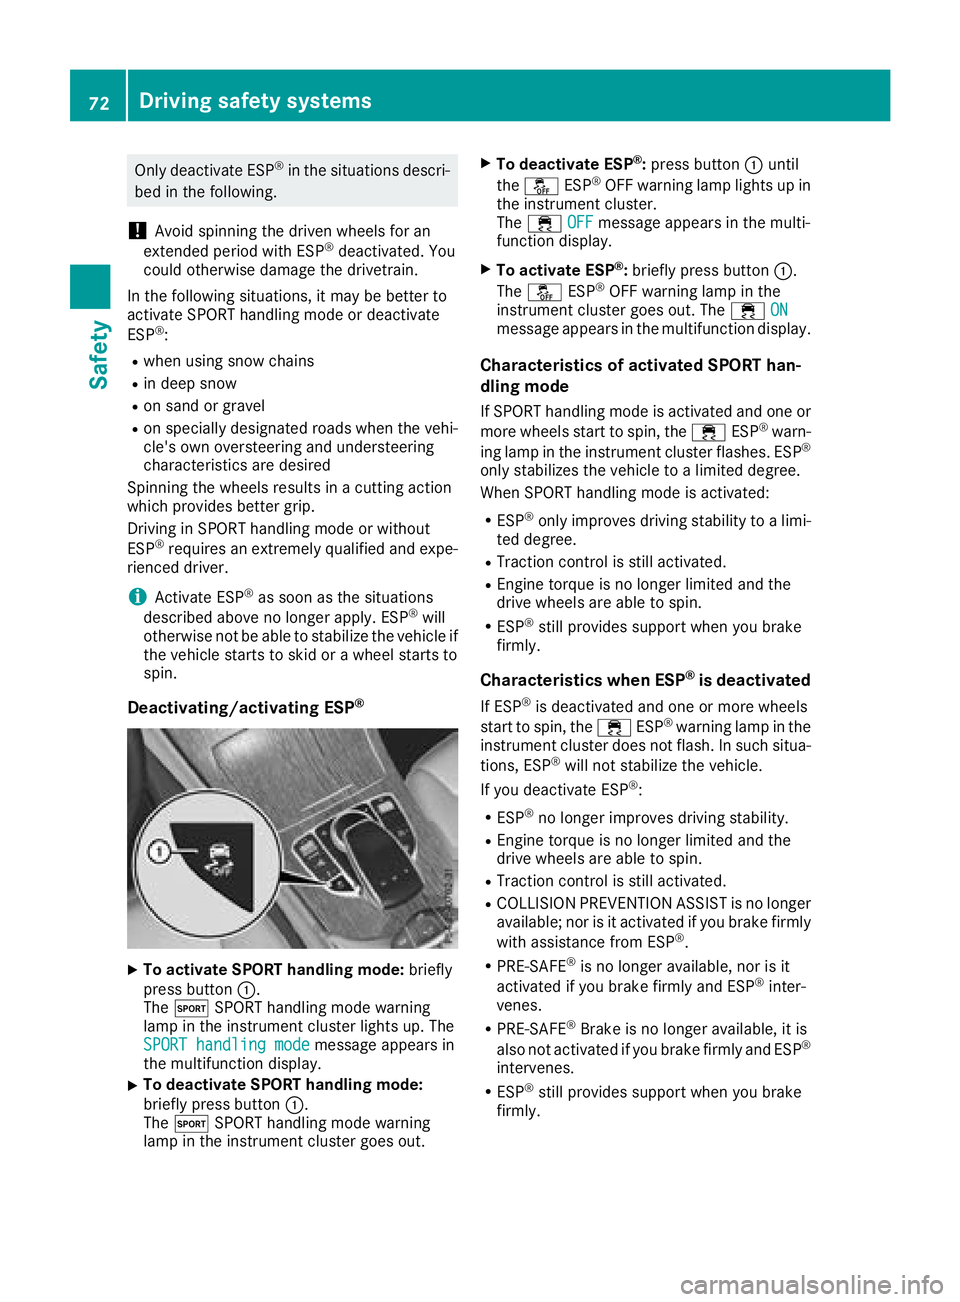
To activate SPORT handling mode: briefly
press button �C .
The �t SPORT handling mode warning
lamp in the instrument cluster lights up. The
SPORT handling mode
message appears in
the multifunction display. X
To deactivate SPORT handling mode:
briefly press button �C .
The �t SPORT handling mode warning
lamp in the instrument cluster goes out. X
To deactivate ESP ®
: press button �C until
the �
Page 100 of 374
Correct driver's seat position
G WARNING
You could lose control of your vehicle if you do
the following while driving: R
adjust the driver's seat, head restraint,
steering wheel or mirrors R
fasten the seat belt
There is a risk of an accident.
Adjust the driver's seat, head restraint, steer-
ing wheel and mirror and fasten your seat belt
before starting the engine.
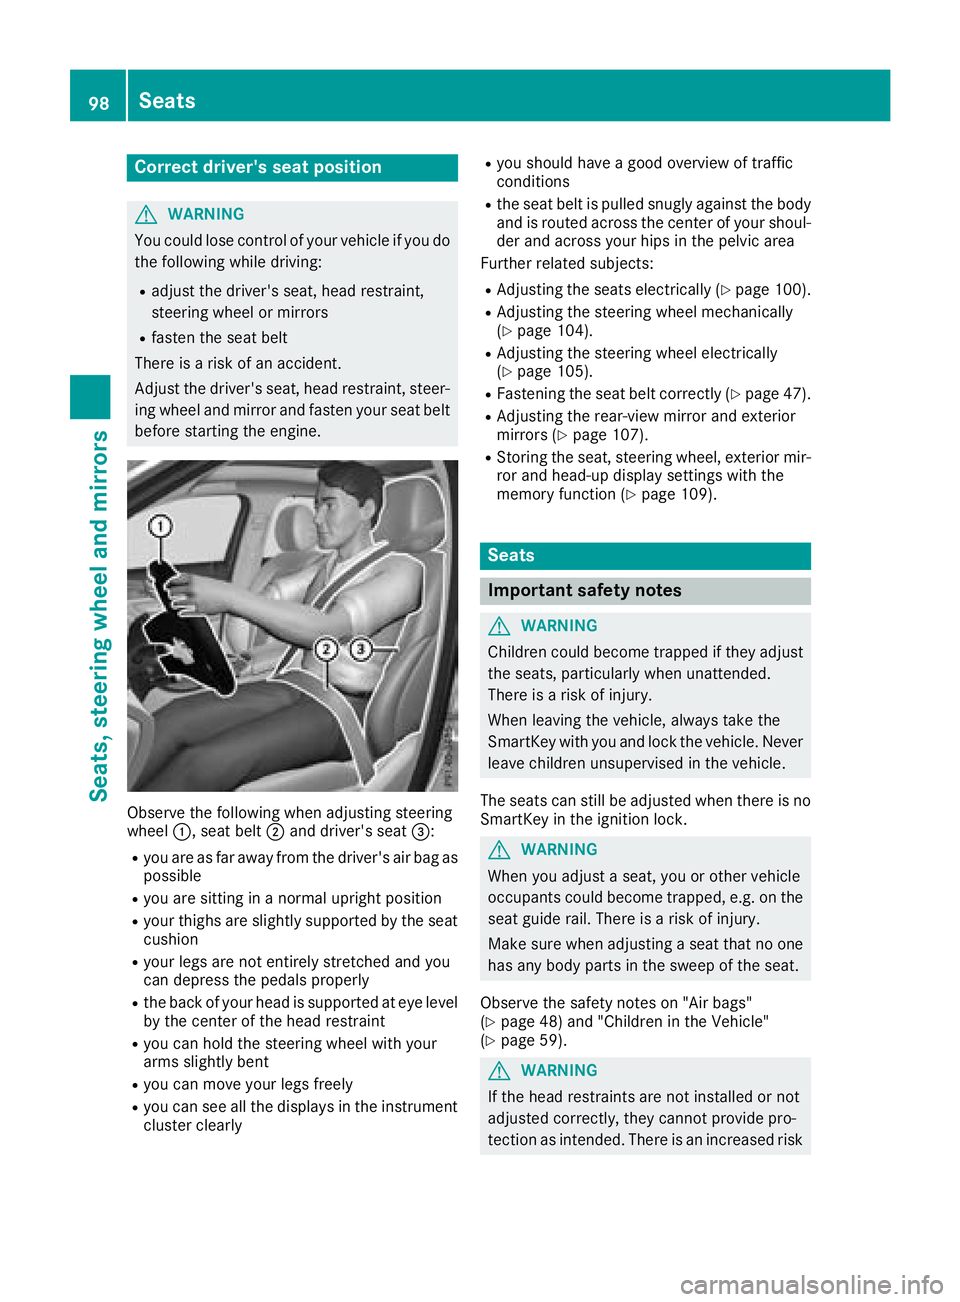
Observe the following when adjusting steering
wheel �C , seat belt �D and driver's seat �
Page 101 of 374
of injury in the head and neck area, e.g. in the
event of an accident or when braking.
Always drive with the head restraints instal-
led. Before driving off, make sure for every
vehicle occupant that the center of the head
restraint supports the back of the head at
about eye level.
Do not rotate the head restraints of the front and
rear seats. Otherwise, you cannot adjust the
height and angle of the head restraints cor-
rectly.
Using the fore-and-aft adjustment, adjust the
head restraint so that it is as close as possible to
your head.
G WARNING
If the driver's seat is not engaged, it could
move unexpectedly while the vehicle is in
motion. This could cause you to lose control of
the vehicle. There is a risk of an accident.
Always make sure that the driver's seat is
engaged before starting the vehicle.
G WARNING
You could lose control of your vehicle if you do
the following while driving: R
adjust the driver's seat, head restraint,
steering wheel or mirrors R
fasten the seat belt
There is a risk of an accident.
Adjust the driver's seat, head restraint, steer-
ing wheel and mirror and fasten your seat belt
before starting the engine.
G WARNING
If you adjust the seat height carelessly, you or
other vehicle occupants could be trapped and
thereby injured. Children in particular could
accidentally press the electrical seat adjust-
ment buttons and become trapped. There is a
risk of injury.
While moving the seats, make sure that your
hands or other body parts do not get under the
lever assembly of the seat adjustment sys-
tem. G WARNING
The seat belt does not offer the intended level
of protection if you have not moved the back-
rest to an almost vertical position. When brak-
ing or in the event of an accident, you could
slide underneath the seat belt and sustain
abdomen or neck injuries, for example. This
poses an increased risk of injury or even fatal
injury.
Adjust the seat properly before beginning
your journey. Always ensure that the backrest
is in an almost vertical position and that the
shoulder section of your seat belt is routed
across the center of your shoulder.
! To avoid damage to the seats and the seat
heating, observe the following information: R
keep liquids from spilling on the seats. If
liquid is spilled on the seats, dry them as
soon as possible. R
if the seat covers are damp or wet, do not
switch on the seat heating. The seat heat-
ing should also not be used to dry the seats. R
clean the seat covers as recommended;
see "Interior care". R
do not transport heavy loads on the seats.
Do not place sharp objects on the seat
cushions, e.g. knives, nails or tools. The
seats should only be occupied by passen-
gers, if possible. R
when the seat heating is in operation, do
not cover the seats with insulating materi-
als, e.g. blankets, coats, bags, seat covers,
child seats or booster seats.
! Make sure that there are no objects in the
footwell under or behind the seats when mov-
ing the seats back. There is a risk that the
seats and/or the objects could be damaged.
i The rear-compartment head restraints can
be removed ( Y
page 102).
For more information, contact a qualified spe-
cialist workshop.
i Related topic: R
EASY-PACK Quickfold rear bench seat
( Y
page 281) Seats 99
Seats, steering wheel and mirrors Z
Page 103 of 374
restraint supports the back of the head at
about eye level.
General notes Pay attention to the important safety notes
( Y
page 98).
Do not rotate the head restraints of the front and
rear seats. Otherwise, you cannot adjust the
height and angle of the head restraints to the
correct position.
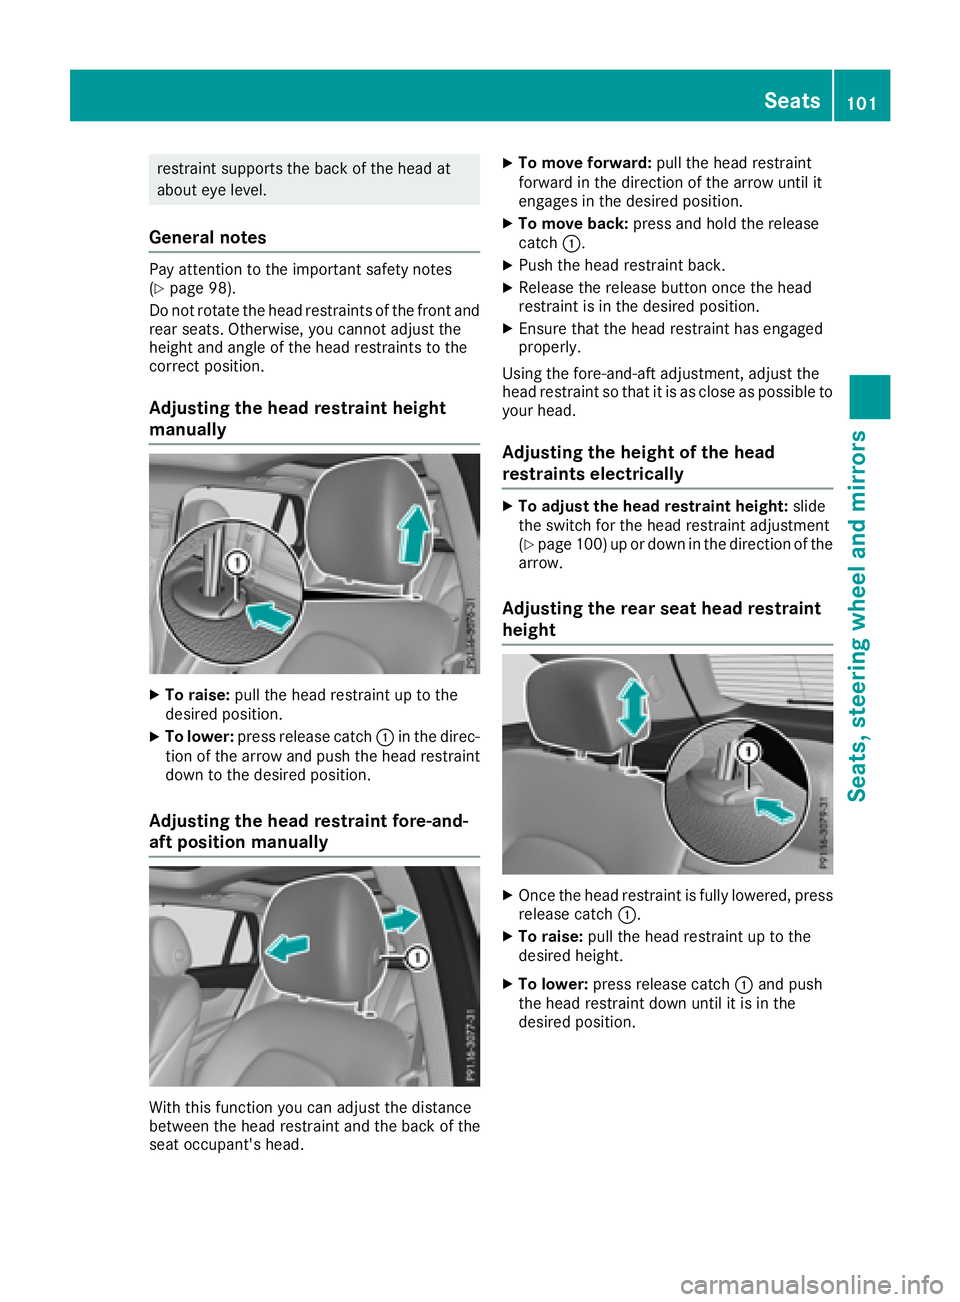
Adjusting the head restraint height
manually
X
To raise: pull the head restraint up to the
desired position. X
To lower: press release catch �C in the direc-
tion of the arrow and push the head restraint
down to the desired position.
Adjusting the head restraint fore-and-
aft position manually
With this function you can adjust the distance
between the head restraint and the back of the
seat occupant's head. X
To move forward: pull the head restraint
forward in the direction of the arrow until it
engages in the desired position. X
To move back: press and hold the release
catch �C . X
Push the head restraint back. X
Release the release button once the head
restraint is in the desired position. X
Ensure that the head restraint has engaged
properly.
Using the fore-and-aft adjustment, adjust the
head restraint so that it is as close as possible to
your head.
Adjusting the height of the head
restraints electrically X
To adjust the head restraint height: slide
the switch for the head restraint adjustment
( Y
page 100) up or down in the direction of the
arrow.
Adjusting the rear seat head restraint
height
X
Once the head restraint is fully lowered, press
release catch �C . X
To raise: pull the head restraint up to the
desired height. X
To lower: press release catch �C and push
the head restraint down until it is in the
desired position. Seats 101
Seats, steering wheel and mirrors Z
Page 105 of 374
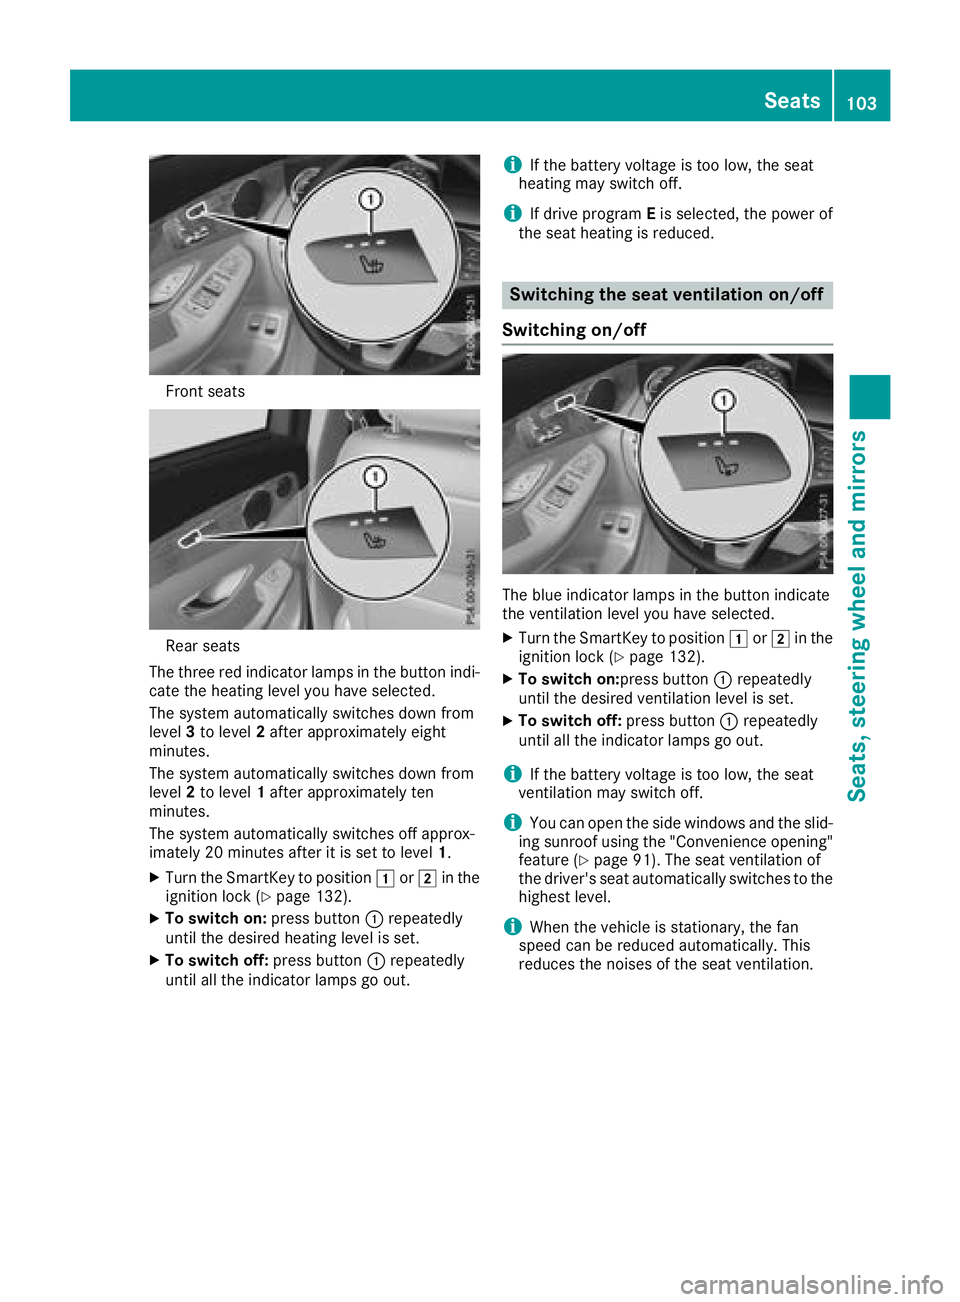
Front seats
Rear seats
The three red indicator lamps in the button indi-
cate the heating level you have selected.
The system automatically switches down from
level 3 to level 2 after approximately eight
minutes.
The system automatically switches down from
level 2 to level 1 after approximately ten
minutes.
The system automatically switches off approx-
imately 20 minutes after it is set to level 1 .X
Turn the SmartKey to position �G or �H in the
ignition lock ( Y
page 132).X
To switch on: press button �C repeatedly
until the desired heating level is set. X
To switch off: press button �C repeatedly
until all the indicator lamps go out. i If the battery voltage is too low, the seat
heating may switch off.
i If drive program E is selected, the power of
the seat heating is reduced.
Switching the seat ventilation on/off
Switching on/off
The blue indicator lamps in the button indicate
the ventilation level you have selected. X
Turn the SmartKey to position �G or �H in the
ignition lock ( Y
page 132). X
To switch on: press button �C repeatedly
until the desired ventilation level is set. X
To switch off: press button �C repeatedly
until all the indicator lamps go out.
i If the battery voltage is too low, the seat
ventilation may switch off.
i You can open the side windows and the slid-
ing sunroof using the "Convenience opening"
feature ( Y
page 91). The seat ventilation of
the driver's seat automatically switches to the
highest level.
i When the vehicle is stationary, the fan
speed can be reduced automatically. This
reduces the noises of the seat ventilation. Seats 103
Seats, steering wheel and mirrors Z
Page 106 of 374
Problems with the seat heating / seat ventilation Problem
Possible causes/consequences and �P Solutions
The seat heating or seat
ventilation has switched
off prematurely or can-
not be switched on. The on-board voltage is too low because too many electrical consum-
ers are switched on. X
Switch off electrical consumers that you do not need, such as the
rear window defroster or interior lighting.
Once the battery is sufficiently charged, the seat heating or seat
ventilation can be switched back on manually.
Steering wheel
Important safety notes
G WARNING
You could lose control of your vehicle if you do
the following while driving: R
adjust the driver's seat, head restraint,
steering wheel or mirrors R
fasten the seat belt
There is a risk of an accident.
Adjust the driver's seat, head restraint, steer-
ing wheel and mirror and fasten your seat belt
before starting the engine.
G WARNING
Children could injure themselves if they
adjust the steering wheel. There is a risk of
injury.
When leaving the vehicle, always take the
SmartKey with you and lock the vehicle. Never
leave children unsupervised in the vehicle.
The electrically adjustable steering wheel can
still be adjusted when there is no key in the igni-
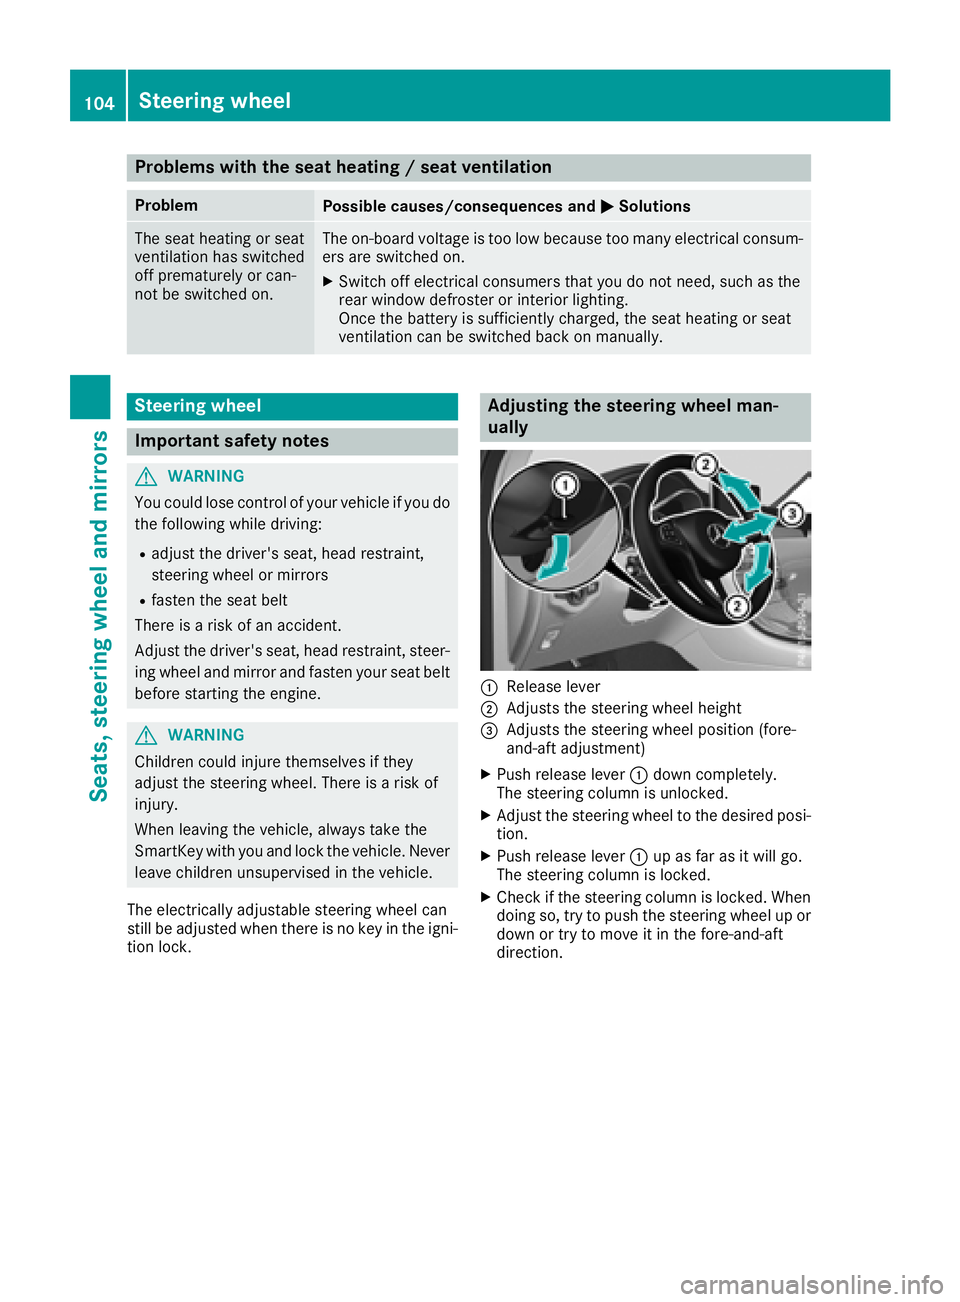
tion lock. Adjusting the steering wheel man-
ually
�C
Release lever �D
Adjusts the steering wheel height �
Page 107 of 374
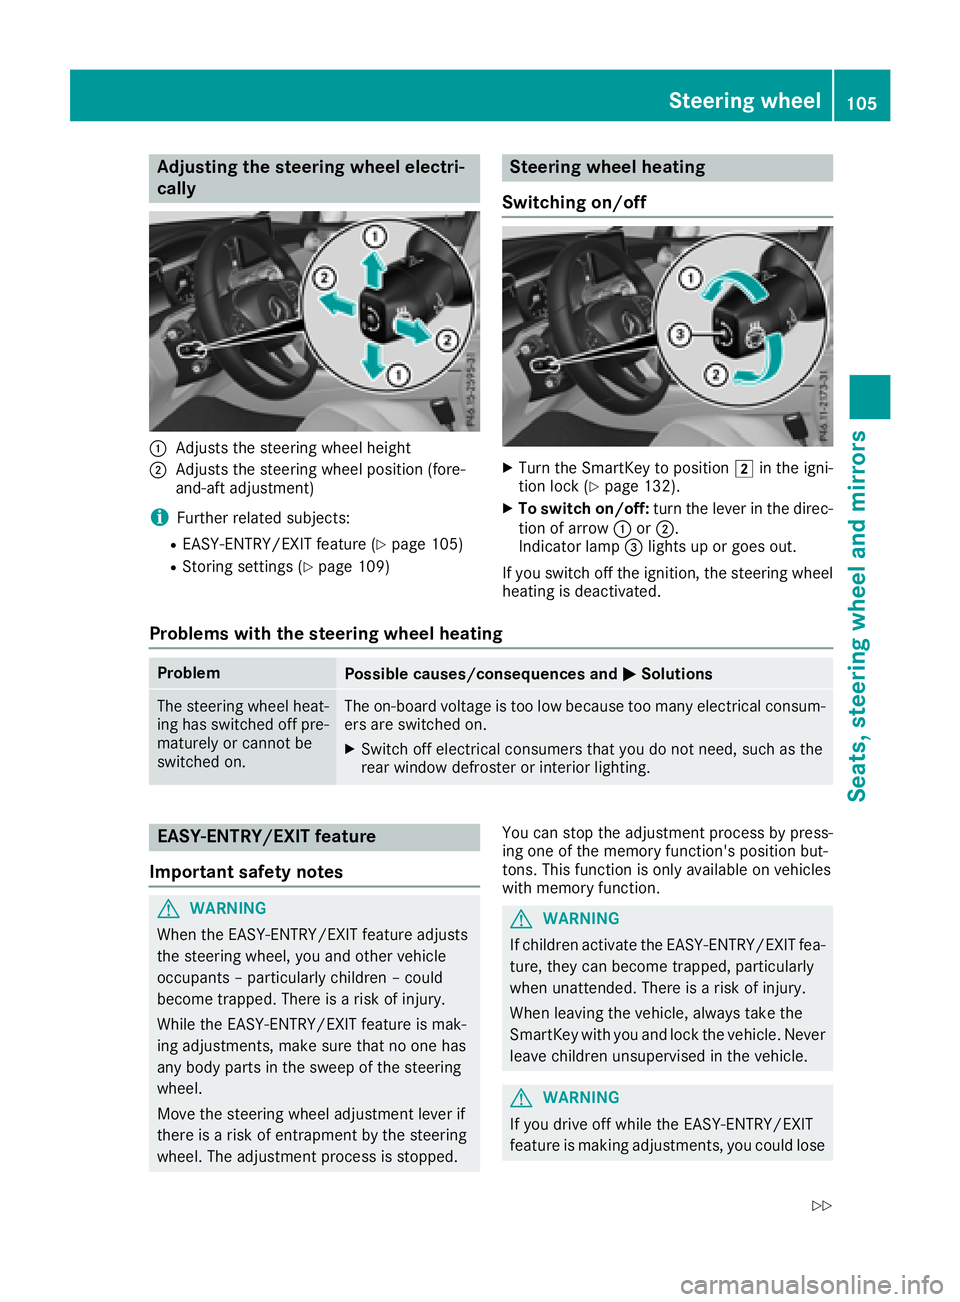
Adjusting the steering wheel elect ri -
cally
�C
Adjusts th e steering whee l height�D
Adjusts th e steering whee l position (fore-
and-af t adjustment)
i Further relate d subjects :R
EASY-ENTRY/EXIT feature ( Y
page 105)R
Storing setting s ( Y
page 109) Steering wheel heating
Switching on/off X
Turn th e SmartKey to position �H in th e igni-
tion loc k ( Y
page 132). X
To switch on/off: tur n th e lever in th e direc -
tion of arrow �C or �D .
Indicato r lamp �
Page 108 of 374
control of the vehicle. There is a risk of an
accident.
Always wait until the adjustment process is
complete before driving off.
The EASY-ENTRY/EXIT feature makes getting in
and out of your vehicle easier.
You can activate and deactivate the EASY-
ENTRY/EXIT feature using the multimedia sys-
tem (see the Digital Operator's Manual)
Position of the steering wheel when the
EASY-ENTRY/EXIT feature is active The steering wheel swings up when you: R
remove the SmartKey from the ignition lock R
with KEYLESS-GO or KEYLESS-GO start
function: open the driver's door; the voltage
supply must be switched on R
with the SmartKey: open the driver's door;
the SmartKey must be in position �Z or �G in
the ignition lock ( Y
page 132)R
open the driver's door when the ignition is
switched off
i The steering wheel only tilts up if the driving
position is stored after the steering column
adjustment has been adjusted ( Y
page 109).
The most recent driving position of the steering
wheel is stored if: R
the ignition is switched off R
the setting is stored using the memory func-
tion ( Y
page 109)
i The steering wheel only moves up if it has
not already reached the upper steering lim-
iter.
Position of the steering wheel for driv-
ing The steering wheel is moved to the last selected
position when: R
the driver's door is closed and you insert the
SmartKey into the ignition lock R
you close the driver's door when the ignition
is switched on R
you press the Start/Stop button once in vehi-
cles with KEYLESS-GO or the KEYLESS-GO
start function i The steering wheel only returns to the last
set position if the driving position is stored
after the seat or steering column has been
adjusted ( Y
page 109).
The most recent driving position of the steering
wheel is stored if: R
the ignition is switched off R
the setting is stored using the memory func-
tion ( Y
page 109)
Crash-responsive EASY-EXIT feature If the crash-responsive EASY-EXIT feature is trig-
gered in an accident, the steering column will
move up when the driver's door is opened or the
SmartKey is removed from the ignition lock. This
makes it easier to exit the vehicle and rescue the
occupants.
The crash-responsive EASY-EXIT feature is
operational only if the EASY-EXIT/ENTRY fea-
ture is activated in the multimedia system (see
Digital Operator's Manual).
Mirrors
Exterior mirrors
Important safety notes
G WARNING
You could lose control of your vehicle if you do
the following while driving: R
adjust the driver's seat, head restraint,
steering wheel or mirrors R
fasten the seat belt
There is a risk of an accident.
Adjust the driver's seat, head restraint, steer-
ing wheel and mirror and fasten your seat belt
before starting the engine.
G WARNING
The exterior mirror on the front-passenger
side reduces the size of the image. Visible
objects are actually closer than they appear.
This means that you could misjudge the dis-
tance from road users traveling behind, e.g.
when changing lane. There is a risk of an acci-
dent.106
Mirrors
Seats, steering wheel and mirrors