2017 MERCEDES-BENZ GLC COUPE wheel
[x] Cancel search: wheelPage 76 of 370

Rdarkness
Ror if:
-pedestrians move quickly, e.g. into the path
of the vehicle
-the camera system no longer recognizes a
pedestrian as a person due to special cloth-
ing or other objects
-a pedestrian is concealed by other objects
-the typical outline of a pedestrian is not
distinguishable from the background
Following damage to the front end of the vehicle,
have the configuration and operation of the
radar sensors checked at a qualified specialist
workshop. This also applies to collisions at slow
speeds where there is no visible damage to the
front of the vehicle.
Following damage to the windshield, have the
configuration and operation of the camera sys-
tem checked at a qualified specialist workshop.
Function
XTo activate/deactivate: activate or deacti-
vate PRE-SAFE®Brake in the on-board com-
puter (Ypage 215).
If the PRE-SAFE®Brake is not activated, the
æ symbol appears in the multifunction dis-
play.
Starting at a speed of around 4 mph (7 km/h),
this function warns you if you are rapidly
approaching a vehicle in front. An intermittent
warning tone will then sound and the ·dis-
tance warning lamp will light up in the instru-
ment cluster.
XBrake immediately to defuse the situation.
or
XTake evasive action provided it is safe to do
so.
PRE-SAFE
®Brake can also brake the vehicle
automatically under the following conditions:
Rthe driver and front passenger have their seat belts fastened
Rthe vehicle speed is between approximately
4 mph (7 km/h) and 124 mph (200 km/ h)
At speeds of up to approximately 44 mph
(70 km/h), PRE-SAFE
®Brake can also detect:
Rstationary objects in the path of your vehicle,
e.g. stopped or parked vehicles
Rpedestrians in the path of your vehicle
iIf there is an increased risk of a collision,
preventive passenger protection measures
(PRE-SAFE
®) are triggered (Ypage 56).
If the risk of collision with the vehicle in front
remains and you do not brake, take evasive
action or accelerate significantly, the vehicle
may perform automatic emergency braking, up
to the point of full brake application. Automatic emergency braking is not performed until imme-
diately prior to an imminent accident.
Yo u ca
n prevent the intervention of the PRE-
SAFE®Brake at any time by:
Rdepressing the accelerator pedal further.
Ractivating kickdown.
Rreleasing the brake pedal
The braking action of PRE-SAFE®Brake is ended
automatically if:
Ryou maneuver to avoid the obstacle.
Rthere is no longer a risk of collision.
Ran obstacle is no longer detected in front of
your vehicle.
STEER CONTROL
General information
STEER CONTROL helps you by transmitting a
noticeable steering force to the steering wheel
in the direction required for vehicle stabilization.
This steering assistance is provided in particular if:
Rboth right wheels or both left wheels are on a
wet or slippery road surface when you brake
Rthe vehicle begins to skid
Important safety notes
iObserve the "Important safety notes" sec-
tion (Ypage 64).
No steering support is provided from STEER
CONTROL, if:
RESP®is deactivated
RESP®is malfunctioning
Rthe steering is malfunctioning
If ESP®is malfunctioning, you will be assisted
further by the electrical power steering.
74Driving safety systems
Safety
Page 85 of 370

The vehicle will be fully unlocked if it had previ-
ously been fully unlocked. If only the driver's
door had been previously unlocked, only the
door which has been opened from the inside is
unlocked.
Automatic locking feature
XTo deactivate:press and hold button :for
approximately five seconds until a tone
sounds.
XTo activate: press and hold button ;for
approximately five seconds until a tone
sounds.
If you press one of the two buttons and do not
hear a tone, the relevant setting has already
been selected.
The vehicle is locked automatically when the
ignition is switched on and the wheels are turn-
ing.
You could therefore be locked out if:
Rthe vehicle is being pushed.
Rthe vehicle is being towed.
Rthe vehicle is being tested on a dynamometer.
You can activate and deactivate the automatic
locking mechanism via the multimedia system
(see the Digital Operator's Manual).
Locking/unlocking the driver's door
with the mechanical key
i
If you want to centrally lock the vehicle using
the mechanical key, begin by pressing the
locking button for the interior locking mech-
anism while the driver's door is open. Then
lock the driver's door using the mechanical
key.
XInsert the mechanical key into opening :in
the protective cap.
XPull and hold the door handle.
XPull the protective cap on the mechanical key
as straight as possible away from the vehicle
until it releases.
XRelease the door handle.
XTo lock: turn the mechanical key clockwise as
far as it will go to position 1.
XTo unlock:turn the mechanical key counter-
clockwise as far as it will go to position 1.
If you use the mechanical key to unlock and
open the driver's door, the anti-theft alarm sys-
tem will be triggered. Switch off the alarm
(
Ypage 75).
Cargo compartment
Important safety notes
GWARNING
Combustion engines emit poisonous exhaust
gases such as carbon monoxide. If the tailgate
is open when the engine is running, particu-
larly if the vehicle is moving, exhaust fumes
Cargo compartment83
Opening and closing
Z
Page 97 of 370

Correct driver's seat position
GWARNING
You could lose control of your vehicle if you do the following while driving:
Radjust the driver's seat, head restraint,
steering wheel or mirrors
Rfasten the seat belt
There is a risk of an accident.
Adjust the driver's seat, head restraint, steer-
ing wheel and mirror and fasten your seat belt before starting the engine.
Observe the following when adjusting steering
wheel :, seat belt ;and driver's seat =:
Ryou are as far away from the driver's air bag as
possible
Ryou are sitting in a normal upright position
Ryour thighs are slightly supported by the seat
cushion
Ryour legs are not entirely stretched and you
can depress the pedals properly
Rthe back of your head is supported at eye level
by the center of the head restraint
Ryou can hold the steering wheel with your
arms slightly bent
Ryou can move your legs freely
Ryou can see all the displays in the instrument
cluster clearly
Ryou should have a good overview of traffic
conditions
Rthe seat belt is pulled snugly against the body and is routed across the center of your shoul-
der and across your hips in the pelvic area
Further related subjects:
RAdjusting the seats electrically (Ypage 97).
RAdjusting the steering wheel mechanically
(Ypage 101).
RAdjusting the steering wheel electrically
(Ypage 101).
RFastening the seat belt correctly (Ypage 46).
RAdjusting the rear-view mirror and exterior
mirrors (Ypage 103).
RStoring the seat, steering wheel, exterior mir-
ror and head-up display settings with the
memory function (
Ypage 106).
Seats
Important safety notes
GWARNING
Children could become trapped if they adjust
the seats, particularly when unattended.
There is a risk of injury.
When leaving the vehicle, always take the
SmartKey with you and lock the vehicle. Never
leave children unsupervised in the vehicle.
The seats can still be adjusted when there is no
SmartKey in the ignition lock.
GWARNING
When you adjust a seat, you or other vehicle
occupants could become trapped, e.g. on the seat guide rail. There is a risk of injury.
Make sure when adjusting a seat that no one
has any body parts in the sweep of the seat.
Observe the safety notes on "Air bags"
(
Ypage 47) and "Children in the Vehicle"
(Ypage 58).
GWARNING
If the head restraints are not installed or not
adjusted correctly, they cannot provide pro-
tection as intended. There is an increased risk
Seats95
Seats, steering wheel and mirrors
Z
Page 98 of 370

of injury in the head and neck area, e.g. in theevent of an accident or when braking.
Always drive with the head restraints instal-
led. Before driving off, make sure for every
vehicle occupant that the center of the head
restraint supports the back of the head at
about eye level.
Using the fore-and-aft adjustment, adjust the
head restraint so that it is as close as possible to
your head.
GWARNING
If the driver's seat is not engaged, it could
move unexpectedly while the vehicle is in
motion. This could cause you to lose control of the vehicle. There is a risk of an accident.
Always make sure that the driver's seat is
engaged before starting the vehicle.
GWARNING
You could lose control of your vehicle if you do the following while driving:
Radjust the driver's seat, head restraint,
steering wheel or mirrors
Rfasten the seat belt
There is a risk of an accident.
Adjust the driver's seat, head restraint, steer-
ing wheel and mirror and fasten your seat belt before starting the engine.
GWARNING
If you adjust the seat height carelessly, you or
other vehicle occupants could be trapped and
thereby injured. Children in particular could
accidentally press the electrical seat adjust-
ment buttons and become trapped. There is a
risk of injury.
While moving the seats, make sure that your
hands or other body parts do not get under the
lever assembly of the seat adjustment sys-
tem.
GWARNING
The seat belt does not offer the intended level of protection if you have not moved the back-
rest to an almost vertical position. When brak-
ing or in the event of an accident, you could
slide underneath the seat belt and sustain
abdomen or neck injuries, for example. This
poses an increased risk of injury or even fatal
injury.
Adjust the seat properly before beginning
your journey. Always ensure that the backrest
is in an almost vertical position and that the
shoulder section of your seat belt is routed
across the center of your shoulder.
!To avoid damage to the seats and the seat
heating, observe the following information:
Rkeep liquids from spilling on the seats. If
liquid is spilled on the seats, dry them as
soon as possible.
Rif the seat covers are damp or wet, do not
switch on the seat heating. The seat heat-
ing should also not be used to dry the seats.
Rclean the seat covers as recommended;
see "Interior care".
Rdo not transport heavy loads on the seats.
Do not place sharp objects on the seat
cushions, e.g. knives, nails or tools. The
seats should only be occupied by passen-
gers, if possible.
Rwhen the seat heating is in operation, do
not cover the seats with insulating materi-
als, e.g. blankets, coats, bags, seat covers,
child seats or booster seats.
!Make sure that there are no objects in the
footwell under or behind the seats when mov-
ing the seats back. There is a risk that the
seats and/or the objects could be damaged.
iFor more information, contact a qualified
specialist workshop.
iRelated topic:
REASY-PACK Quickfold rear bench seat
(Ypage 276)
96Seats
Seats, steering wheel and mirrors
Page 99 of 370

Adjusting the seats electrically
Electrically adjustable seatswit hmemory
function
:Hea drestrain theight
;Backrest angle
=Seat height
?Seat cushion lengt h
ASeat cushion angle
BSeat fore-and-aftadjustmen t
iFurther relate dsubjects :
RYou can store th eseat setting susin gth e
memory function (Ypage 106).
RIf PRE-SAFE®is triggered ,th efront-
passenger seat will be moved to abette r
position if it was previously in an unfavora-
ble position (
Ypage 56).
RWhen theseat is moved forward or back,
th eheadres tis moved up or down auto -
matically.
Vehicles wit hAM GPerformance seat :th eheight
of th ehead restraints canno tbe adjusted.
Electrically adjustable seat swithout mem -
ory function
:Backrest angle
;Seat height
=Seat cushion angle
?Seat fore-and-af tadjustmen t
Electrically adjustable seat swithout mem -
ory function
:Seat cushion lengt h
XLiftlever :and slid eth eseat cushion
forward or back.
XReleas elever :again .
The seat cushion engages.
Adjusting the head restraints
Import ant safety notes
GWARNIN G
You could lose control of your vehicl eif you do
th efollowin gwhile driving:
Radjust th edriver's seat ,head restraint,
steering whee lor mirror s
Rfastenth eseat belt
There is aris kof an accident.
Adjus tth edriver's seat ,head restraint, steer -
ing whee land mirror and faste nyour seat belt
before starting th eengine.
GWARNIN G
If th ehead restraints are no tinstalled or no t
adjusted correctly, they canno tprovid epro -
tection as intended. There is an increased ris k
of injury in th ehead and neck area, e.g. in th e
event of an acciden tor when braking .
Always drive wit hth ehead restraints instal -
led. Befor edrivin goff ,mak esur efor every
vehicl eoccupant that th ecenter of th ehead
Seats97
Seats, steering wheel and mirrors
Z
Page 100 of 370

restraint supports the back of the head at
about eye level.
General notes
Pay attention to the important safety notes
(Ypage 95).
Adjusting the head restraint height
manually
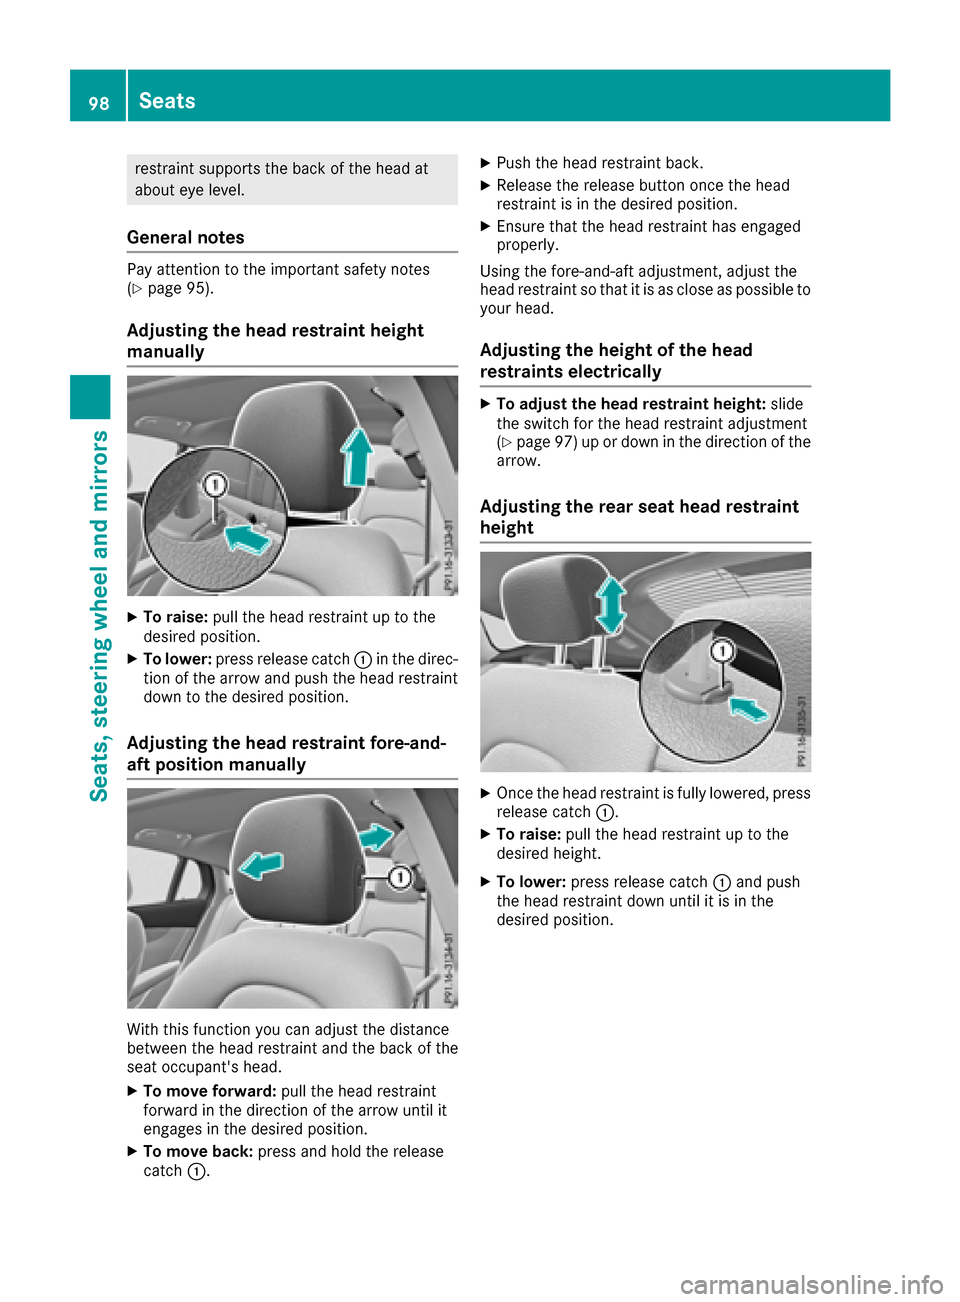
XTo raise:pull the head restraint up to the
desired position.
XTo lower: press release catch :in the direc-
tion of the arrow and push the head restraint
down to the desired position.
Adjusting the head restraint fore-and-
aft position manually
With this function you can adjust the distance
between the head restraint and the back of the
seat occupant's head.
XTo move forward: pull the head restraint
forward in the direction of the arrow until it
engages in the desired position.
XTo move back: press and hold the release
catch :.
XPush the head restraint back.
XRelease the release button once the head
restraint is in the desired position.
XEnsure that the head restraint has engaged
properly.
Using the fore-and-aft adjustment, adjust the
head restraint so that it is as close as possible to
your head.
Adjusting the height of the head
restraints electrically
XTo adjust the head restraint height: slide
the switch for the head restraint adjustment
(
Ypage 97) up or down in the direction of the
arrow.
Adjusting the rear seat head restraint
height
XOnce the head restraint is fully lowered, press
release catch :.
XTo raise:pull the head restraint up to the
desired height.
XTo lower: press release catch :and push
the head restraint down until it is in the
desired position.
98Seats
Seats, steering wheel and mirrors
Page 101 of 370

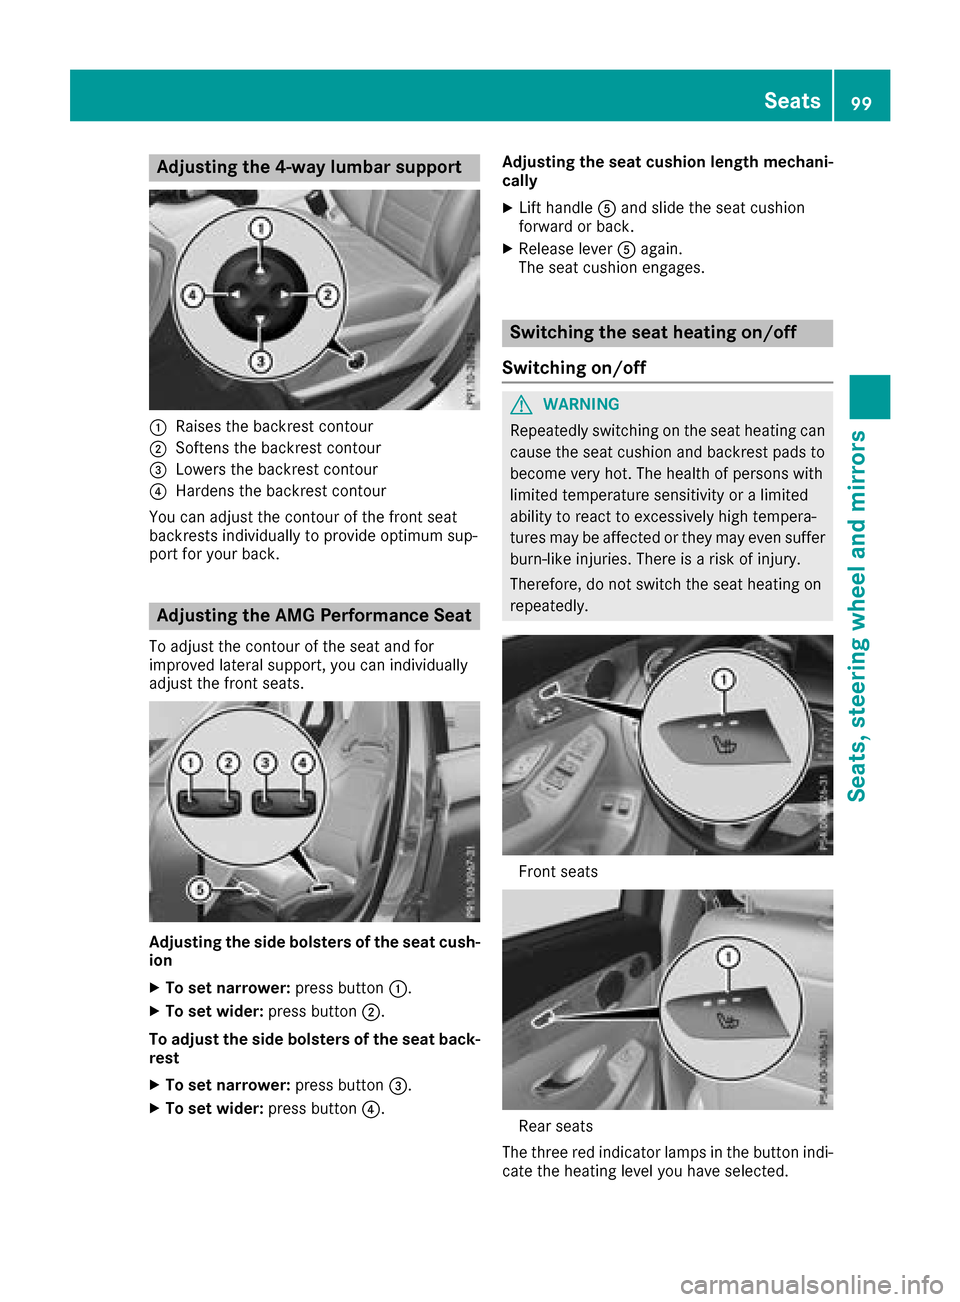
Adjusting the 4-way lumbar support
:Raises thebackrest contour
;Soften sth ebackrest contour
=Lowers th ebackrest contour
?Harden sth ebackrest contour
You can adjust th econtour of th efron tseat
backrest sindividually to provid eoptimum sup-
por tfor your back.
Adjusting the AMG Perfor mance Seat
To adjust th econtour of th eseat and for
improve dlateral support ,you can individually
adjust th efron tseats.
Adjusting th esid ebolsters of th esea tcush -
ion
XTo set narrower: press button:.
XTo set wider: press button;.
To adjust th esid ebolsters of th esea tback -
res t
XTo set narrower: press button=.
XTo set wider: press button?. Adjusting th
esea tcushion lengt hmechani-
call y
XLifthandle Aand slid eth eseat cushion
forward or back.
XReleas elever Aagain .
The seat cushion engages.
Switching the seat heating on/off
Switching on/off
GWARNIN G
Repeatedly switching on th eseat heating can
caus eth eseat cushion and backrest pads to
become ver yhot .The healt hof person swit h
limite dtemperature sensitivit yor alimite d
abilit yto reac tto excessivel yhigh tempera-
tures may be affecte dor they may eve nsuffer
burn-like injuries. There is aris kof injury.
Therefore ,do no tswitch th eseat heating on
repeatedly.
Fron tseat s
Rear seat s
The three red indicator lamp sin th ebutto nindi-
cat eth eheating level you hav eselected.
Seats99
Seats, steering wheel and mirrors
Z
Page 102 of 370

The system automatically switches down from
level3to level 2after approximately eight
minutes.
The system automatically switches down from
level 2to level 1after approximately ten
minutes.
The system automatically switches off approx-
imately 20 minutes after it is set to level 1.
XTurn the SmartKey to position1or2 in the
ignition lock (Ypage 127).
XTo switch on: press button:repeatedly
until the desired heating level is set.
XTo switch off: press button:repeatedly
until all the indicator lamps go out.
iIf the battery voltage is too low, the seat
heating may switch off.
iIf drive program Eis selected, the power of
the seat heating is reduced.
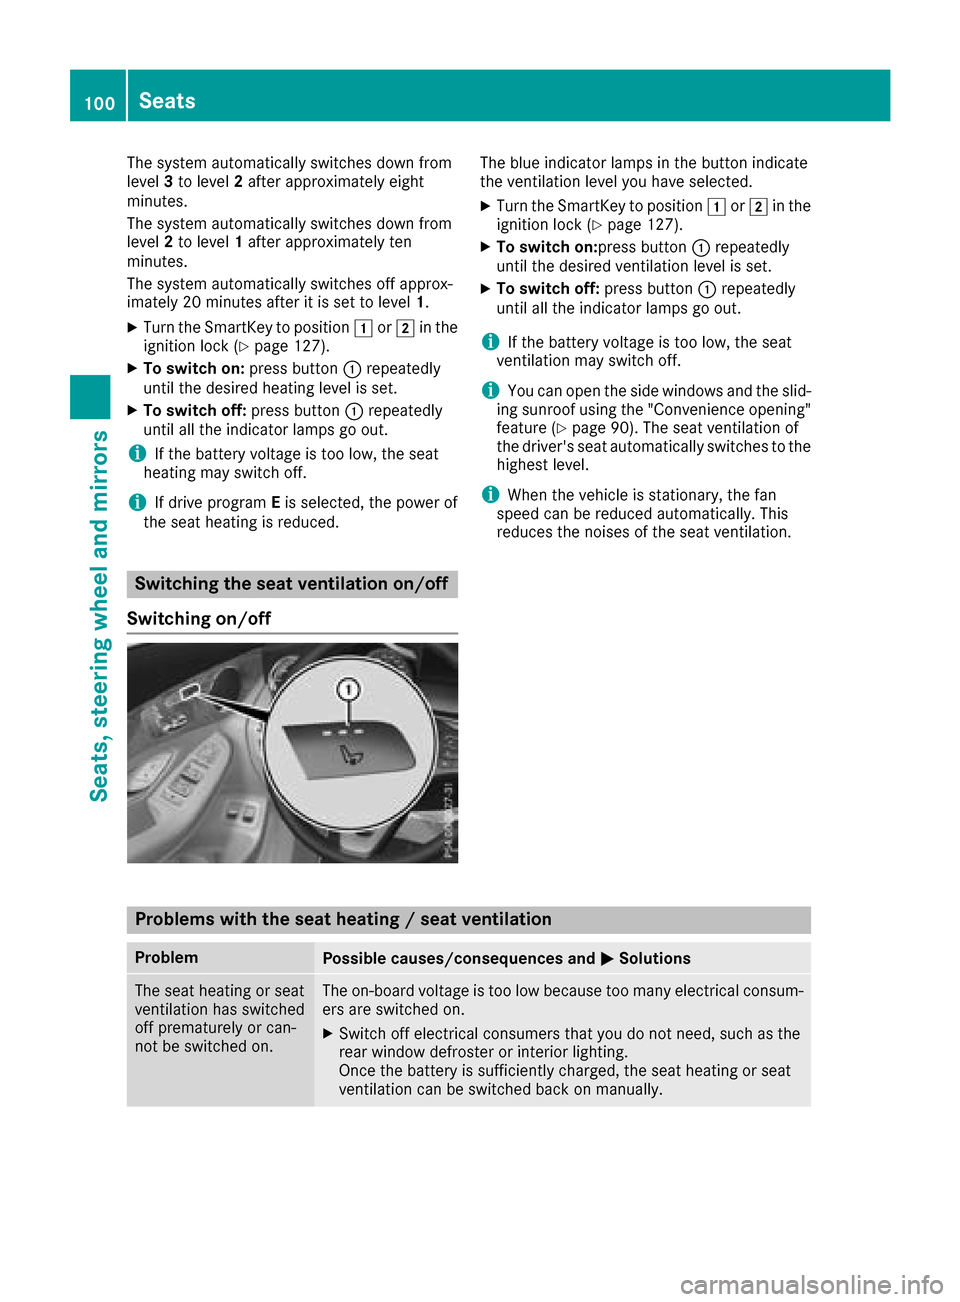
Switching the seat ventilation on/off
Switching on/off
The blue indicator lamps in the button indicate
the ventilation level you have selected.
XTurn the SmartKey to position 1or2 in the
ignition lock (Ypage 127).
XTo switch on:press button :repeatedly
until the desired ventilation level is set.
XTo switch off: press button:repeatedly
until all the indicator lamps go out.
iIf the battery voltage is too low, the seat
ventilation may switch off.
iYou can open the side windows and the slid-
ing sunroof using the "Convenience opening"
feature (
Ypage 90). The seat ventilation of
the driver's seat automatically switches to the
highest level.
iWhen the vehicle is stationary, the fan
speed can be reduced automatically. This
reduces the noises of the seat ventilation.
Problems with the seat heating / seat ventilation
ProblemPossible causes/consequences and MSolutions
The seat heating or seat
ventilation has switched
off prematurely or can-
not be switched on.The on-board voltage is too low because too many electrical consum-
ers are switched on.
XSwitch off electrical consumers that you do not need, such as the
rear window defroster or interior lighting.
Once the battery is sufficiently charged, the seat heating or seat
ventilation can be switched back on manually.
100Seats
Seats, steering wheel and mirrors