2017 MERCEDES-BENZ GLC COUPE ECO mode
[x] Cancel search: ECO modePage 7 of 370

AirbagWarning lamp ................................ .257
Alarm
ATA (Anti-Theft Alarm system) ......... 75
Switching off (ATA) .......................... 75
Switching the function on/off
(ATA) ................................................ 75
Alarm system
see ATA (Anti-Theft Alarm system)
AMG
Performance Seat ............................ 99
AMG menu (on-board computer) ..... 219
Anti-lock braking system
see ABS (Anti-lock Braking System)
Armrest
Stowage compartment .................. 274
Ashtray ............................................... 286
Assistance display (on-board com-
puter) ..................................................2 14
Assistance menu (on-board com-
puter) ..................................................2 15
ASSYST PLUS
Displaying a service message ........3 04
Driving abroad ............................... 305
Hiding a service message .............. 304
Resetting the service interval dis-
play ................................................ 305
Service message ............................ 304
Special service requirements ......... 305
ATA (Anti-Theft Alarm system)
Activating/deactivating ................... 75
Function ...........................................7 5
Switching off the alarm .................... 75
ATTENTION ASSIST
Activating/deactivating ................. 216
Display message ............................ 239
Displaying level .............................. 187
Function/notes ............................. 186
Authorized Mercedes-Benz Center
see Qualified specialist workshop
Authorized workshop
see Qualified specialist workshop
AUTO lights
Display message ............................ 234
see Lights
Automatic car wash (care) ............... 305Automatic engine start (ECO start/
stop function)
.................................... 132
Automatic engine switch-off (ECO
start/stop function) .......................... 131
Automatic headlamp mode .............. 108
Automatic transmission
Accel erato
r pedal position ............. 138
Changing gear ............................... 138
DIRECT SELECT lever ..................... 136
Display message ............................ 247
Double-clutch function .................. 138
Drive program ................................ 139
Drive program display .................... 137
Driving tips .................................... 138
DYNAMIC SELECT switch .............. 134
Emergency running mode .............. 143
Engaging drive position .................. 137
Engaging neutral ............................ 137
Engaging park position automati-
cally ............................................... 136
Engaging reverse gear ................... 137
Engaging the park position ............ 136
Gearshift recommendation ............ 142
Gliding mode ................................. 139
Kickdown ....................................... 139
Manual shifting .............................. 140
Oil temperature (on-board com-
puter, Mercedes-AMG vehicles) ..... 219
Overview ........................................ 136
Permanent setting ......................... 141
Problem (malfunction) ................... 143
Pulling away ................................... 130
Starting the engine ........................ 129
Steering wheel paddle shifters ...... 140
Trailer towing ................................. 139
Transmission position display
(DIRECT SELECT lever) ................... 137
Transmission positions .................. 138
Automatic transmission emer-
gency mode ....................................... 143
Axle load, permissible (trailer tow-
ing) ...................................................... 365
B
Back button ....................................... 264
Backup lamp
Display message ............................ 234
Index5
Page 14 of 370

Displaying the current consump-
tion ................................................ 208
Displaying the range ...................... 208
Driving tips .................................... 152
E10 ................................................ 359
Fuel gauge ....................................... 35
Gasoline ......................................... 359
Grade (gasoline) ............................ 359
Important safety notes .................. 359
Low outside temperatures ............. 360
Problem (malfunction) ................... 146
Quality (diesel) ............................... 360
Refueling ........................................ 143
Tank content/reserve fuel ............. 359
Fuel filler flap
Closing ........................................... 145
Fuel filter (display message) ............ 238
Fuel level
Calling up the range (on-board
computer) ...................................... 208
Fuel tank
Capacity ........................................ 359
Problem (malfunction) ................... 146
Fuses
Allocation chart ............................. 328
Before changing ............................. 327
Dashboard fuse box ....................... 328
Fuse box in the cargo compart-
ment .............................................. 328
Fuse box in the engine compart-
ment .............................................. 328
Fuse box in the front-passenger
footwell .......................................... 328
Important safety notes .................. 327
G
G-Meter (on-board computer,
Mercedes-AMG vehicles) .................. 219
Garage door opener
Clearing the memory ..................... 299
General notes ................................ 296
Important safety notes .................. 297
Opening/closing the garage doo r..2 99
Problems when programming ........2 98
Programming (button in the rear-
view mirror) ................................... 297
Synchronizing the rolling code ....... 298 Gasoline
............................................. 359
Gear indicator (on-board com-
puter, Mercedes-AMG vehicles) ....... 219
Genuine parts ...................................... 26
Glove box ...........................................2 74
Google™ Local Search
see also Digital Operator's Man-
ual ..................................................2 63
H
HANDS-FREE ACCESS.......................... 86
Handwriting recognition
Switching text reader function
on/off ............................................ 266
Touchpad ....................................... 265
Hazard warning lamps ......................110
Head restraints
Adjusting (electrically) ..................... 98
Adjusting (manually) ........................ 98
Adjusting (rear) ................................ 98
Adjusting the fore-and-aft posi-
tion manually ................................... 98
General notes .................................. 98
Important safety notes .................... 97
Head-up display
Adjusting the brightness ................ 217
Displays and operating .................. 206
Function/notes .............................2 06
Important safety notes .................. 206
Selecting displays .......................... 216
Setting the position ....................... 217
Storing settings (memory func-
tion) ............................................... 106
Headlamps
Display message ............................ 234
Fogging up ..................................... 111
see Automatic headlamp mode
Heating
see Climate control
High beam flasher .............................1 09
High-beam headlamps
Adaptive Highbeam Assist ............. 110
Display message ............................ 234
Replacing bulbs .............................1 13
Switching on/off ........................... 109
Hill start assist .................................. 131
12Index
Page 22 of 370

Warning lamp ................................. 256
Standing lamps
Display message ............................2 34
Switching on/off ........................... 109
Start button
Display message ............................ 251
Start/Stop button
Key positions ................................. 128
Starting the engine ........................ 129
Start/stop function
see ECO start/stop function
Starting (engine) ................................ 128
STEER CONTROL .................................. 74
Steering
Display message ............................ 249
Warning lamps ............................... 262
Steering Assist and Stop&Go Pilot .. 164
Steering Assist and Stop&Go Pilot
(DISTRONIC PLUS)
Display message ............................ 243
Steering assistant STEER CON-
TROL
see STEER CONTROL
Steering wheel
Adjusting (electrically) ................... 101
Adjusting (manually) ...................... 101
Button overview ............................... 36
Buttons (on-board computer) ......... 204
Cleaning ......................................... 311
EASY ENTRY/EXIT feature ............. 102
Important safety notes .................. 101
Storing settings (memory func-
tion) ............................................... 106
Steering wheel heating
Problem (malfunction) ................... 102
Switching on/off ........................... 101
Steering wheel paddle shifters ........ 140
Stop&Go Pilot and Steering Assist .. 164
Stopwatch (RACETIMER) ................... 220
Stowage areas ................................... 273
Stowage compartments
Armrest (under) ............................. 274
Center console .............................. 274
Cup holders ................................... 284
Door ............................................... 275
Eyeglasses compartment ............... 274
Glove box ....................................... 274 Important safety information ......... 273
Map pockets .................................. 275
Rear ............................................... 275
Stowage net ................................... 275
see Stowage areas
Stowage net ....................................... 275
Summer tires
In winter ........................................ 332
Sun visor ............................................ 285
Suspension settings
AIR BODY CONTROL ...................... 168
Suspe
nsion tuning
AMG sports suspension based on
AIR BODY CONTROL ...................... 169
SETUP (on-board computer,
Mercedes-AMG vehicles) ............... 219
Switching air-recirculation mode
on/off ................................................. 123
Switching on media mode
Via the device list .......................... 271
T
Tachometer ........................................ 204
Tail lamps
Display message ............................ 234
Tailgate
Display message ............................ 248
Emergency unlocking ....................... 88
HANDS-FREE ACCESS ..................... 86
Important safety notes .................... 83
Limiting the opening angle ............... 88
Obstruction detection ...................... 84
Opening dimensions ...................... 364
Opening/closing (automatically
from inside) ...................................... 87
Opening/closing (automatically
from outside) ................................... 84
Reversing feature ............................. 84
Tank content
Fuel gauge ....................................... 35
Technical data
Capacities ...................................... 358
Drawbar load (maximum) ............... 365
Information .................................... 356
Trailer loads ................................... 365
Vehicle data ................................... 364
20Index
Page 41 of 370

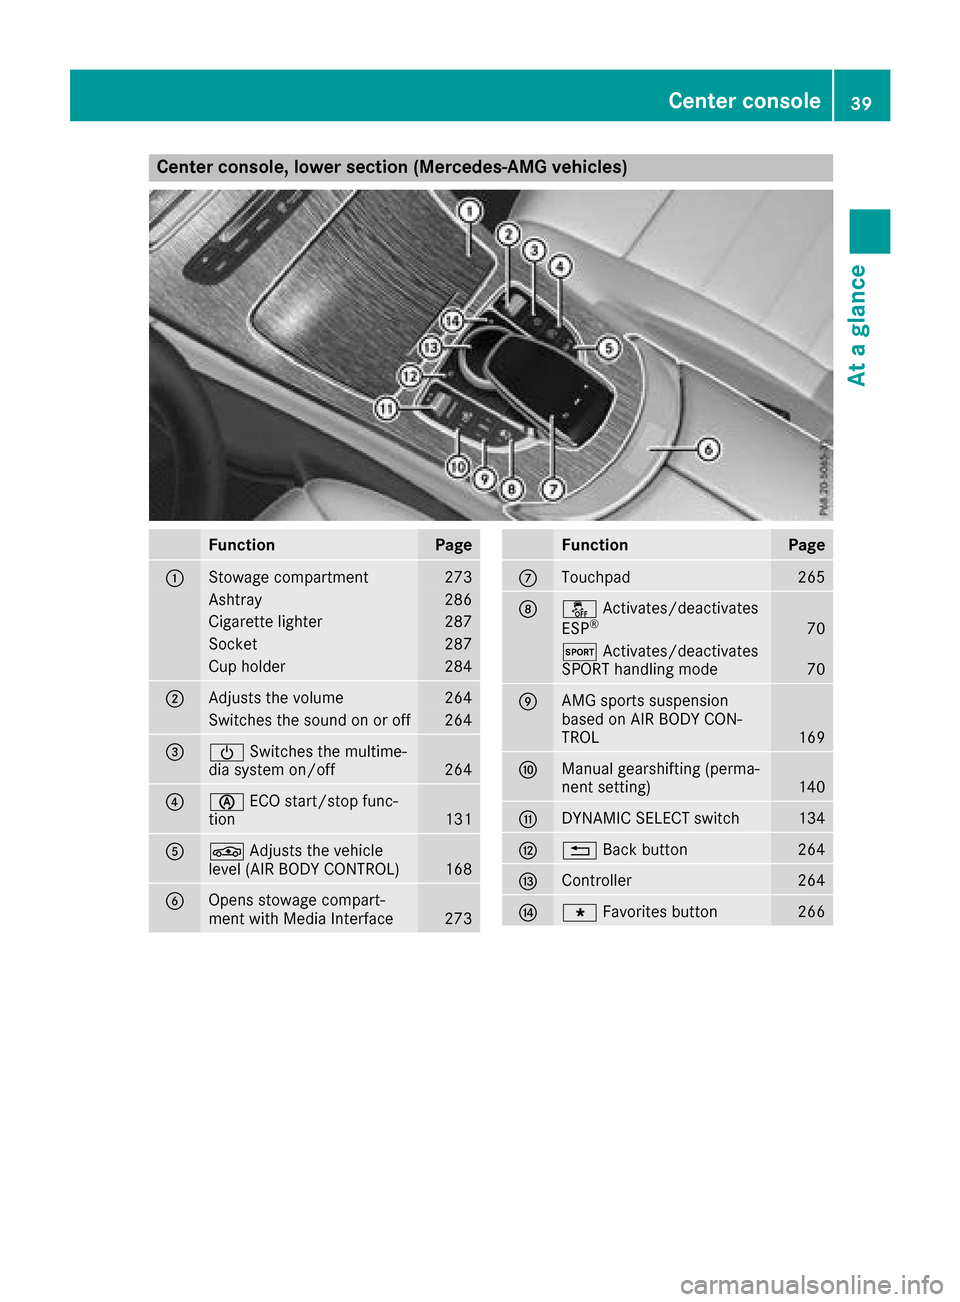
Center console, lower section (Mercedes-AMG vehicles)
FunctionPage
:Stowage compartment273
Ashtray286
Cigarette lighter287
Socket287
Cup holder284
;Adjusts the volume264
Switches the sound on or off264
=ÜSwitches the multime-
dia system on/off264
?è ECO start/stop func-
tion131
AÉ Adjusts the vehicle
level (AIR BODY CONTROL)168
BOpens stowage compart-
ment with Media Interface273
FunctionPage
CTouchpad265
Då Activates/deactivates
ESP®70
M Activates/deactivates
SPORT handling mode70
EAMG sports suspension
based on AIR BODY CON-
TROL
169
FManual gearshifting (perma-
nent setting)140
GDYNAMIC SELECT switch134
H% Back button264
IController264
JgFavorites button266
Center console39
At a glance
Page 107 of 370

piratory organs or clothing or be swallowed.
There is a risk of injury.
If you come into contact with the electrolyte,
observe the following:
RRinse off the electrolyte from your skin
immediately with water.
RImmediately rinse the electrolyte out of
your eyes thoroughly with clean water.
RIf the electrolyte is swallowed, immediately
rinse your mouth out thoroughly. Do not
induce vomiting.
RIf electrolyte comes into contact with your
skin or hair or is swallowed, seek medical
attention immediately.
RImmediately change out of clothing which
has come into contact with electrolyte.
RIf an allergic reaction occurs, seek medical
attention immediately.
The exterior mirror on the driver's side and the
rear-view mirror automatically go into anti-glare
mode if:
Rthe ignition is switched on
Rincident light from headlamps strikes the sen-
sor in the rear-view mirror
The mirrors do not go into anti-glare mode if
reverse gear is engaged or if the interior lighting
is switched on.
Parking position for the exterior mir-
ror on the front-passenger side
Storing the parking position
You can set the front-passenger side exterior
mirror such that you can see the rear wheel on
that side as soon as you engage reverse gear.
You can store this position.
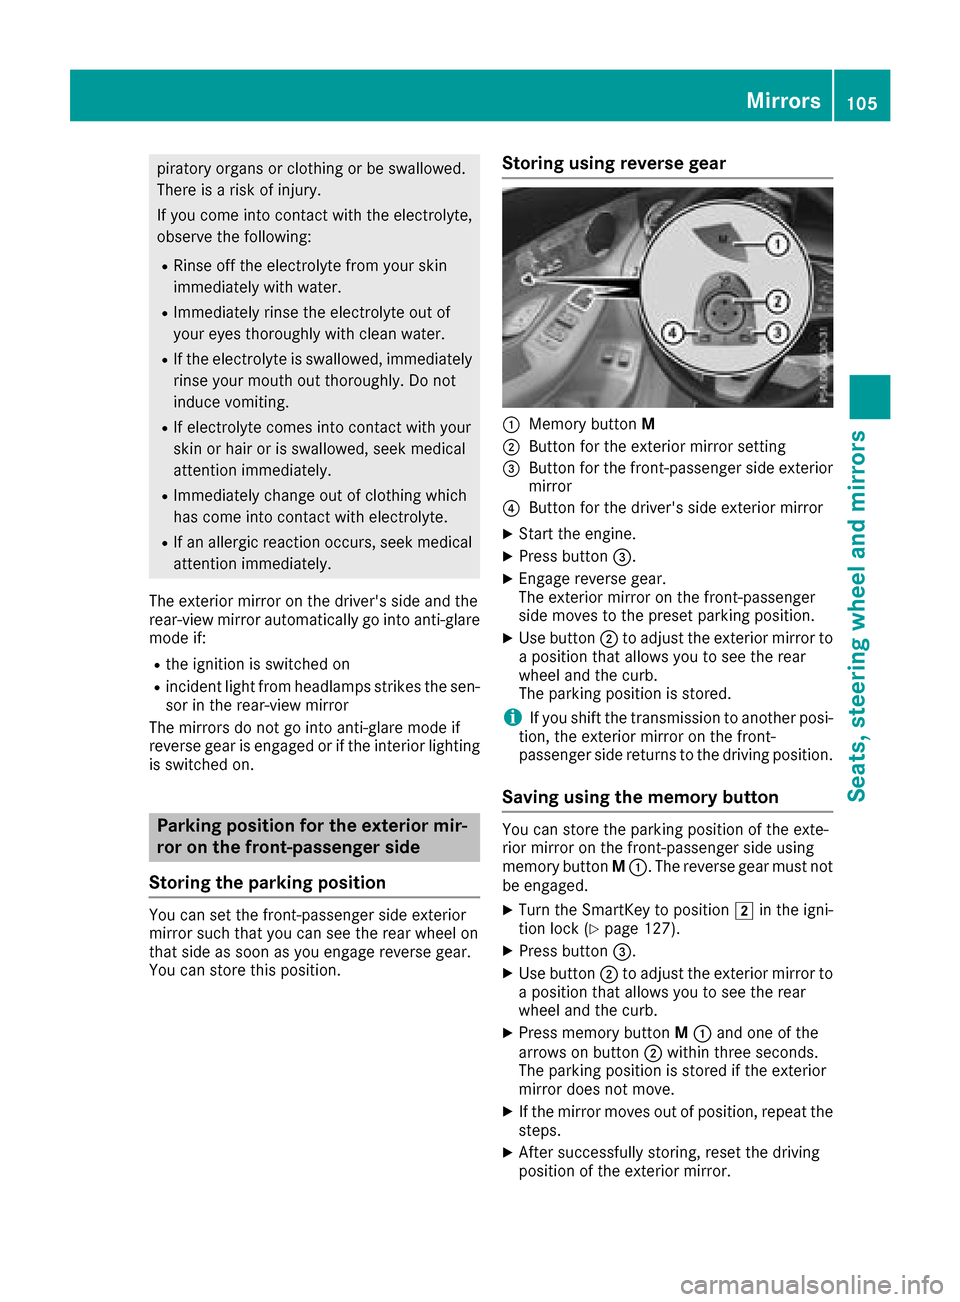
Storing using reverse gear
:Memory button M
;Button for the exterior mirror setting
=Button for the front-passenger side exterior
mirror
?Button for the driver's side exterior mirror
XStart the engine.
XPress button=.
XEngage reverse gear.
The exterior mirror on the front-passenger
side moves to the preset parking position.
XUse button;to adjust the exterior mirror to
a position that allows you to see the rear
wheel and the curb.
The parking position is stored.
iIf you shift the transmission to another posi-
tion, the exterior mirror on the front-
passenger side returns to the driving position.
Saving using the memory button
You can store the parking position of the exte-
rior mirror on the front-passenger side using
memory button M:. The reverse gear must not
be engaged.
XTurn the SmartKey to position 2in the igni-
tion lock (Ypage 127).
XPress button =.
XUse button;to adjust the exterior mirror to
a position that allows you to see the rear
wheel and the curb.
XPress memory button M: and one of the
arrows on button ;within three seconds.
The parking position is stored if the exterior
mirror does not move.
XIf the mirror moves out of position, repeat the
steps.
XAfter successfully storing, reset the driving
position of the exterior mirror.
Mirrors105
Seats, steering wheel and mirrors
Z
Page 120 of 370

Overview of climate control systems
General notes
Observe the settings recommended on the fol-
lowing pages. The windows could otherwise fog
up.
To prevent the windows from fogging up:
Rswitch off climate control only briefly
Rswitch on air-recirculation mode only briefly
Rswitch on the cooling with air dehumidifica-
tion function
Ractivate the "Windshield defrosting" function
briefly, if required
Climate control regulates the temperature and
air humidity in the vehicle interior. The interior
filter cleans the air, thus improving the interior
climate.
The "Cooling with air dehumidification" function
is only available when the engine is running.
Optimum climate control is only achieved with
the side windows and roof closed.
If you start the engine using your smartphone,
the last selected climate control setting is reac-
tivated (
Ypage 129). The integrated filter filters out most particles of
dust and soot and completely filters out pollen.
It also reduces gaseous pollutants and odors. A
clogged filter reduces the amount of air suppliedto the vehicle interior. For this reason, you
should always observe the interval for replacing
the filter, which is specified in the Maintenance
Booklet. As it depends on environmental condi-
tions, e.g. heavy air pollution, the interval may
be shorter than stated in the Maintenance Book-
let.
iVentilate the vehicle for a brief period during
warm weather, e.g. using the convenience
opening feature (
Ypage 90). This will speed
up the cooling process and the desired inte-
rior temperature will be reached more
quickly.
iIt is possible that the blower may be activa-
ted automatically 60 minutes after the Smart-
Key has been removed depending on various
factors, e.g. the outside temperature. The
vehicle is then ventilated for 30 minutes to dry
the automatic climate control.
Control panel for dual-zone automatic climate control
Example: control panel for dual-zone automatic climate control
:
Sets the temperature, left (Ypage 121)
;Sets the air distribution (Ypage 121)
=Sets the airflow (Ypage 121)
Switches off climate control (
Ypage 119)
118Overview of climate control systems
Climate control
Page 121 of 370

?Sets climate control to automatic (Ypage 120)
ADefrosts the windshield (Ypage 121)
BCalls up the climate control menu of the multimedia system (Ypage 268)
CSwitches the rear window defroster on/off (Ypage 122)
DActivates or deactivates synchronization (Ypage 121)
ESwitches air-recirculation mode manually on/off (Ypage 123)
FSwitches cooling with air dehumidification on/off (Ypage 120)
GSets the temperature, right (Ypage 121)
Optimum use of automatic climate
control
Optimum use of the automatic climate
control
The following contains notes and recommenda-
tions on optimum use of dual-zone climate con-
trol.
XActivate climate control using the Ã
rocker switch. The indicator lamp above the
à rocker switch lights up. The "Cooling
with dehumidification" function is activated in
automatic mode.
XSet the temperature to 72 ‡ (22 †).
iOnly use the "Windshield defrosting" func-
tion briefly until the windshield is clear again.
iOnly use air-recirculation mode briefly, e.g.
if there are unpleasant outside odors or when
in a tunnel. The windows could otherwise fog
up, since no fresh air is drawn into the vehicle in air-recirculation mode.
DYNAMIC SELECT switch
You can choose between various drive programs
with the DYNAMIC SELECT switch
(
Ypage 134).
If you have selected drive program E:
Rwhen heating, the electrical heater booster is
deactivated and heat output is reduced as a
result
Rthe rear window defroster running time is
reduced
If you have selected drive program C,S or S+ ,
the current climate settings are maintained.
ECO start/stop function
During automatic engine switch-off, the climate
control system only operates at a reduced capa-
city. If you require the full climate control output,
you can switch off the ECO start/stop function
by pressing the ECO button (
Ypage 132).
Operating the climate control sys-
tems
Activating/deactivating climate con-
trol
General notes
When the climate control is switched off, the air
supply and air circulation are also switched off.
The windows could fog up. Therefore, switch off
climate control only briefly
Switch on climate control primarily using the
à rocker switch (
Ypage 120).
Activating/deactivating
XTurn the SmartKey to position 2in the igni-
tion lock (Ypage 127).
XTo switch on: set the airflow to level 1or
higher using rocker switch H.
XTo switch off:set the airflow to level 0using
rocker switch H.
i3-zone automatic climate control: when cli-
mate control is switched off, "OFF" appears in
the rear-compartment display.
Operating the climate control systems119
Climate control
Page 131 of 370

GWARNING
Flammable materials introduced through
environmental influence or by animals can
ignite if in contact with the exhaust system or
parts of the engine that heat up. There is a risk
of fire.
Carry out regular checks to make sure that
there are no flammable foreign materials in
the engine compartment or in the exhaust
system.
General notes
Vehicles with a gasoline engine: the catalytic
converter is preheated for up to 30 seconds
after a cold start. The sound of the engine may
change during this time.
Automatic transmission
XShift the transmission to position j
(Ypage 136).
The transmission position indicator on the
multifunction display shows j
(
Ypage 137).
iYou can start the engine in transmission
position jand i.
Starting procedure with the SmartKey
To start the engine using the SmartKey instead
of the Start/Stop button, pull the Start/Stop
button out of the ignition lock.
XTo start a diesel engine: turn the SmartKey
to position 2in the ignition lock
(
Ypage 127).
The % preglow indicator lamp in the instru-
ment cluster lights up.
XTurn the SmartKey to position 3in the igni-
tion lock (Ypage 127) and release it as soon
as the engine is running.
iVehicles with a diesel engine: you can
start the engine without preglow if the engine
is warm.
If the engine will not start:
XRemove the SmartKey from the ignition lock.
XReinsert the SmartKey into the ignition lock
after a short waiting period.
XTurn the SmartKey to position 2in the igni-
tion lock (Ypage 127).
The indicator lamps in the instrument cluster
light up (
Ypage 251).
XTurn the SmartKey to position 3in the igni-
tion lock (Ypage 127) and release it as soon
as the engine is running.
Starting procedure with the Start/Stop
button
The Start/Stop button is only available on vehi-
cles with KEYLESS-GO or the KEYLESS-GO start
function.
The Start/Stop button can be used to start the
vehicle manually without inserting the SmartKey
into the ignition lock. The Start/Stop button
must be inserted in the ignition lock and the
SmartKey must be in the vehicle. This mode for starting the engine operates independently of
the ECO start/stop automatic engine start func-
tion.
You can start the engine if a valid SmartKey is in
the vehicle. Switch off the engine and always
take the SmartKey with you when leaving the
vehicle, even if you only leave it for a short time.Pay attention to the important safety notes.
XDepress the brake pedal and keep it
depressed.
XPress the Start/Stop button once
(Ypage 128).
Vehicles with a gasoline engine: the engine
starts.
Vehicles with a diesel engine: preglow is
activated and the engine starts.
Starting procedure via smartphone
Observe the important safety notes on starting
the engine (Ypage 128).
You can also start your engine via your smart-
phone from outside the vehicle. In this case, the
previously selected climate control setting is
activated. In this way you can cool or heat the
interior of the vehicle before starting the jour-
ney.
Only start the engine via your smartphone if it is
safe to start and run the engine where your vehi-
cle is parked.
Observe the legal stipulations in the area where your vehicle is parked. Engine start via smart-
phone may be limited to certain countries or
regions.
Driving129
Driving and parking
Z