2017 MERCEDES-BENZ GLA SUV door lock
[x] Cancel search: door lockPage 96 of 369
the closing area or may enter the closing area
during the closing process. There is a risk of
injury.
Make sure that nobody is in the vicinity of the closing area during the closing process.
Use one of the following options to stop the
closing process:
R press the Fbutton on the key
R pull or press the remote operating switch
on the driver's door
R press the closing or locking button on the
tailgate
R pull the handle on the tailgate
! The tailgate swings upwards and to the rear
when opened. Therefore, make sure that
there is sufficient clearance above and behind
the tailgate.
Two warning tones sound while the tailgate is
opening or closing.
You will find details on the tailgate opening
dimensions in the "Vehicle data" section
(Y page 358).
Opening/closing automatically You can open the tailgate from the driver's seat
when the vehicle is stationary and unlocked.
It is only possible to close the tailgate from the
driver's seat on vehicles with the EASY-PACK
tailgate. X
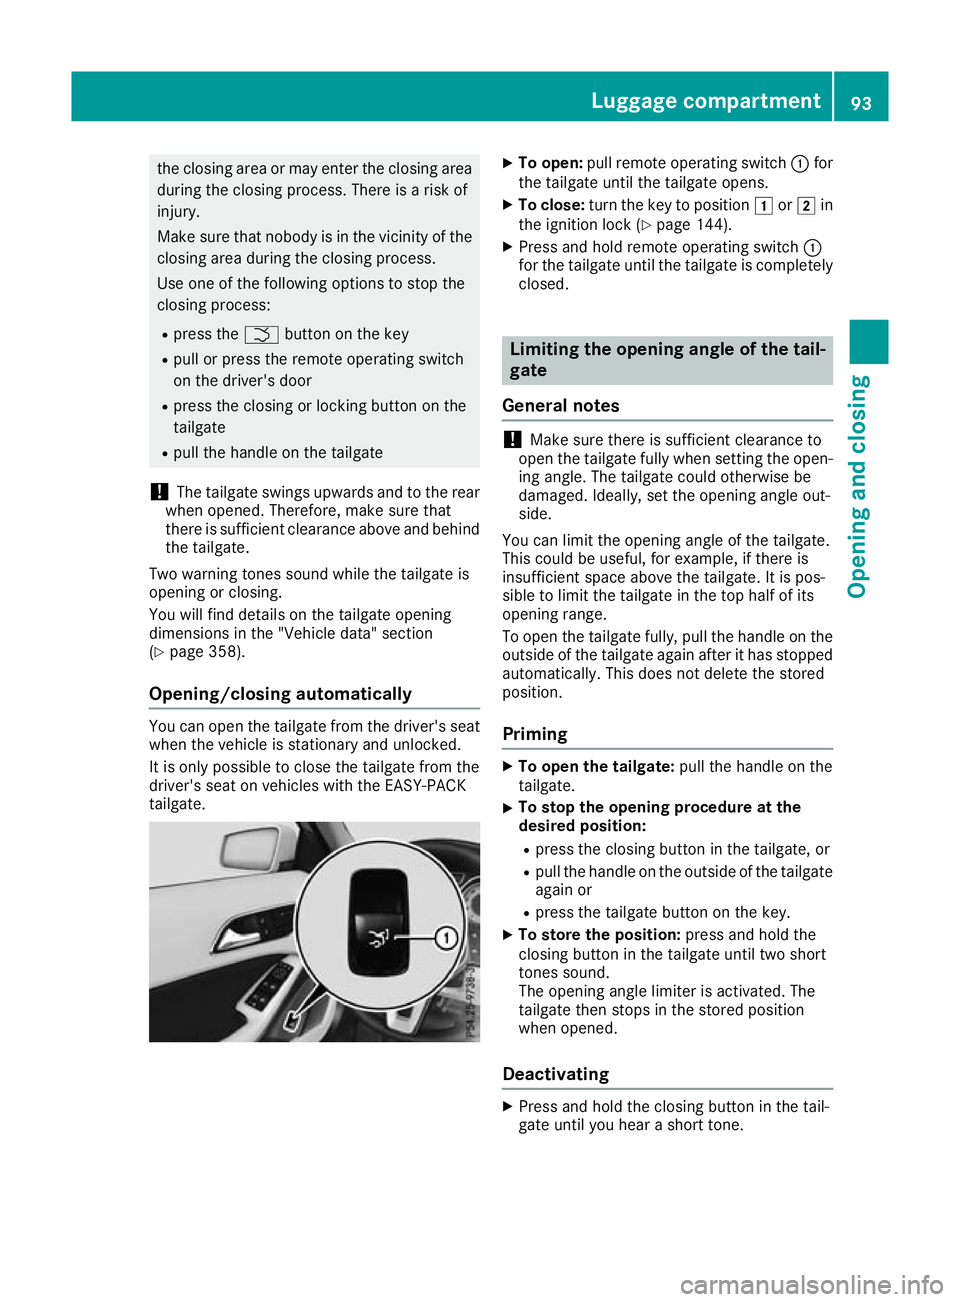
To open: pull remote operating switch :for
the tailgate until the tailgate opens.
X To close: turn the key to position 1or2 in
the ignition lock (Y page 144).
X Press and hold remote operating switch :
for the tailgate until the tailgate is completely
closed. Limiting the opening angle of the tail-
gate
General notes !
Make sure there is sufficient clearance to
open the tailgate fully when setting the open- ing angle. The tailgate could otherwise be
damaged. Ideally, set the opening angle out-
side.
You can limit the opening angle of the tailgate.
This could be useful, for example, if there is
insufficient space above the tailgate. It is pos-
sible to limit the tailgate in the top half of its
opening range.
To open the tailgate fully, pull the handle on the
outside of the tailgate again after it has stopped
automatically. This does not delete the stored
position.
Priming X
To open the tailgate: pull the handle on the
tailgate.
X To stop the opening procedure at the
desired position:
R press the closing button in the tailgate, or
R pull the handle on the outside of the tailgate
again or
R press the tailgate button on the key.
X To store the position: press and hold the
closing button in the tailgate until two short
tones sound.
The opening angle limiter is activated. The
tailgate then stops in the stored position
when opened.
Deactivating X
Press and hold the closing button in the tail-
gate until you hear a short tone. Luggage compartment
93Opening and closing Z
Page 97 of 369
Emergency release
General notes !
The tailgate swings upwards and to the rear
when opened. Therefore, make sure that
there is sufficient clearance above and behind
the tailgate.
You will find details on the tailgate opening
dimensions in the "Vehicle data" section
(Y page 358).
If the tailgate can no longer be unlocked:
R using the key, or
R using the remote operating switch in the door
control panel:
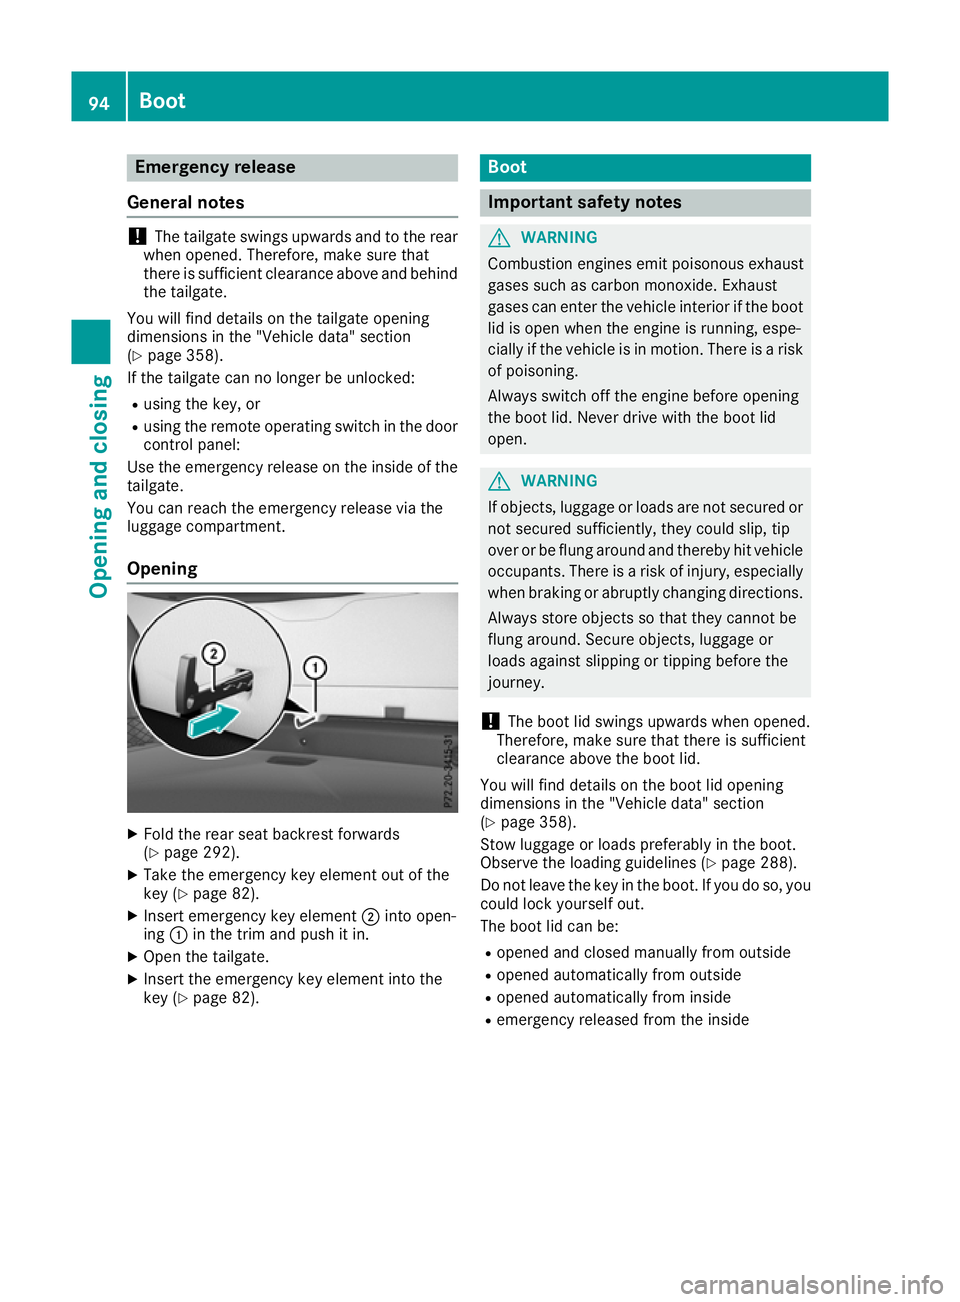
Use the emergency release on the inside of the tailgate.
You can reach the emergency release via the
luggage compartment.
Opening X
Fold the rear seat backrest forwards
(Y page 292).
X Take the emergency key element out of the
key (Y page 82).
X Insert emergency key element ;into open-
ing :in the trim and push it in.
X Open the tailgate.
X Insert the emergency key element into the
key (Y page 82). Boot
Important safety notes
G
WARNING
Combustion engines emit poisonous exhaust
gases such as carbon monoxide. Exhaust
gases can enter the vehicle interior if the boot
lid is open when the engine is running, espe-
cially if the vehicle is in motion. There is a risk of poisoning.
Always switch off the engine before opening
the boot lid. Never drive with the boot lid
open. G
WARNING
If objects, luggage or loads are not secured or not secured sufficiently, they could slip, tip
over or be flung around and thereby hit vehicle
occupants. There is a risk of injury, especially when braking or abruptly changing directions.
Always store objects so that they cannot be
flung around. Secure objects, luggage or
loads against slipping or tipping before the
journey.
! The boot lid swings upwards when opened.
Therefore, make sure that there is sufficient
clearance above the boot lid.
You will find details on the boot lid opening
dimensions in the "Vehicle data" section
(Y page 358).
Stow luggage or loads preferably in the boot.
Observe the loading guidelines (Y page 288).
Do not leave the key in the boot. If you do so, you
could lock yourself out.
The boot lid can be:
R opened and closed manually from outside
R opened automatically from outside
R opened automatically from inside
R emergency released from the inside 94
BootOpening and closing
Page 100 of 369
Opening
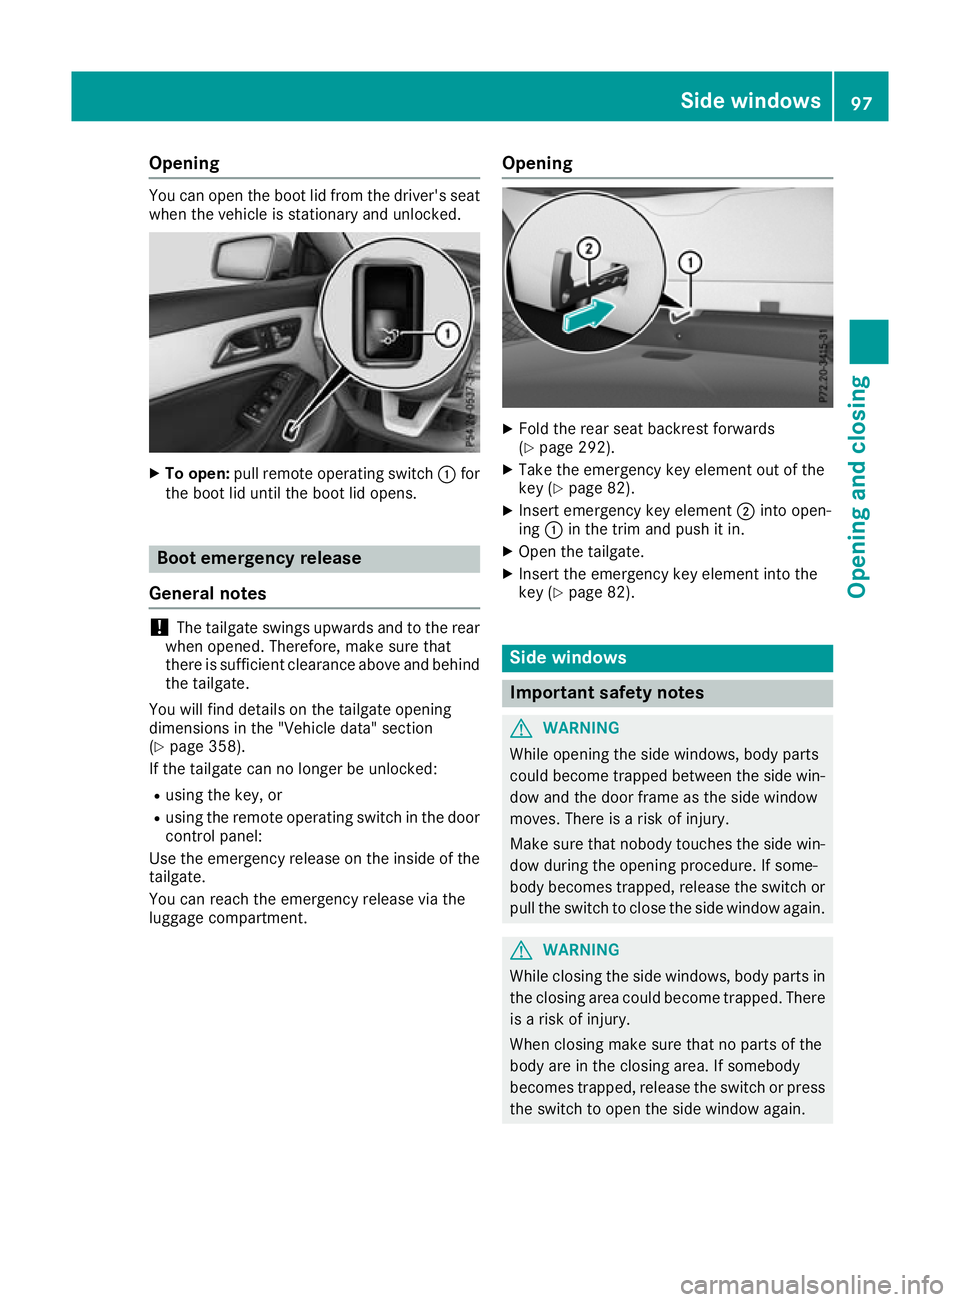
You can open the boot lid from the driver's seat
when the vehicle is stationary and unlocked. X
To open: pull remote operating switch :for
the boot lid until the boot lid opens. Boot emergency release
General notes !
The tailgate swings upwards and to the rear
when opened. Therefore, make sure that
there is sufficient clearance above and behind
the tailgate.
You will find details on the tailgate opening
dimensions in the "Vehicle data" section
(Y page 358).
If the tailgate can no longer be unlocked:
R using the key, or
R using the remote operating switch in the door
control panel:
Use the emergency release on the inside of the tailgate.
You can reach the emergency release via the
luggage compartment. Opening X
Fold the rear seat backrest forwards
(Y page 292).
X Take the emergency key element out of the
key (Y page 82).
X Insert emergency key element ;into open-
ing :in the trim and push it in.
X Open the tailgate.
X Insert the emergency key element into the
key (Y page 82). Side windows
Important safety notes
G
WARNING
While opening the side windows, body parts
could become trapped between the side win- dow and the door frame as the side window
moves. There is a risk of injury.
Make sure that nobody touches the side win-
dow during the opening procedure. If some-
body becomes trapped, release the switch or pull the switch to close the side window again. G
WARNING
While closing the side windows, body parts in the closing area could become trapped. There is a risk of injury.
When closing make sure that no parts of the
body are in the closing area. If somebody
becomes trapped, release the switch or press
the switch to open the side window again. Side windows
97Opening and closing Z
Page 101 of 369
G
WARNING
If children operate the side windows they
could become trapped, particularly if they are left unsupervised. There is a risk of injury.
Activate the override feature for the rear side
windows. When leaving the vehicle, always
take the key with you and lock the vehicle.
Never leave children unattended in the vehi-
cle. Side window reversing feature
The side windows are equipped with an auto-
matic reversing feature. If a solid object blocks
or restricts a side window from travelling
upwards during the automatic closing process,
the side window opens again automatically. Dur-
ing the manual closing process, the side window
only opens again automatically after the corre-
sponding switch is released. The automatic
reversing feature is only an aid and is no substi- tute for your attention when closing a side win-
dow. G
WARNING
The reversing function does not react:
R to soft, light and thin objects, e.g. small fin-
gers
R while resetting
This means that the reversing feature cannot
prevent someone being trapped in these sit-
uations. There is a risk of injury.
When closing, make sure that no parts of the
body are in the closing area. If someone
becomes trapped, press the switch to open
the side window again. Opening and closing the side win-
dows
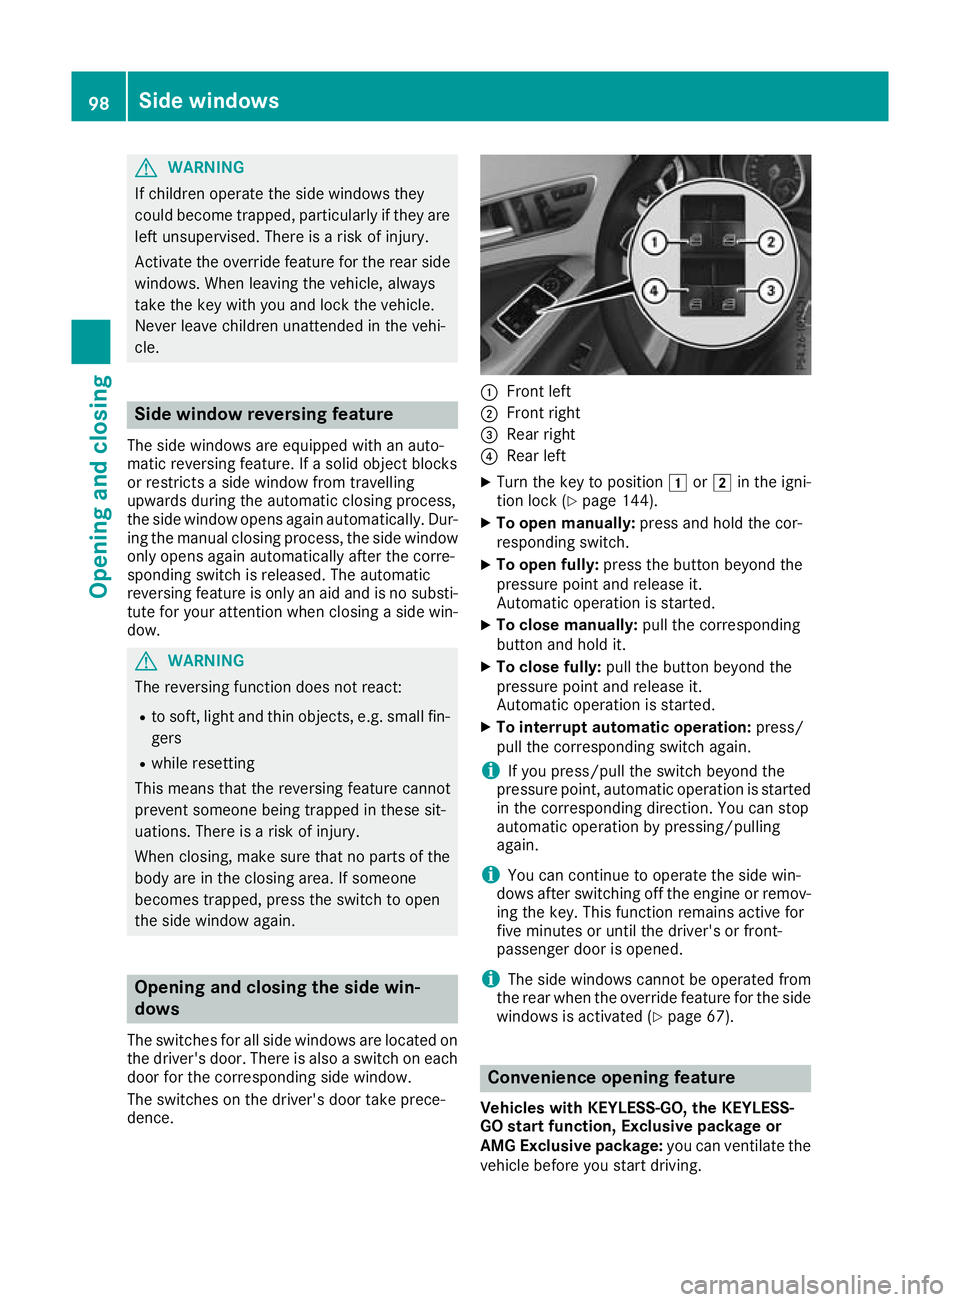
The switches for all side windows are located on
the driver's door. There is also a switch on each door for the corresponding side window.
The switches on the driver's door take prece-
dence. :
Front left
; Front right
= Rear right
? Rear left
X Turn the key to position 1or2 in the igni-
tion lock (Y page 144).
X To open manually: press and hold the cor-
responding switch.
X To open fully: press the button beyond the
pressure point and release it.
Automatic operation is started.
X To close manually: pull the corresponding
button and hold it.
X To close fully: pull the button beyond the
pressure point and release it.
Automatic operation is started.
X To interrupt automatic operation: press/
pull the corresponding switch again.
i If you press/pull the switch beyond the
pressure point, automatic operation is started
in the corresponding direction. You can stop
automatic operation by pressing/pulling
again.
i You can continue to operate the side win-
dows after switching off the engine or remov-
ing the key. This function remains active for
five minutes or until the driver's or front-
passenger door is opened.
i The side windows cannot be operated from
the rear when the override feature for the side
windows is activated (Y page 67). Convenience opening feature
Vehicles with KEYLESS-GO, the KEYLESS-
GO start function, Exclusive package or
AMG Exclusive package: you can ventilate the
vehicle before you start driving. 98
Side windowsOpening and closing
Page 102 of 369
The key can also be used to carry out the fol-
lowing functions simultaneously:
R unlock the vehicle
R open the side windows
R open the panorama sliding sunroof and the
roller sunblind
The convenience opening feature can only be
operated using the key.
The "Convenience opening" feature is also avail- able when the vehicle is unlocked.
X Vehicles with Exclusive package or AMG
Exclusive package but without KEYLESS-
GO and the KEYLESS-GO start function: for
the following operations, point the tip of the
key at the door handle on the driver's door.
The key must be close to the driver's door
handle.
i Vehicles with KEYLESS-GO or the KEY-
LESS-GO start function: the key must be in
close proximity to the vehicle.
X Press and hold the %button until the side
windows and the panorama sunroof are in the
desired position.
If the roller sunblind of the panorama sliding
sunroof is closed, the roller sunblind is
opened first.
X Press and hold the %button once more
until the panorama sliding sunroof reaches
the desired position.
X To interrupt convenience opening: release
the % button. Convenience closing feature
Important safety notes G
WARNING
When the convenience closing feature is oper- ating, parts of the body could become trapped
in the closing area of the side window and the
sliding sunroof. There is a risk of injury.
Observe the complete closing procedure
when the convenience closing feature is oper-
ating. When closing make sure that no parts of the body are in the closing area. Vehicles with KEYLESS-GO, the KEYLESS-
GO start function, Exclusive package or
AMG Exclusive package: at the same time you
can:
R lock the vehicle
R close the side windows
R close the panorama sliding sunroof
On vehicles with a panorama sliding sunroof,
you can then close the roller sunblind.
i Notes on the automatic reversing function
for:
R the side windows (Y page 98)
R the panorama sliding sunroof
(Y page 102)
R the roller sunblind (Y page 103)
Using the key X
Vehicles with Exclusive package or AMG
Exclusive package but without KEYLESS-
GO and the KEYLESS-GO start function:
for
the following operations, point the tip of the
key at the door handle on the driver's door.
The key must be close to the driver's door
handle.
i Vehicles with KEYLESS-GO or the KEY-
LESS-GO start function: the key must be in
close proximity to the vehicle.
X Press and hold the &button until the side
windows and the panorama sliding sunroof
are fully closed.
X Make sure that all the side windows and the
panorama sliding sunroof are closed.
On vehicles with a panorama sliding sunroof: X Press and hold the &button again until the
roller sunblind of the panorama sliding sun-
roof closes.
X To interrupt convenience closing: release
the & button.
Using KEYLESS-GO The driver's door and the door at which the han-
dle is used must both be closed. The key must beoutside the vehicle. The gap between the key
and the corresponding door handle should not
be greater than 1 m. Side windows
99Opening and closing Z
Page 103 of 369
X
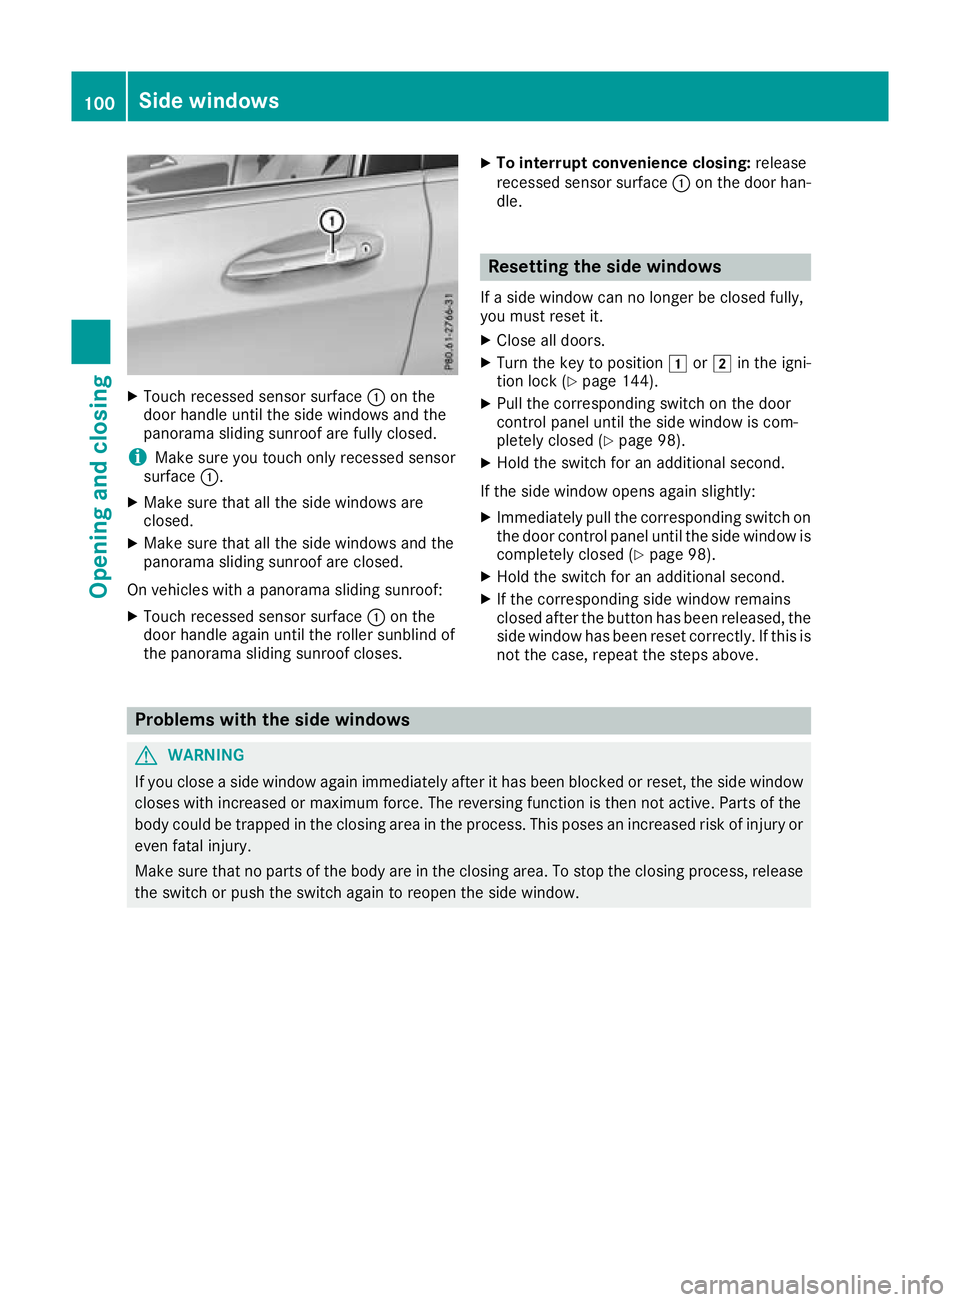
Touch recessed sensor surface :on the
door handle until the side windows and the
panorama sliding sunroof are fully closed.
i Make sure you touch only recessed sensor
surface :.
X Make sure that all the side windows are
closed.
X Make sure that all the side windows and the
panorama sliding sunroof are closed.
On vehicles with a panorama sliding sunroof: X Touch recessed sensor surface :on the
door handle again until the roller sunblind of
the panorama sliding sunroof closes. X
To interrupt convenience closing: release
recessed sensor surface :on the door han-
dle. Resetting the side windows
If a side window can no longer be closed fully,
you must reset it.
X Close all doors.
X Turn the key to position 1or2 in the igni-
tion lock (Y page 144).
X Pull the corresponding switch on the door
control panel until the side window is com-
pletely closed (Y page 98).
X Hold the switch for an additional second.
If the side window opens again slightly:
X Immediately pull the corresponding switch on
the door control panel until the side window is
completely closed (Y page 98).
X Hold the switch for an additional second.
X If the corresponding side window remains
closed after the button has been released, the
side window has been reset correctly. If this is
not the case, repeat the steps above. Problems with the side windows
G
WARNING
If you close a side window again immediately after it has been blocked or reset, the side window
closes with increased or maximum force. The reversing function is then not active. Parts of the
body could be trapped in the closing area in the process. This poses an increased risk of injury or even fatal injury.
Make sure that no parts of the body are in the closing area. To stop the closing process, releasethe switch or push the switch again to reopen the side window. 100
Side windowsOpening and closing
Page 105 of 369
Reversing feature of the sliding sun-
roof
In the following section, the term "sliding sun-
roof" refers to the panorama sliding sunroof.
The sliding sunroof is equipped with an auto-
matic reversing function. If a solid object blocks
or restricts the sliding sunroof during the closing process, the sliding sunroof opens again auto-
matically. The automatic reversing feature is,
however, only an aid and is no substitute for your attention when closing the sliding roof. G
WARNING
The reversing feature does not react:
R to soft, light and thin objects, e.g. small fin-
gers
R over the last 4 mm of the closing movement
R during resetting
R when closing the sliding sunroof again man-
ually immediately after automatic reversing
This means that the reversing feature cannot
prevent someone being trapped in these sit-
uations. There is a risk of injury.
When closing make sure that no body parts
are in the closing area.
If someone is trapped:
R release the switch immediately or
R press the switch in any direction during the
automatic closing process
The closing process is stopped. Operating the panorama sliding sun-
roof
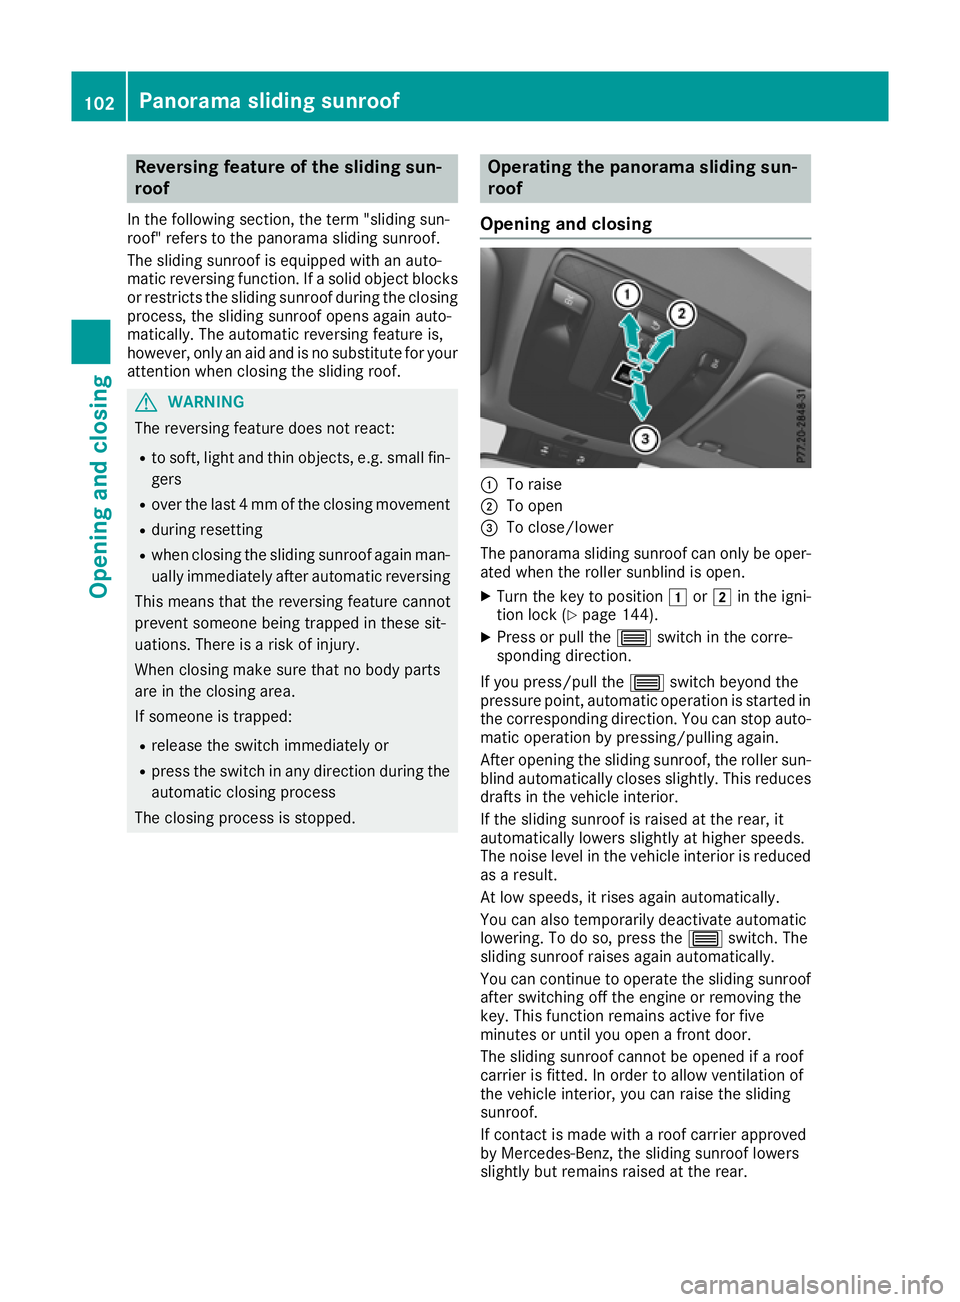
Opening and closing :
To raise
; To open
= To close/lower
The panorama sliding sunroof can only be oper-
ated when the roller sunblind is open.
X Turn the key to position 1or2 in the igni-
tion lock (Y page 144).
X Press or pull the 3switch in the corre-
sponding direction.
If you press/pull the 3switch beyond the
pressure point, automatic operation is started in
the corresponding direction. You can stop auto-
matic operation by pressing/pulling again.
After opening the sliding sunroof, the roller sun- blind automatically closes slightly. This reduces drafts in the vehicle interior.
If the sliding sunroof is raised at the rear, it
automatically lowers slightly at higher speeds.
The noise level in the vehicle interior is reduced
as a result.
At low speeds, it rises again automatically.
You can also temporarily deactivate automatic
lowering. To do so, press the 3switch. The
sliding sunroof raises again automatically.
You can continue to operate the sliding sunroof
after switching off the engine or removing the
key. This function remains active for five
minutes or until you open a front door.
The sliding sunroof cannot be opened if a roof
carrier is fitted. In order to allow ventilation of
the vehicle interior, you can raise the sliding
sunroof.
If contact is made with a roof carrier approved
by Mercedes-Benz, the sliding sunroof lowers
slightly but remains raised at the rear. 102
Panorama sliding sunroofOpening and closing
Page 116 of 369
mirror using button
=as long as the indicator
lamp is lit.
X Press button =up, down, or to the right or
left until you have adjusted the exterior mirror
to the correct position. You should have a
good overview of traffic conditions.
The convex exterior mirrors provide a larger field of vision.
After the engine has been started, the exterior
mirrors are automatically heated at low outside
temperatures. Heating takes a maximum of ten
minutes.
i The exterior mirrors can also be heated
manually by switching on the rear window
heating.
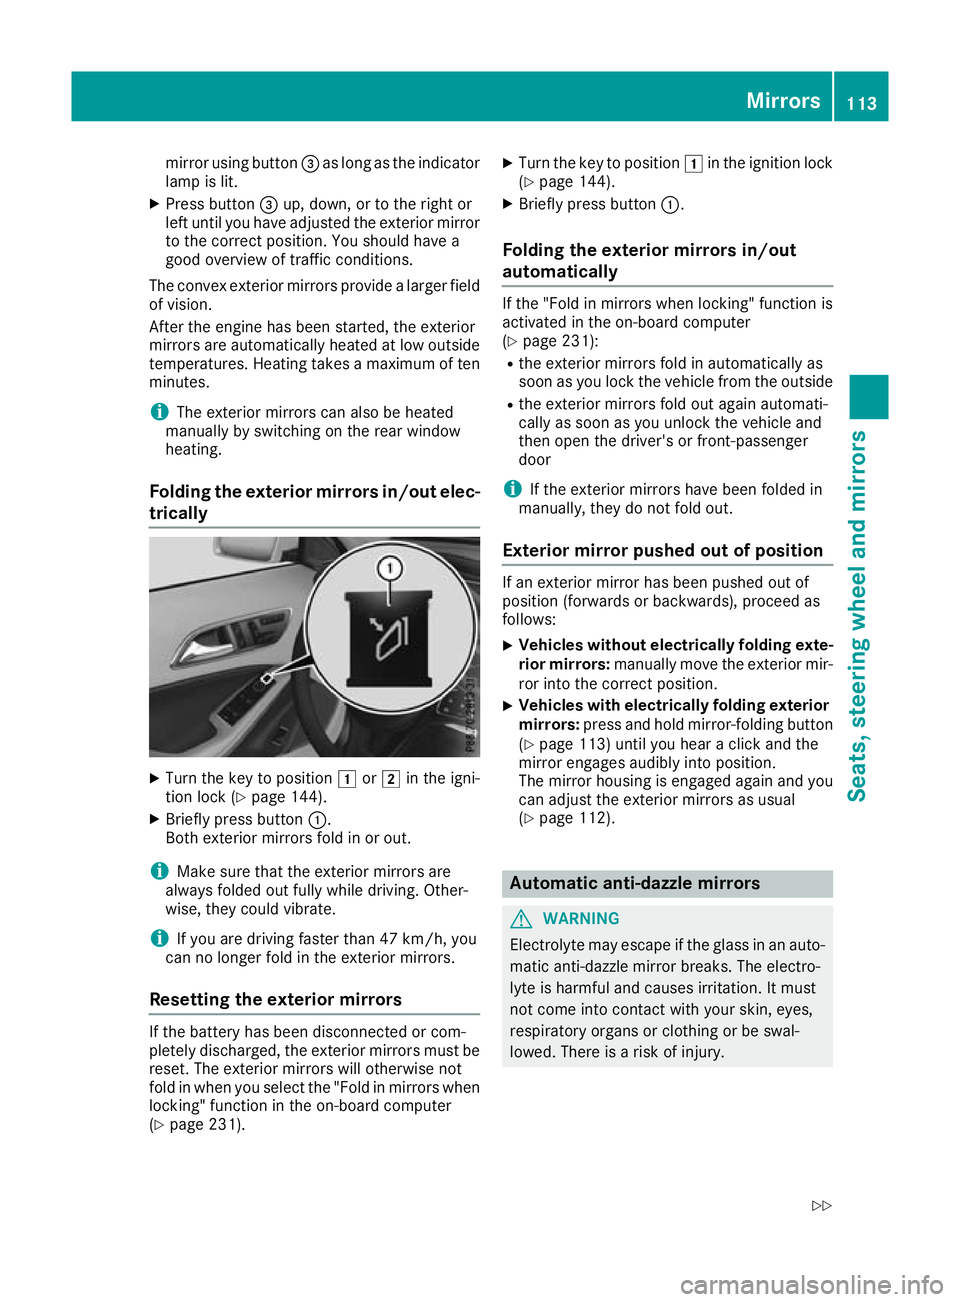
Folding the exterior mirrors in/out elec- trically X
Turn the key to position 1or2 in the igni-
tion lock (Y page 144).
X Briefly press button :.
Both exterior mirrors fold in or out.
i Make sure that the exterior mirrors are
always folded out fully while driving. Other-
wise, they could vibrate.
i If you are driving faster than 47 km/h, you
can no longer fold in the exterior mirrors.
Resetting the exterior mirrors If the battery has been disconnected or com-
pletely discharged, the exterior mirrors must be
reset. The exterior mirrors will otherwise not
fold in when you select the "Fold in mirrors when locking" function in the on-board computer
(Y page 231). X
Turn the key to position 1in the ignition lock
(Y page 144).
X Briefly press button :.
Folding the exterior mirrors in/out
automatically If the "Fold in mirrors when locking" function is
activated in the on-board computer
(Y page 231):
R the exterior mirrors fold in automatically as
soon as you lock the vehicle from the outside
R the exterior mirrors fold out again automati-
cally as soon as you unlock the vehicle and
then open the driver's or front-passenger
door
i If the exterior mirrors have been folded in
manually, they do not fold out.
Exterior mirror pushed out of position If an exterior mirror has been pushed out of
position (forwards or backwards), proceed as
follows:
X Vehicles without electrically folding exte-
rior mirrors: manually move the exterior mir-
ror into the correct position.
X Vehicles with electrically folding exterior
mirrors: press and hold mirror-folding button
(Y page 113) until you hear a click and the
mirror engages audibly into position.
The mirror housing is engaged again and you
can adjust the exterior mirrors as usual
(Y page 112). Automatic anti-dazzle mirrors
G
WARNING
Electrolyte may escape if the glass in an auto- matic anti-dazzle mirror breaks. The electro-
lyte is harmful and causes irritation. It must
not come into contact with your skin, eyes,
respiratory organs or clothing or be swal-
lowed. There is a risk of injury. Mirrors
113Seats, steering wheel and mirrors
Z