2017 MERCEDES-BENZ E43AMG fuel cap
[x] Cancel search: fuel capPage 11 of 482

1Speedom eter →
199
2 ÷ ESP
®
3
#! Turn signal light →
113
4 Ð Steering assis tance malfunction
5 Multifunction displ ay →
202
6 ! ABS malfunction
7 ; CheckEngine
8 Tach ome ter →
199
9 % This indicator lamp has no function
A Elect ric park ing brake applied (red)
F USA only
! Canada only
B Brakes (red)
$ USA only
J Canada only
C # Electrical malfunction
D
· Distance warning
E ? Coolant too hot/cold
F Coolant temp erature gauge →
199
G J Brakes (yell ow)
H ! Electric pa rking brake (yellow)
I 6 Restra int sy stem →
31
J ü Seat belt is not fastened
K T Parking lights →
112
L Fuel le vel indicator
8 Fuelreser vewith fuel filler cap location
indicator
M K High beam →
113
N L Low beam →
112
O R Rear fog light →
113
P h Tire pressure monitoring sy stem
Q å ESP
®OFF
Ataglance – Warning and indicator lamps 9
Page 13 of 482

1Speedom eter →
199
2 ü Seat belt is not fastened
3 #! Turn signal light →
113
4 Multifunction display →
202
5 Tach ome ter →
199
6 å ESP
®OFF
÷ ESP
®
7
K High beam →
113
L Low beam →
112
T Parking lights →
112
8 ? Coolant too hot/cold
9 Coolant temp erature gauge →
199
A · Distance warning
B Ð Steering assis tance malfunction
C # Electrical malfunction
D Brakes (red)
$ USA only
J Canada only
E Fuel le vel indicator
F 8 Fuelreser vewith fuel filler cap location
indicator
G R Rear fog light →
113
H 6 Restra int sy stem →
31
I % This indicator lamp has no function
J ; Check Engine
K J Brakes (yellow)
L Elect ric park ing brake applied (red)
F USA only
! Canada only
M h Tire pressure monitoring sy stem
N ! ABS malfunction
O ! Electric park ing brake (yellow)
Ataglance – Warning and indicator lamps 11
Page 143 of 482
%Glide mode can also be activated if you ha ve
selected the "Eco" setting forth e drive
(engine management) when in drive program
I.
Glide mode is deactivated again if one of the
conditions is no longer met.
Ve hicles with Driving Assistance Package,
Di stance Pilot DISTRONIC or Active Brake
Assi st:Glide mode is also deacti vated depend‐
ing on the traf fic situation and theve hicle then
switches toove rrun mode. This fur ther reduces
fuel consum ption.
Glide mode can also be pr evented bythefo llow‐
ing parame ters:
RGradient
RTe mp erature
RHeight
RSpeed
RObs tacle de tection
ROpe rating condition of the engine
Re fueling
Refueling theve hicle
&
WARNING Risk offire and explosion
caused byfuel
Fu els are highly inflammable.
#You must avoidfire , open flames, creat‐
ing spar ksand smoking.
#Before refueling, switch off the engine
and, if ins talled in your vehicle, thest a‐
tionary heater.
& WARNING Risk of injury from fuel
Fu els are poisonous and harmful to your
health
#Do not swallow fuel or let it come into
contact with skin, eyes or clo thing.
#Do not inhale fuel vapors.
#Ke ep children away from fuel.
If yo u or other people come into contact with
fuel, obser vethefo llowing:
#Immediately rinse fuel off your skin with
soap and water.
#If fuel comes into contact with your
ey es, immediately rinse them thor‐
oughly with clean water.Seek medical
attention immediately.
#If yo u sw allow fuel, seek medical atten‐
tion immediatel y.Do not induce vomit‐
ing.
#Change immediately out of clo thing that
has come into con tact wi thfuel.
&
WARNING Risk ofexplosion or fire due
to electros tatic charge
Electros tatic charge can cause spa rks and
th ereby ignite fuel vapors.
#Alw aysto uch the me talve hicle body
before opening the fuel filler cap or
to uching the pump nozzle.
This dischar ges any electros tatic charge that
may ha vebuilt up.
Driving and parking 14
1
Page 145 of 482
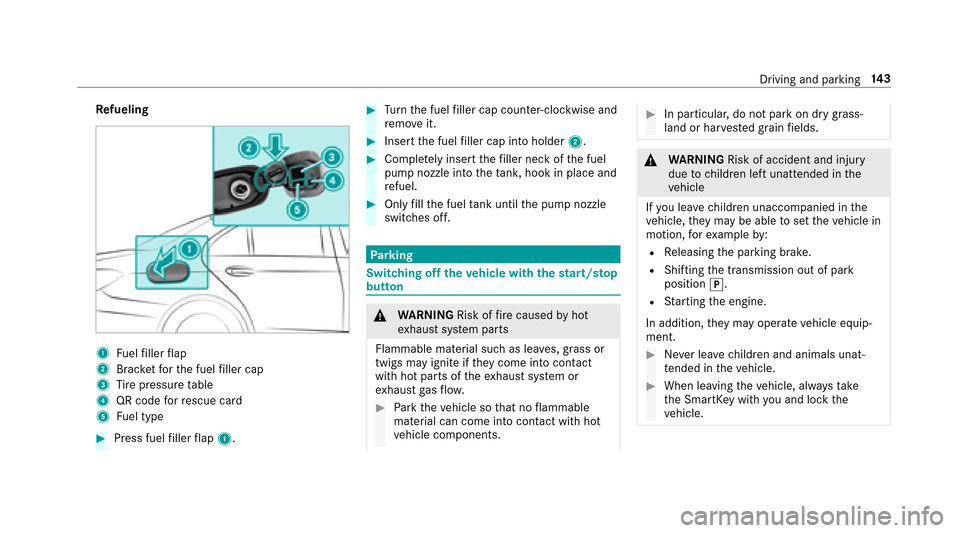
Refueling
1Fuelfiller flap
2Brac ketfo rth e fuel filler cap
3Ti re pressure table
4QR code forre scue card
5Fu el type
#Press fuel filler flap 1.
#Turn the fuel filler cap coun ter-clockwise and
re mo veit.
#Insert the fuel filler cap into holder 2.
#Completely inse rtthefiller neck of the fuel
pump nozzle into theta nk, hook in place and
re fuel.
#Only fill th e fuel tank until the pump nozzle
switches off.
Pa rking
Switching off theve hicle with thest art/s top
button
& WARNING Risk offire caused byhot
ex haust sy stem parts
Flammable material such as lea ves, grass or
twigs may ignite if they come into contact
wi th hot parts of theex haust sy stem or
ex haust gasflow .
#Park theve hicle so that no flammable
material can come into con tact wi thhot
ve hicle components.
#In particular, do not park on dry grass‐
land or har vested grain fields.
&
WARNING Risk of accident and injury
due tochildren left unatte nded inthe
ve hicle
If yo u lea vechildren unaccompanied in the
ve hicle, they may be able toset theve hicle in
motion, forex ample by:
RRe leasing the parking brake.
RShifting the transmission out of park
position j.
RStarting the engine.
In addition, they may operate vehicle equip‐
ment.
#Ne ver lea vechildren and animals unat‐
te nded in theve hicle.
#When leaving theve hicle, alw aysta ke
th e SmartK eywith you and lock the
ve hicle.
Driving and parking 14
3
Page 202 of 482
Vehicles with Traf fic Sign Assist and Wide‐
scre en Cockpit: detected instructions and traf‐
fi c signs appear in the speedome ter
(
→page 191).
* NO
TEEngine damage duetoexc essively
high engine speeds
The engine will be damaged if youdriv ewit h
th e engine in theov errevving range.
#Do not drive wi th the engine in theove r‐
re vving range.
The fuel supply is inter rupted toprotect the
engine when there d band in tach ome ter3
(o ve rrev ving range) is reached.
During no rmal operating conditions, coolant
te mp erature display 4may rise to248 °F
(120 °C).
& WARNING Danger of burn s when open‐
ing the hood
If yo u open the hood when the engine has
ove rheated or during a fire inthe engine
compartment, you could come into contact
wit h hot gases or other escaping operating
fl uids.
#Before opening the hood, allow the
engine tocool down.
#Intheeve nt of a fire inthe engine com‐
partment, keep the hood closed and
call thefire service.
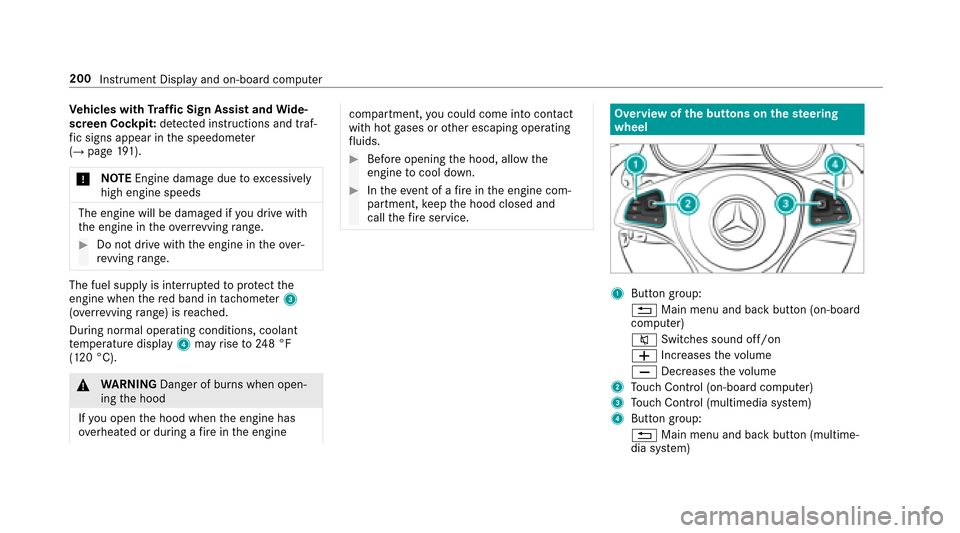
Overview of the butto ns onthest eering
wheel
1But ton group:
% Main menu and ba ckbutton (on-board
computer)
8 Switches sound off/on
W Increases thevo lume
X Decreases thevo lume
2Touch Control (on-board co mputer)
3Touch Control (multimedia sy stem)
4Button group:
% Main menu and back button (multime‐
dia sy stem)
200
Instrument Display and on-board computer
Page 307 of 482
&WARNING Risk of accident and injury
when opening and closing the engine
hood
When opening or closing the engine hood, it
may suddenly drop into the end position.
There is a risk of injury for an yone in the
engine hood's range of mo vement.
#Only open or close the engine hood
when there are no persons in the
engine hood's range of mo vement.
&
WARNING Danger of burn s when open‐
ing the hood
If yo u open the hood when the engine has
ove rheated or during a fire inthe engine
compartment, you could come into contact
wit h hot gases or other escaping operating
fl uids.
#Before opening the hood, allow the
engine tocool down.
#Intheeve nt of a fire inthe engine com‐
partment, keep the hood closed and
call thefire service.
&
WARNING Risk of injury duetomoving
parts
Cer tain components in the engine compart‐
ment may continue tomo veor suddenly
mo veagain even af terth e ignition has been
switched off, e.g. the cooler fan.
Make sure of thefo llowing before per form ing
ta sks in the engine compartmen t:
#Switchthe ignition off.
#Ne verto uch the danger zone sur round‐
ing moving co mponent parts, e.g. the
ro tation area of thefa n.
#Re mo vejewe lry and watches.
#Keep items of clo thing and hair away
from moving parts.
& WARNING Risk of injury fromtouching
co mp onent parts under voltage
The ignition sy stem and the fuel injection
sy stem workunder high voltage. If youto uch
co mp onent parts which are under voltage,
yo u could receive an electric shoc k.
#Neverto uch co mponent parts of the
ignition sy stem or the fuel injection sys‐
te m when the ignition is switched on.
&
WARNING Risk of burn s from hot com‐
ponent parts in the engine compartment
Cer tain component parts in the engine com‐
partment can be very hot, e.g. the engine,
th e cooler and parts of theex haust sy stem.
#Let the engine cool down and only
to uch the component parts described
as follo ws .
Maintenance and care 305
Page 326 of 482
call 1-800-FOR-MERCedes (inthe USA) or
1-800-387-0 100 (in Canada).
#Cor rect the tire pressure if it is still at least
13 0 kPa (1.3 bar/19 psi). See theTire and
Loading Info rmation placard on the driver's
side B‑pillar or the tire pressure table in the
fuel filler flap forva lues.
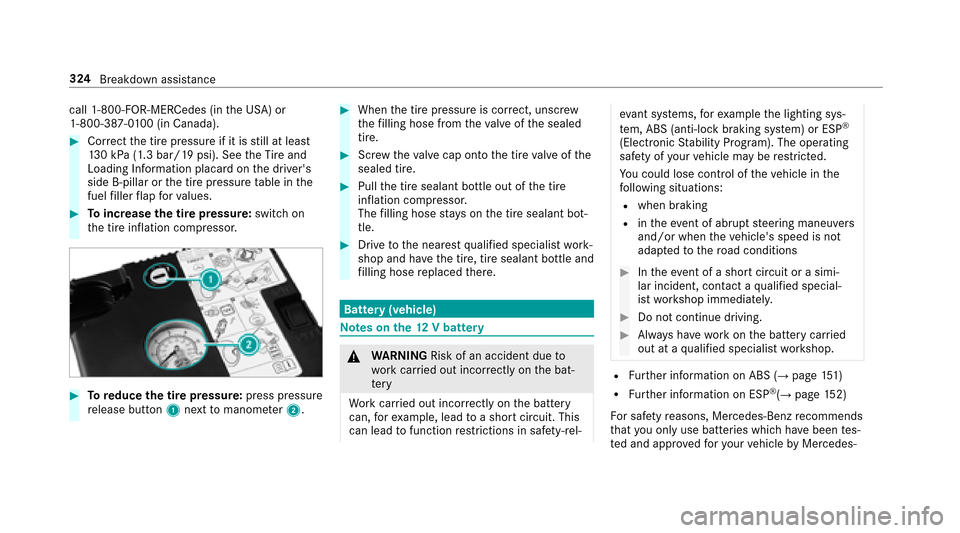
#To increase the tire pressure: switchon
th e tire inflation compressor.
#To reduce the tire pressure: press pressure
re lease button 1next tomanome ter2.
#When the tire pressure is cor rect, unscr ew
th efilling hose from theva lve of the sealed
tire.
#Scr ew theva lve cap onto the tire valve of the
sealed tire.
#Pull the tire sealant bottle out of the tire
inflation compressor.
The filling hose stay s on the tire sealant bot‐
tle.
#Drive tothe nearest qualified specialist work‐
shop and ha vethe tire, tire sealant bottle and
fi lling hose replaced there.
Bat tery (vehicle)
Note s onthe12 V battery
&
WARNING Risk of an accident due to
wo rkcar ried out incor rectly on the bat‐
te ry
Wo rkcar ried out incor rectly on the battery
can, forex ample, lead toa short circuit. This
can lead tofunction restrictions in saf ety-re l‐
eva nt sy stems, forex ample the lighting sys‐
te m, ABS (anti-lock braking system) or ESP®
(Elect ronic Stability Prog ram). The operating
saf etyof your vehicle may be restricted.
Yo u could lose cont rol of theve hicle in the
fo llowing situations:
Rwhen braking
Rin theeve nt of ab rupt steering maneuvers
and/or when theve hicle's speed is not
adap tedto thero ad conditions
#In theeve nt of a short circuit or a simi‐
lar incident, contact a qualified special‐
ist workshop immediately.
#Do not continue driving.
#Alw ays ha vewo rkon the battery car ried
out at a qualified specialist workshop.
RFu rther information on ABS (→page 151)
RFu rther information on ESP®(→page 152)
Fo r saf etyre asons, Mercedes-Benz recommends
th at you only use batte ries which ha vebeen tes‐
te d and appr oved foryo ur vehicle byMercedes-
324
Breakdown assis tance
Page 343 of 482
&WARNING Risk of accident caused by
re peated drop in tire pressure
If th e tire pressure drops repeatedl y,the
wheel, valve or tire may be damaged.
Insuf ficient tire pressure can cause the tires
to bur st.
#Inspect the tire for signs of fore ign
objects.
#Check whe ther the wheel or valve has a
leak.
#If yo u are unab leto rectify the damage,
conta ct aqualified specialist workshop.
Yo u can find information on tire pressure forth e
ve hicle's factor y-ins talled tires on thefo llowing
labels:
RTi re and Loading Info rmation placard on the
B‑pillar of your vehicle (→page 345).
RTire pressure table on the inside of the fuel
fi ller flap (→page 341).
Observ eth e maximum tire pressure
(
→page 352). Use a suitable pressure
gauge tocheck the tire
pressure. The outer appearance of a tire does
not permit any reliable conclusion about the tire
pressure.
Ve hicles with a tire pressure monitoring sys‐
te m: You can also check the tire pressure using
th e on-board computer.
Only cor rect tire pressure when the tires are
cold. Conditions for cold tires:
RThe vehicle has been par ked with the tires
out of direct sunlight for at least th ree hours.
RThe vehicle has tr aveled less than 1 mile
(1.6 km).
A rise in the tire temp erature of 18°F (10 °C)
increases the tire pressure byappr ox.10 kPa
(0.1 bar/1.5 psi). Take this into account when
ch ecking the tire pressure of warm tires.
The tire pressure re commendedfor increased
load/speed in the tire pressure table can af fect
th eride comfort.
&
WARNING Risk of accident from unsuita‐
ble accessori es onthe tire valves
If yo u mount unsuitable accessories onto tire
va lves, the tire valves may be overloaded and
malfunction, which can cause tire pressure
loss. Tire pressure monitoring sy stems for
re trofitting will cause the tire valve toremain
open. This can also result in tire pressure
loss.
#Only scr ewstandard valve caps or valve
caps specifically appr ovedby
Mercedes-Benz foryo ur vehicle onto
th e tire valve.
Ti re pressure table
The tire pressure table is on the inside of the
fuel filler flap.
% The data shown in the images is example
data.
Wheels and tires 34
1