2017 MERCEDES-BENZ E43AMG Pressure
[x] Cancel search: PressurePage 313 of 482
RThe blowerfo rth eve ntilation/heating is
switched off.
RThe windshield wiper switch is in position 0.
RIn car washes with a towing mechanism: neu‐
tral iis engaged.
RThe SmartK eyis at a dis tance of at least
10 ft(3 m) away from theve hicle, otherwise
th e trunk lid could open unintentionall y.
% Remo vethewa x from the windshield and
wiper rubber af terth e car wash; this will pre‐
ve nt smearing and reduce wiper noise.
Information on using a po werwa sher
&
WARNING Risk of accident when using
high-pressure cleaning equipment wi th
ro und-s pray nozzles
The wate r jet from a round-s pray nozzle (dirt
grinder) may cause damage totires and sus‐
pension components that is not visible.
Components damaged in this wa yma yfa il
unexpec tedly.
#Do not use high-pressure cleaning
equipment wi thround-spr aynozzles to
clean your vehicle.
#Damaged tires or suspension compo‐
nents must be replaced immediatel y.
Toavo id damage to yourvehicle, obser vethefo l‐
lowing when using a po werwa sher:
RKeep the SmartK eyat least 10ft(3 m) away
from theve hicle. Otherwise the trunk lid
could open unintentionall y.
RMaintain a distance of at least 11.8 in
(30 cm) totheve hicle.
RVe hicles with deco rative foil: parts of your
ve hicle are co vered with a decorative foil.
Maintain a dis tance of at least 27.6 in
(70 cm) between thefo il-c ove red parts of the
ve hicle and the nozzle of the high pressure
cleaner. Mo vethe po werwa sher nozzle
around whilst cleaning.
RObser vethe information on the cor rect dis‐
ta nce in the equipment manufacturer's oper‐
ating instructions.
RDo not point the nozzle of the po werwa sher
directly at sensitive parts such as tires, slits,
electrical component parts, batteries, light
sources and ventilation slot s.
Washing the vehicle byhand
Obser velegal requ irements, forex ample in
some countries washing byhand is only allo wed
at specially equipped washing ba ys.
#Use a mild cleaning agent such as car sham‐
poo.
#Wa shtheve hicle with luk ewarmwate r and a
soft car sponge. While doing so, do not
ex pose theve hicle todirect sunlight.
#Hose down theve hicle carefully with water
and dry it with a leather clo th. Make sure
th at thewate r jet is not pointed directly into
th e air inlet grille.
Maintenance and care 31
1
Page 316 of 482

Information on cleaning and careAvoiding vehicle damage
Wi per blades
Fold out the wiper blades and clean them using a damp clo th.D o not clean the wiper blades too of ten.
Ex terior lighting
Cleanthe lens with a wet sponge and mild de terg ent, e.g. car
shampoo. Only use cleaning agents or cleaning clo
thsth at are suitable
fo r plast ic lenses.
AIRPANEL Ifth eve hicle is very dusty or there are salt deposits in the
AIRPA NEL mechanics, the adjustment range of the shutters in
th era diator trim may be restricted.
RSwitch on the ignition, and the shutters open automati‐
cally af ter app roxima tely 12 0 seconds.
RClean the bearing points of the shutters with a high-pres‐
sure water jet. When using a high-pre
ssurewater jet, maintain a minimum
dis tance of 11.8 in (30 cm).
Senso rs
Cleanthe sensors in the front and rear bumpers and in the
ra diator grille with a soft clo thand car shampoo. When using a high-pressure
water jet, maintain a minimum
dis tance of 11.8 in (30 cm).
Re ar view camera
and 360° Camera
ROpen the camera co ver with the multimedia sys‐
te m(→pa ge 184) .
RUse clear water and a soft clo thtoclean the camera lens. Do not use a high-pressure
water jet.
Ta ilpipes
Clean with cleaning agent sre commend
edbyMercedes-Benz,
particularly in the winter and af terwa shing theve hicle. Use acid-free cleaning agents.
31
4
Maintenance and care
Page 321 of 482
#Changetheflat tire immediately with
th e emer gency spa rewheel or spare
wheel. Alternativel y,consult a qualified
specialist workshop.
Ti re s with run-flat characteristics:
#Observ eth e information and warning
no tes on MOExtended tires (run-flat
tires).
In theeve nt of a flat tire, thefo llowing options
are available depending on your vehicle's equip‐
ment:
RVe hicles with MOExtended tires: it is pos‐
sible tocontinue the journey for a short
period of time. Make sure you observ eth e
no tes on MOExtended tires (run-flat tires)
(
→page 319).
RVe hicles with a TIREFIT kit: you can repair
th e tire so that it is possible tocontinue the
journ ey for a short period of time. Todo this,
use the TIREFIT kit (
→page 320).
RVe hicles with a Mercedes-Benz emer‐
ge ncy call sy stem: intheeve nt of a break‐ down, consult
the Mercedes-Benz emer gency
call sy stem Cus tomer Assis tance Center.
RChange the wheel (→page 362).
MOExtended tires (run-flat tires)
Wi th MOExtended tires (run-flat tires), you can
continue todrive your vehicle even if there is a
to ta l loss of pressure in one or more tires. How‐
eve r,th e tire af fected must not show any clear ly
visible dama ge.
Yo u can recognize MOExtended tires bythe
MOExtended marking which appears on the side
wa ll of the tire.
Ve hicles with a tire pressure monitoring sys‐
te m: MOExtended tires may only be used in con‐
junction wi than activated tire pressure monitor‐
ing sy stem.
If a pressure loss warning message appears in
th e multifunction display:
RCheck the tire for dama ge
RIf driving on, obser vethefo llowing no tes
&
WARNING Risk of accident when driving
in li mp-home mode
When driving in li mp-home mode, the han‐
dling characteristics are impaired. e.g. when
cornering, when accelerating stronglyand
when braking.
#Do not exceed the maximum permissi‐
ble speed.
#Av oid any abrupt steering and driving
maneuvers as well as driving over
obs tacles (curbs, pot holes, cross-coun‐
try). This applies, in part icular,toa loa‐
ded vehicle.
#Stop driving in limp-home mode if you
notice:
Rbanging noise
Rve hicle vibration
Rsmoke which smells like rubber
Rcontinuous ESP®inter vention
Rcrac ksin tire side walls
#After driving in limp-home mode, ha ve
th erims checkedby aqu alified special‐
Breakdown assis tance 31
9
Page 322 of 482
istworkshop with rega rd totheir fur ther
use.
#The defective tire must be replaced in
eve rycase.
Driving distance possible in li mp-home mode
af te r the pressure loss warning
Load condition Driving distance pos‐
sible in limp-homemode
Pa rtially laden 50 miles (80 km)
Fu lly laden 19miles (30 km)
RThe driving dis tance possible in li mp-home
mode may vary depending on the driving
st yle.
RMaximum permissible speed 50 mph
(80 km/h).
If a tire has gone flat and cannot be replaced
with an MOEx tended tire, a standard tire may be
used as a temp orary measure.
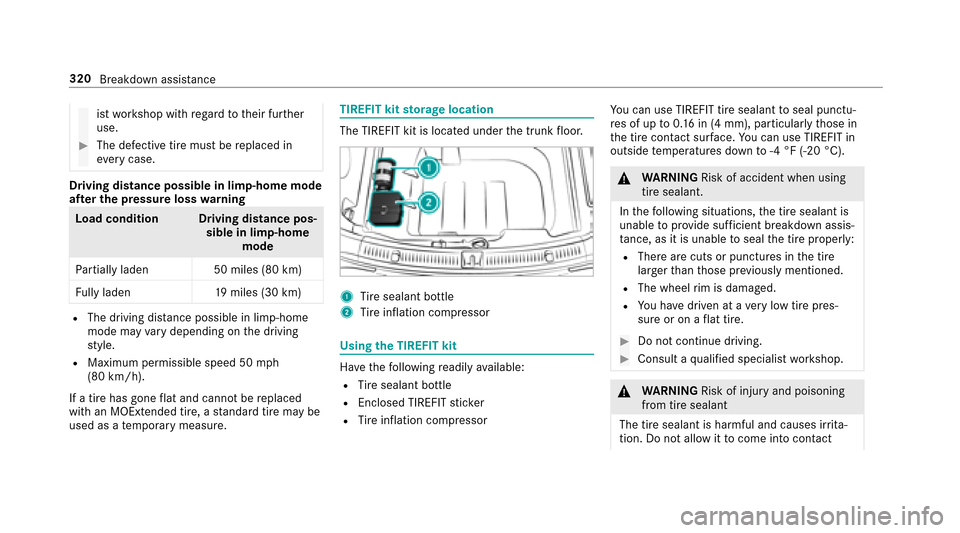
TIREFIT kit storage location
The TIREFIT kit is located under the trunk floor.
1Ti re sealant bottle
2Tire inflation compressor
Using the TIREFIT kit
Ha ve thefo llowing readily available:
RTire sealant bottle
REnclosed TIREFIT sticke r
RTire inflation compressor Yo
u can use TIREFIT tire sealant toseal punctu‐
re s of up to0.16 in (4 mm), particular lythose in
th e tire conta ct surface.You can use TIREFIT in
outside temp eratures down to-4 °F (-20 °C).
&
WARNING Risk of accident when using
tire sealant.
In thefo llowing situations, the tire sealant is
unable toprov ide suf ficient breakdown assis‐
ta nce, as it is unable toseal the tire properly:
RThere are cuts or punctures in the tire
larger than those pr eviously mentioned.
RThe wheel rim is dama ged.
RYo u ha vedriven at a very low tire pres‐
sure or on a flat tire.
#Do not continue driving.
#Consult a qualified specialist workshop.
&
WARNING Risk of injury and poisoning
from tire sealant
The tire sealant is harmful and causes ir rita ‐
tion. Do not allow it tocome into contact
320
Breakdown assis tance
Page 324 of 482
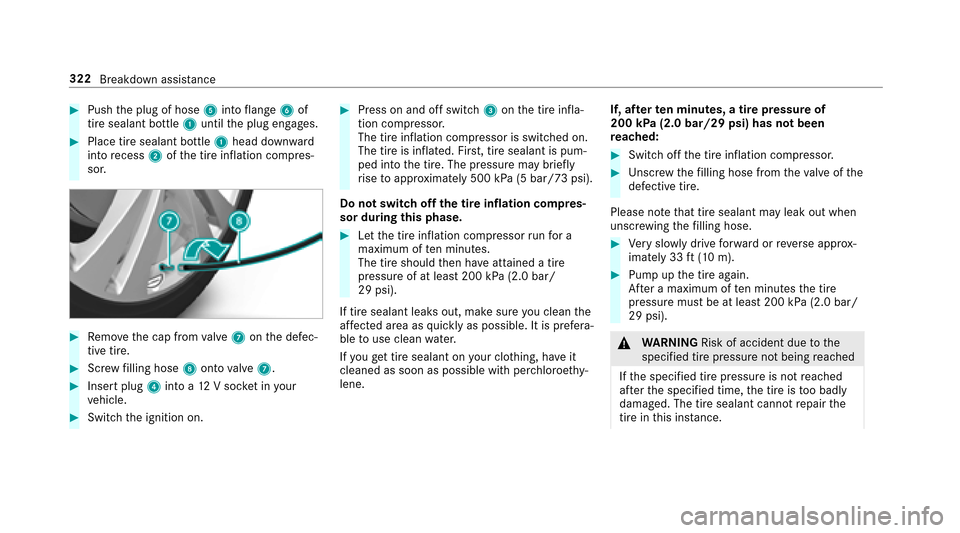
#Pushthe plug of hose 5into flange 6of
tire sealant bottle 1until the plug engages.
#Place tire sealant bottle 1head down ward
into recess 2ofthe tire inflation compres‐
sor.
#Re mo vethe cap from valve 7 onthe defec‐
tive tire.
#Scr ew filling hose 8onto valve 7.
#Insert plug 4into a 12V soc ket in your
ve hicle.
#Switch the ignition on.
#Press on and off switch 3onthe tire infla‐
tion compressor.
The tire inflation compressor is switched on.
The tire is inflated. Fir st, tire sealant is pum‐
ped into the tire. The pressure may brief ly
ri se toappr oximately 500 kPa (5 bar/73 psi).
Do not switch off the tire inflation compres‐
sor du ring this phase.
#Let the tire inflation compressor runfo r a
maximum of ten minu tes.
The tire should then ha veattained a tire
pressure of at least 200 kPa (2.0 bar/
29 psi).
If tire sealant leaks out, make sure you clean the
af fected area as quickly as possible. It is prefera‐
ble touse clean water.
If yo uge t tire sealant on your clo thing, ha veit
cleaned as soon as possible with per chloroe thy‐
lene. If, af
terte n minutes, a tire pressure of
200 kPa (2.0 bar/29 psi) has not been
re ached:
#Switch off the tire inflation compressor.
#Un scr ew thefilling hose from theva lve of the
defective tire.
Please no tethat tire sealant may leak out when
unscr ewing thefilling hose.
#Ve ry slowly drive forw ard or reve rse appr ox‐
imately 33 ft(10 m).
#Pump up the tire again.
Af ter a maximum of ten minu testh e tire
pressure must be at least 200 kPa (2.0 bar/
29 psi).
& WARNING Risk of accident due tothe
specified tire pressure not being reached
If th e specified tire pressure is not reached
af te rth e specified time, the tire is too badly
damaged. The tire sealant cannot repair the
tire in this ins tance.
322
Breakdown assist ance
Page 325 of 482
Damaged tires and a tire pressurethat is too
low can significantly impair braking and han‐
dling characteristics.
#Do not continue driving.
#Consult a qualified specialist workshop.
If, af terte n minutes, a tire pressure of
200 kPa (2.0 bar/29 psi) has been reached:
&
WARNING Risk of accident from driving
wi th sealed tires
A tire temp orarily sealed with tire sealant
impairs the handling characteristics and is
not suitable for higher speeds.
#Ad apt your dr ivingst yle according lyand
drive carefull y.
#Do notexceed the specified maximum
speed with a tire that has been repaired
using tire sealant.
#Obser vethe maximum permissible speed for
a tire sealed with tire sealant 50 mph
(80 km/h).
#Af fix th e upper section of the TIREFIT sticke r
to the instrument clus ter where it will be eas‐
ily seen bythe driver.
* NO
TEStaining caused byleaking tire
sealant
Af ter use, excess tire sealant may leak out
from thefilling hose.
#Therefore, place thefilling hose in the
plastic bag that con tained the TIREFIT
kit.
+ENVIRONMEN TALNO TEEnvironmental
pollution caused byenvironmen tally ir re‐
sponsible disposal
Ti re sealant contains polluta nts.
#Have the tire sealant bottle disposed of
professionall y,e.g. at a Mercedes-Benz
service center.
#Switch off the tire inflation compressor.
#Un scr ew thefilling hose from theva lve of the
defective tire.
#St ow th e tire sealant bottle, the tire inflation
compressor and thewa rning triangle.
#Pull away immediatel y.
#Stop af ter driving for app roxima tely ten
minutes and check the tire pressure using
th e tire inflation compressor.
The tire pressure must now be at least
13 0 kPa (1.3 bar/19 psi).
&
WARNING Risk of accident due tothe
specified tire pressure not being reached
If th e specified tire pressure is not reached
af te r a brief drive, the tire is too badly dam‐
aged. The tire sealant cannot repair the tire
in this ins tance.
Dama ged tires and tire pressure that is too
low can significantly impair the braking prop‐
erties and the handling characteristics.
#Do not continue driving.
#Consult a qualified specialist workshop.
In cases such as the one mentioned abo ve, con‐
ta ct an au thorized Mercedes-Benz Center. Or
Breakdown assis tance 323
Page 326 of 482
call 1-800-FOR-MERCedes (inthe USA) or
1-800-387-0 100 (in Canada).
#Cor rect the tire pressure if it is still at least
13 0 kPa (1.3 bar/19 psi). See theTire and
Loading Info rmation placard on the driver's
side B‑pillar or the tire pressure table in the
fuel filler flap forva lues.
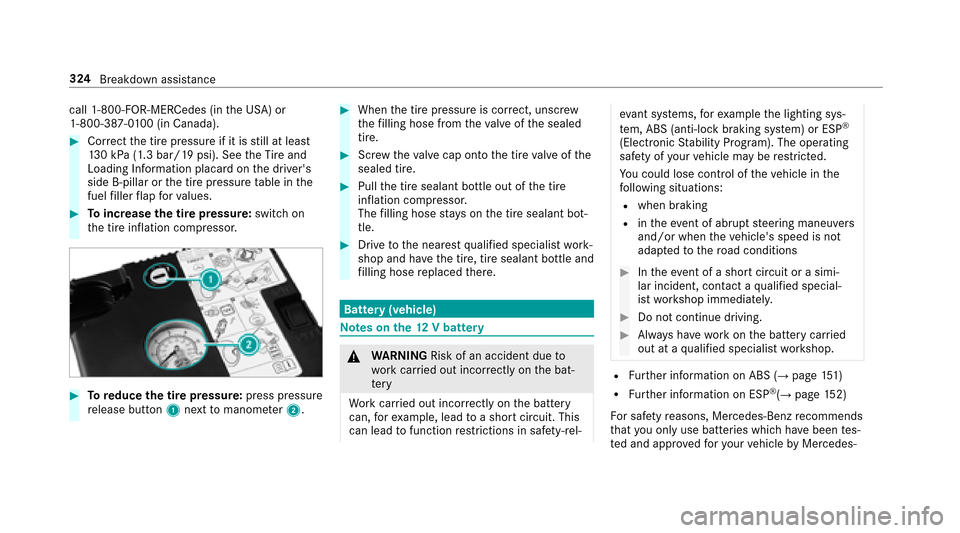
#To increase the tire pressure: switchon
th e tire inflation compressor.
#To reduce the tire pressure: press pressure
re lease button 1next tomanome ter2.
#When the tire pressure is cor rect, unscr ew
th efilling hose from theva lve of the sealed
tire.
#Scr ew theva lve cap onto the tire valve of the
sealed tire.
#Pull the tire sealant bottle out of the tire
inflation compressor.
The filling hose stay s on the tire sealant bot‐
tle.
#Drive tothe nearest qualified specialist work‐
shop and ha vethe tire, tire sealant bottle and
fi lling hose replaced there.
Bat tery (vehicle)
Note s onthe12 V battery
&
WARNING Risk of an accident due to
wo rkcar ried out incor rectly on the bat‐
te ry
Wo rkcar ried out incor rectly on the battery
can, forex ample, lead toa short circuit. This
can lead tofunction restrictions in saf ety-re l‐
eva nt sy stems, forex ample the lighting sys‐
te m, ABS (anti-lock braking system) or ESP®
(Elect ronic Stability Prog ram). The operating
saf etyof your vehicle may be restricted.
Yo u could lose cont rol of theve hicle in the
fo llowing situations:
Rwhen braking
Rin theeve nt of ab rupt steering maneuvers
and/or when theve hicle's speed is not
adap tedto thero ad conditions
#In theeve nt of a short circuit or a simi‐
lar incident, contact a qualified special‐
ist workshop immediately.
#Do not continue driving.
#Alw ays ha vewo rkon the battery car ried
out at a qualified specialist workshop.
RFu rther information on ABS (→page 151)
RFu rther information on ESP®(→page 152)
Fo r saf etyre asons, Mercedes-Benz recommends
th at you only use batte ries which ha vebeen tes‐
te d and appr oved foryo ur vehicle byMercedes-
324
Breakdown assis tance
Page 340 of 482
Noise or unusual handling characteristics
While driving, pay attention tovibrations, noises
and unusual handling characteristics, e.g. pulling
to one side. This may indicate that the wheels or
tires are damaged. If you suspect that a tire is
defective, reduce your speed immediatel y.Stop
th eve hicle as soon as possible tocheck the
wheels and tires for dama ge. Hidden tire dam‐
age could also be causing the unusual handling
ch aracteristics. If youfind no signs of damage,
ha ve the tires and wheels checked at a qualified
specialist workshop.
Re gular checking of wheels and tires
&
WARNING Risk of accident from dam‐
aged tires
Dama ged tires can cause tire pressure loss.
As a result, you could lose cont rol of your
ve hicle.
#Check the tires regularly for signs of
dama geand replace any damaged tires
immediatel y.
&
WARNING Risk of aquaplaning due to
insuf ficient tire tread
Insuff icient tire tread will result in reduced
tire grip. The tire tread is no longer able to
dissipate water.
This means that in heavy rain or slush the
ri sk of hydroplaning is increased, in particu‐
lar if vehicle speed is not adap tedto suit the
conditions.
If th e tire pressure is too high or too lo w,
tires may exhibit dif fere nt le vels of wear at
dif fere nt locations on the tire conta ct sur‐
fa ce.
#Thus, you should regularly check the
tread de pth and the condition of the tire
conta ct surf ace across the entire width
of all tires.
Minimum tread dep thfor:
RSummer tires: âin (3 mm)
RM+S tires: ãin (4 mm)
#For saf etyre asons, replace the tires
before the legally prescribed limit for
th e minimum tread dep thisreached.
Car ryout thefo llowing checks on all wheels reg‐
ularly, at least once a month or as requ ired, e.g.
prior toa long journey or driving off- road:
RCheck the tire pressure (→page 339).
RVisual check of wheels and tires for dama ge.
RCheck theva lve caps.
The valves must be pr otected against mois‐
ture and dirt bytheva lve caps appr oved
especially foryo ur vehicle byMercedes-Benz.
RVisual check of the tread dep thand the tire
conta ct surf ace across the entire width.
The minimum tread dep thfor summer tires is
â in (3 mm) and for winter tires ãin
(4 mm).
338 Wheels and tires