2017 MERCEDES-BENZ E-CLASS SALOON phone
[x] Cancel search: phonePage 129 of 497

#
Place the mobile phone as close tothe
centre of mat 1as possible wi th the display
fa cing up wards.
When thech arging symbol is shown in the
multimedia sy stem, the mobile phone is
being charge d.
Malfunctions during thech arging process are
shown in the multimedia sy stem displa y.
% The mat can be remo vedfo r cleaning, e.g.
using clean, luk ewarmwate r. Fi
tting or removing the floormats &
WARNING Risk of accident due to
objects in the driver's foot we ll
Objects in the driver's foot we ll may impede
pedal tr avel or block a depressed pedal.
This jeopardises the operating and road
saf ety of theve hicle. #
Stow all objects in theve hicle securely
so that they cannot getinto the driver's
fo ot we ll. #
Alw aysfit th efloor mats securely and
as prescribed in order toensure that
th ere is alw ays suf ficient room forthe
pedals. #
Do not use loose floor mats and do not
place floor mats on top of one ano ther. #
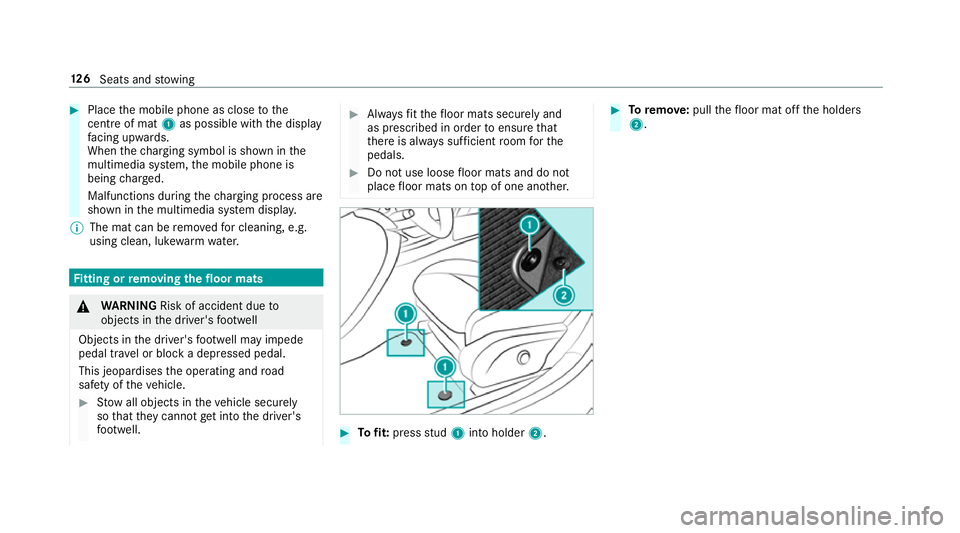
Tofit: press stud 1 into holder 2. #
Toremo ve:pull thefloor mat off the holders
2. 12 6
Seats and stowing
Page 162 of 497

Driving
Note
s on Mercedes-AMG vehicles Obser
vethe no tes on thefo llowing topics in the
Supplement. Otherwise, you may failto recog‐
nise dangers.
R Rear axle locking dif fere ntial
R AMG Performance exhaust sy stem
R AMG ceramic high-per form ance composite
brake sy stem
R RACE START
R DRIFT MODE
R AMG RIDE CONTROL Switching on
the po wer supp lyor ignition
using theSt art/S top button &
WARNING Risk of accident and inju ry
due tochildren left unat tended in the
ve hicle
If ch ildren are left unat tended in theve hicle,
th ey could:
R Open doo rs,th ereby endangering other
persons or road users.
R Get out of theve hicle and be hit by
oncoming traf fic.
R Ope rate ve hicle equipment and become
trapped, forex ample.
Moreo ver,ch ildren could also set theve hicle
in motion by,fo rex ample:
R Releasing the parking brake.
R Shifting the automatic transmission out
of park position jor shifting manual
transmission into idle position.
R Starting the engine. #
Never lea vechildren and animals unat‐
te nded in theve hicle. #
When leaving theve hicle, alw aysta ke
th eke y with you and lock theve hicle.
This also applies tomobile phones if the
"Digital Car Key in the smartphone"
function is activated via the Mercedes
me connect web app. #
Keep theve hicle key out of reach of
ch ildren. This also applies tomobile
phones if the "Digital Car Key in the
smartphone" function is activated via
th e Mercedes me connect web app. &
WARNING Risk ofexhaust gas poisoning
Combustion engines emit poisonous exhaust
ga ses such as carbon monoxide. Inhaling
th ese exhaust gases causes poisoning. #
Never lea vethe engine running in an
enclosed space wi thout suf ficient venti‐
lation. Driving and pa
rking 15 9
Page 163 of 497

&
WARNING Risk offire caused byflam‐
mable material on theex haust sy stem
Flammable materials brought in byeither ani‐
mals or environmen tal influences may ignite
if th ey come into contact wi thhot parts of
th e engine or exhaust sy stem. #
Therefore, check regularly that there
are no flammable materials in the
engine compartment or on theex haust
sy stem. Re
quirements:
R theke y is located in theve hicle and thekey
battery is not dischar ged.
R or, if the "Digital Vehicle Key" function is acti‐
va ted via the Mercedes me connect web app:
th e mobile phone is in the mar ked space
(→ page 161). #
Toswitch on the po wer supp ly:press but‐
to n1 once.
Yo u can activate the windscreen wiper, for
ex ample.
The po wer supp lyis switched off again if thefo l‐
lowing conditions are me t:
R you open the driver's door.
R you press but ton1 twice. #
Toswitch on the ignition: press button 1
twice.
The indicator lamps in the instrument clus ter
light up.
The ignition is switched off again if one of the
fo llowing conditions is me t:
R you do not start theve hicle within
15 minutes.
Ve hicles with automatic transmission: the
transmission is in position j.
or
The electric pa rking brake is applied.
R you press but ton1 once. St
arting the vehicle St
arting the vehicle with thest art/s top but‐
ton
Requ irements:
R theke y is located in theve hicle and thekey
battery is not dischar ged.
R or, if the "Digital Vehicle Key" function is acti‐
va ted via the Mercedes me connect web app: 16 0
Driving and pa rking
Page 164 of 497

th
e mobile phone is in the mar ked space
(→ page 161). #
Vehicles with manual transmission:
depress the clutch pedal. #
Vehicles with automatic transmission:
shift the transmission toposition jori. #
Depress the brake pedal and push button 1
once. #
Ifth eve hicle does not star t:switch off non-
essential consumers and press button 1
once. #
Ifth eve hicle still does not start and the
Place the key in the marked space See Own-
er's Manual display message also appears in
th e multifunction display: start theve hicle in
emer gency operation mode.
Yo u can swit choff the engine while driving by
pressing button 1for about thre e seconds. Be
sure toobser vethe saf ety no tes under "Driving
instructions". St
arting a vehicle using a mobile phone
Re quirements:
R theve hicle is equipped with the "Digital Car
Ke y" function.
R the "Digital Car Key" function is activated via
th e Mercedes me connect web app: http://
www.mercedes.me.
R suitable mobile phone with NFC aerial (Near
Field Communication) and Secure Element.
R sufficient charge leve l of the mobile
phone. On some mobile phones, the function
is also available when the battery is dis‐
ch arge d.
% You can check the suitability of your mobile
phone byentering the phone number at
http://www.mercedes.me.
Information about suitable mobile phones
can be obtained from your Mercedes-Benz
service centre or at http://www.mercedes-
benz.com/connect.
% Mercedes-Benz recommends that you car ry
th e emer gency key in case of function
re strictions. %
The function is only available in combination
with Mercedes me connect and on lyin cer‐
ta in countries.
% Protective cases around the mobile phone
can impair the functionality. #
Make sure that thech arge leve l of the mobile
phone is suf ficient. If necessar y,ch arge the
mobile phone before starting the journe y.
St arting theve hicle for the firs t time af ter
activating the function #
Make sure that there is a valid vehicle key in
th eve hicle. Driving and parking
161
Page 165 of 497

#
Place the mobile phone in mar ked space 1
so that the NFC aerial areas touch each
ot her. #
Depress the brake pedal and start theve hicle
using thest art/ stop button.
% The key is not needed for any fur ther starts.
Any fu rther starts #
Place the mobile phone in mar ked space 1
so that the NFC aerial areas touch each
ot her, and lea veitth ere while driving. #
Depress the brake pedal and start theve hicle
using thest art/ stop button.
The "Digital Vehicle Key" service can be deacti‐
va ted in Mercedes me connect at http://
www.mercedes.me. The function is then deacti‐
va ted in the smartphone via an online connec‐
tion. If connection tothe Internet is not possible,
e.g. af terth e mobile phone has been stolen, the
ke y function can be deacti vated at a Mercedes-
Benz Service Centre. St
arting theve hicle in emer gency operation
mode
If th eve hicle does not start and thePlace the
key in the marked space See Owner's Manual
display message appears in the multifunction
displa y,yo u can start theve hicle in emer gency
operation mode. #
Ensu rethat the mar ked space 2is em pty. #
Remo vekey1 from theke yring. #
Lay theke y1 inthe mar ked space 2.
The vehicle will start af ter a short while.
If yo ure mo vetheke y1 from the mar ked
space 2,the engine starts again. For fur‐
th er vehicle starts, ho wever,ke y1 must be located in
the mar ked space 2during the
entire journe y. #
Have theke y1 checked at a qualified spe‐
cialist workshop.
If th eve hicle does not star t: #
leavetheke y1 inthe mar ked space 2. #
Vehicles with manual transmission:
depress the clutch pedal. #
Vehicles with automatic transmission:
depress the brake pedal. #
Start theve hicle using thest art/ stop button.
% You can also swit chon the po wer supp lyor
th e ignition with thest art/ stop button. St
arting theve hicle via Remo teOnline serv‐
ices Cooling or heating
theve hicle interior before
st arting the jou rney
% This function is not available in all countries.
If yo ustart theve hicle via your smartphone, the
pr ev iously selec ted air conditioning setting is
active. 16 2
Driving and pa rking
Page 166 of 497

Ensu
rethefo llowing before starting the engine:
R the legal stipulations in the area where your
ve hicle is par ked allow engine starting via
smartphone.
R it is safe tostart and runth e engine where
yo ur vehicle is par ked.
R the fuel tank is su fficiently filled.
R thest ar ter battery is suf ficiently charge d.
% You can also set thete mp erature with your
smartphone. In form ation on Mercedes me
connect and other services: http://
www.mercedes.me
Charging the bat tery before commencing
yo ur journey
% This function is not available in all countries.
R Ifth eve hicle battery is discharged, you
re cei vea message on your smartphone.
R You can then start theve hicle with the
smartphone tocharge the batter y.
R The vehicle is automatically switched off
af te rte n minu tes. Ensure
thefo llowing before starting the engine:
R the legal stipulations in the area where your
ve hicle is par ked allow engine starting via
smartphone.
R it is safe tostart and runth e engine where
yo ur vehicle is par ked.
R the fuel tank is su fficiently filled.
St arting theve hicle &
WARNING Risk of crushing or entrap‐
ment due tounin tentional starting of the
engine
Limbs could be crushed or trapped if the
engine is star ted unintentionally during
service or maintenance work. #
Alw ays secure the engine against unin‐
te ntional starting before car rying out
maintenance or repair work. Re
quirements:
R park position jis selected.
R the anti- theft alarm sy stem is not activated.
R the panic alarm is not activated. R
the hazard warning lamps are switched off.
R the bonn etis closed.
R the doors are closed and loc ked.
R the windo wsand sliding sun roof are closed. #
Start theve hicle using the smartphone:
R afte reve ryvehicle start, the engine runs for
te n minu tes.
R you can car ryout a maximum of two consec‐
utive starting attem pts.
R you can stop theve hicle again at any time.
R further information can be found in the
smartphone app.
Securing the engine against starting before
car rying out maintenance or repair work: #
switch on the hazard warning lamps.
or #
unlock the doors.
or #
open a side window or the sliding sunroof. Driving and parking
16 3
Page 175 of 497

Au
tomatic transmission DIRECT SELECT le
verFu
nction of the DIRECT SELECT le ver&
WARNING Risk of accident and inju ry
due tochildren left unat tended in the
ve hicle
If ch ildren are left unat tended in theve hicle,
th ey could:
R Open doo rs,th ereby endangering other
persons or road users.
R Get out of theve hicle and be hit by
oncoming traf fic.
R Ope rate ve hicle equipment.
Moreo ver,ch ildren could also set theve hicle
in motion by,fo rex ample:
R Releasing the parking brake.
R Shifting the transmission out of park
position j.
R Starting the engine. #
Never lea vechildren and animals unat‐
te nded in theve hicle. #
When leaving theve hicle, alw aysta ke
th eke y with you and lock theve hicle.
This also applies tomobile phones if the
"Digital Car Key in the smartphone"
function is activated via the Mercedes
me connect web app. #
Keep theke ys out of there ach of chil‐
dren. This also applies tomobile
phones if the "Digital Car Key in the
smartphone" function is activated via
th e Mercedes me connect web app. &
WARNING Risk of accident due toincor‐
re ct gearshifting
If th e engine speed is higher than the idle
speed and you en gage the transmission posi‐
tion hork, theve hicle may accelerate
sharply. #
Ifyo u en gage the transmission position
h ork always depress the brake pedal
firm lyand do not accelerate at
th e same time. Use
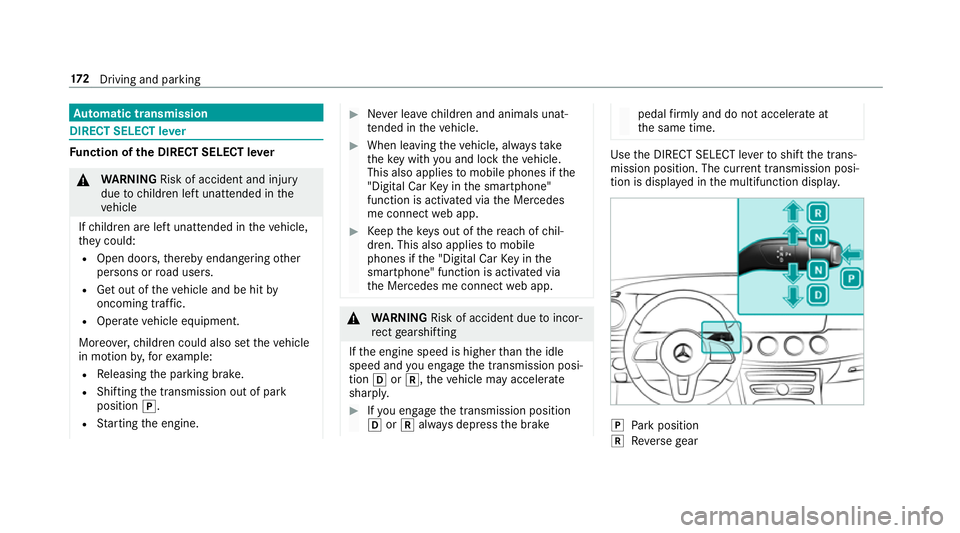
the DIRECT SELECT le verto shift the trans‐
mission position. The cur rent transmission posi‐
tion is displ ayed in the multifunction displa y. j
Park position
k Reversege ar 17 2
Driving and pa rking
Page 184 of 497

To
pping up AdBlue ® #
Screw disposable hose 1onto thefiller
neck of theve hicle until finger-tight. #
Lift up and tip AdBlue ®
re fill canis ter2.
The filling process stops when theAd Blue ®
ta nk is compl etely full.
Ad Blue ®
re fill canis ter2 can be remo ved
when it has been only partially em ptied. #
Unscr ew and close disposable hose 1and
Ad Blue ®
re fill canis ter2 inreve rse order. #
Switch on the ignition for at least 60 sec‐
onds. #
Start theve hicle. %
Avoid storing AdBlue ®
re fill con tainers per‐
manently in theve hicle. Pa
rking Switching off
theve hicle &
WARNING Risk offire caused byhot
ex haust sy stem parts
Flammable material such as lea ves, grass or
twigs may ignite if they come into contact
wi th hot parts of theex haust sy stem or
ex haust gasflow. #
Park theve hicle so that no flammable
material can come into con tact wi thhot
ve hicle components. #
In particular, do not park on dry grass‐
land or har vested grain fields. &
WARNING Risk of accident and inju ry
due tochildren left unat tended in the
ve hicle
If yo u lea vechildren unat tended in theve hi‐
cle, they may be able toset theve hicle in
motion, forex ample by:
R Releasing the parking brake.
R Shifting the automatic transmission out
of park position jor shifting the manual
transmission into neutral.
R Starting the engine.
In addition, they may operate vehicle equip‐
ment. #
Never lea vechildren and animals unat‐
te nded in theve hicle. #
When leaving theve hicle, alw aysta ke
th eke y with you and lock theve hicle.
This also applies tomobile phones if the
"Digital Car Key in the smartphone"
function is activated via the Mercedes
connect me web app. Driving and parking
181