2017 MERCEDES-BENZ CLS key battery
[x] Cancel search: key batteryPage 88 of 334

! The trunk lid swings upwards when opened.
Therefore, make sure that there is sufficient
clearance above the trunk lid.
The opening dimensions of the trunk lid can be
found in the "Vehicle data" section
( Y
page 328).
Opening and closing X
To open: pull remote operating switch for
trunk lid �C until the trunk lid opens.X
To close: press remote operating switch for
trunk lid �C until the trunk lid is completely
closed.
You can open and close the trunk lid from the
driver's seat when the vehicle is stationary and
unlocked.
Unlocking the trunk
! The trunk lid swings upwards when opened.
Therefore, make sure that there is sufficient
clearance above the trunk lid.
If the trunk cannot be unlocked with the Smart-
Key or KEYLESS-GO, use the mechanical key.
If you use the mechanical key to unlock and
open the trunk lid, the anti-theft alarm system
will be triggered. Switch off the alarm
( Y
page 75). X
Take the mechanical key out of the SmartKey
( Y
page 78).X
Insert the mechanical key into the trunk lid
lock as far as it will go. X
Turn the mechanical key from position �G
counter-clockwise as far as it will go to posi-
tion �H . Simultaneously pull the trunk lid han-
dle.
The trunk is unlocked. X
Turn the mechanical key back to position �G
and remove it. X
Insert the mechanical key into the SmartKey.
Emergency release for the trunk You can open the trunk lid from inside the vehi-
cle with the emergency release button.
X
Press emergency release button �C briefly.
The trunk lid unlocks and opens.
The trunk lid can be unlocked and opened with
the trunk lid emergency release when the vehi-
cle is stationary or while driving.
The trunk lid emergency release does not open
the trunk lid if the battery is disconnected or
discharged.
Trunk lid emergency release light: R
Emergency release button �C flashes for
30 minutes after the trunk lid is opened. R
Emergency release button �C flashes for
60 minutes after the trunk lid is closed.86
Trunk
Opening and closing
Page 100 of 334

Switching the seat ventilation on/off
Driver's and front-passenger seat
The three blue indicator lamps in the buttons
indicate the ventilation level you have selected. X
Turn the SmartKey to position 1 or 2 in the
ignition lock ( Y
page 123). X
To switch on: press button �C repeatedly
until the desired ventilation level is set. X
To switch off: press button �C repeatedly
until all the indicator lamps go out.
i If the battery voltage is too low, the seat
ventilation may switch off.
i You can open the side windows and the slid-
ing sunroof using the "Convenience opening"
feature ( Y
page 88). The seat ventilation of
the driver's seat automatically switches to the
highest level.
Problems with the seat heating or seat ventilation Problem
Possible causes/consequences and �P Solutions
The seat heating or seat
ventilation has switched
off prematurely or can-
not be switched on. The on-board voltage is too low because too many electrical consum-
ers are switched on. X
Switch off electrical consumers that you do not need, such as the
rear window defroster or interior lighting.
Once the battery is sufficiently charged, the seat heating or seat
ventilation can be switched back on manually.
Steering wheel
Important safety notes
G WARNING
You could lose control of your vehicle if you do
the following while driving: R
adjust the driver's seat, head restraint,
steering wheel or mirrors R
fasten the seat belt
There is a risk of an accident.
Adjust the driver's seat, head restraint, steer-
ing wheel and mirror and fasten your seat belt
before starting the engine.
G WARNING
Children could injure themselves if they
adjust the steering wheel. There is a risk of
injury. When leaving the vehicle, always take the
SmartKey with you and lock the vehicle. Never
leave children unsupervised in the vehicle.
The electrically adjustable steering wheel can
still be adjusted when there is no SmartKey in
the ignition lock.98
Steering wheel
Seats, steering wheel and mirrors
Page 108 of 334

USA only: the daytime running lamps improve
the visibility of your vehicle during the day. To do
this, the Daytime running lamps
function
must be switched on using the on-board com-
puter ( Y
page 198).
If the engine is running and you turn the light
switch to the �` or �X position, the manual
settings take precedence over the daytime run-
ning lamps.
Low-beam headlamps
G WARNING
When the light switch is set to �X , the low-
beam headlamps may not be switched on
automatically if there is fog, snow or other
causes of poor visibility due to the weather
conditions such as spray. There is a risk of an
accident.
In such situations, turn the light switch to
�X .
Even if the light sensor does not detect that it is
dark, the parking lamps and low-beam head-
lamps switch on when the ignition is switched on
and the light switch is set to the �X position.
This is a particularly useful function in the event
of rain and fog. X
To switch on the low beam headlamps:
turn the SmartKey in the ignition lock to posi-
tion 2 or start the engine.X
Turn the light switch to the �X position.
The green �X indicator lamp in the instru-
ment cluster lights up.
Parking lamps
! If the battery charge is very low, the parking
lamps or standing lamps are automatically
switched off to enable the next engine start.
Always park your vehicle safely and in a well lit
area, in accordance with the relevant legal
stipulations. Avoid using the �` parking
lamps over a period of several hours. If pos-
sible, switch on the right-hand �d or left-
hand �c standing lamps.X
To switch on the parking lamps: turn the
light switch to the �` position.
The green �` indicator lamp on the instru-
ment cluster lights up. Standing lamps Switching on the standing lamps ensures the
corresponding side of the vehicle is illuminated. X
To switch on the standing lamps: turn the
SmartKey to position 0 in the ignition lock or
remove the SmartKey. X
Turn the light switch to the �c (left-hand
side of the vehicle) or �d (right-hand side of
the vehicle) position.
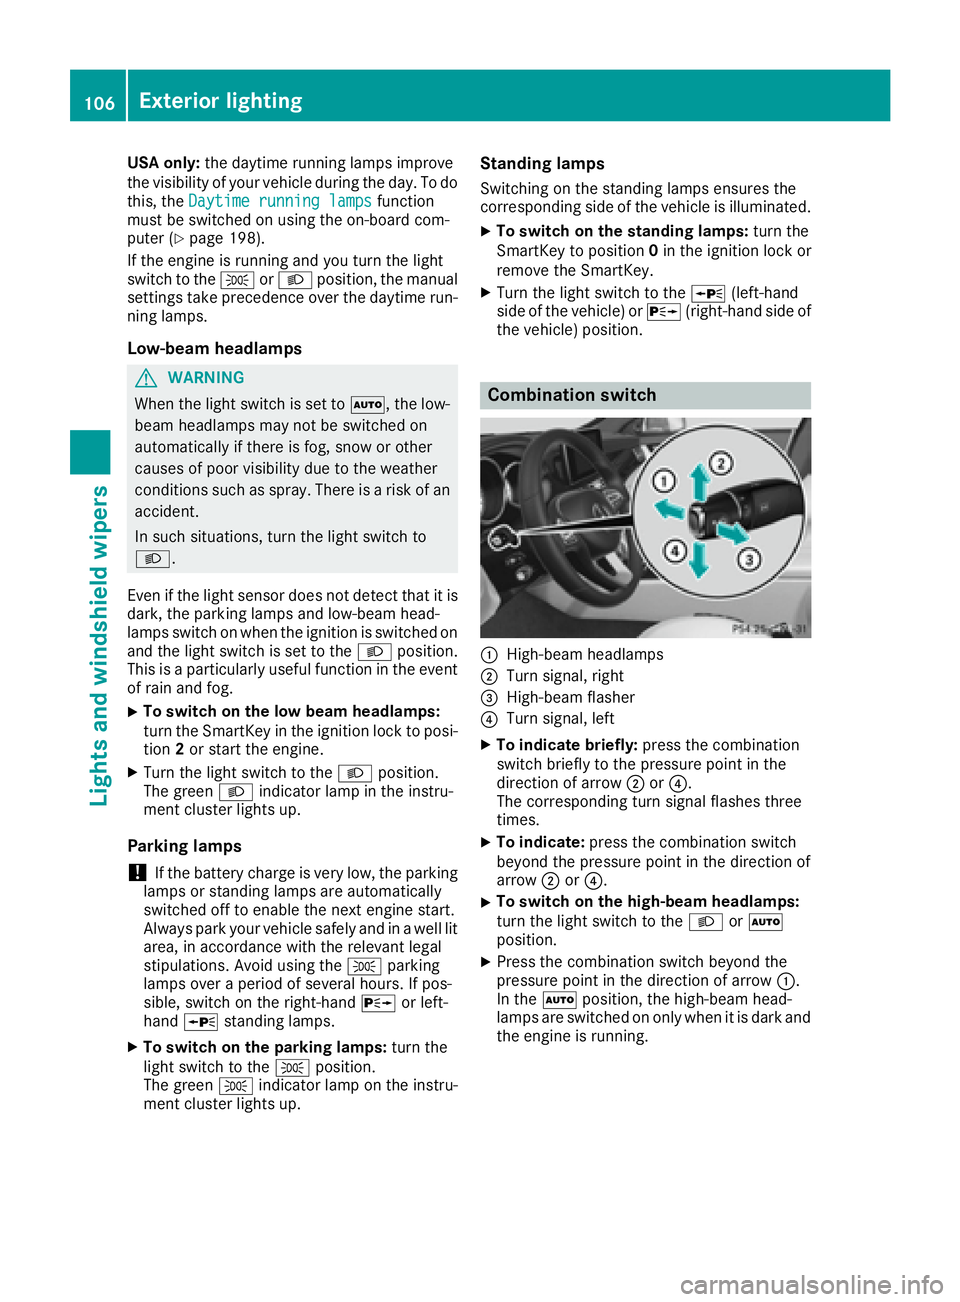
Combination switch
�C
High-beam headlamps �D
Turn signal, right �
Page 111 of 334

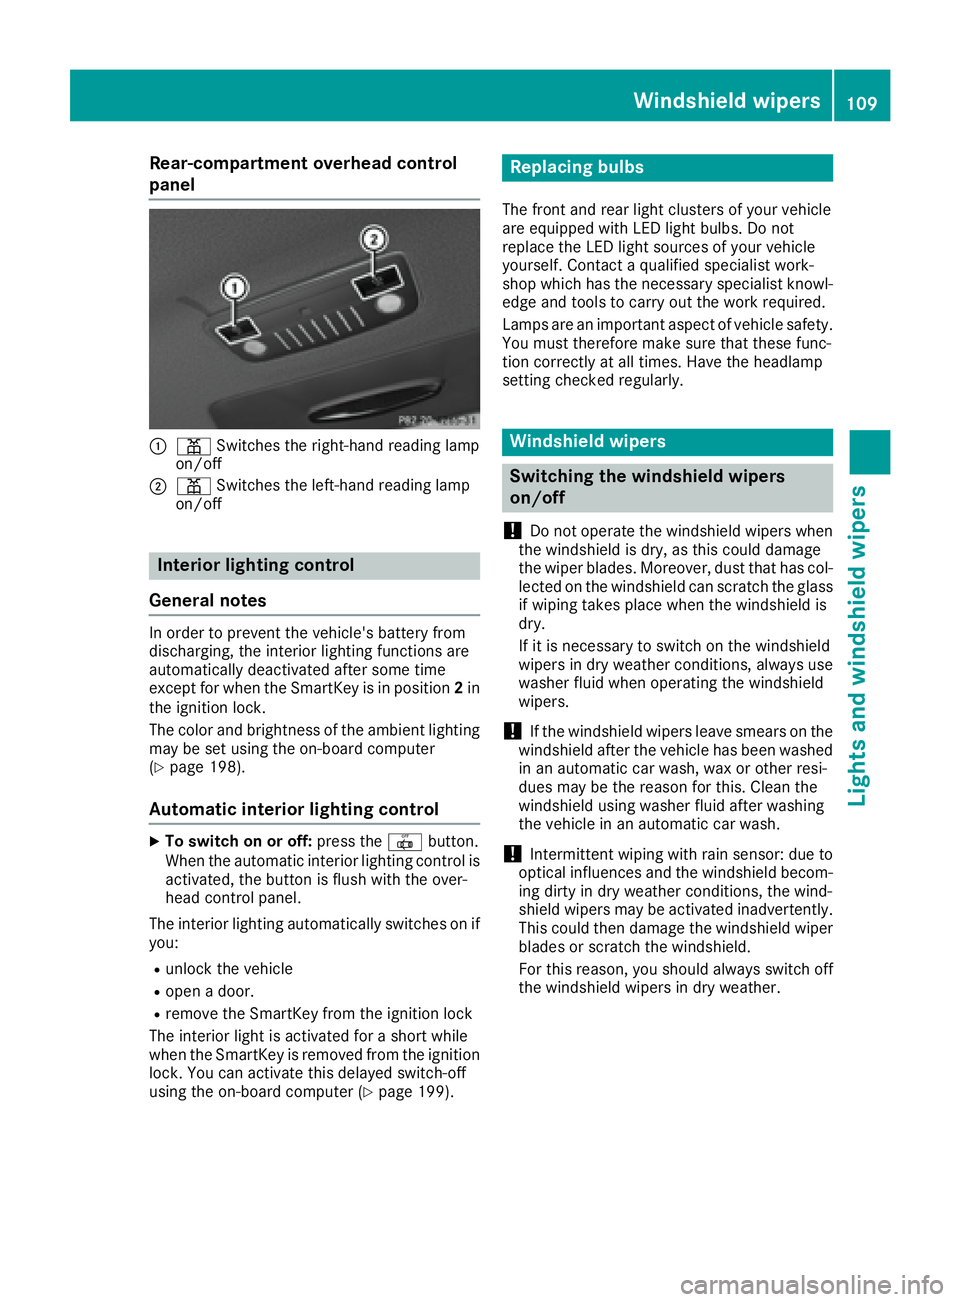
Rear-compartment overhead control
panel
�C
�= Switches the right-hand reading lamp
on/off�D
�= Switches the left-hand reading lamp
on/off
Interior lighting control
General notes In order to prevent the vehicle's battery from
discharging, the interior lighting functions are
automatically deactivated after some time
except for when the SmartKey is in position 2 in
the ignition lock.
The color and brightness of the ambient lighting
may be set using the on-board computer
( Y
page 198).
Automatic interior lighting control X
To switch on or off: press the �3 button.
When the automatic interior lighting control is
activated, the button is flush with the over-
head control panel.
The interior lighting automatically switches on if
you: R
unlock the vehicle R
open a door. R
remove the SmartKey from the ignition lock
The interior light is activated for a short while
when the SmartKey is removed from the ignition
lock. You can activate this delayed switch-off
using the on-board computer ( Y
page 199). Replacing bulbs The front and rear light clusters of your vehicle
are equipped with LED light bulbs. Do not
replace the LED light sources of your vehicle
yourself. Contact a qualified specialist work-
shop which has the necessary specialist knowl-
edge and tools to carry out the work required.
Lamps are an important aspect of vehicle safety.
You must therefore make sure that these func-
tion correctly at all times. Have the headlamp
setting checked regularly.
Windshield wipers
Switching the windshield wipers
on/off
! Do not operate the windshield wipers when
the windshield is dry, as this could damage
the wiper blades. Moreover, dust that has col-
lected on the windshield can scratch the glass
if wiping takes place when the windshield is
dry.
If it is necessary to switch on the windshield
wipers in dry weather conditions, always use
washer fluid when operating the windshield
wipers.
! If the windshield wipers leave smears on the
windshield after the vehicle has been washed
in an automatic car wash, wax or other resi-
dues may be the reason for this. Clean the
windshield using washer fluid after washing
the vehicle in an automatic car wash.
! Intermittent wiping with rain sensor: due to
optical influences and the windshield becom-
ing dirty in dry weather conditions, the wind-
shield wipers may be activated inadvertently.
This could then damage the windshield wiper
blades or scratch the windshield.
For this reason, you should always switch off
the windshield wipers in dry weather.Windshield wipers 109
Lights and windshield wipers Z
Page 121 of 334

Switch off the "Windshield defrosting" function
as soon as the windshield is clear again. X
Turn the SmartKey to position 2 in the ignition
lock ( Y
page 123).X
To activate: press the �d button.
The indicator lamp in the �d button lights
up.
The climate control system switches to the
following functions: R
high airflow R
high temperature R
air distribution to the windshield and front
side windows R
air-recirculation mode off
If the battery is not sufficiently charged, blower
output may be reduced. Once the battery is suf-
ficiently charged again, full blower output will be
available again. X
To deactivate: press the �d button.
The indicator lamp in the �d button goes
out. The previously selected settings are
restored. Air-recirculation mode remains
deactivated.
MAX COOL maximum cooling The MAX COOL function is only available in vehi-
cles for the USA.
MAX COOL is only operational when the engine
is running. X
To activate: press the �
Page 122 of 334

Problems with the rear window defroster Problem
Possible causes/consequences and �P Solutions
The rear window
defroster has deactiva-
ted prematurely or can-
not be activated. The battery has not been sufficiently charged. X
Switch off any consumers that are not required, e.g. reading lamps,
interior lighting or the seat heating.
When the battery is sufficiently charged, the rear window defroster
can be activated again.
Switching air-recirculation mode
on/off
General notes You can deactivate the flow of fresh air if
unpleasant odors are entering the vehicle from
outside. The air already inside the vehicle will
then be recirculated.
If you switch on air-recirculation mode, the win-
dows can fog up more quickly, in particular at
low temperatures. Only use air-recirculation
mode briefly to prevent the windows from fog-
ging up.
Activating/deactivating X
Turn the SmartKey to position 2 in the ignition
lock ( Y
page 123).X
To activate: press the �r button.
The indicator lamp in the �r button lights
up.
Dual-zone automatic climate control: air-recir-
culation mode is automatically activated at high
outside temperatures.
3-zone automatic climate control: air-recircula-
tion mode is automatically activated at high lev-
els of pollution or at high outside temperatures.
When air-recirculation mode is activated auto-
matically, the indicator lamp above the �r
button does not light up. Outside air is added
after approximately 30 minutes. X
To deactivate: press the �r button.
The indicator lamp in the �r button goes
out. Air-recirculation mode deactivates automati-
cally: R
after approximately five minutes at outside
temperatures below approximately 41 ‡
(5 †) R
after approximately five minutes if cooling
with air dehumidification is deactivated R
after approximately 30 minutes at outside
temperatures above approximately 41 ‡
(5 †) if the "Cooling with air dehumidifica-
tion" function is activated
Switching the residual heat on or off
General notes The residual heat function is only available with
3-zone automatic climate control.
It is possible to make use of the residual heat of
the engine to continue heating the vehicle for
approximately 30 minutes after the engine has
been switched off. The heating time depends on
the set interior temperature.
Activating/deactivating X
Turn the SmartKey to position 0 in the ignition
lock or remove it ( Y
page 123).X
To switch on: press the �K button.
The indicator lamp in the �K button lights
up.
If the residual heat function is activated, the
windows may fog up on the inside.
The blower will run at a low speed regardless of
the airflow setting.
If you activate the residual heat function at high
temperatures, only the ventilation will be acti-
vated. The blower runs at medium speed.120
Operating the climate control systems
Climate control
Page 130 of 334

If indicator lamp �D is off, the ECO start/stop
function has been deactivated manually or as
the result of a malfunction. The engine will then not be switched off automatically when the vehi-
cle stops.
Problems with the engine Problem
Possible causes/consequences and �P Solutions
The engine does not
start. The HOLD function or DISTRONIC PLUS is activated. X
Deactivate the HOLD function ( Y
page 157) or DISTRONIC PLUS
( Y
page 155). X
Try to start the engine again.
The engine does not
start. The starter motor
can be heard. R
There is a malfunction in the engine electronics. R
There is a malfunction in the fuel supply.
Before attempting to start the engine again: X
Turn the SmartKey back to position 0 in the ignition lock.
or X
Press the Start/Stop button repeatedly until all indicator lamps in
the instrument cluster go out. X
Try to start the engine again ( Y
page 124). Avoid excessively long
and frequent attempts to start the engine as these will drain the
battery.
If the engine does not start after several attempts: X
Consult a qualified specialist workshop.
The engine does not
start. You cannot hear
the starter motor. The on-board voltage is too low because the battery is too weak or
discharged. X
Jump-start the vehicle ( Y
page 285).
If the engine does not start despite attempts to jump-start it: X
Consult a qualified specialist workshop.
The starter motor was exposed to a thermal load that was too high. X
Allow the starter motor to cool down for approximately two minutes. X
Try to start the engine again.
If the engine still does not start: X
Consult a qualified specialist workshop.128
Driving
Driving and parking
Page 143 of 334

Problem
Possible causes/consequences and �P Solutions
The SmartKey battery is discharged or nearly discharged. X
Unlock the vehicle using the mechanical key ( Y
page 78).X
Open the trunk lid. X
Manually unlock the fuel filler flap using the emergency release
( Y
page 140).
The fuel filler flap is unlocked, but the opening mechanism is jammed. X
Consult a qualified specialist workshop.
Parking
Important safety notes
G WARNING
Flammable material such as leaves, grass or
twigs may ignite if they come into contact with
hot parts of the exhaust system or exhaust
gas flow. There is a risk of fire.
Park the vehicle so that no flammable mate-
rials come into contact with parts of the vehi-
cle which are hot. Take particular care not to
park on dry grassland or harvested grain
fields.
G WARNING
If you leave children unsupervised in the vehi-
cle, they could set it in motion by, for example: R
release the parking brake. R
shift the automatic transmission out of the
parking position P .R
start the engine.
In addition, they may operate vehicle equip-
ment and become trapped. There is a risk of
an accident and injury.
When leaving the vehicle, always take the
SmartKey with you and lock the vehicle. Never
leave children unsupervised in the vehicle.
! Always secure the vehicle correctly against
rolling away. Otherwise, the vehicle or its driv-
etrain could be damaged. To ensure that the vehicle is secured against
rolling away unintentionally: R
the parking brake must be applied. R
the transmission must be in position P and the
Smartkey must be removed from the ignition
lock. R
the front wheels must be turned towards the
curb on steep uphill or downhill gradients.
Switching off the engine
Important safety notes
G WARNING
The automatic transmission switches to neu-
tral position N when you switch off the engine.
The vehicle may roll away. There is a risk of an
accident.
After switching off the engine, always switch
to parking position P . Prevent the parked vehi-
cle from rolling away by applying the parking
brake.
Vehicles with automatic transmission X
Apply the parking brake firmly. X
All vehicles (except Mercedes-AMG vehi-
cles): shift the transmission to position P .Parking 141
Driving and parking Z