2017 MERCEDES-BENZ CLS-Class lumbar support
[x] Cancel search: lumbar supportPage 15 of 334

KickdownDrivin g tips .................................... 133
Manual drive program .................... 137
Knee bag .............................................. 47
L
Lamps
see Warning and indicator lamps
Lane Keeping Assist
Activating/deactivating ................ .197
Display message ............................ 217
Function/information .................... 181
Lane Tracking package ..................... 179
Lap time (RACETIMER) ...................... 201
LATCH-type (ISOFIX) child seat
anchors ................................................ 60
License plate lamp (display mes-
sage) ................................................... 212
Light function, active
Display message ............................ 212
Light sensor (display message) ....... 212
Lights
Activating/deactivating the inte-
rior lighting delayed switch-off ....... 199
Adaptive Highbeam Assist ............. 107
Automatic headlamp mode ............ 105
Cornering light function ................. 107
Fogged up headlamps .................... 108
General notes ................................ 105
Hazard warning lamps ................... 107
High beam flasher .......................... 106
High-beam headlamps ................... 106
Light switch ................................... 105
Low-beam headlamps .................... 106
Parking lamps ................................ 106
Setting exterior lighting ................. 105
Setting the brightness of the
ambient lighting (on-board com-
puter) ............................................. 198
Setting the brightness of the dis-
play/switch (on-board computer) .. 198
Setting the color of the ambient
lighting (on-board computer) ......... 198
Standing lamps .............................. 106
Switching the daytime running
lamps on/off (on-board com-
puter) ............................................. 198 Switching the exterior lighting
delayed switch-off on/off (on-
board computer) ............................ 198
Switching the surround lighting
on/off (on-board computer) .......... 198
Turn signals ................................... 106
see Interior lighting
Loading guidelines ............................ 242
Loc
king
see Central locking
Locking (doors)
Automatic ........................................ 82
Emergency locking ........................... 83
From inside (central locking but-
ton) .................................................. 82
Locking centrally
see Central locking
Locking verification signal (on-
board computer) ............................... 199
Low-beam headlamps
Display message ............................ 212
Switching on/off ........................... 106
Lumbar support
Adjusting the 4-way lumbar sup-
port .................................................. 97
Luxury head restraints ....................... 95
M
M+S tires............................................ 294
Malfunction message
see Display messages
Matte finish (cleaning instruc-
tions) .................................................. 272
mbrace
Call priority .................................... 257
Display message ............................ 206
Downloading destinations
(COMAND) ..................................... 257
Downloading routes ....................... 260
Emergency call .............................. 255
General notes ................................ 254
Geo fencing ................................... 261
Locating a stolen vehicle ............... 259
MB info call button ........................ 257
Remote fault diagnosis .................. 259
Remote vehicle locking .................. 259
Roadside Assistance button .......... 256
Index13
Page 98 of 334

reduce the potential for injury to the head and
neck in the event of an accident or similar sit-
uation.
Whenever the rear seats are occupied, only
drive the vehicle with the head restraints
installed and engaged. Head restraints are
intended to help reduce injuries during an
accident.
Adjusting the rear seat head restraint
angle
XPull or push the top of the head restraint until
it is in the desired position.
Removing and installing the rear seat
head restraints
GWARNING
If the head restraints are not installed or not
adjusted correctly, they cannot provide pro-
tection as intended. There is an increased risk
of injury in the head and neck area, e.g. in the event of an accident or when braking.
Always drive with the head restraints instal-
led. Before driving off, make sure for every
vehicle occupant that the center of the head
restraint supports the back of the head at
about eye level.
!Make sure that the rear window roller sun-
blind has been retracted before the rear head
restraints are removed. You could otherwise
damage the roller sunblind.
The head restraints can only be removed if the
rear seat folds forward.
XTo remove: press release catch :and pull
the head restraint out of the guides.
XTo re-install: insert the head restraint so that
the notches on the bar are on the left when
viewed in the direction of travel.
XPush the head restraint down until you hear it engage in position.
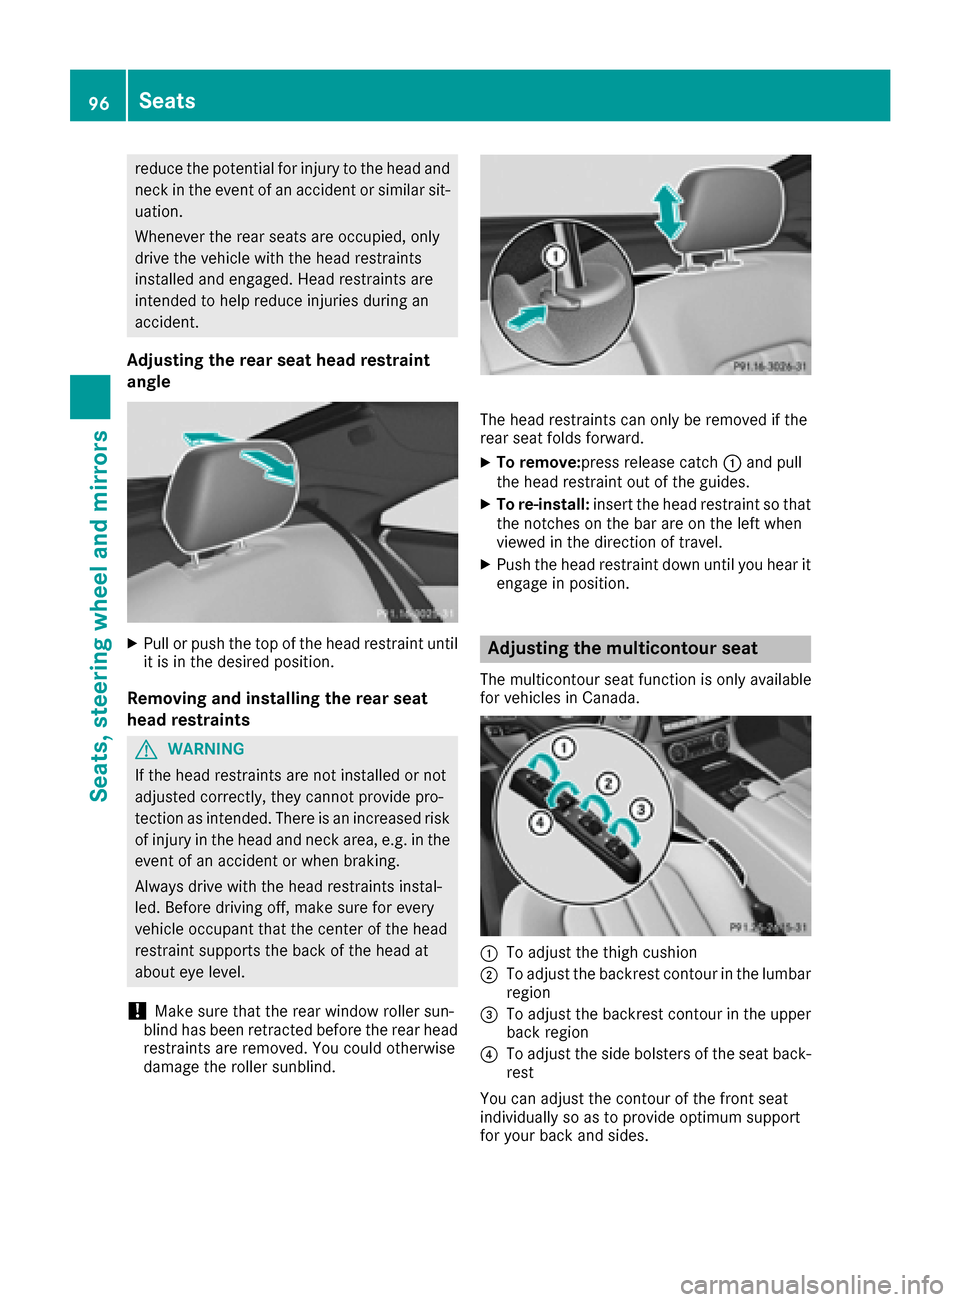
Adjusting the multicontour seat
The multicontour seat function is only available
for vehicles in Canada.
:To adjust the thigh cushion
;To adjust the backrest contour in the lumbar
region
=To adjust the backrest contour in the upper
back region
?To adjust the side bolsters of the seat back-
rest
You can adjust the contour of the front seat
individually so as to provide optimum support
for your back and sides.
96Seats
Seats, steering wheel and mirrors
Page 99 of 334

XTurn the SmartKey to position2in the ignition
lock (Ypage 123).
Adjusting the active multicontour
seat
The active multicontour seat is only available for
the driver's side.
You can adjust the active multicontour seat via
the multimedia system (see the Digital Opera-
tor's Manual).
Adjusting the 4-way lumbar support
:To raise the backrest contour
;To soften the backrest contour
=To lower the backrest contour
?To harden the backrest contour
You can adjust the contour of the front seat
backrests individually to provide optimum sup-
port for your back.
Seat heating and seat ventilation
Switching the seat heating on/off
GWARNING
Repeatedly switching on the seat heating can
cause the seat cushion and backrest pads to
become very hot. The health of persons with
limited temperature sensitivity or a limited
ability to react to excessively high tempera-
tures may be affected or they may even suffer
burn-like injuries. There is a risk of injury.
Therefore, do not switch the seat heating on
repeatedly.
Driver's and front-passenger seat
Rear seats
The three red indicator lamps in the button indi-
cate the heating level you have selected.
Driver's and front-passenger seat: the sys-
tem automatically switches down from level 3to
level 2after approximately eight minutes.
Rear seat: the system automatically switches
down from level 3to level 2after approximately
five minutes.
The system automatically switches down from
level 2to level 1after approximately ten
minutes.
The system automatically switches off approx-
imately 20 minutes after it is set to level 1.
XTurn the SmartKey to position1or 2in the
ignition lock (Ypage 123).
XTo switch on: press button:repeatedly
until the desired heating level is set.
XTo switch off: press button:repeatedly
until all the indicator lamps go out.
Seats97
Seats, steering wheel and mirrors
Z