2017 MERCEDES-BENZ CLS-Class window
[x] Cancel search: windowPage 120 of 334
Only change the temperature setting in small
increments. Start at 72 ‡ (22 †).
XTo increase or reduce the temperature in
the rear compartment using the front con-
trol panel:press theábutton.
The indicator lamp in the ábutton goes
out.
The temperature setting for the driver's side
is adopted for the rear compartment and the
front-passenger side.
XTurn temperature control :counter-clock-
wise or clockwise (Ypage 114).
Only change the temperature setting in small
increments. Start at 72 ‡ (22 †).
XTo increase or reduce the temperature in
the rear compartment using the rear con-
trol panel: press therors button on
the rear control panel.
Only change the temperature setting in small
increments. Start at 72 ‡ (22 †).
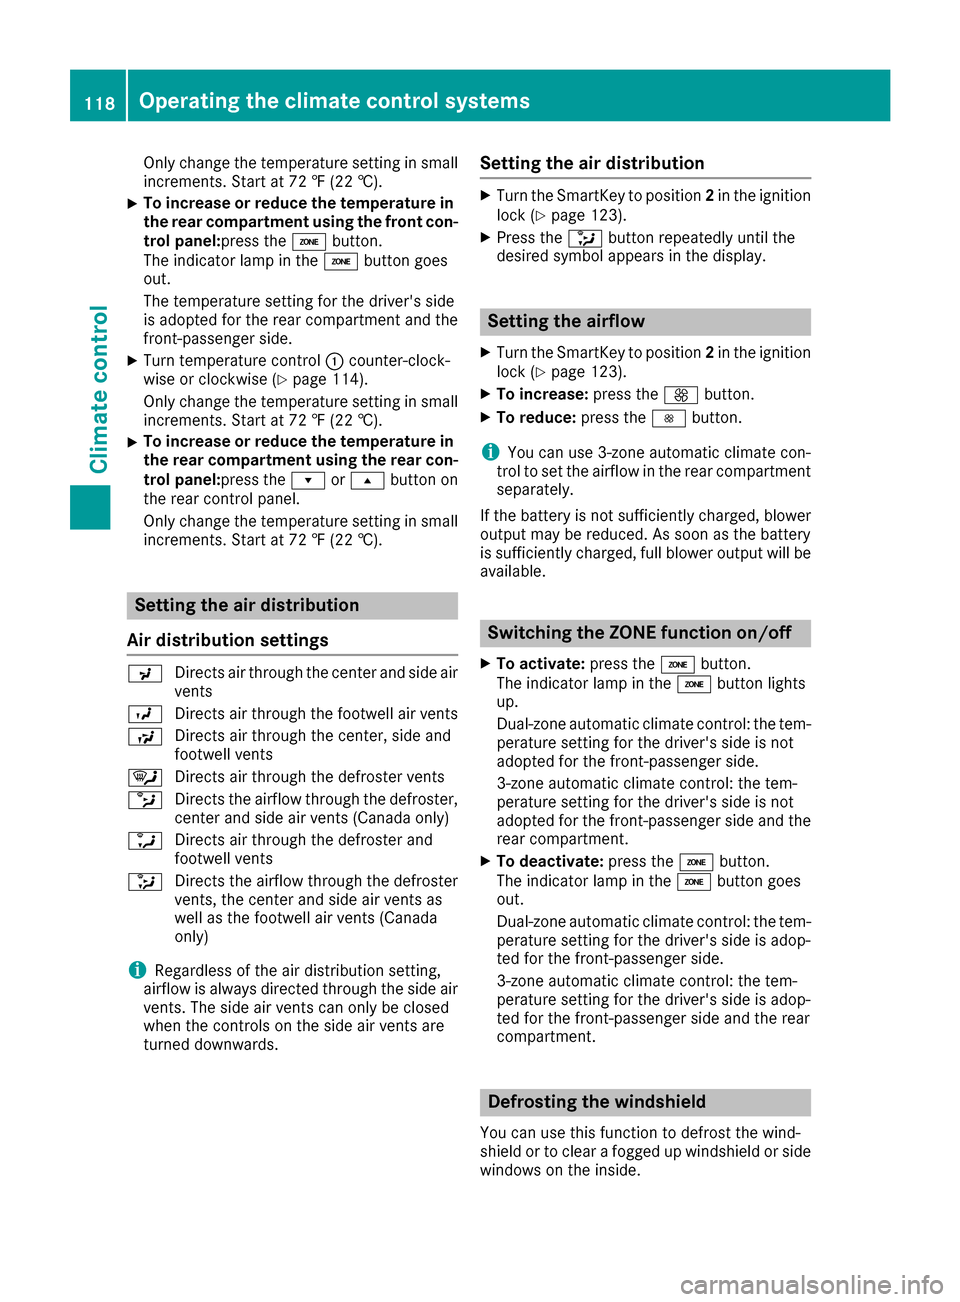
Setting the air distribution
Air distribution settings
P Directs air through the center and side air
vents
O Directs air through the footwell air vents
S Directs air through the center, side and
footwell vents
¯ Directs air through the defroster vents
b Directs the airflow through the defroster,
center and side air vents (Canada only)
a Directs air through the defroster and
footwell vents
_ Directs the airflow through the defroster
vents, the center and side air vents as
well as the footwell air vents (Canada
only)
iRegardless of the air distribution setting,
airflow is always directed through the side air
vents. The side air vents can only be closed
when the controls on the side air vents are
turned downwards.
Setting the air distribution
XTurn the SmartKey to position 2in the ignition
lock (Ypage 123).
XPress the _button repeatedly until the
desired symbol appears in the display.
Setting the airflow
XTurn the SmartKey to position 2in the ignition
lock (Ypage 123).
XTo increase: press theKbutton.
XTo reduce: press theIbutton.
iYou can use 3-zone automatic climate con-
trol to set the airflow in the rear compartment
separately.
If the battery is not sufficiently charged, blower output may be reduced. As soon as the battery
is sufficiently charged, full blower output will be
available.
Switching the ZONE function on/off
XTo activate: press theábutton.
The indicator lamp in the ábutton lights
up.
Dual-zone automatic climate control: the tem-
perature setting for the driver's side is not
adopted for the front-passenger side.
3-zone automatic climate control: the tem-
perature setting for the driver's side is not
adopted for the front-passenger side and the
rear compartment.
XTo deactivate: press theábutton.
The indicator lamp in the ábutton goes
out.
Dual-zone automatic climate control: the tem-
perature setting for the driver's side is adop-
ted for the front-passenger side.
3-zone automatic climate control: the tem-
perature setting for the driver's side is adop-
ted for the front-passenger side and the rear
compartment.
Defrosting the windshield
You can use this function to defrost the wind-
shield or to clear a fogged up windshield or side
windows on the inside.
118Operating the climate control systems
Climate control
Page 121 of 334

Switch off the "Windshield defrosting" function
as soon as the windshield is clear again.
XTurn the SmartKey to position2in the ignition
lock (Ypage 123).
XTo activate: press the¬button.
The indicator lamp in the ¬button lights
up.
The climate control system switches to the
following functions:
Rhigh airflow
Rhigh temperature
Rair distribution to the windshield and front
side windows
Rair-recirculation mode off
If the battery is not sufficiently charged, blower
output may be reduced. Once the battery is suf-
ficiently charged again, full blower output will be
available again.
XTo deactivate: press the¬button.
The indicator lamp in the ¬button goes
out. The previously selected settings are
restored. Air-recirculation mode remains
deactivated.
MAX COOL maximum cooling
The MAX COOL function is only available in vehi-
cles for the USA.
MAX COOL is only operational when the engine
is running.
XTo activate: press theÙbutton.
The indicator lamp in the Ùbutton lights
up.
XTo deactivate: press theÙbutton.
The indicator lamp in the Ùbutton goes
out. The previously selected settings are
restored.
When you activate MAX COOL, the following
functions are also activated:
Rmaximum cooling
Rmaximum airflow
Rair-recirculation mode
Defrosting the windows
Windows fogged up on the inside
XActivate the ¿cooling with air dehumidi-
fication function.
XActivate automatic mode Ã.
XAdjust the side air vents so that the warmed
air is directed to the side windows.
XIf the windows continue to fog up, activate the
"windshield defrosting" function ¬.
iYou should only select this setting until the
windshield is clear again.
Windows fogged up on the outside
XPress the _button repeatedly until the
P orO symbol appears in the display.
XAdjust the side air vents so that no air is
directed to the side windows.
Rear window defroster
General notes
The rear window defroster has a high current
draw. You should therefore switch it off as soon
as the rear window is clear. Otherwise, the rear window defroster switches off automatically
after several minutes.
If the battery voltage is too low, the rear window
defroster may switch off.
Activating or deactivating
XTurn the SmartKey to position 2in the ignition
lock (Ypage 123).
XPress the ¤button.
The indicator lamp in the ¤button lights
up or goes out.
Operating the climate control systems119
Climate control
Page 122 of 334

Problems with the rear window defroster
ProblemPossible causes/consequences andMSolutions
The rear window
defroster has deactiva-
ted prematurely or can-
not be activated.The battery has not been sufficiently charged.
XSwitch off any consumers that are not required, e.g. reading lamps,
interior lighting or the seat heating.
When the battery is sufficiently charged, the rear window defroster
can be activated again.
Switching air-recirculation mode
on/off
General notes
You can deactivate the flow of fresh air if
unpleasant odors are entering the vehicle from
outside. The air already inside the vehicle will
then be recirculated.
If you switch on air-recirculation mode, the win-
dows can fog up more quickly, in particular at
low temperatures. Only use air-recirculation
mode briefly to prevent the windows from fog-
ging up.
Activating/deactivating
XTurn the SmartKey to position 2in the ignition
lock (Ypage 123).
XTo activate: press thegbutton.
The indicator lamp in the gbutton lights
up.
Dual-zone automatic climate control: air-recir-
culation mode is automatically activated at high outside temperatures.
3-zone automatic climate control: air-recircula-
tion mode is automatically activated at high lev-
els of pollution or at high outside temperatures.
When air-recirculation mode is activated auto-
matically, the indicator lamp above the g
button does not light up. Outside air is added
after approximately 30 minutes.
XTo deactivate: press thegbutton.
The indicator lamp in the gbutton goes
out. Air-recirculation mode deactivates automati-
cally:
Rafter approximately five minutes at outside
temperatures below approximately 41 ‡
(5 †)
Rafter approximately five minutes if cooling
with air dehumidification is deactivated
Rafter approximately 30 minutes at outside
temperatures above approximately 41 ‡
(5 †) if the "Cooling with air dehumidifica-
tion" function is activated
Switching the residual heat on or off
General notes
The residual heat function is only available with
3-zone automatic climate control.
It is possible to make use of the residual heat of
the engine to continue heating the vehicle for
approximately 30 minutes after the engine has
been switched off. The heating time depends on
the set interior temperature.
Activating/deactivating
XTurn the SmartKey to position 0in the ignition
lock or remove it (Ypage 123).
XTo switch on: press theÌbutton.
The indicator lamp in the Ìbutton lights
up.
If the residual heat function is activated, the
windows may fog up on the inside.
The blower will run at a low speed regardless of
the airflow setting.
If you activate the residual heat function at high
temperatures, only the ventilation will be acti-
vated. The blower runs at medium speed.
120Operating the climate control systems
Climate control
Page 149 of 334

Drivingon wet road s
Hydroplaning
If water has accumulated to acertain dept hon
th eroad surface, there is adanger of hydro-
planin goccurring, eve nif:
Ryou drive at low speeds .
Rthetires hav eadequat etread depth.
Fo rthis reason ,in th eevent of heav yrain or in
condition sin whic hhydroplaning may occur ,
you mus tdrive in th efollowin gmanner:
Rlowe ryour speed.
Ravoid ruts.
Ravoid sudden steerin gmovements .
Rbrake carefully.
Drivingon flooded road s
!Do notdrive through floode dareas. Chec k
th edept hof any water befor edrivin gthrough
it .Drive slowly through standin gwater. Oth-
erwise ,water may ente rth evehicle interio ror
th eengin ecompartment. Thi scan damage
th eelectronic component sin th eengin eor
th eautomatic transmission. Water can also
be drawn in by th eengine's air suction nozzles
and this can cause engin edamage.
Winte rdrivin g
GWARNING
If you shift down on aslipper yroad surfac ein
an attempt to increase th eengine's braking
effect ,th edrive wheels could los etheir grip.
There is an increase ddanger of skidding and
accidents .
Do no tshift down fo radditional engin ebrak-
in g on aslipper yroad surface.
GDANGER
If th eexhaus tpipe is blocke dor adequat e
ventilation is no tpossible, poisonous gases
suc has carbon monoxide (CO) may ente rth e
vehicle. Thi sis th ecase, e.g. if th evehicle
becomes trappe din snow. There is aris kof
fatal injury.
If you leav eth eengin eor th eauxiliar yheatin g
running ,mak esur eth eexhaus tpipe and are a
around th evehicle are clear of snow. To
ensur ean adequat esupply of fresh air, ope n a
window on th esid eof th evehicle that is no t
facin ginto th ewind.
Hav eyour vehicle winter-proofed at aqualified
specialis tworkshop at th eonset of winter.
Drive particularly carefully on slipper yroad sur -
faces. Avoid sudden acceleration ,steerin gand
braking maneuvers .Do no tuse th ecruise con-
trol or DISTRONIC PLUS.
If th evehicle threatens to skid or canno tbe
stopped when movin gat low speed:
XShift th etransmissio nto position N.
The outsid etemperature indicator is no t
designed to serve as an ice-warnin gdevic eand
is therefore unsuitable fo rthat purpose.
Changes in th eoutsid etemperature are dis -
playe dafter ashort delay.
Indicated temperature sjust abov eth efreezin g
poin tdo no tguarantee that th eroad surfac eis
free of ice. The road may still be icy, especially in
wooded areas or on bridges. The vehicle could
skid if you fail to adapt your drivin gstyle. Always
adapt your drivin gstyle and drive at aspeed to
suit th
ep
revailin gweather conditions.
You should pay special attention to road condi-
tion swhen temperature sare around freezin g
point.
Fo rmore information on drivin gwit hsnow
chains, see (
Ypage 294).
Fo rmore information on drivin gwit hsummer
tires ,see (
Ypage 294).
Observ eth enote sin th e"Winte roperation "sec -
tion (
Ypage 294).
Drivin gsystems
Mercedes-Benz Intelligent Drive
Mercedes-Ben zIntelligen tDrive stand sfo rinno -
vative driver assistanc eand safet ysystems
whic henhance comfor tand suppor tth edriver in
critical situations. Wit hthese intelligen tco-ordi -
nated systems Mercedes-Ben zhas set amile-
ston eon th epat htoward sautonomous driving.
Mercedes-Ben zIntelligen tDrive embraces all
elements of active and passive safet yin on ewell
Driving systems14 7
Driving an d parking
Z
Page 211 of 334

Display messagesPossible causes/consequences andMSolutions
6
Front LeftMalfunc‐tio nServic eRequiredorFron tRight MalfunctionServic eRequired
The restrain tsystem has malfunctioned at th efron ton th elef tor right .
The 6 warning lamp also lights up in th einstrumen tcluster.
GWARNIN G
The air bags or Emergency Tensioning Devices may either be triggered
unintentionally or, in th eevent of an accident, may no tbe triggered .
There is an increased ris kof injury.
XVisit aqualified specialist workshop immediately.
6
Rea rLef tMalfunc‐tio nServic eRequiredorRearRight MalfunctionServic eRequired
The restrain tsystem has malfunctioned at th erear on th elef tor right .
The 6 warning lamp also lights up in th einstrumen tcluster.
GWARNIN G
The air bags or Emergency Tensioning Devices may either be triggered
unintentionally or, in th eevent of an accident, may no tbe triggered .
There is an increased ris kof injury.
XVisit aqualified specialist workshop immediately.
6
Lef tSid eCurtai nAirbag MalfunctionServiceRequiredorRigh tSideCurtai nAirbagMalfunctionServiceRequired
The left-han dor right-hand window curtai nair bag is malfunctioning .
The 6 warning lamp also lights up in th einstrumen tcluster.
GWARNIN G
The lef tor right window curtai nair bag may either be triggered unin-
tentionally or, in th eevent of an accident, may no tbe triggered .
There is an increased ris kof injury.
XVisit aqualified specialist workshop immediately.
Display messages20 9
On-board computer and displays
Z
Page 253 of 334

:Mirror light
;Bracket
=Retaining clip, e.g. for a car park ticket
?Vanity mirror
AMirror cover
Vanity mirror in the sun visor
Mirror light:only functions if the sun visor is
clipped into bracket ;and mirror cover Ahas
been folded up.
Glare from the side
XFold down sun visor :.
XPull sun visor:out of retainer ;.
XSwing sun visor :to the side.
XSlide sun visor :horizontally as required.
Rear window roller sunblind
Important safety notes
GWARNING
Parts of the body could be trapped in the
sweep of the roller sunblind when the roller
sunblind is extended or retracted. There is a
risk of injury.
When extending or retracting make sure that
no parts of the body are in the sweep of the
roller sunblind. Briefly press the button again
if someone becomes trapped. The opening or
closing process is briefly stopped. The roller
sunblind then returns to its initial position.
!Make sure that the roller sunblind can move
freely. Otherwise, the roller sunblind or other
objects could be damaged.
Retracting or extending from the
driver’s seat
XTurn the SmartKey to position 1or 2in the
ignition lock (Ypage 123).
XTo extend or retract: briefly press button:.
The roller sunblind fully extends or fully
retracts.
XTo stop: briefly press button :again.
The roller sunblind stops briefly and moves
back into the out-of-use position.
Features251
Stowage and features
Z
Page 260 of 334

Points of Interest (POIs)/important destinations
in the vicinity.
Furthermore, you can download routes with up
to four way points.
You are prompted to confirm route guidance to
the address entered.
XSelectYesby turning 3or sliding 1
the controller and confirm with 7.
The system calculates the route and subse-
quently starts the route guidance with the
address entered.
If you select No
the address can be stored in
the address book.
The destination download function is available
if:
Rthe vehicle is equipped with a navigation sys-
tem.
Rthe relevant mobile phone network is availa-
ble and data transfer is possible.
Route Assistance
This service is part of the mbrace PLUS Package
and cannot be purchased separately.
You can use the route assistance function even
if the vehicle is not equipped with a navigation
system.
Within the framework of this service, you receive
a professional and reliable form of navigation
support without having to leave your vehicle.
The customer service representative finds a
suitable route depending on your vehicle's cur-
rent position and the desired destination. You
will then be guided live through the current route
section.
Search & Send
General notes
To use "Search & Send", your vehicle must be
equipped with mbrace and a navigation system.
Additionally, an mbrace service subscription
must be completed.
"Search & Send" is a destination entry service. A
destination address which is found on Google
Maps
®can be transferred via mbrace directly to
your vehicle's navigation system.
Specifying and sending the destination
address
XGo to the website http://maps.google.com
and enter a destination address into the entry
field.
XTo send the destination address to the e-
mail address of your mbrace account:
click on the corresponding button on the web-
site.
Example:
If you select 'Send to vehicle' and then
'Mercedes-Benz', the destination address will
be sent to your vehicle.
XWhen the "Send" dialog window appears:
Enter the e-mail address you specified when
setting up your mbrace account into the cor-
responding field.
XClick "Send".
Information on specific commands such as
"Address entry" or "Send" can be found on the
website.
Calling up a transmitted destination
address
XTurn the SmartKey to position 2in the ignition
lock (Ypage 123).
The transmitted destination address is loaded
into the vehicle's navigation system.
A display message appears, asking whether
navigation should be started.
XSelect Yesby turning 3or sliding 1
the controller and confirm with 7.
The system calculates the route and subse-
quently starts the route guidance with the
address entered.
If you select No
the address can be stored in
the address book.
If you have sent more than one destination
address, each individual destination must be
confirmed separately.
Destination addresses are loaded in the same
order as the order in which they were sent.
If you own multiple Mercedes-Benz vehicles with
mbrace and activated mbrace accounts:
If multiple vehicles are registered under the
same e-mail address, the destination will be
sent to all the vehicles.
258Features
Stowage and features
Page 273 of 334

After the vehicle has been washed, brake
carefully while paying attention to the traffic
conditions until full braking power is restored.
!When DISTRONIC PLUS or the HOLD func-
tion is activated, the vehicle brakes automat-
ically in certain situations.
To avoid damage to the vehicle, deactivate
DISTRONIC PLUS and the HOLD function in
the following or similar situations:
Rwhen towing the vehicle
Rin the car wash
!Never clean your vehicle in a Touchless
Automatic Car Wash as these use special
cleaning agents. These cleaning agents can
damage the paintwork or plastic parts.
!Make sure that:
Rthe side windows and the sliding sunroof
are fully closed.
Rthe ventilation/heating is switched off (the
OFF button has been pressed).
Rthe windshield wiper switch is at position 0.
Rthe 360° camera or rear view camera is
switched off.
The vehicle may otherwise be damaged.
!In car washes with a towing mechanism,
make sure that the automatic transmission is in transmission position N, otherwise the
vehicle could be damaged.
RVehicles with a SmartKey:
Do not remove the SmartKey from the igni-
tion lock. Do not open the driver's door or
front-passenger door whe
n the engine is
switched off. Otherwise, the automatic
transmission selects park position Pauto-
matically and locks the wheels. You can
prevent this by shifting the automatic trans-
mission to Nbeforehand.
RVehicles with KEYLESS-GO:
Do not open the driver's door or front-
passenger door when the engine is
switched off. Otherwise, the automatic
transmission selects park position Pauto-
matically and locks the wheels.
Observe the following to make sure that the
automatic transmission stays in position N:
XMake sure the vehicle is stationary and the
ignition is switched off.
XTurn the SmartKey to position2in the ignition
lock (Ypage 123).
Use the SmartKey instead of the Start/Stop
button on vehicles with KEYLESS-GO.
XDepress and hold the brake pedal.
XShift the automatic transmission to position
N.
XRelease the brake pedal.
XRelease the electric parking brake.
XSwitch off the ignition and leave the SmartKey
in the ignition lock.
You can wash the vehicle in an automatic car
wash from the very start.
If the vehicle is very dirty, pre-wash it before
cleaning it in an automatic car wash.
After using an automatic car wash, wipe off wax
from the windshield and the wipe r b
lades. This
will prevent smears and reduce wiping noises
caused by residue on the windshield.
Washing by hand
In some countries, washing by hand is only
allowed at specially equipped washing bays.
Observe the legal requirements in each country.
XDo not use hot water and do not wash the
vehicle in direct sunlight.
XUse a soft sponge to clean.
XUse a mild cleaning agent, such as a car
shampoo approved by Mercedes-Benz.
XThoroughly hose down the vehicle with a gen-
tle jet of water.
XDo not point the water jet directly towards the
air inlet.
XUse plenty of water and rinse out the sponge
frequently.
XRinse the vehicle with clean water and dry
thoroughly with a chamois.
XDo not let the cleaning agent dry on the paint- work.
Carefully remove all deposits of road salt as
soon as possible when driving in winter.
Power washers
GWARNING
The water jet from a circular jet nozzle (dirt
blasters) can cause invisible exterior damage
Care271
Maintenance and care
Z