2017 MERCEDES-BENZ CLA ECU
[x] Cancel search: ECUPage 245 of 318

Have the system checked at the nearest
Mercedes-Benz Service Center or contact the
following service hotlines:
Mercedes-Benz Customer Assistance Center at
1-800-FOR-MERCedes (1 -800-367-6372) or
1-866-990-9007
Emergency call Important safety notes
G WARNING
It can be dangerous to remain in the vehicle,
even if you have pressed the SOS button in an
emergency if: R
you see smoke inside or outside of the vehi-
cle, e.g. if there is a fire after an accident R
the vehicle is on a dangerous section of
road R
the vehicle is not visible or cannot easily be
seen by other road users, particularly when
dark or in poor visibility conditions
There is a risk of an accident and injury.
Leave the vehicle immediately in this or simi-
lar situations as soon as it is safe to do so.
Move to a safe location along with other vehi-
cle occupants. In such situations, secure the
vehicle in accordance with national regula-
tions, e. g. with a warning triangle.
General notes Observe the notes on system activation
( Y
page 242).
An emergency call is dialed automatically if an
air bag or Emergency Tensioning Device is trig-
gered. You cannot end an automatically trig-
gered emergency call yourself.
An emergency call can also be initiated man-
ually.
As soon as the emergency call has been initi-
ated, the indicator lamp in the SOS button
flashes. The Connecting Call message
appears in the multifunction display.
The audio output is muted.
Once the connection has been made, the Call
Connected message appears in the multifunc-
tion display. All important information on the emergency is
transmitted, for example: R
current location of the vehicle (as determined
by the GPS system) R
vehicle identification number R
information on the severity of the accident
Shortly after the emergency call has been initi-
ated, a voice connection is automatically estab-
lished between the Customer Assistance Center
and the vehicle occupants. R
If the vehicle occupants respond, the
Mercedes-Benz Customer Assistance Center
attempts to get more information on the
emergency. R
If there is no response from the vehicle occu-
pants, an ambulance is immediately sent to
the vehicle.
If no voice connection can be established to the
Mercedes-Benz Customer Assistance Center,
the system has been unable to initiate an emer-
gency call.
This can occur, for example, if the relevant
mobile phone network is not available. The indi-
cator lamp in the SOS button flashes continu-
ously.
The Call Failed message appears in the mul-
tifunction display and must be confirmed.
In this case, summon assistance by other
means.
Making an emergency call
X
To initiate an emergency call manually:
press cover C briefly to open. X
Press and hold the SOS button for at least one
second D .
The indicator lamp in SOS button D flashes
until the emergency call is concluded. X
Wait for a voice connection to the Mercedes-
Benz Customer Assistance Center. Features 243
Sto wag e an d features Z
Page 255 of 318

South America
Floormats
G WARNING
Objects in the driver's footwell can restrict the
pedal travel or obstruct a depressed pedal.
The operating and road safety of the vehicle is
jeopardized. There is a risk of an accident.
Make sure that all objects in the vehicle are
stowed correctly, and that they cannot enter
the driver's footwell. Install the floormats
securely and as specified in order to ensure
sufficient clearance for the pedals. Do not use
loose floormats and do not place floormats on
top of one another.
X
Slide the seat backwards. X
To install: place the floormat in the footwell. X
Press safety catch knobs C onto retain-
ers D . X
To remove: pull the floormat off retainers D .X
Remove the floormat.
Features 253
Stowage and features Z
Page 264 of 318
! Clean the water drainage channels of the
windshield and the rear window at regular
intervals. Deposits such as leaves, petals and
pollen may under certain circumstances pre-
vent water from draining away. This can lead
to corrosion damage and damage to elec-
tronic components. X
Clean the inside and outside of the windows
with a damp cloth and a cleaning product that
is recommended and approved by Mercedes-
Benz.
Cleaning wiper blades
G WARNING
You could become trapped by the windshield
wipers if they start moving while cleaning the
windshield or wiper blades. There is a risk of
injury.
Always switch off the windshield wipers and
the ignition before cleaning the windshield or
wiper blades.
! Only fold the windshield wipers away from
the windshield when vertical. Otherwise, you
will damage the hood.
! Do not pull the wiper blade. Otherwise, the
wiper blade could be damaged.
! Do not clean wiper blades too often and do
not rub them too hard. Otherwise, the graph-
ite coating could be damaged. This could
cause wiper noise.
! Hold the wiper arm securely when folding
back. The windshield could be damaged if the
wiper arm smacks against it suddenly. X
Fold the windshield wiper arms away from the
windshield. X
Carefully clean the wiper blades with a damp
cloth. X
Fold the windshield wiper arms back again
before switching on the ignition.
Cleaning the exterior lighting
! Only use cleaning agents or cleaning cloths
which are suitable for plastic light lenses.
Unsuitable cleaning agents or cleaning cloths
could scratch or damage the plastic light len-
ses. X
Clean the plastic lenses of the exterior lights
with a wet sponge and a mild cleaning agent,
e.g. Mercedes-Benz car shampoo or cleaning
cloths.
Cleaning the mirror turn signals
! Only use cleaning agents or cleaning cloths
that are suitable for plastic lenses. Unsuitable
cleaning agents or cleaning cloths could
scratch or damage the plastic lenses of the
mirror turn signals. X
Clean the plastic lenses of the mirror turn sig-
nals in the exterior mirror housing using a wet
sponge and mild cleaning agent, e.g.
Mercedes-Benz car shampoo or cleaning
cloths.
Cleaning the sensors
! If you clean the sensors with a power
washer, make sure that you keep a distance
of at least 11.8 in (30 cm) between the vehicle
and the power washer nozzle. Information
about the correct distance is available from
the equipment manufacturer.
X
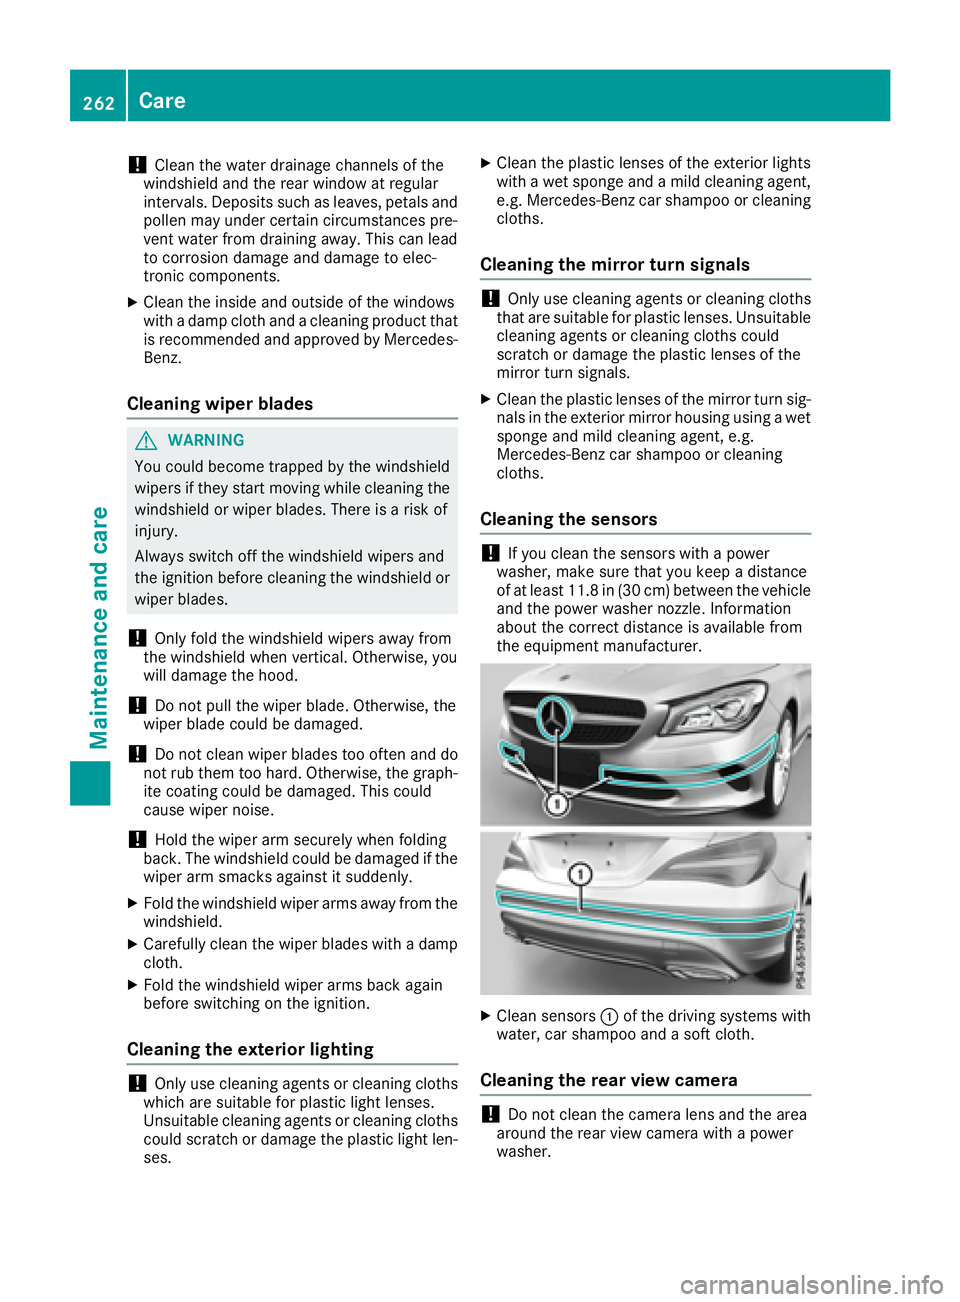
Clean sensors C of the driving systems with
water, car shampoo and a soft cloth.
Cleaning the rear view camera
! Do not clean the camera lens and the area
around the rear view camera with a power
washer.262
Care
Maintenance and care
Page 274 of 318
the household rubbish. They
must be collected separately
and recycled to protect the
environment.
Dispose of batteries in an
environmentally friendly
manner. Take discharged
batteries to a qualified spe-
cialist workshop or a special
collection point for used bat-
teries.
! Have the battery checked regularly at a
qualified specialist workshop.
Observe the service intervals in the Mainte-
nance Booklet or contact a qualified specialist
workshop for more information.
! You should have all work involving the bat-
tery carried out at a qualified specialist work-
shop. In the exceptional case that it is neces-
sary for you to disconnect the battery your-
self, make sure that: R
you switch off the engine and remove the
key. On vehicles with KEYLESS-GO, ensure
that the ignition is switched off. Check that
all the indicator lamps in the instrument
cluster are off. Otherwise, electronic com-
ponents, such as the alternator, may be
damaged. R
you first remove the negative terminal
clamp and then the positive terminal
clamp. Never swap the terminal clamps.
Otherwise, the vehicle's electronic system
may be damaged. R
in vehicles with automatic transmission,
the transmission is locked in position P
after disconnecting the battery. The vehicle
is s ecured against rolling away. You can
th
en no longer move the vehicle.
The battery and the cover of the positive ter-
minal clamp must be installed securely during
operation.
Comply with safety precautions and take pro-
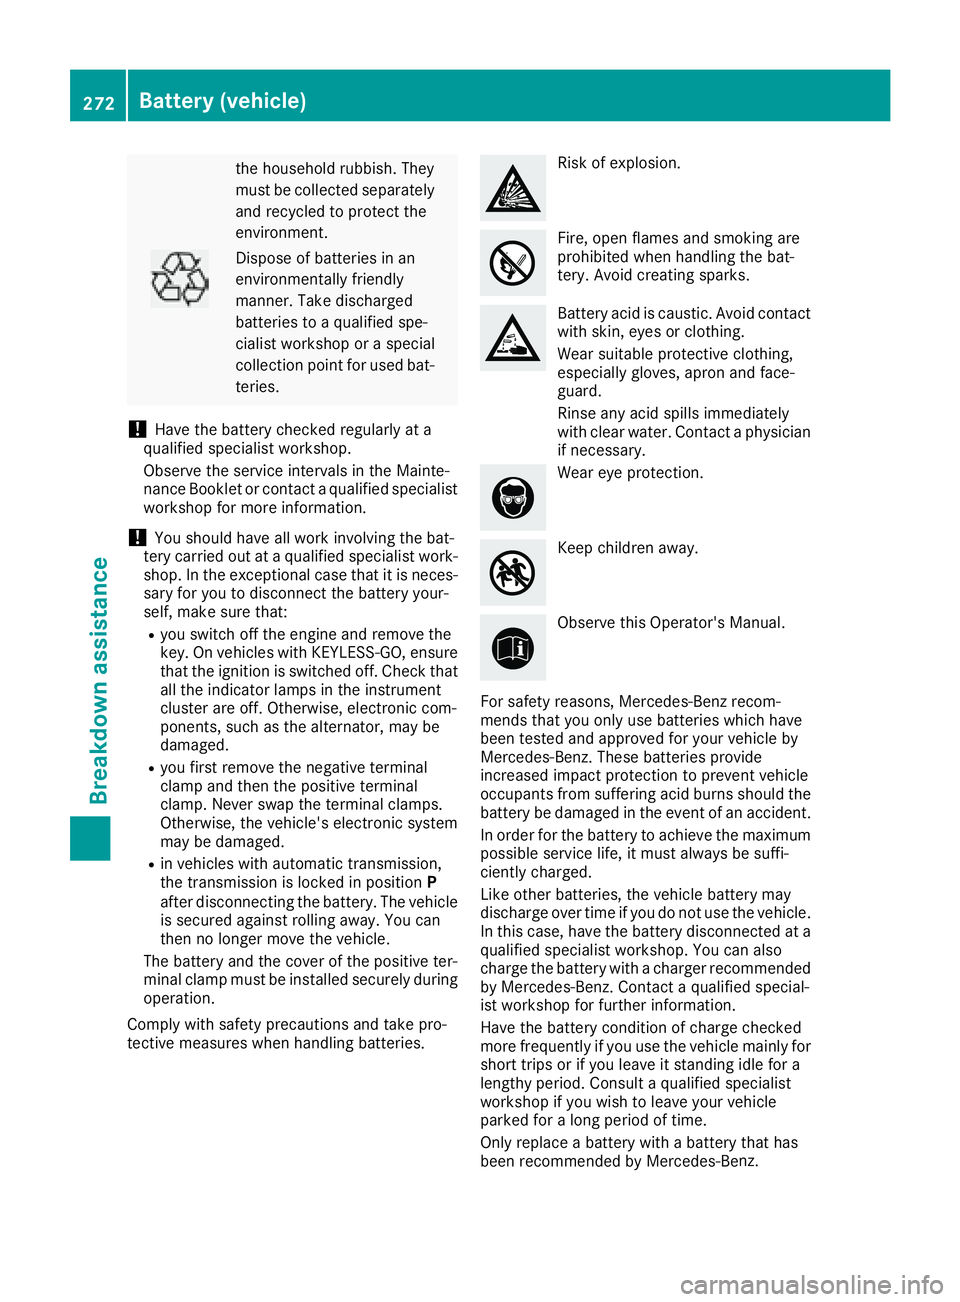
tective measures when handling batteries. Risk of explosion.
Fire, open flames and smoking are
prohibited when handling the bat-
tery. Avoid creating sparks.
Battery acid is caustic. Avoid contact
with skin, eyes or clothing.
Wear suitable protective clothing,
especially gloves, apron and face-
guard.
Rinse any acid spills immediately
with clear water. Contact a physician
if necessary.
Wear eye protection.
Keep children away.
Observe this Operator's Manual.
For safety reasons, Mercedes-Benz recom-
mends that you only use batteries which have
been tested and approved for your vehicle by
Mercedes-Benz. These batteries provide
increased impact protection to prevent vehicle
occupants from suffering acid burns should the
battery be damaged in the event of an accident.
In order for the battery to achieve the maximum
possible service life, it must always be suffi-
ciently charged.
Like other batteries, the vehicle battery may
discharge over time if you do not use the vehicle.
In this case, have the battery disconnected at a
qualified specialist workshop. You can also
charge the battery with a charger recommended
by Mercedes-Benz. Contact a qualified special-
ist workshop for further information.
Have the battery condition of charge checked
more frequently if you use the vehicle mainly for
short trips or if you leave it standing idle for a
lengthy period. Consult a qualified specialist
workshop if you wish to leave your vehicle
parked for a long period of time.
Only replace a battery with a battery that has
been recommended by Mercedes-Be nz.272
Battery (vehicle)
Breakdown assistance
Page 277 of 318
Make sure that: R
The jumper cables are not damaged. R
Non-insulated parts of the terminal clamps do not come into contact with other metal parts while
the jumper cables are connected to the battery R
The jumper cables cannot come into contact with parts that can move when the engine is running,
such as the V-belt pulley or the fan X
Secure the vehicle by applying the electric parking brake. X
Shift the transmission to position P .X
Turn the SmartKey to position 0 in the ignition lock and remove it.X
Switch off all electrical consumers, e.g. rear window defroster, lighting, etc. X
Open the hood.
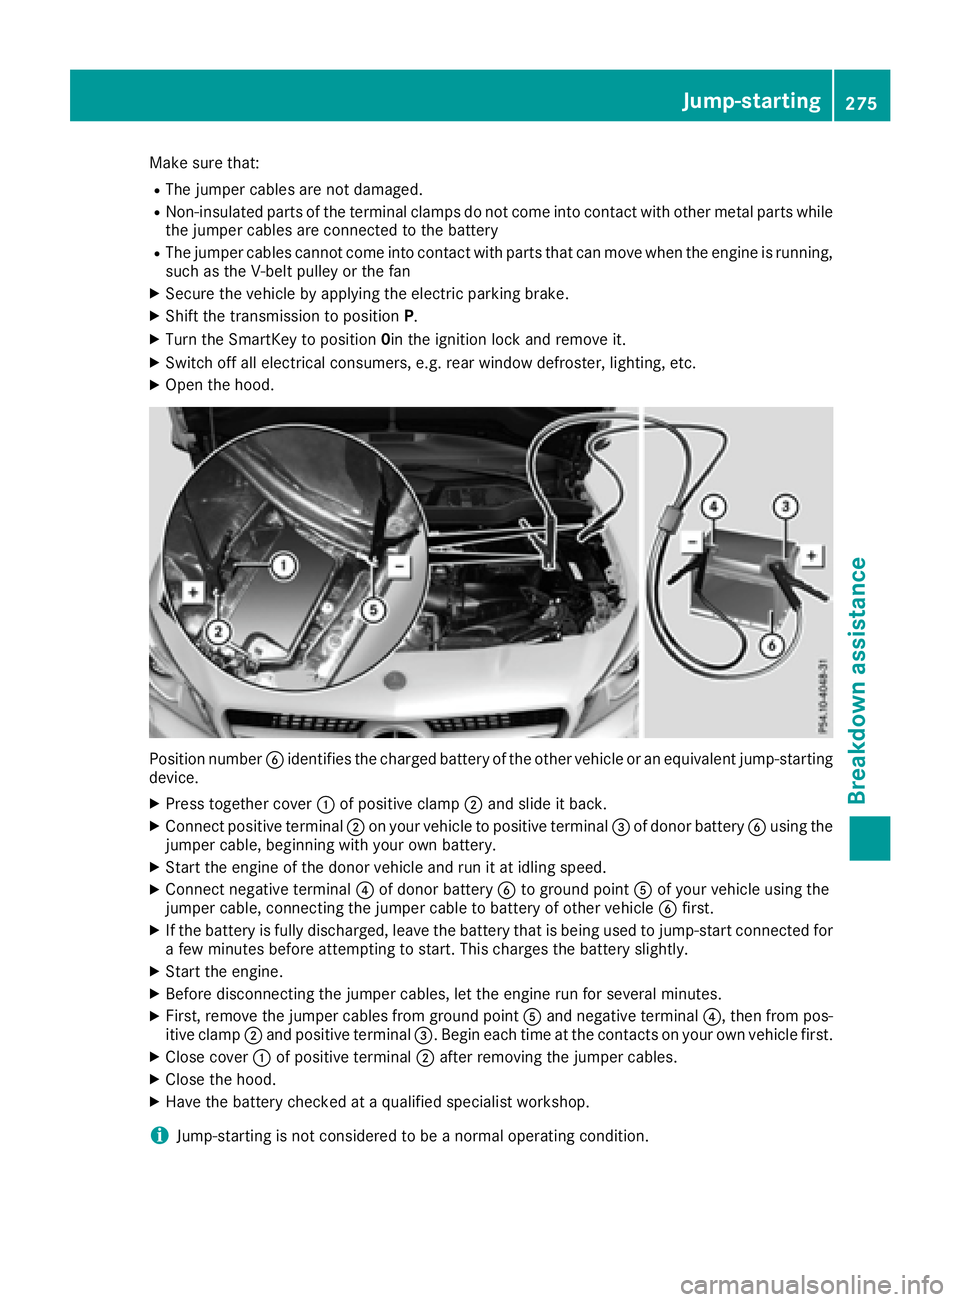
Position number
Page 278 of 318
i Jumper cables and further information regarding jump-starting can be obtained at any qualified
specialist workshop.
Towing and tow-starting
Important safety notes
G WARNING
Functions relevant to safety are restricted or
no longer available if: R
the engine is not running. R
the brake system or the power steering is
malfunctioning. R
there is a malfunction in the voltage supply
or the vehicle's electrical system.
If your vehicle is being towed, much more
force may be necessary to steer or brake.
There is a risk of an accident.
In such cases, use a tow bar. Before towing,
make sure that the steering moves freely.
G WARNING
You can no longer steer the vehicle if the
steering wheel lock has been engaged. There
is a risk of an accident.
Always switch off the ignition when towing the
vehicle with a tow cable or a tow bar.
G WARNING
When towing or tow-starting another vehicle
and its weight is greater than the permissible
gross weight of your vehicle, the: R
the towing eye could detach itself R
the vehicle/trailer combination could roll-
over.
There is a risk of an accident.
When towing or tow-starting another vehicle,
its weight should not be greater than the per-
missible gross weight of your vehicle.
Details on the permissible gross vehicle weight
of your vehicle can be found on the vehicle iden-
tification plate ( Y
page 308).
! When Active Brake Assist, Distance Pilot
DISTRONIC or the HOLD function is activated, the vehicle brakes automatically in certain
situations.
To avoid damage to the vehicle, deactivate
these systems in the following or similar sit-
uations: R
when towing the vehicle R
in the car wash
! Make sure that the electric parking brake is
released. If the electric parking brake is faulty,
visit a qualified specialist workshop.
! Only secure the tow rope or tow bar at the
towing eyes. Otherwise, the vehicle could be
damaged.
! Do not use the towing eyes for recovery pur-
poses as this could damage the vehicle. If in
doubt, recover the vehicle with a crane.
! When towing, pull away slowly and
smoothly. If the tractive power is too high, the
vehicles could be damaged.
! The vehicle can be towed a maximum of
30 miles (50km). The towing speed of 30 mph
(50km/h) must not be exceeded.
If the vehicle has to be towed more than
30 miles (50km), the front axle must be raised
or the entire vehicle raised and transported.
! Do not tow with sling-type equipment. This
could damage the vehicle.
! When towing vehicles with KEYLESS-GO,
use the key instead of the Start/Stop button.
Otherwise, the automatic transmission may
shift to position P when the driver's or front-
passenger door are opened, which could lead
to damage to the transmission.
! Vehicles with automatic transmission must
not be started by tow-starting. This could oth-
erwise damage the transmission.
It is better to have the vehicle transported than
to have it towed away.
If the vehicle can no longer be driven because of
an accident or breakdown, you have the follow-
ing options: R
transporting the vehicle276
Towing and tow-starting
Breakdown assistance
Page 280 of 318
X
When the vehicle is stationary, depress the
brake pedal and keep it depressed. X
Shift the automatic transmission to posi-
tion P .X
Release the brake pedal. X
Release the electric parking brake. X
Switch off the automatic locking
( Y
page 184).X
Switch on the hazard warning lamps
( Y
page 101).X
Turn the SmartKey in the ignition lock to posi-
tion 0 and leave the SmartKey in the ignition
lock.
Towing a vehicle with both axles on
the ground It is important that you observe the safety
instructions when towing away your vehicle
( Y
page 276). X
On vehicles with KEYLESS-GO or the KEY-
LESS-GO start function: you must use the
SmartKey instead of the Start/Stop button
( Y
page 122).
The automatic transmission automatically shifts
to position P when you open the driver's or front-
passenger door or when you remove the Smart-
Key from the ignition lock. In order to ensure
that the automatic transmission stays in posi-
tion N when towing the vehicle, you must
observe the following points: X
Make sure that the vehicle is stationary. X
Turn the SmartKey to position 2 in the ignition
lock. X
Depress and hold the brake pedal. X
Shift the automatic transmission to position
N . X
Leave the SmartKey in position 2 in the igni-
tion lock. X
Release the brake pedal. X
Release the electric parking brake. X
Switch on the hazard warning lamps
( Y
page 101).
i In order to signal a change of direction when
towing the vehicle with the hazard warning
lamps switched on, use the combination
switch as usual. In this case, only the indicator
lamps for the direction of travel flash. After resetting the combination switch, the hazard
warning lamp starts flashing again.
Transporting the vehicle
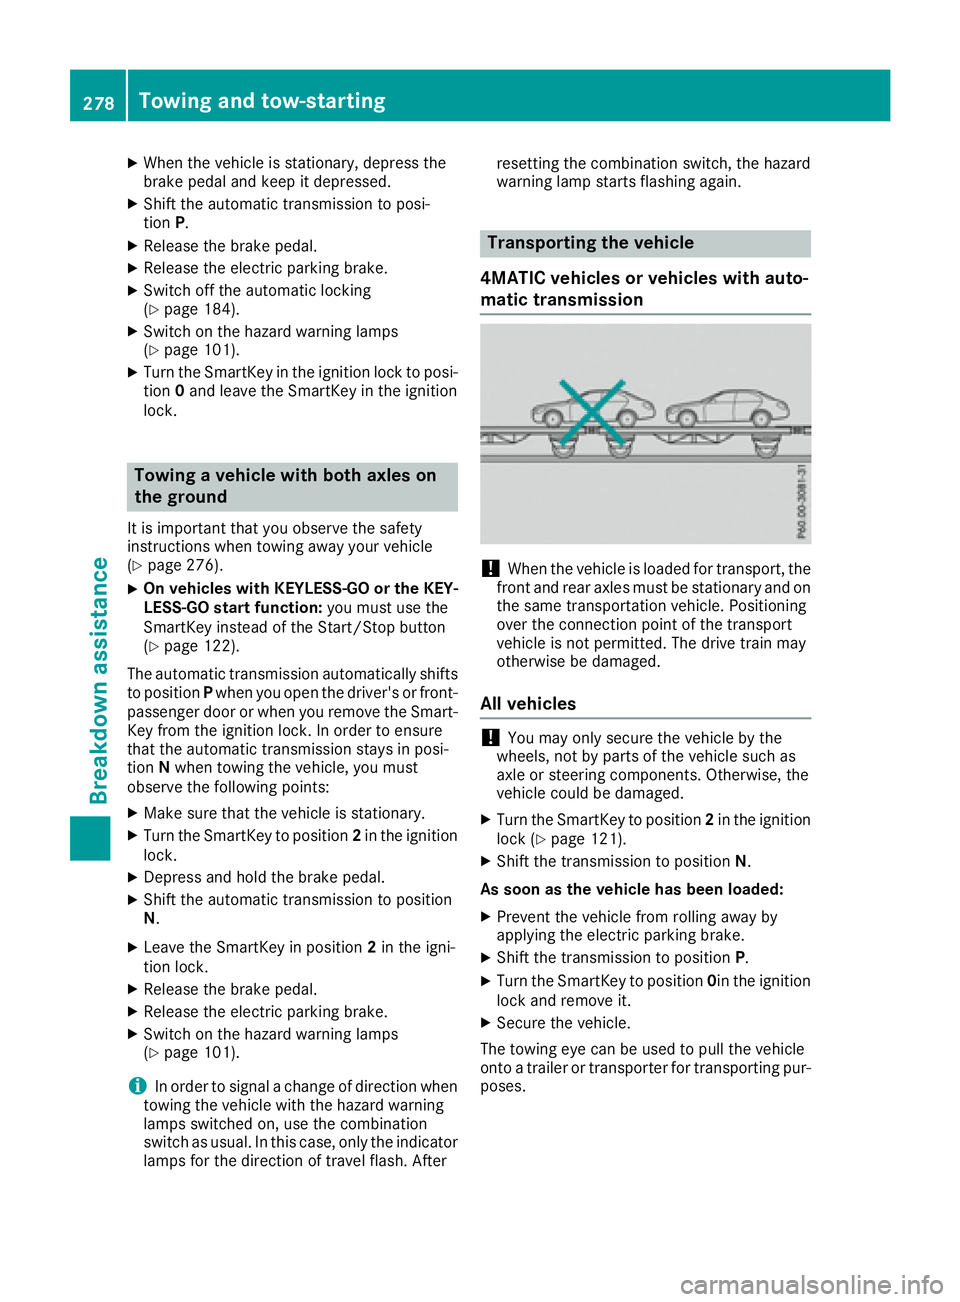
4MATIC vehicles or vehicles with auto-
matic transmission
! When the vehicle is loaded for transport, the
front and rear axles must be stationary and on
the same transportation vehicle. Positioning
over the connection point of the transport
vehicle is not permitted. The drive train may
otherwise be damaged.
All vehicles
! You may only secure the vehicle by the
wheels, not by parts of the vehicle such as
axle or steering components. Otherwise, the
vehicle could be damaged. X
Turn the SmartKey to position 2 in the ignition
lock ( Y
page 121). X
Shift the transmission to position N .
As soon as the vehicle has been loaded: X
Prevent the vehicle from rolling away by
applying the electric parking brake. X
Shift the transmission to position P .X
Turn the SmartKey to position 0 in the ignition
lock and remove it. X
Secure the vehicle.
The towing eye can be used to pull the vehicle
onto a trailer or transporter for transporting pur-
poses.278
Towing and tow-starting
Breakdown assistance
Page 281 of 318

Notes on 4MATIC vehicles
! Vehicles with 4MATIC must not be towed
with either the front or the rear axle raised, as
doing so will damage the transmission.
Vehicles with 4MATIC may only either be towed
away with both axles on the ground or be loaded
up and transported.
If the vehicle's transmission, front, or rear axle is
damaged, have the vehicle transported on a
truck or trailer.
In the event of damage to the electrical sys-
tem:
If the battery is defective, the automatic trans-
mission will be locked in position P . To shift the
automatic transmission to position N , you must
provide power to the vehicle's electrical system
in the same way as when jump-starting
( Y
page 273).
Have the vehicle transported on a transporter or
trailer.
Tow-starting (emergency engine
starting)
! Vehicles with automatic transmission must
not be tow-started. You could otherwise dam-
age the automatic transmission.
i You can find information on "Jump-starting"
under ( Y
page 273).
Fuses
Important safety notes
G WARNING
If you manipulate or bridge a faulty fuse or if
you replace it with a fuse with a higher amper-
age, the electric cables could be overloaded.
This could result in a fire. There is a risk of an
accident and injury.
Always replace faulty fuses with the specified
new fuses having the correct amperage.
! Only use fuses that have been approved for
Mercedes-Benz vehicles and which have the
correct fuse rating for the system concerned.
Only use fuses marked with an "S". Other- wise, components or systems could be dam-
aged.
! Make sure that no moisture can enter the
fuse box when the cover is open.
! When closing the cover, make sure that it is
lying correctly on the fuse box. Moisture seep-
ing in or dirt could otherwise impair the oper-
ation of the fuses.
The fuses in your vehicle serve to close down
faulty circuits. If a fuse blows, all the compo-
nents on the circuit and their functions stop
operating.
Blown fuses must be replaced with fuses of the
same rating, which you can recognize by the
color and value. The fuse ratings are listed in the
fuse al loca tion chart.
T he fuse allocation chart is in the fuse box in the
front-passenger footwell ( Y
page 280).
If a newly inserted fuse also blows, have the
cause traced and rectified at a qualified special-
ist workshop, e.g. an authorized Mercedes-Benz
Center.
Before changing a fuse X
Secure the vehicle against rolling away
( Y
page 140). X
Switch off all electrical consumers. X
Vehicles without KEYLESS-GO: remove the
SmartKey from the ignition lock. X
Vehicles with KEYLESS-GO start-function
or KEYLESS-GO: open the driver's door.
The vehicle electronics now have status 0 .
This is the same as the SmartKey having been
removed.
The fuses are located in various fuse boxes: R
Fuse box in the engine compartment on the
left-hand side of the vehicle, when viewed in
the direction of travel R
Fuse box in the front-passenger footwell
The fuse allocation chart is on the fuse box in the
front-passenger footwell ( Y
page 280).Fuses 279
Breakdown assistance Z