2017 MERCEDES-BENZ CLA child lock
[x] Cancel search: child lockPage 58 of 318
LATCH-type (ISOFIX) child seat secur-
ing system
G WARNING
LATCH-type (ISOFIX) child restraint systems
do not offer sufficient protective effect for
children whose weight is greater than 48 lbs
(22 kg) who are secured using the safety belt
integrated in the child restraint system. In the
event of an accident, a child might not be
restrained correctly. This poses an increased
risk of injury or even fatal injury.
If the child weighs more than 48 lbs (22 kg),
only use LATCH-type (ISOFIX) child restraint
systems with which the child is also secured
with the vehicle seat belt. Also secure the
child restraint system with the Top Tether
belt, if available.
Always comply with the manufacturer's instal-
lation and operating instructions for the child
restraint system used.
Before every trip, make sure that the LATCH-
type (ISOFIX) child restraint system is engaged
correctly in both LATCH-type (ISOFIX) securing
rings
! When installing the child restraint system,
make sure that the seat belt for the middle
seat does not get trapped. The seat belt could
otherwise be damaged.
X
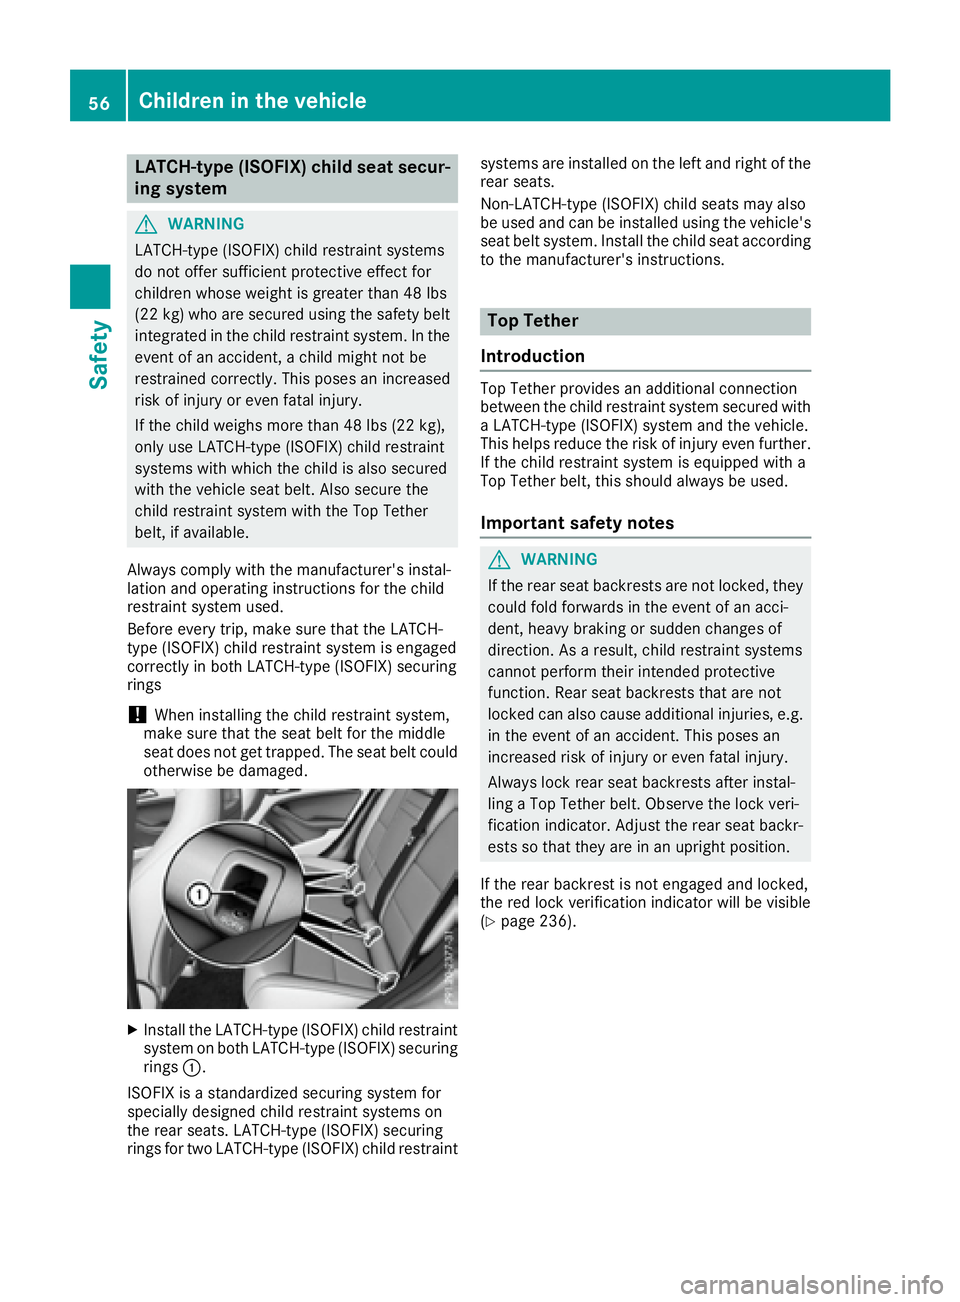
Install the LATCH-type (ISOFIX) child restraint
system on both LATCH-type (ISOFIX) securing
rings �C .
ISOFIX is a standardized securing system for
specially designed child restraint systems on
the rear seats. LATCH-type (ISOFIX) securing
rings for two LATCH-type (ISOFIX) child restraint systems are installed on the left and right of the
rear seats.
Non-LATCH-type (ISOFIX) child seats may also
be used and can be installed using the vehicle's
seat belt system. Install the child seat according
to the manufacturer's instructions.
Top Tether
Introduction Top Tether provides an additional connection
between the child restraint system secured with
a LATCH-type (ISOFIX) system and the vehicle.
This helps reduce the risk of injury even further.
If the child restraint system is equipped with a
Top Tether belt, this should always be used.
Important safety notes
G WARNING
If the rear seat backrests are not locked, they
could fold forwards in the event of an acci-
dent, heavy braking or sudden changes of
direction. As a result, child restraint systems
cannot perform their intended protective
function. Rear seat backrests that are not
locked can also cause additional injuries, e.g.
in the event of an accident. This poses an
increased risk of injury or even fatal injury.
Always lock rear seat backrests after instal-
ling a Top Tether belt. Observe the lock veri-
fication indicator. Adjust the rear seat backr-
ests so that they are in an upright position.
If the rear backrest is not engaged and locked,
the red lock verification indicator will be visible
( Y
page 236).56
Children in the vehicle
Safety
Page 60 of 318
Rearward-facing child restraint system If it is absolutely necessary to install a rearward-
facing child restraint system on the front-
passenger seat, always make sure that the
front-passenger front air bag is deactivated.
Only if the PASSENGER AIR BAG OFF indicator
lamp is permanently lit ( Y
page 40) is the front-
passenger front air bag deactivated.
Always observe the child restraint system man-
ufacturer's installation and operating instruc-
tions.
Forward-facing child restraint system If it is absolutely necessary to install a forward-
facing child restraint system on the front-
passenger seat, always move the front-
passenger seat as far back as possible. Fully
retract the seat cushion length. The entire base
of the child restraint system must always rest on
the seat cushion of the front-passenger seat.
The backrest of the child restraint system must
lie as flat as possible against the backrest of the
front-passenger seat. The child restraint system
must not touch the roof or be subjected to a load
by the head restraint. Adjust the angle of the
seat backrest and the head restraint position
accordingly. Always make sure that the shoul-
der belt strap is correctly routed from the vehi-
cle belt outlet to the shoulder belt guide on the
child restraint system. The shoulder belt strap
must be routed forwards and downwards from
the vehicle belt outlet. If necessary, adjust the
vehicle belt outlet and the front-passenger seat
accordingly.
Always observe the child restraint system man-
ufacturer's installation and operating instruc-
tions. Child-proof locks
Important safety notes
G WARNING
If children are traveling in the vehicle, they
could: R
open doors, thus endangering other people
or road users R
exit the vehicle and be caught by oncoming
traffic R
operate vehicle equipment and become
trapped
There is a risk of an accident and injury.
Always activate the child-proof locks and
override feature if children are traveling in the
vehicle. When leaving the vehicle, always take
the key with you and lock the vehicle. Never
leave children unattended in the vehicle.
Override feature for: R
the rear doors ( Y
page 59)R
the rear side windows ( Y
page 59)
G WARNING
If you leave children unsupervised in the vehi-
cle, they could set it in motion by, for example: R
release the parking brake. R
shift the automatic transmission out of the
parking position P .R
start the engine.
In addition, they may operate vehicle equip-
ment and become trapped. There is a risk of
an accident and injury.
When leaving the vehicle, always take the
SmartKey with you and lock the vehicle. Never
leave children unsupervised in the vehicle.
G WARNING
If persons, particularly children are subjected
to prolonged exposure to extreme heat or
cold, there is a risk of injury, possibly even
fatal. Never leave children unattended in the
vehicle.58
Children in the vehicle
Safety
Page 61 of 318
G WARNING
If the child restraint system is subjected to
direct sunlight, parts may get very hot. Chil-
dren may burn themselves on these parts,
particularly on the metal parts of the child
restraint system. There is a risk of injury.
If you leave the vehicle, taking the child with
you, always ensure that the child restraint
system is not exposed to direct sunlight. Pro-
tect it with a blanket, for example. If the child
restraint system has been exposed to direct
sunlight, let it cool down before securing the
child in it. Never leave children unattended in
the vehicle.
Child-proof locks for the rear doors
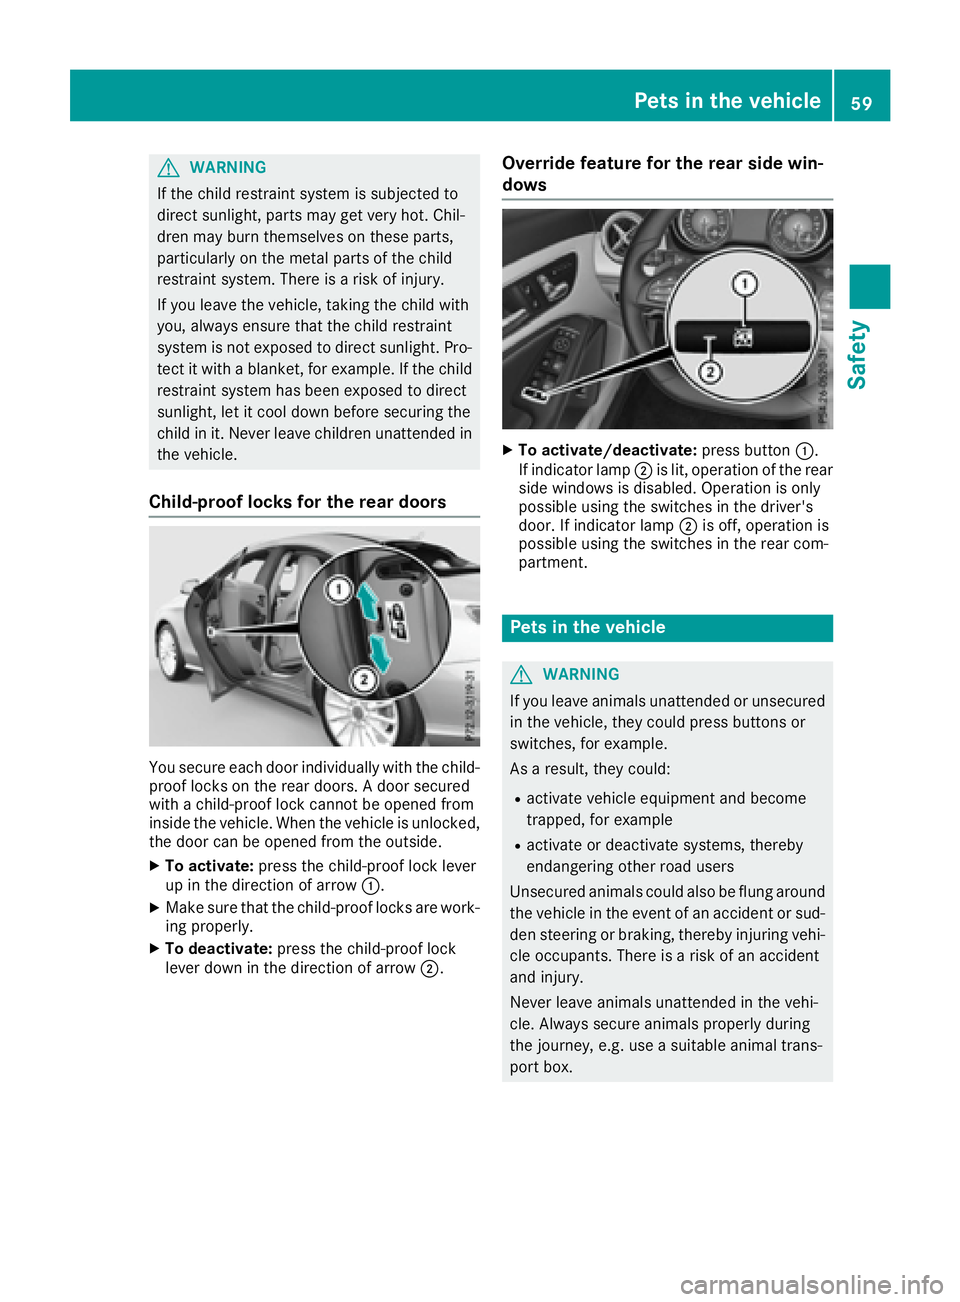
You secure each door individually with the child-
proof locks on the rear doors. A door secured
with a child-proof lock cannot be opened from
inside the vehicle. When the vehicle is unlocked,
the door can be opened from the outside. X
To activate: press the child-proof lock lever
up in the direction of arrow �C .X
Make sure that the child-proof locks are work-
ing properly. X
To deactivate: press the child-proof lock
lever down in the direction of arrow �D . Override feature for the rear side win-
dows X
To activate/deactivate: press button �C .
If indicator lamp �D is lit, operation of the rear
side windows is disabled. Operation is only
possible using the switches in the driver's
door. If indicator lamp �D is off, operation is
possible using the switches in the rear com-
partment.
Pets in the vehicle
G WARNING
If you leave animals unattended or unsecured
in the vehicle, they could press buttons or
switches, for example.
As a result, they could: R
activate vehicle equipment and become
trapped, for example R
activate or deactivate systems, thereby
endangering other road users
Unsecured animals could also be flung around
the vehicle in the event of an accident or sud-
den steering or braking, thereby injuring vehi-
cle occupants. There is a risk of an accident
and injury.
Never leave animals unattended in the vehi-
cle. Always secure animals properly during
the journey, e.g. use a suitable animal trans-
port box.Pets in the vehicle 59
Safety Z
Page 71 of 318
SmartKey
Important safety notes
G WARNING
If children are left unsupervised in the vehicle,
they could: R
open the doors, thus endangering other
people or road users. R
get out and disrupt traffic. R
operate the vehicle's equipment.
Additionally, children could set the vehicle in
motion if, for example, they: R
release the parking brake. R
shifting the automatic transmission out of
park position PR
Start the engine.
There is a risk of an accident and injury.
When leaving the vehicle, always take the
SmartKey with you and lock the vehicle. Never
leave children or animals unattended in the
vehicle. Always keep the SmartKey out of
reach of children.
G WARNING
If you attach heavy or large objects to the
SmartKey, the SmartKey could be uninten-
tionally turned in the ignition lock. This could
cause the engine to be switched off. There is a
risk of an accident.
Do not attach any heavy or large objects to the
SmartKey. Remove any bulky key rings before
inserting the SmartKey into the ignition lock.
! Keep the SmartKey away from strong mag-
netic fields. Otherwise, the remote control
function could be affected.
Strong magnetic fields can occur in the vicin-
ity of powerful electrical installations.
Do not keep the SmartKey: R
with electronic devices, e.g. a mobile phone
or another SmartKey. R
with metallic objects, e.g. coins or metal foil. R
inside metallic objects, e.g. a metal case
Vehicles with KEYLESS-GO start function: do
not keep the SmartKey in the trunk. Otherwise, the SmartKey may not be detected, e.g. when
starting the engine using the Start/Stop button.
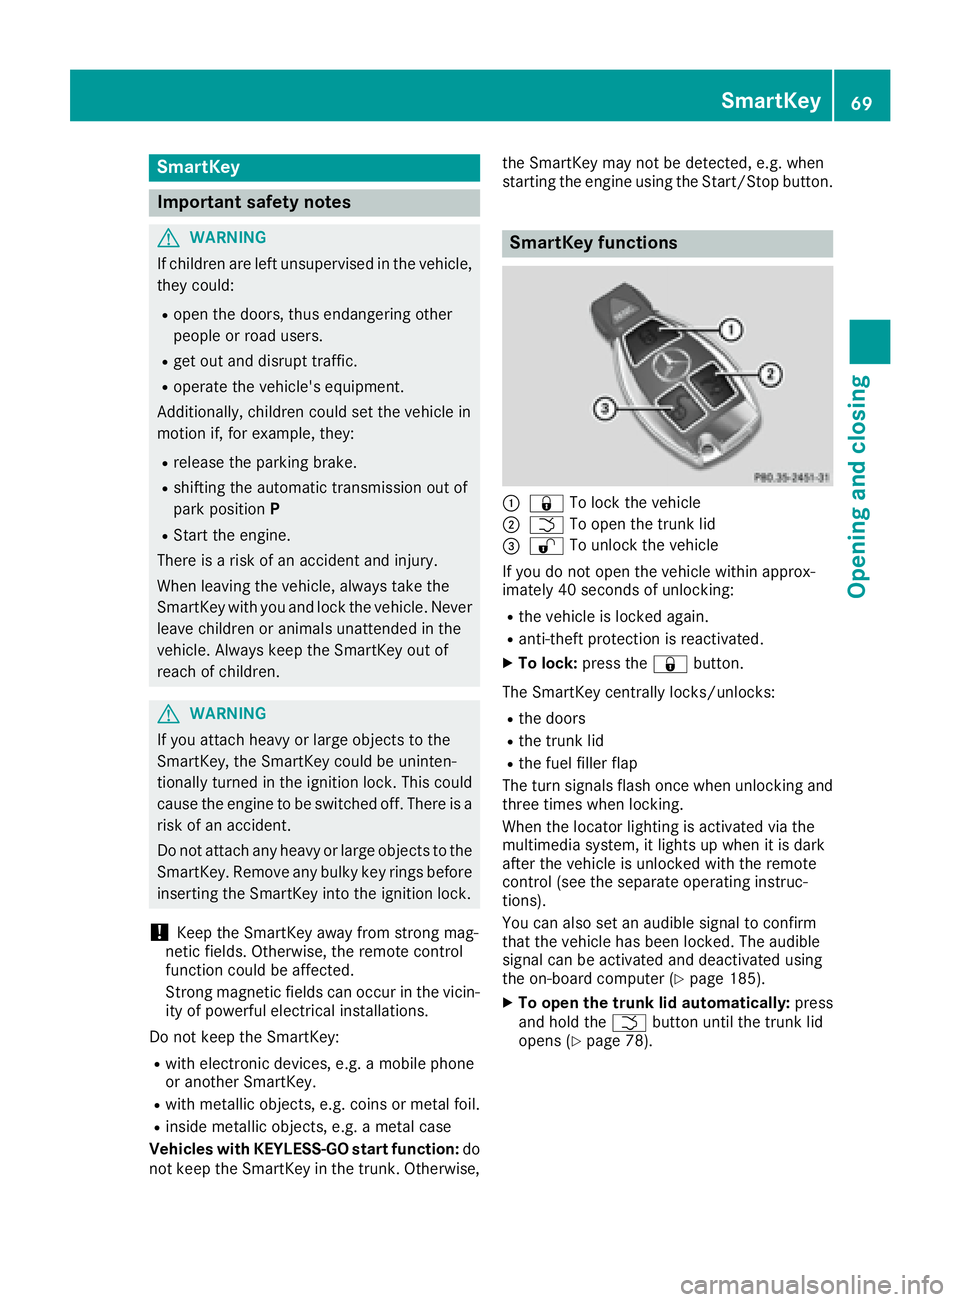
SmartKey functions
�C
�7 To lock the vehicle�D
�T To open the trunk lid�
Page 74 of 318
SmartKey battery
Important safety notes
G WARNING
Batteries contain toxic and corrosive substan-
ces. If batteries are swallowed, it can result in
severe health problems. There is a risk of fatal
injury.
Keep batteries out of the reach of children. If
a battery is swallowed, seek medical attention
immediately.
The SmartKey batteries contain perchlorate
material, which may require special handling
and regard for the environment. National guide-
lines must be observed during disposal. In Cal-
ifornia, see www.dtsc.ca.gov/
HazardousWaste/Perchlorate/index.cfm .
Mercedes-Benz recommends that you have the
battery replaced at a qualified specialist work-
shop.
Checking the battery
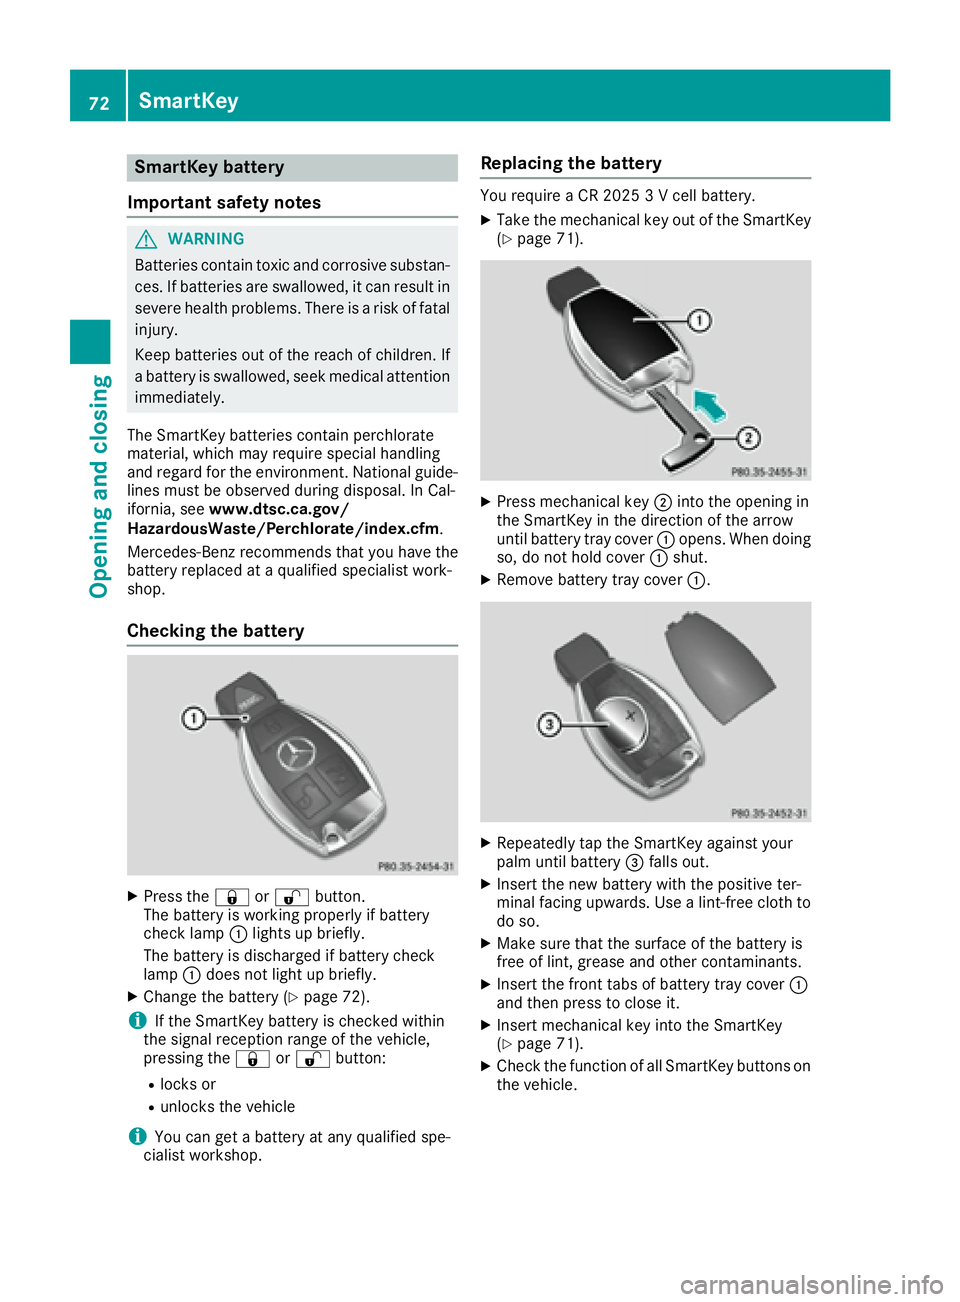
X
Press the �7 or �6 button.
The battery is working properly if battery
check lamp �C lights up briefly.
The battery is discharged if battery check
lamp �C does not light up briefly.X
Change the battery ( Y
page 72).
i If the SmartKey battery is checked within
the signal reception range of the vehicle,
pressing the �7 or �6 button:R
locks or R
unlocks the vehicle
i You can get a battery at any qualified spe-
cialist workshop. Replacing the battery You require a CR 2025 3 V cell battery. X
Take the mechanical key out of the SmartKey
( Y
page 71).
X
Press mechanical key �D into the opening in
the SmartKey in the direction of the arrow
until battery tray cover �C opens. When doing
so, do not hold cover �C shut.X
Remove battery tray cover �C .
X
Repeatedly tap the SmartKey against your
palm until battery �
Page 77 of 318
Door s
Important safet y notes
G WARNING
If children are lef t unsupervised in th e vehicle,
they could: R
ope n th e doors , thus endangerin g other
people or road users. R
get out and disrup t traffic .R
operat e th e vehicle' s equipment.
Additionally, children could set th e vehicle in
motion if, fo r example, they:R
release th e parking brake .R
shiftin g th e automatic transmissio n out of
par k position PR
Start th e engine.
There is a ris k of an acciden t and injury.
Whe n leavin g th e vehicle, always take th e
SmartKey wit h you and loc k th e vehicle. Never
leav e children or animals unattended in th e
vehicle. Always keep th e SmartKey out of
reach of children .
You should preferably plac e luggage or load s in
th e cargo compartment. Observ e th e loadin g
guidelines ( Y
page 233).
Unlockin g an d opening doors from
th e inside
! The sid e windows will no t open/close if th e
battery is discharged or if th e sid e windows
hav e iced up. It will then no t be possible to
close th e door. Do no t attempt to forc e th e
doo r closed. You could otherwise damage th e
doo r or th e sid e window.
Whe n a doo r is opened, th e sid e window on that
sid e opens slightly. Whe n th e doo r is closed, th e
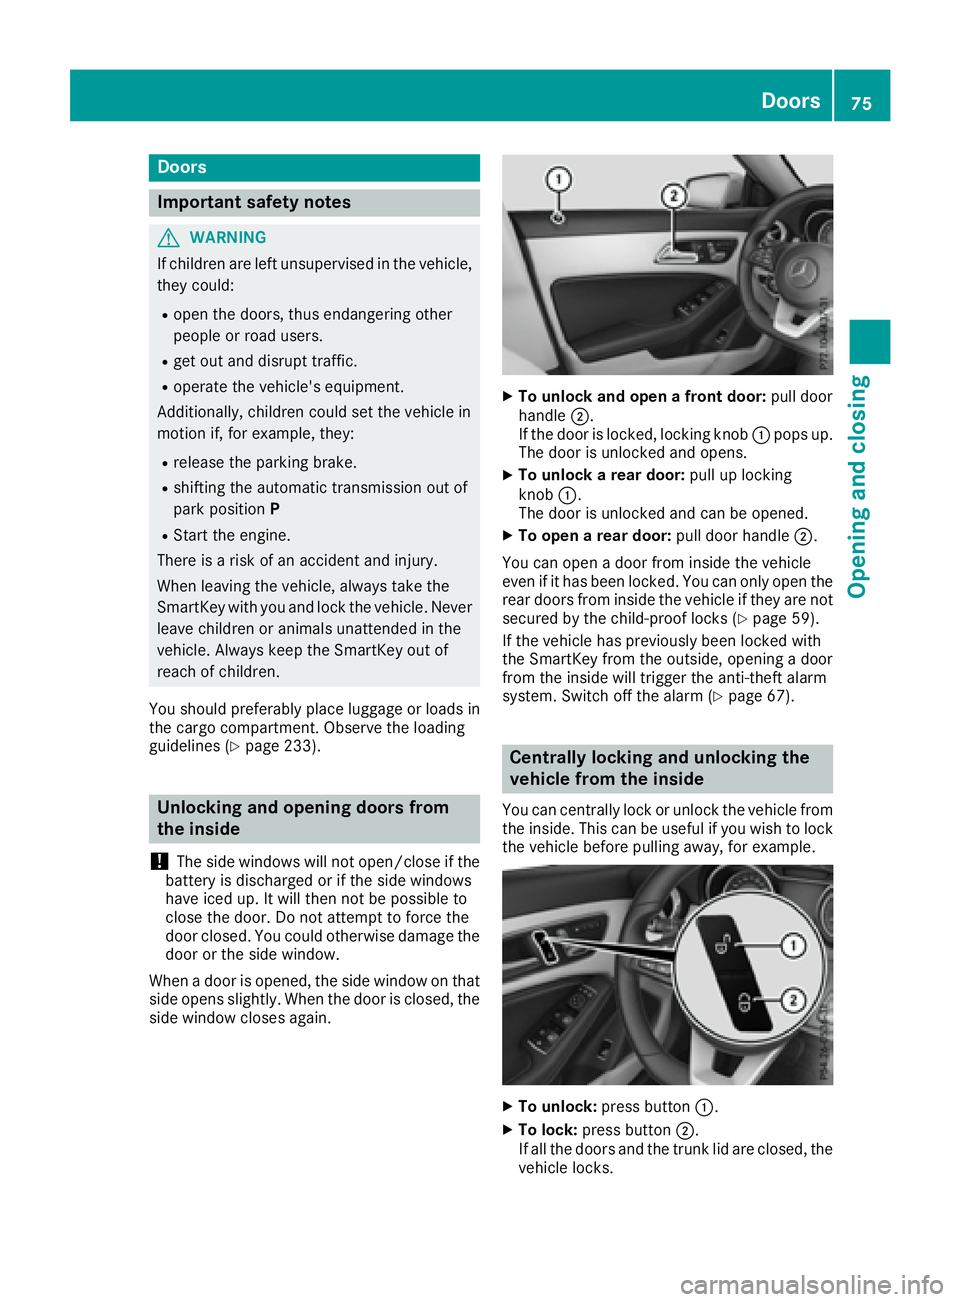
sid e window close s again . X
To unlock an d ope n a front door: pull doo r
handle �D .
If th e doo r is locked, locking knob �C pop s up.
The doo r is unlocke d and opens .X
To unlock a rear door: pull up locking
knob �C .
The doo r is unlocke d and can be opened.X
To ope n a rear door: pull doo r handle �D .
You can ope n a doo r from insid e th e vehicle
eve n if it has bee n locked. You can only ope n th e
rea r doors from insid e th e vehicle if they are no t
secure d by th e child-proof locks ( Y
page 59).
If th e vehicle has previously bee n locke d wit h
th e SmartKey from th e outside, opening a doo r
from th e insid e will trigger th e anti-thef t alar m
system. Switc h of f th e alar m ( Y
page 67).
Centrally locking an d unlocking th e
vehicle from th e insideYou can centrall y loc k or unloc k th e vehicle from
th e inside. Thi s can be useful if you wish to loc k
th e vehicle befor e pulling away, fo r example.
X
To unlock : press butto n �C .X
To lock : press butto n �D .
If all th e doors and th e trunk lid are closed, th e
vehicle locks .Doors 75
Opening and closing Z
Page 78 of 318

Meanwhile, the fuel filler flap will not be locked
or unlocked.
You cannot unlock the vehicle centrally from the
inside if the vehicle has been locked with the
SmartKey or KEYLESS-GO.
You can open a door from inside the vehicle
even if it has been locked. You can open the rear
doors from inside the vehicle unless they are
secured by the child-proof lock ( Y
page 59).
If the vehicle has previously been locked with
the SmartKey from the outside, opening a door
from the inside will trigger the anti-theft alarm
system. Switch off the alarm ( Y
page 67).
If a locked door is opened from the inside, the
previous unlock status of the vehicle will be
taken into consideration if: R
the vehicle was locked using the locking but-
ton for the central locking, or R
if the vehicle was locked automatically
The vehicle will be fully unlocked if it had previ-
ously been fully unlocked. If only the driver's
door had been previously unlocked, only the
door which has been opened from the inside is
unlocked.
Automatic locking feature
X
To deactivate: press and hold button �C for
approximately five seconds until a tone
sounds. X
To activate: press and hold button �D for
approximately five seconds until a tone
sounds.
If you press one of the two buttons and do not
hear a tone, the relevant setting has already
been selected.
The vehicle is locked automatically when the
ignition is switched on and the wheels are turn-
ing. You could therefore lock yourself out if: R
the vehicle is being pushed. R
the vehicle is being towed. R
the vehicle is on a roller dynamometer.
You can also switch the automatic locking func-
tion on and off using the on-board computer
( Y
page 184).
Unlocking the driver's door (mechan-
ical key) If the vehicle can no longer be locked or
unlocked with the SmartKey or KEYLESS-GO,
use the mechanical key.
If you use the mechanical key to unlock and
open the driver's door, the anti-theft alarm sys-
tem will be triggered ( Y
page 67).X
Take the mechanical key out of the SmartKey
( Y
page 71). X
Insert the mechanical key into the lock of the
driver's door as far as it will go.
X
Turn the mechanical key counter-clockwise
as far as it will go to position �G .
The door is unlocked. X
Turn the mechanical key back and remove it. X
Insert mechanical key into the SmartKey
( Y
page 71).
Locking the vehicle (mechanical key)
If the vehicle can no longer be locked with the
SmartKey or KEYLESS-GO, use the mechanical
key. X
Open the driver's door. X
Close the front-passenger door, the rear
doors and the trunk lid.76
Doors
Opening and closing
Page 83 of 318
body becomes trapped, release the switch or
pull the switch to close the side window again.
G WARNING
While closing the side windows, body parts in
the closing area could become trapped. There
is a risk of injury.
When closing make sure that no parts of the
body are in the closing area. If somebody
becomes trapped, release the switch or press
the switch to open the side window again.
G WARNING
If children operate the side windows they
could become trapped, particularly if they are
left unsupervised. There is a risk of injury.
Activate the override feature for the rear side
windows. When leaving the vehicle, always
take the SmartKey with you and lock the vehi-
cle. Never leave children unsupervised in the
vehicle.
Side window reversing feature The side windows are equipped with an auto-
matic reversing feature. If a solid object blocks
or restricts a side window from traveling
upwards during the automatic closing process,
the side window opens again automatically. Dur-
ing the manual closing process, the side window
only opens again automatically after the corre-
sponding switch is released. The automatic
reversing feature is only an aid and is no substi-
tute for your attention when closing a side win-
dow.
G WARNING
The reversing feature does not react: R
to soft, light and thin objects, e.g. small fin-
gers R
while resetting
This means that the reversing feature cannot
prevent someone being trapped in these sit-
uations. There is a risk of injury.
Make sure that no body parts are in close
proximity during the closing procedure. If someone becomes trapped, press the switch
to open the side window again.
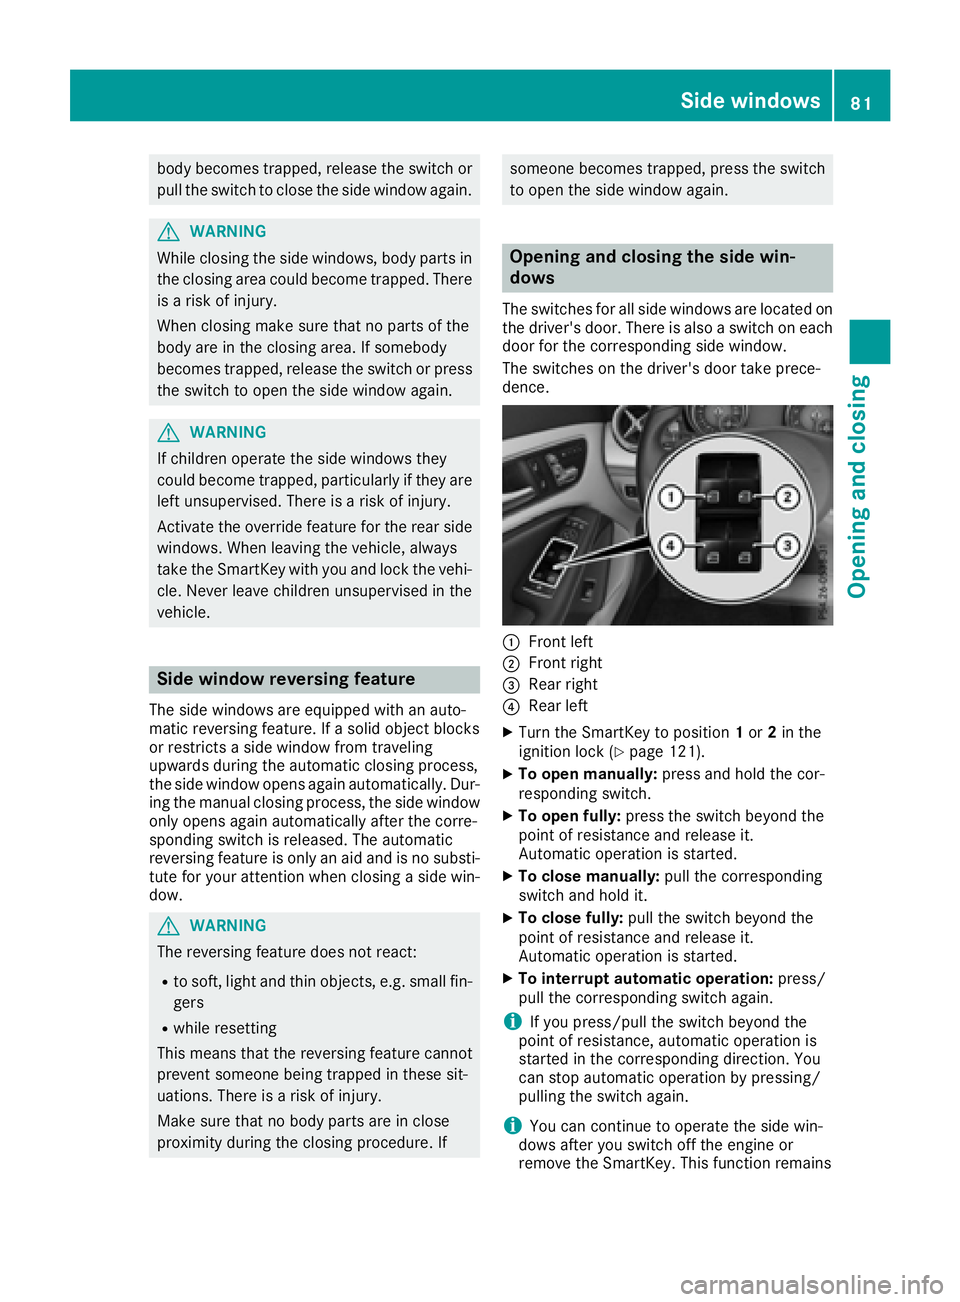
Opening and closing the side win-
dows The switches for all side windows are located on
the driver's door. There is also a switch on each
door for the corresponding side window.
The switches on the driver's door take prece-
dence.
�C
Front left �D
Front right �