2017 MERCEDES-BENZ CLA-Class fold seats
[x] Cancel search: fold seatsPage 17 of 318

Important safety notes .................. 162
Parking .......................................... 164
PASSENGER AIR BAG
Display message ............................ 197
Indicator lamps ................................ 40
Problem (malfunction) ................... 197
Pets in the vehicle ............................... 59
Phone book
see also Digital Operator's Man-
ual .................................................. 227
Plastic trim (cleaning instruc-
tions) .................................................. 263
Power washers .................................. 260
Power windows
see Side windows
Protection against theft
ATA (Anti-Theft Alarm system) ......... 67
Immobilizer ...................................... 67
Protection of the environment
General notes .................................. 23
Pulling away
Automatic transmission ................. 124
General notes ................................ 124
Hill start assist ............................... 124
Q
QR codeMercedes-Benz Guide App ................. 1
Rescue card ..................................... 28
Qualified specialist workshop ........... 27
R
RACE START
Important safety notes .................. 157
RACE START (Mercedes-AMG vehi-
cles) .................................................... 157
RACETIMER (on-board computer) .... 186
Radio
Selecting a station ......................... 180
see separate operating instructions
Radio mode
see also Digital Operator's Man-
ual .................................................. 227
Radio-wave reception/transmis-
sion in the vehicle
Declaration of conformity ................ 26 Rain closing feature (panorama
roof with power tilt/sliding panel)
.... 86
Reading lamp ..................................... 102
Rear compartment
Setting the air vents ...................... 119
Rear fog lamp
Display message ............................ 200
Replacing bulbs ............................. 105
Switching on/off ........................... 100
Rear lamps
see Lights
Rear seats
Folding the backrest forwards/
back ............................................... 236
Rear view camera
"Reverse parking" function ............ 168
Cleaning instructions ..................... 262
Display in the multimedia system .. 167
Function/notes ............................. 166
General notes ................................ 166
Switching on/off ........................... 167
Rear window defroster
Problem (malfunction) ................... 118
Switching on/off ........................... 118
Rear-view mirror
Anti-glare (manual) .......................... 95
Dipping (automatic) ......................... 96
Refrigerant (air-conditioning sys-
tem)
Important safety notes .................. 313
Refueling
Fuel gauge ....................................... 32
Important safety notes .................. 137
Refueling process .......................... 138
see Fuel
Remote control
Garage door opener ....................... 249
Programming (garage door
opener) .......................................... 249
Replacing bulbs
Brake lamp .................................... 105
High-beam headlamps ................... 105
Important safety notes .................. 103
Installing/removing the cover
(front whee l a
rch) .......................... 104
Low-beam headlamps .................... 104
Overview of bulb types .................. 103
Rear fog lamp ................................ 105
Index15
Page 18 of 318

Turn signals (front) .........................105
Turn signals (rear) .......................... 105
Reporting safety defects .................... 27
Rescue card ......................................... 28
Reserve (fuel tank)
see Fuel
Reserve fuel
Display message ............................ 204
Warning lamp ................................. 222
see Fuel
Residual heat (climate control) ........118
Restraint system
Display message ............................ 195
Introduction ..................................... 39
Warning lamp ................................. 222
Warning lamp (function) ................... 40
Reverse gear (selector lever) ........... 131
Reversing feature
Panorama sliding sunroof ................ 85
Roller sunblind ................................. 86
Side windows ................................... 81
Roadside Assistance (breakdown) .... 25
Roller sunblind
Panorama roof with power tilt/
sliding panel ..................................... 86
Roof carrier ........................................ 238
Roof lining and carpets (cleaning
guidelines) ......................................... 265
Roof load (maximum) ........................ 314
Route guidance
see also Digital Operator's Man-
ual ..................................................2 27
S
Safety
Children in the vehicle ..................... 53
see Occupant safety
Safety system
see Driving safety systems
SD card
Inserting ........................................ 232
Inserting/removing ........................ 232
Removing ....................................... 232
SD memory card
see also Digital Operator's Man-
ual ..................................................2 27Search & Send
see also Digital Operator's Man-
ual ..................................................2 27
Seat belts
Adjusting the height ......................... 43
Cleaning ......................................... 264
Correct usage .................................. 42
Fastening ......................................... 43
Important safety guidelines ............. 41
Introduction ..................................... 40
Releasing ......................................... 43
Warning lamp ................................. 216
Warning lamp (function) ................... 43
Seats
Adjusting (electrically) ..................... 91
Adjusting (manually) ........................ 90
Adjusting (Performance Seat) .......... 93
Adjusting the 4-way lumbar sup-
port ..................................................9 2
Adjusting the head restraint ............ 91
Cleaning the cover ......................... 264
Correct driver's seat position ........... 89
Folding the backrest (rear com-
partment) forwards/back .............. 236
Important safety notes .................... 89
Seat heating problem ...................... 94
Storing settings (memory func-
tion) ................................................. 98
Switching seat heating on/off ......... 93
Securing cargo .................................. 237
Selector lever
Cleaning ......................................... 264
Sensors (cleaning instructions) ....... 262
Service menu (on-board com-
puter) .................................................. 183
Service message
see ASSYST PLUS
Service products
Brake fluid ..................................... 312
Coolant (engine) ............................ 312
Eng
ine oil ....................................... 311
Fuel ................................................ 309
Important safety notes .................. 309
Refrigerant (air-conditioning sys-
tem) ............................................... 313
Washer fluid ................................... 313
Setting the air distribution ............... 115
16Index
Page 39 of 318

Door controlpanel
FunctionPage
:Opens th edoo r75
;%&Unlocks/locks
the vehicle75
=r45= Saves
the seat and exterior mirror
settings
97
?Adjusts the seats electrically91
A7 Zö\
Adjusts and folds the exterior
mirrors in/out electrically
95
FunctionPage
BW Opens/closes the side
windows81
Cn Activates/deactivates
the override feature for the
side windows in the rear
compartment
59
Dq Opens the trunk79
Door control panel37
At a glance
Page 58 of 318

LATCH-type (ISOFIX) child seat secur-
ing system
GWARNING
LATCH-type (ISOFIX) child restraint systems
do not offer sufficient protective effect for
children whose weight is greater than 48 lbs
(22 kg) who are secured using the safety belt integrated in the child restraint system. In the
event of an accident, a child might not be
restrained correctly. This poses an increased
risk of injury or even fatal injury.
If the child weighs more than 48 lbs (22 kg),
only use LATCH-type (ISOFIX) child restraint
systems with which the child is also secured
with the vehicle seat belt. Also secure the
child restraint system with the Top Tether
belt, if available.
Always comply with the manufacturer's instal-
lation and operating instructions for the child
restraint system used.
Before every trip, make sure that the LATCH-
type (ISOFIX) child restraint system is engaged
correctly in both LATCH-type (ISOFIX) securing
rings
!When installing the child restraint system,
make sure that the seat belt for the middle
seat does not get trapped. The seat belt could
otherwise be damaged.
XInstall the LATCH-type (ISOFIX) child restraint system on both LATCH-type (ISOFIX) securing
rings :.
ISOFIX is a standardized securing system for
specially designed child restraint systems on
the rear seats. LATCH-type (ISOFIX) securing
rings for two LATCH-type (ISOFIX) child restraint systems are installed on the left and right of the
rear seats.
Non-LATCH-type (ISOFIX) child seats may also
be used and can be installed using the vehicle's
seat belt system. Install the child seat according
to the manufacturer's instructions.
Top Tether
Introduction
Top Tether provides an additional connection
between the child restraint system secured with
a LATCH-type (ISOFIX) system and the vehicle.
This helps reduce the risk of injury even further.
If the child restraint system is equipped with a
Top Tether belt, this should always be used.
Important safety notes
GWARNING
If the rear seat backrests are not locked, they
could fold forwards in the event of an acci-
dent, heavy braking or sudden changes of
direction. As a result, child restraint systems
cannot perform their intended protective
function. Rear seat backrests that are not
locked can also cause additional injuries, e.g.
in the event of an accident. This poses an
increased risk of injury or even fatal injury.
Always lock rear seat backrests after instal-
ling a Top Tether belt. Observe the lock veri-
fication indicator. Adjust the rear seat backr-
ests so that they are in an upright position.
If the rear backrest is not engaged and locked,
the red lock verification indicator will be visible
(
Ypage 236).
56Children in the vehicle
Safety
Page 59 of 318

Top Tether anchorages
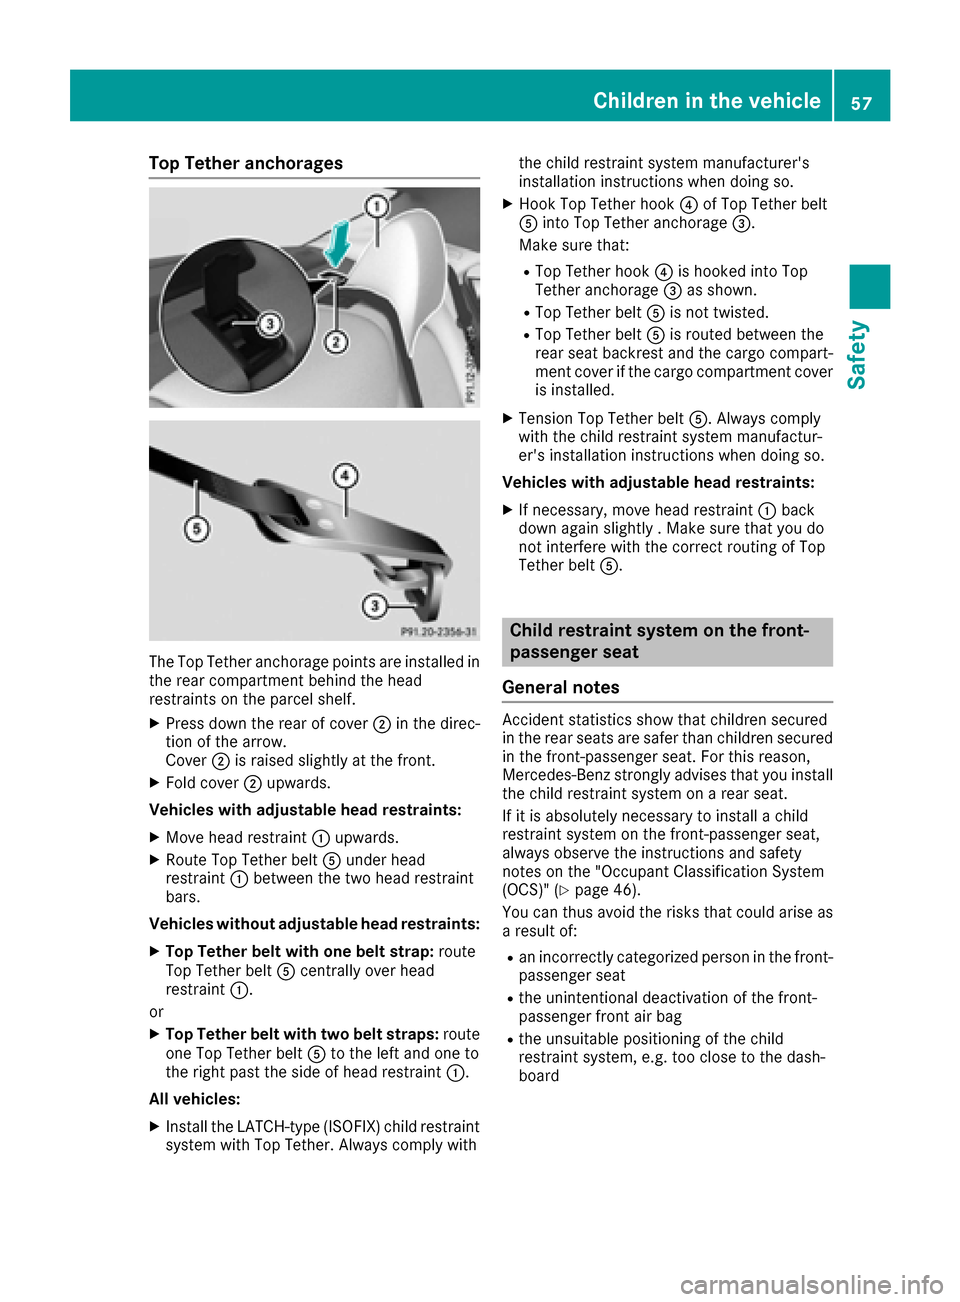
The Top Tether anchorage points are installed in
the rear compartment behind the head
restraints on the parcel shelf.
XPress down the rear of cover ;in the direc-
tion of the arrow.
Cover ;is raised slightly at the front.
XFold cover ;upwards.
Vehicles with adjustable head restraints:
XMove head restraint :upwards.
XRoute Top Tether belt Aunder head
restraint :between the two head restraint
bars.
Vehicles without adjustable head restraints:
XTop Tether belt with one belt strap: route
Top Tether belt Acentrally over head
restraint :.
or
XTop Tether belt with two belt straps: route
one Top Tether belt Ato the left and one to
the right past the side of head restraint :.
All vehicles:
XInstall the LATCH-type (ISOFIX) child restraint system with Top Tether. Always comply with the child restraint system manufacturer's
installation instructions when doing so.
XHook Top Tether hook
?of Top Tether belt
A into Top Tether anchorage =.
Make sure that:
RTop Tether hook ?is hooked into Top
Tether anchorage =as shown.
RTop Tether belt Ais not twisted.
RTop Tether belt Ais routed between the
rea r seat backrest and the cargo compart-
ment cover if the cargo compartment cover
is installed.
XTension Top Tether belt A. Always comply
with the child restraint system manufactur-
er's installation instructions when doing so.
Vehicles with adjustable head restraints:
XIf necessary, move head restraint :back
down again slightly . Make sure that you do
not interfere with the correct routing of Top
Tether belt A.
Child restraint system on the front-
passenger seat
General notes
Accident statistics show that children secured
in the rear seats are safer than children secured
in the front-passenger seat. For this reason,
Mercedes-Benz strongly advises that you install
the child restraint system on a rear seat.
If it is absolutely necessary to install a child
restraint system on the front-passenger seat,
always observe the instructions and safety
notes on the "Occupant Classification System
(OCS)" (
Ypage 46).
You can thus avoid the risks that could arise as a result of:
Ran incorrectly categorized person in the front-
passenger seat
Rthe unintentional deactivation of the front-
passenger front air bag
Rthe unsuitable positioning of the child
restraint system, e.g. too close to the dash-
board
Children in the vehicle57
Safety
Z
Page 92 of 318

motion. This could cause you to lose control ofthe vehicle. There is a risk of an accident.
Always make sure that the driver's seat is
engaged before starting the vehicle.
GWARNING
You could lose control of your vehicle if you do the following while driving:
Radjust the driver's seat, head restraint,
steering wheel or mirrors
Rfasten the seat belt
There is a risk of an accident.
Adjust the driver's seat, head restraint, steer-
ing wheel and mirror and fasten your seat belt before starting the engine.
GWARNING
If you adjust the seat height carelessly, you or
other vehicle occupants could be trapped and
thereby injured. Children in particular could
accidentally press the electrical seat adjust-
ment buttons and become trapped. There is a
risk of injury.
While moving the seats, make sure that your
hands or other body parts do not get under the
lever assembly of the seat adjustment sys-
tem.
!To avoid damage to the seats and the seat
heating, observe the following information:
Rkeep liquids from spilling on the seats. If
liquid is spilled on the seats, dry them as
soon as possible.
Rif the seat covers are damp or wet, do not
switch on the seat heating. The seat heat-
ing should also not be used to dry the seats.
Rclean the seat covers as recommended;
see the "Interior care" section.
Rdo not transport heavy loads on the seats.
Do not place sharp objects on the seat
cushions, e.g. knives, nails or tools. The
seats should only be occupied by passen-
gers, if possible.
Rwhen the seat heating is in operation, do
not cover the seats with insulating materi-
als, e.g. blankets, coats, bags, seat covers,
child seats or booster seats.
!Make sure that there are no objects in the
footwell under or behind the seats when mov-
ing the seats back. There is a risk that the
seats and/or the objects could be damaged.
iFurther related subjects:
Rcargo compartment enlargement (folding
down the rear seats) (Ypage 236)
Adjusting the seats manually
Vehicles without the seating comfort
package
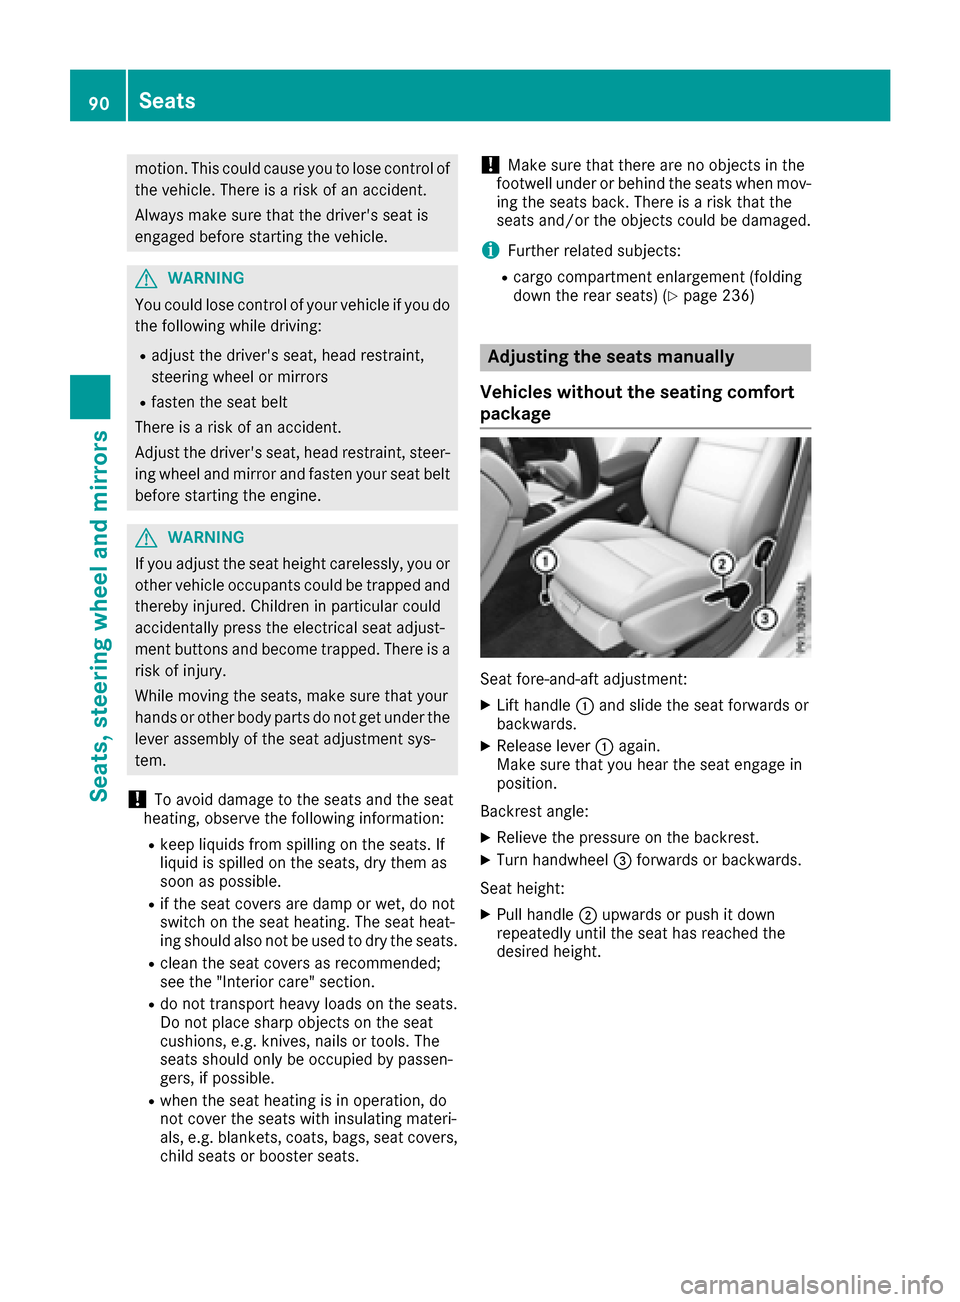
Seat fore-and-aft adjustment:
XLift handle :and slide the seat forwards or
backwards.
XRelease lever :again.
Make sure that you hear the seat engage in
position.
Backrest angle:
XRelieve the pressure on the backrest.
XTurn handwheel =forwards or backwards.
Seat height:
XPull handle ;upwards or push it down
repeatedly until the seat has reached the
desired height.
90Seats
Seats, steering wheel and mirrors
Page 98 of 318

Folding the exterior mirrors in or out
electrically
XTurn theSmartKey to position 1or 2in th e
ignition loc k (Ypage 121).
XBriefly press :.
Both exterio rmirror sfol din or out .
iMakesure that th eexterio rmirror sare
always folded out fully while driving .They
could otherwise vibrate .
iIf you are driving fasterthan 30 mph
(47 km/h), you can no longer fol din th eexte -
rio rmirrors.
Resetting the exterior mirrors
If th ebattery has been disconnected or com-
pletely discharged, th eexterio rmirror smust be
reset .The exterio rmirror swill otherwise no t
fol din when you select th e"Fold in mirror swhen
locking" function in th eon-board computer
(
Ypage 185).
XTurn th eSmartKey to position 1in th eignition
loc k (Ypage 121).
XBriefly press :.
Folding the exterior mirrors in or out
automatically
If the"Fold in mirror swhen locking" function is
activated in th eon-board computer
(
Ypage 185):
Rth eexterio rmirror sfol din automatically as
soo nas you loc kth evehicl efrom th eoutside .
Rtheexterio rmirror sfol dout again automati-
call yas soo nas you unlock th evehicl eand
then open th edriver' sor front-passenger
door .
iIf theexterio rmirror shave been folded in
manually, they do no tfol dout .
Exterior mirror pushed out of position
If an exterio rmirror has been pushed out of
position ,procee das follows :
XVehicles without electricall yfolding exte-
rior mirrors :mov eth eexterio rmirror int o
th ecorrect position manually.
XVehicles with electricall yfolding exterior
mirrors :press and hold mirror-foldin gbutto n
(
Ypage 96 )until you hear the mirror click into
place.
The mirror housing is engaged again and you
can adjust the exterior mirrors as usual
(
Ypage 95).
Automatic anti-glare mirrors
GWARNING
Electrolyte may escape if the glass in an auto-
matic anti-glare mirror breaks. The electrolyte
is harmful and causes irritation. It must not
come into contact with your skin, eyes, res-
piratory organs or clothing or be swallowed.
There is a risk of injury.
If you come into contact with the electrolyte,
observe the following:
RRinse off the electrolyte from your skin
immediately with water.
RImmediately rinse the electrolyte out of
your eyes thoroughly with clean water.
RIf the electrolyte is swallowed, immediately
rinse your mouth out thoroughly. Do not
induce vomiting.
RIf electrolyte comes into contact with your
skin or hair or is swallowed, seek medical
attention immediately.
RImmediately change out of clothing which
has come into contact with electrolyte.
RIf an allergic reaction occurs, seek medical
attention immediately.
The "Automatic anti-glare mirrors" function is
only available if the vehicle is equipped with the
"Mirrors package".
96Mirrors
Seats, steering wheel and mirrors