2017 MERCEDES-BENZ CLA-Class parking brake
[x] Cancel search: parking brakePage 215 of 318
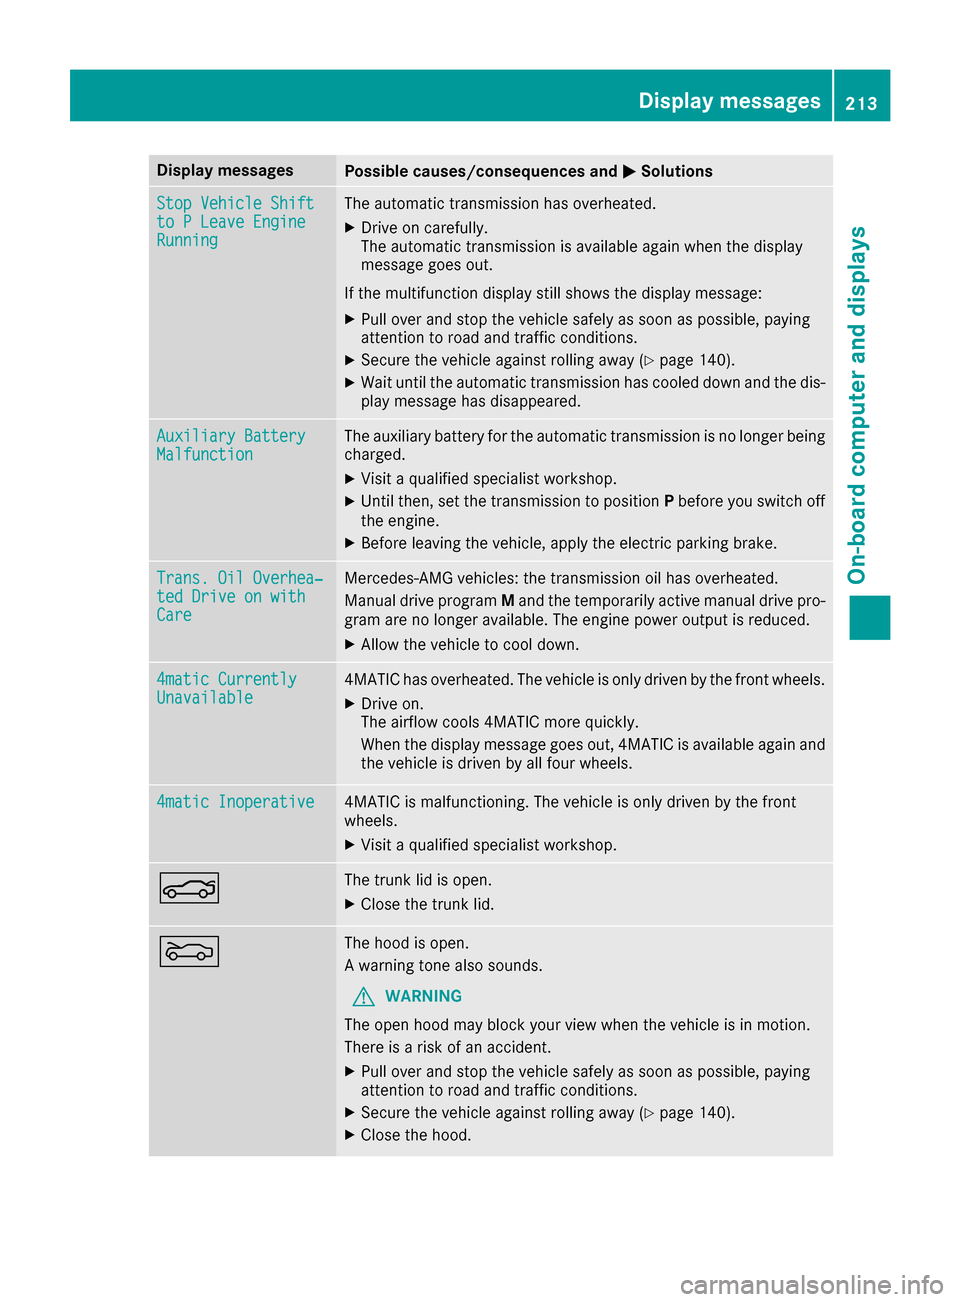
Display messagesPossible causes/consequences andMSolutions
StopVehicl eShiftto PLeave EngineRunnin g
The automatic transmission has overheated.
XDrive on carefully.
The automatic transmission is available again when th edisplay
message goe sout .
If th emultifunction display still shows th edisplay message :
XPull overand stop th evehicl esafely as soo nas possible, payin g
attention to roa dand traffic conditions.
XSecur eth evehicl eagainst rollin gaway (Ypage 140).
XWait until th eautomatic transmission has cooled down and th edis-
play message has disappeared.
Auxiliary Batter yMalfunctionThe auxiliary battery for th eautomatic transmission is no longer bein g
charged.
XVisit aqualified specialist workshop .
XUntilthen ,set th etransmission to position Pbefore you switch off
th eengine.
XBefor eleaving th evehicle, apply th eelectric parking brake.
Trans. Oil Overhea‐ted Drive on wit hCare
Mercedes-AMG vehicles: th etransmission oil has overheated.
Manual drive progra mM and th etemporarily active manual drive pro -
gra mare no longer available. The engin epowe routput is reduced.
XAllow th evehicl eto cool down .
4matic CurrentlyUnavailable4MATIC has overheated. The vehicl eis only driven by th efron twheels.
XDrive on .
The airflow cools 4MATIC mor equickly.
Whe nth edisplay message goe sout ,4MATIC is available again and
th evehicl eis driven by all fou rwheels.
4matic Inoperative4MATIC is malfunctioning .The vehicl eis only driven by th efron t
wheels.
XVisit aqualified specialist workshop .
NThe trunk lid is open.
XCloseth etrunk lid.
MThe hoo dis open .
A warning tone also sounds.
GWARNIN G
The open hoo dmay bloc kyour vie wwhen th evehicl eis in motion .
There is aris kof an accident.
XPull ove rand stop th evehicl esafely as soo nas possible, payin g
attention to roa dand traffic conditions.
XSecur eth evehicl eagainst rollin gaway (Ypage 140).
XCloseth ehood.
Display messages21 3
On-board computer and displays
Z
Page 224 of 318

Warning/
indicator
lampNSignal type
Possible causes/consequences and M
Solutions
!FNF (USA only), !(Canada only): the red indicator lamp for the electric
parking brake flashes or lights up and/or the yellow warning lamp for the electric
parking brake lights up.
XObserve the additional display messages in the multifunction display.
6N The red restraint system warning lamp is lit while the engine is running.
The restraint system is malfunctioning.
GWARNING
The air bags or Emergency Tensioning Devices may either be triggered uninten-
tionally or, in the event of an accident, may not be triggered.
There is an increased risk of injury.
XObserve the additional display messages in the multifunction display.
XDrive on carefully.
XContact a qualified specialist workshop and have the restraint system checked.
For further information about the restraint system, see (
Ypage 39).
Engine
Warning/
indicator
lampNSignal type
Possible causes/consequences and M
Solutions
;NThe yellow Check Engine warning lamp lights up while the engine is running.
There may be a malfunction, for example:
Rin the engine management
Rin the fuel injection system
Rin the exhaust system
Rin the ignition system
Rin the fuel system
The emission limit values may be exceeded and the engine may be in emergency
mode.
XVisit a qualified specialist workshop immediately.
iIn some states, you must immediately visit a qualified specialist workshop as
soon as the yellow Check Engine warning lamp lights up. This is due to the legal
requirements in effect in these states. If in doubt, check whether such legal
regulations apply in the state in which you are currently driving.
æN The yellow reserve fuel warning lamp lights up while the engine is running.
The fuel level has dropped into the reserve range.
XRefuel at the nearest gas station.
222Warning and indicator lamps in the instrument cluster
On-board computer and displays
Page 277 of 318

Make sure that:
RThe jumper cables are not damaged.
RNon-insulated parts of the terminal clamps do not come into contact with other metal parts while
the jumper cables are connected to the battery
RThe jumper cables cannot come into contact with parts that can move when the engine is running,
such as the V-belt pulley or the fan
XSecure the vehicle by applying the electric parking brake.
XShift the transmission to positionP.
XTurn the SmartKey to position0in the ignition lock and remove it.
XSwitch off all electrical consumers, e.g. rear window defroster, lighting, etc.
XOpen the hood.
Position numberBidentifies the charged battery of the other vehicle or an equivalent jump-starting
device.
XPress together cover :of positive clamp ;and slide it back.
XConnect positive terminal ;on your vehicle to positive terminal =of donor battery Busing the
jumper cable, beginning with your own battery.
XStart the engine of the donor vehicle and run it at idling speed.
XConnect negative terminal ?of donor battery Bto ground point Aof your vehicle using the
jumper cable, connecting the jumper cable to battery of other vehicle Bfirst.
XIf the battery is fully discharged, leave the battery that is being used to jump-start connected for
a few minutes before attempting to start. This charges the battery slightly.
XStart the engine.
XBefore disconnecting the jumper cables, let the engine run for several minutes.
XFirst, remove the jumper cables from ground point Aand negative terminal ?, then from pos-
itive clamp ;and positive terminal =. Begin each time at the contacts on your own vehicle first.
XClose cover:of positive terminal ;after removing the jumper cables.
XClose the hood.
XHave the battery checked at a qualified specialist workshop.
iJump-starting is not considered to be a normal operating condition.
Jump-starting275
Breakdown assistance
Z
Page 278 of 318
iJumper cables and further information regarding jump-starting can be obtained at any qualified
specialist workshop.
Towing and tow-starting
Important safety notes
GWARNING
Functions relevant to safety are restricted or
no longer available if:
Rthe engine is not running.
Rthe brake system or the power steering is
malfunctioning.
Rthere is a malfunction in the voltage supply or the vehicle's electrical system.
If your vehicle is being towed, much more
force may be necessary to steer or brake.
There is a risk of an accident.
In such cases, use a tow bar. Before towing,
make sure that the steering moves freely.
GWARNING
You can no longer steer the vehicle if the
steering wheel lock has been engaged. There
is a risk of an accident.
Always switch off the ignition when towing the
vehicle with a tow cable or a tow bar.
GWARNING
When towing or tow-starting another vehicle
and its weight is greater than the permissible
gross weight of your vehicle, the:
Rthe towing eye could detach itself
Rthe vehicle/trailer combination could roll-
over.
There is a risk of an accident.
When towing or tow-starting another vehicle,
its weight should not be greater than the per- missible gross weight of your vehicle.
Details on the permissible gross vehicle weight
of your vehicle can be found on the vehicle iden-
tification plate (
Ypage 308).
!When Active Brake Assist, Distance Pilot
DISTRONIC or the HOLD function is activated, the vehicle brakes automatically in certain
situations.
To avoid damage to the vehicle, deactivate
these systems in the following or similar sit-
uations:
Rwhen towing the vehicle
Rin the car wash
!Make sure that the electric parking brake is
released. If the electric parking brake is faulty,
visit a qualified specialist workshop.
!Only secure the tow rope or tow bar at the
towing eyes. Otherwise, the vehicle could be
damaged.
!Do not use the towing eyes for recovery pur-
poses as this could damage the vehicle. If in
doubt, recover the vehicle with a crane.
!When towing, pull away slowly and
smoothly. If the tractive power is too high, the
vehicles could be damaged.
!The vehicle can be towed a maximum of
3
0 miles (50km). The towing speed of 30 mph
(50km/h) must not be exceeded.
If the vehicle has to be towed more than
30 miles (50km), the front axle must be raised
or the entire vehicle raised and transported.
!Do not tow with sling-type equipment. This
could damage the vehicle.
!When towing vehicles with KEYLESS-GO,
use the key instead of the Start/Stop button.
Otherwise, the automatic transmission may
shift to position Pwhen the driver's or front-
passenger door are opened, which could lead
to damage to the transmission.
!Vehicles with automatic transmission must
not be started by tow-starting. This could oth-
erwise damage the transmission.
It is better to have the vehicle transported than
to have it towed away.
If the vehicle can no longer be driven because of
an accident or breakdown, you have the follow-
ing options:
Rtransporting the vehicle
276Towing and tow-starting
Breakdown assistance
Page 279 of 318
As a rule, you should have the vehicle trans-
ported.
Rtowing the vehicle with a tow rope or tow bar
Only tow the vehicle in exceptional cases.
The battery must be connected and charged.
Otherwise, you:
Rcannot turn the SmartKey to position 2in the
ignition lock
Rcannot release the electric parking brake
Rcannot move the transmission to position N
The function of the electric parking brake and
the parking lock is dependent on the on-board
voltage.
If the on-board voltage is low or if there is a sys-
tem malfunction:
Rthe electric parking brake may not be applied
in certain circumstances, or
Rthe transmission may not be shifted to P
Switch off non-essential consumers, e.g. the
radio.
Disarm the automatic locking feature before the
vehicle is towed (
Ypage 184). You could other-
wise be locked out when pushing or towing the
vehicle.
Installing/removing the towing eye
Installing the towing eye
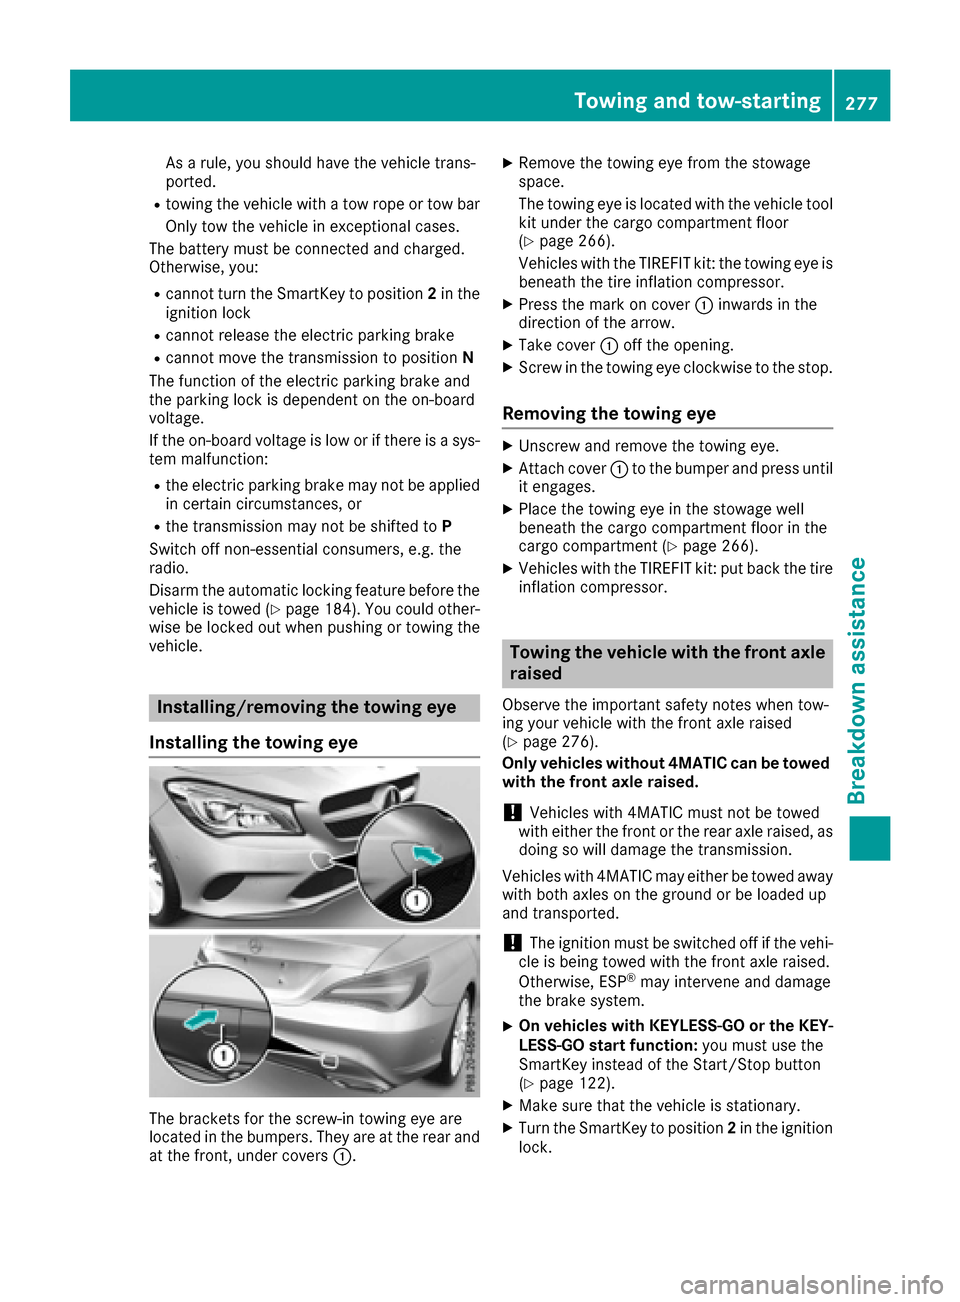
The brackets for the screw-in towing eye are
located in the bumpers. They are at the rear and
at the front, under covers :.
XRemove the towing eye from the stowage
space.
The towing eye is located with the vehicle tool
kit under the cargo compartment floor
(
Ypage 266).
Vehicles with the TIREFIT kit: the towing eye is beneath the tire inflation compressor.
XPress the mark on cover :inwards in the
direction of the arrow.
XTake cover :off the opening.
XScrew in the towing eye clockwise to the stop.
Removing the towing eye
XUnscrew and remove the towing eye.
XAttach cover :to the bumper and press until
it engages.
XPlace the towing eye in the stowage well
beneath the cargo compartment floor in the
cargo compartment (
Ypage 266).
XVehicles with the TIREFIT kit: put back the tire inflation compressor.
Towing the vehicle with the front axle
raised
Observe the important safety notes when tow-
ing your vehicle with the front axle raised
(
Ypage 276).
Only vehicles without 4MATIC can be towed
with the front axle raised.
!Vehicles with 4MATIC must not be towed
with either the front or the rear axle raised, as doing so will damage the transmission.
Vehicles with 4MATIC may either be towed away
with both axles on the ground or be loaded up
and transported.
!The ignition must be switched off if the vehi-
cle is being towed with the front axle raised.
Otherwise, ESP
®may intervene and damage
the brake system.
XOn vehicles with KEYLESS-GO or the KEY-
LESS-GO start function: you must use the
SmartKey instead of the Start/Stop button
(
Ypage 122).
XMake sure that the vehicle is stationary.
XTurn the SmartKey to position 2in the ignition
lock.
Towing and tow-starting277
Breakdo wn assis tance
Z
Page 280 of 318

XWhen the vehicle is stationary, depress the
brake pedal and keep it depressed.
XShift the automatic transmission to posi-
tionP.
XRelease the brake pedal.
XRelease the electric parking brake.
XSwitch off the automatic locking
(Ypage 184).
XSwitch on the hazard warning lamps
(Ypage 101).
XTurn the SmartKey in the ignition lock to posi-
tion0and leave the SmartKey in the ignition
lock.
Towing a vehicle with both axles on
the ground
It is important that you observe the safety
instructions when towing away your vehicle
(
Ypage 276).
XOn vehicles with KEYLESS-GO or the KEY-
LESS-GO start function: you must use the
SmartKey instead of the Start/Stop button
(
Ypage 122).
The automatic transmission automatically shifts
to position Pwhen you open the driver's or front-
passenger door or when you remove the Smart-
Key from the ignition lock. In order to ensure
that the automatic transmission stays in posi-
tion Nwhen towing the vehicle, you must
observe the following points:
XMake sure that the vehicle is stationary.
XTurn the SmartKey to position 2in the ignition
lock.
XDepress and hold the brake pedal.
XShift the automatic transmission to position
N .
XLeave the SmartKey in position 2in the igni-
tion lock.
XRelease the brake pedal.
XRelease the electric parking brake.
XSwitch on the hazard warning lamps
(Ypage 101).
iIn order to signal a change of direction when
towing the vehicle with the hazard warning
lamps switched on, use the combination
switch as usual. In this case, only the indicator
lamps for the direction of travel flash. After resetting the combination switch, the hazard
warning lamp starts flashing again.
Transporting the vehicle
4MATIC vehicles or vehicles with auto-
matic transmission
!When the vehicle is loaded for transport, the
front and rear axles must be stationary and on
the same transportation vehicle. Positioning
over the connection point of the transport
vehicle is not permitted. The drive train may
otherwise be damaged.
All vehicles
!You may only secure the vehicle by the
wheels, not by parts of the vehicle such as
axle or steering components. Otherwise, the
vehicle could be damaged.
XTurn the SmartKey to position 2in the ignition
lock (Ypage 121).
XShift the transmission to position N.
As soon as the vehicle has been loaded:
XPrevent the vehicle from rolling away by
applying the electric parking brake.
XShift the transmission to position P.
XTurn the SmartKey to position0in the ignition
lock and remove it.
XSecure the vehicle.
The towing eye can be used to pull the vehicle
onto a trailer or transporter for transporting pur- poses.
278Towing and tow-starting
Breakdown assistance
Page 284 of 318

Important safety notes
GWARNING
If wheels and tires of th ewrong siz eare used,
th ewhee lbrakes or suspension component s
may be damaged. Ther eis aris kof an acci-
dent.
Always replace wheels and tires wit hthose
that fulfill th especification sof th eoriginal
part .
When replacing wheels, mak esur eto use th e
correct:
Rdesignation
Rmodel
When replacing tires ,mak esur eto use th e
correct:
Rdesignation
Rmanufacturer
Rmodel
GWARNIN G
A flat tire severely impairs th edriving ,steer -
ing and braking characteristics of th evehicle.
Ther eis aris kof accident.
Tires without run-flat characteristics :
Rdo notdriv ewit h a flat tire.
Rimmediately replace th eflat tire wit hyour
emergenc yspar ewhee lor spar ewheel, or
consult aqualified specialist workshop.
Tires wit hrun-flat characteristics :
Rpay attention to theinformation and warn -
ing notice son MOExtended tires (tire swit h
run-flat characteristics).
Accessories that are no tapprove dfor your vehi-
cle by Mercedes-Ben zor are no tbein gused cor-
rectl ycan impair th eoperating safety.
Before purchasing and usin gnon-approve d
accessories, visit aqualified specialist work-
sho pand inquire about :
Rsuitability
Rlegal stipulation s
Rfactory recommendation sFurther information regarding wheels and tires
can be foun
dunder "Wheel/tire combinations"
(
Ypage 306).
You can ask for information regarding permitte d
wheel-tire combination sat an authorize d
Mercedes-Ben zCenter.
Information on tire pressur ecan be found:
Ron th eTir eand Loading Information placard
on th eB-pillar on th edriver' sside
(
Ypage 292)
Rin th etire pressur etable in th efuel filler flap
(Ypage 138)
Runder "Tir epressure" (Ypage 285)
Operation
Information on driving
Checkth etire pressur ewhen th evehicl eis
heavily laden and adjust prio rto atrip.
While driving ,pay attention to vibrations, noises
and unusual handlin gcharacteristics ,e.g. pull-
ing to on eside .This may indicat ethat th e
wheels or tires are damaged. If you suspec tthat
a tire is defective, reduce your spee dimmedi-
ately. Stop th evehicl eas soo nas possible to
chec kth ewheels and tires for damage. Hidden
tire damag ecould also be causing th eunusual
handlin gcharacteristics .If you fin dno sign sof
damage, hav eth etires and wheels checke dat a
qualified specialist workshop.
When parking your vehicle, mak esur ethat th e
tires do no tget deformed by th ecur bor other
obstacles. If they canno tbe avoided, driv eove r
obstacles suc has curbs slowly and at an obtuse
angle. Otherwise, you may damag eth ewheels
or tires .
Regular checking of wheels and tires
GWARNIN G
Damaged tires can caus etire inflation pres-
sur eloss .As aresult ,you could lose control of
your vehicle. Ther eis aris kof accident.
Chec kth etires regularly for sign sof damag e
and replace any damaged tires immediately.
282Operation
Wheels and tires
Page 304 of 318

Tire-mounting tools should not be used near
the valve. This could damage the electronic
components.
Only have tires changed at a qualified spe-
cialist workshop.
Observe the instructions and safety notes in the
"Changing a wheel" section (
Ypage 301).
The wear patterns on the front and rear tires
differ, depending on the operating conditions.
Rotate the wheels before a clear wear pattern
has formed on the tires. Front tires typically
wear more on the shoulders and the rear tires in
the center.
On vehicles that have the same size front and
rear wheels, you can rotate the wheels accord-
ing to the intervals in the tire manufacturer's
warranty book in your vehicle documents. If no
warranty book is available, the tires should be
rotated every 3,000 to 6,000 miles (5,000 to
10,000 km). Depending on tire wear, this may
be required earlier. Do not change the direction
of wheel rotation.
Clean the contact surfaces of the wheel and the brake disc thoroughly every time a wheel is rota-
ted. Check the tire pressure and, if necessary,
restart the tire pressure loss warning system
(Canada only) or the tire pressure monitor (USA
only).
Direction of rotation
Tires with a specified direction of rotation have
additional benefits, e.g. if there is a risk of hydro-
planing. These advantages can only be gained if
the tires are installed corresponding to the
direction of rotation.
An arrow on the sidewall of the tire indicates its
correct direction of rotation.
Storing wheels
Store wheels that are not being used in a cool,
dry and preferably dark place. Protect the tires
from oil, grease, gasoline and diesel.
Mounting a wheel
Preparing the vehicle
XStop the vehicle on solid, non-slippery and
level ground.
XApply the electric parking brake manually.
XBring the front wheels into the straight-ahead position.
XShift the transmission to position P.
XSwitch off the engine.
XVehicles without KEYLESS-GO:remove the
SmartKey from the ignition lock.
XVehicles with KEYLESS-GO start-function
or KEYLESS-GO: open the driver's door.
The vehicle electronics now have status 0.
This is the same as the SmartKey having been
removed.
XVehicles with KEYLESS-GO start-function
or KEYLESS-GO: remove the Start/Stop but-
ton from the ignition lock (
Ypage 121).
XMake sure that the engine cannot be started
via your smartphone (Ypage 122).
XIf included in the vehicle equipment, remove
the tire-change tool kit from the vehicle.
XSafeguard the vehicle against rolling away
(Ypage 140).
Securing the vehicle to prevent it from
rolling away
If your vehicle is equipped with a wheel chock, it
can be found in the tire-change tool kit
(
Ypage 266).
The folding wheel chock is an additional safety
measure to prevent the vehicle from rolling
away, for example when changing a wheel.
302Changing a wheel
Wheels and tires