2017 MERCEDES-BENZ CLA-Class parking brake
[x] Cancel search: parking brakePage 60 of 318

Rearward-facing child restraint system
If it is absolutely necessary to install a rearward-
facing child restraint system on the front-
passenger seat, always make sure that the
front-passenger front air bag is deactivated.
Only if the PASSENGER AIR BAG OFF indicator
lamp is permanently lit (
Ypage 40) is the front-
passenger front air bag deactivated.
Always observe the child restraint system man-
ufacturer's installation and operating instruc-
tions.
Forward-facing child restraint system
If it is absolutely necessary to install a forward-
facing child restraint system on the front-
passenger seat, always move the front-
passenger seat as far back as possible. Fully
retract the seat cushion length. The entire base
of the child restraint system must always rest on
the seat cushion of the front-passenger seat.
The backrest of the child restraint system must
lie as flat as possible against the backrest of the front-passenger seat. The child restraint system
must not touch the roof or be subjected to a load
by the head restraint. Adjust the angle of the
seat backrest and the head restraint position
accordingly. Always make sure that the shoul-
der belt strap is correctly routed from the vehi-
cle belt outlet to the shoulder belt guide on the
child restraint system. The shoulder belt strap
must be routed forwards and downwards from
the vehicle belt outlet. If necessary, adjust the
vehicle belt outlet and the front-passenger seat
accordingly.
Always observe the child restraint system man-
ufacturer's installation and operating instruc-
tions.
Child-proof locks
Important safety notes
GWARNING
If children are traveling in the vehicle, they
could:
Ropen doors, thus endangering other people
or road users
Rexit the vehicle and be caught by oncoming
traffic
Roperate vehicle equipment and become
trapped
There is a risk of an accident and injury.
Always activate the child-proof locks and
override feature if children are traveling in the vehicle. When leaving the vehicle, always take
the key with you and lock the vehicle. Never
leave children unattended in the vehicle.
Override feature for:
Rthe rear doors (Ypage 59)
Rthe rear side windows (Ypage 59)
GWARNING
If you leave children unsupervised in the vehi-
cle, they could set it in motion by, for example:
Rrelease the parking brake.
Rshift the automatic transmission out of the
parking position P.
Rstart the engine.
In addition, they may operate vehicle equip-
ment and become trapped. There is a risk of
an accident and injury.
When leaving the vehicle, always take the
SmartKey with you and lock the vehicle. Never
leave children unsupervised in the vehicle.
GWARNING
If persons, particularly children are subjected to prolonged exposure to extreme heat or
cold, there is a risk of injury, possibly even
fatal. Never leave children unattended in the
vehicle.
58Children in the vehicle
Safety
Page 63 of 318

Important safety notes
iObserveth e"Importan tsafet ynotes" sec -
tion (Ypage 60).
GWARNIN G
If BA Sis malfunctioning ,th ebraking distanc e
in an emergenc ybraking situation is
increased. Ther eis aris kof an accident.
In an emergenc ybraking situation ,depress
th ebrak epedal wit hfull force .AB Sprevents
th ewheels from locking.
Braking
XKee pth ebrak epedal firmly depressed until
th eemergenc ybraking situation is over.
AB Sprevents th ewheels from locking.
The brakes will function as usual once you
release th ebrak epedal .BA Sis deactivated.
Active Brake Assist
General information
iObserv eth e"Importan tsafet ynotes" sec -
tion (Ypage 60).
Active Brake Assist consist sof adistanc ewarn -
ing function wit han autonomous braking func-
tion and braking assistanc eappropriat eto th e
situation .
Active Brake Assist can help you to minimiz eth e
ris kof acollision wit hth evehicl etraveling in
fron tor reduce th eeffects of suc h acollision .
If Active Brake Assist detects that there is aris k
of collision ,you will be warned visually and
acoustically. If you do no treac tto th evisual and
audible collision warning ,autonomous braking
can be initiate din critical situations. If you apply
th ebrak eyourself in acritical situation ,Adap-
tive Brake Assist support syou wit hbraking
assistanc eappropriat eto th esituation .
Important safety notes
Detection of hazardous situation scan be par-
ticularly impaired by:
Rthere is dirt on th esensor sor anythin gelse
covering th esensor s
Rthere is snow or heav yrain
Rthere is interferenc eby other radar source s
Rthere are strongradar reflections, for exam-
ple in parking garages
Ra narrow vehicl eis traveling in front, e.g. a
motorbike
Ra vehicl eis traveling in fron ton adifferen tlin e
Rne wvehicles or after servicing is carrie dout
on th eActive Brake Assist system
Observ eth eimportant safet ynote sin th e
"Breaking-in notes" section (
Ypage 120).
Followin gdamag eto th efron ten dof th evehicle,
hav eth econfiguration and operation of th e
radar sensor checke dat aqualified specialist
workshop. This also applie sto collision sat low
speeds wher eno visible damag eto th efron tof
th evehicl eis apparent.
Activating/deactivating
Active Brake Assist is active after every ignition
cycle.
You can activat eor deactivat eActive Brake
Assist (
Ypage 182) in th eon-board computer.
When deactivated, th edistanc ewarning func-
tion and th eautonomous braking function are
also deactivated.
If Active Brake Assist is deactivated, th eæ
symbol appear sin th eassistanc egraphic dis-
play.
Distance warning function
Gene ral information
The distanc ewarning function can help you to
minimiz eth eris kof afront-en dcollision wit h a
vehicl eahead or reduce th eeffects of suc h a
collision .If th edistanc ewarning function
detects that there is aris kof acollision ,you will
be warned visually and acoustically.
Import ant safety notes
iObserveth e"Importan tsafet ynotes" sec -
tion for driving safet ysystems (Ypage 60).
GWARNIN G
The distanc ewarning function does no treact:
Rto people or animals
Rto oncomin gvehicles
Rto crossing traffic
Rwhen cornering
Driving safety systems61
Safety
Z
Page 71 of 318
SmartKey
Important safety notes
GWARNING
If children are left unsupervised in the vehicle,
they could:
Ropen the doors, thus endangering other
people or road users.
Rget out and disrupt traffic.
Roperate the vehicle's equipment.
Additionally, children could set the vehicle in
motion if, for example, they:
Rrelease the parking brake.
Rshifting the automatic transmission out of
park position P
RStart the engine.
There is a risk of an accident and injury.
When leaving the vehicle, always take the
SmartKey with you and lock the vehicle. Never
leave children or animals unattended in the
vehicle. Always keep the SmartKey out of
reach of children.
GWARNING
If you attach heavy or large objects to the
SmartKey, the SmartKey could be uninten-
tionally turned in the ignition lock. This could
cause the engine to be switched off. There is a risk of an accident.
Do not attach any heavy or large objects to the
SmartKey. Remove any bulky key rings before
inserting the SmartKey into the ignition lock.
!Keep the SmartKey away from strong mag-
netic fields. Otherwise, the remote control
function could be affected.
Strong magnetic fields can occur in the vicin-
ity of powerful electrical installations.
Do not keep the SmartKey:
Rwith electronic devices, e.g. a mobile phone
or another SmartKey.
Rwith metallic objects, e.g. coins or metal foil.
Rinside metallic objects, e.g. a metal case
Vehicles with KEYLESS-GO start function: do
not keep the SmartKey in the trunk. Otherwise, the SmartKey may not be detected, e.g. when
starting the engine using the Start/Stop button.
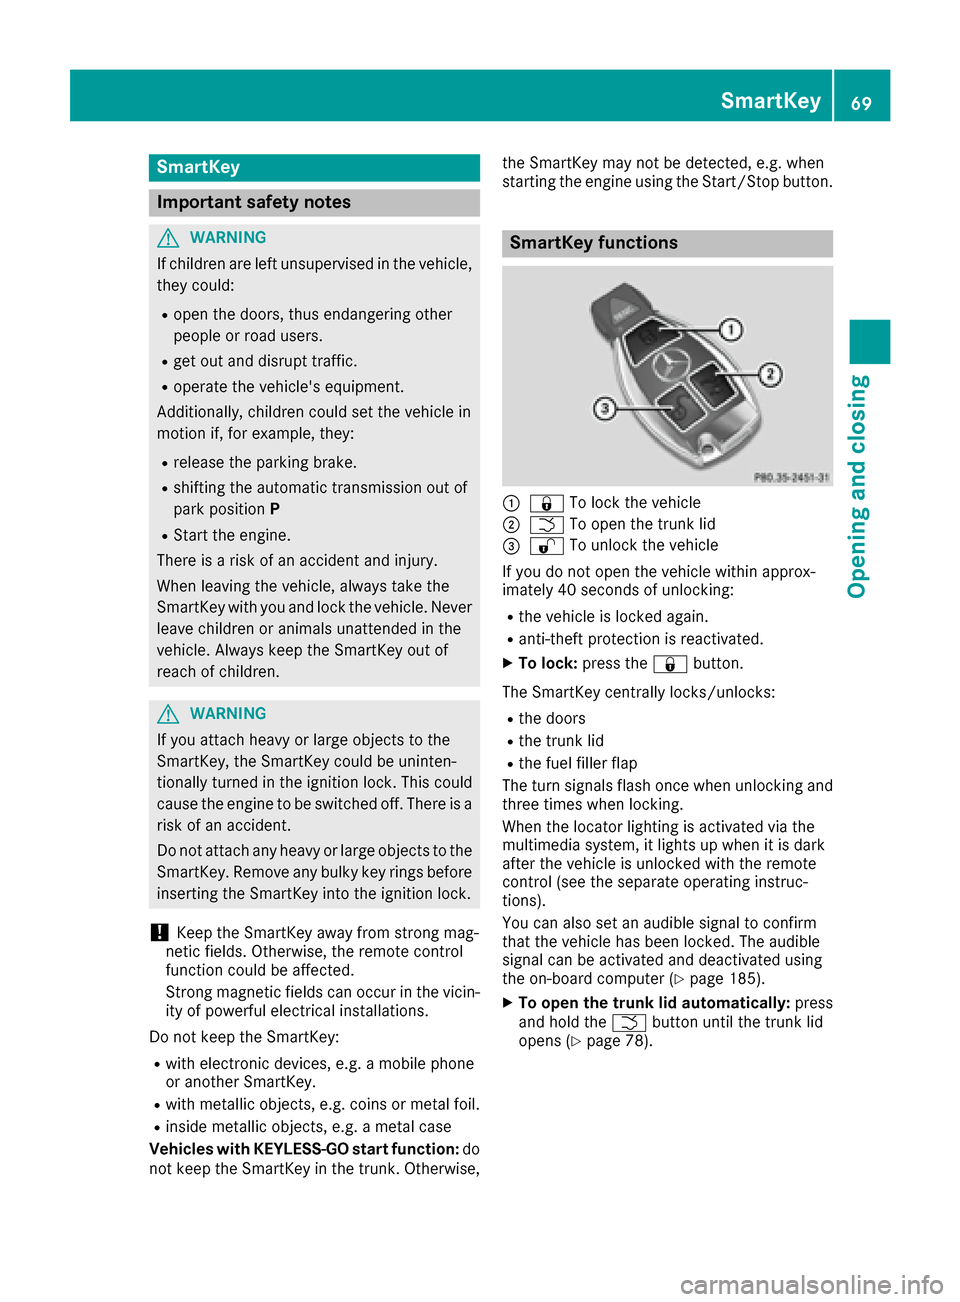
SmartKey functions
:&
To lock the vehicle
;FTo open the trunk lid
=%To unlock the vehicle
If you do not open the vehicle within approx-
imately 40 seconds of unlocking:
Rthe vehicle is locked again.
Ranti-theft protection is reactivated.
XTo lock: press the &button.
The SmartKey centrally locks/unlocks:
Rthe doors
Rthe trunk lid
Rthe fuel filler flap
The turn signals flash once when unlocking and
three times when locking.
When the locator lighting is activated via the
multimedia system, it lights up when it is dark
after the vehicle is unlocked with the remote
control (see the separate operating instruc-
tions).
You can also set an audible signal to confirm
that the vehicle has been locked. The audible
signal can be activated and deactivated using
the on-board computer (
Ypage 185).
XTo open the trunk lid automatically: press
and hold the Fbutton until the trunk lid
opens (
Ypage 78).
SmartKey69
Opening and closing
Z
Page 77 of 318

Doors
Important safet ynotes
GWARNING
If children are lef tunsupervised in th evehicle,
they could:
Rope nth edoors ,thus endangerin gother
people or road users.
Rget out and disrup ttraffic .
Roperat eth evehicle' sequipment.
Additionally, children could set th evehicle in
motion if, fo rexample, they:
Rrelease th eparking brake .
Rshiftingth eautomatic transmissio nout of
par kposition P
RStart theengine.
There is aris kof an acciden tand injury.
Whe nleavin gth evehicle, always take th e
SmartKey wit hyou and loc kth evehicle. Never
leav echildren or animals unattended in th e
vehicle. Always keep th eSmartKey out of
reach of children .
You should preferably plac eluggage or load sin
th ecargo compartment. Observ eth eloadin g
guidelines (
Ypage 233).
Unlockingan dopening doors from
th einside
!
The sid ewindows will no topen/close if th e
battery is discharged or if th esid ewindows
hav eiced up. It will then no tbe possible to
close th edoor. Do no tattempt to forc eth e
doo rclosed. You could otherwise damage th e
doo ror th esid ewindow.
Whe n adoo ris opened, th esid ewindow on that
sid eopens slightly. Whe nth edoo ris closed, th e
sid ewindow close sagain .
XTo unlock an dope n afront door: pull door
handle ;.
If th edoo ris locked, locking knob :pop sup.
The doo ris unlocke dand opens .
XTo unlock arear door: pull up locking
knob :.
The doo ris unlocke dand can be opened.
XTo ope n arear door: pull doorhandle ;.
You can ope n adoo rfrom insid eth evehicle
eve nif it has bee nlocked. You can only ope nth e
rea rdoors from insid eth evehicle if they are no t
secure dby th echild-proof locks (
Ypage 59).
If th evehicle has previously bee nlocke dwit h
th eSmartKey from th eoutside, opening adoo r
from th einsid ewill trigger th eanti-thef talar m
system. Switc hof fth ealar m (
Ypage 67).
Centrally locking an dunlocking th e
vehicle from th einside
You can centrall yloc kor unloc kth evehicle from
th einside. Thi scan be useful if you wish to loc k
th evehicle befor epulling away, fo rexample.
XTo unlock :press butto n:.
XTo lock :press butto n;.
If all th edoors and th etrunk lid are closed, th e
vehicle locks .
Doors75
Opening and closing
Z
Page 102 of 318

take precedence over the daytime running
lamps.
USA only:
The daytime running lamps improve the visibility
of your vehicle during the day. To do this, the
daytime running lamps function must be
switched on using the on-board computer
(
Ypage 184).
If the engine is running and you turn the light
switch to the TorL position, the manual
settings take precedence over the daytime run-
ning lamps.
Low-beam headlamps
Even if the light sensor does not detect that it is
dark, the parking lamps and low-beam head-
lamps come on when the ignition is switched on and the light switch is set to the Lposition.
This is a particularly useful function in the event
of rain and fog.
XTo switch on the low-beam headlamps:
turn the SmartKey in the ignition lock to posi- tion 2or start the engine.
XTurn the light switch to L.
The green Lindicator lamp in the instru-
ment cluster lights up.
Rear fog lamp
The rear fog lamp improves visibility of your
vehicle for the traffic behind in the event of thick
fog. Please take note of the country-specific
regulations for the use of rear fog lamps.
XTo switch on the rear fog lamp: turn the
SmartKey in the ignition lock to posi tion2or
start the engine.
XTurn the light switch to LorÃ.
XPress the Rbutton.
The yellow Rindicator lamp in the instru-
ment cluster lights up.
XTo switch off the rear fog lamp: press the
R button.
The yellow Rindicator lamp in the instru-
ment cluster goes out.
iWhen the rear fog lamp is switched on, the
center brake lamp in the tail lamp switches off
due to a legal requirement.
Parking lamps
!If the battery charge is very low, the parking
lamps or standing lamps are automatically
switched off to enable the next engine start. Always park your vehicle safely and in a well lit
area, in accordance with the relevant legal
stipulations. Avoid using the
Tparking
lamps over a period of several hours. If pos-
sible, switch on the right-hand Xor left-
hand W standing lamps.
XTo switch on: turn the light switch to T.
The green Tindicator lamp in the instru-
ment cluster lights up.
Standing lamps
Switching on the standing lamps ensures the
corresponding side of the vehicle is illuminated.
XTo switch on the standing lamps: the
SmartKey should not be in the ignition lock or
it should be in position 0.
XTurn the light switch to W( left-hand side of
the vehicle) or X(right-hand side of the
vehicle).
Combination switch
XTo indicate briefly: press the combination
switch briefly to the pressure point in the
direction of arrow ;or?.
The corresponding turn signal flashes three
times.
XTo indicate: press the combination switch
beyond the pressure point in the direction of
arrow ;or?.
XTo switch on the high-beam headlamps:
turn the light switch to LorÃ.
XPress the combination switch beyond the
pressure point in the direction of arrow :.
The high-beam headlamps only switch on in
the à position if the low-beam headlamps
are on.
100Exterior lighting
Lights and windshield wiper s
Page 106 of 318

Vehicles with halogen headlamps
:
Turn signal lamp: PY 21 W
;High-beam headlamps/daytime running
lamps/parking lamps/standing lamps:
H15 55 W/15 W
=Low-beam headlamps: H7 55 W
Tail lamps (vehicles with halogen headlamps)
:
Rear fog lamp: P 21 W
;Brake lamp: W 16 W
=Brake lamp: W 16 W
?Turn signal lamp: PY 21 W
ABackup lamp: W 16 W
Replacing front bulbs
Removing and installing the cover in the
front wheel housing
You must remove the cover of the front wheel
housing before you can change the front turn
signal lamp.
XTo remove: switch off the lights.
XTurn the front wheels inwards.
XTurn rotary knob :through 90°.
Cover ;is released.
XPush cover ;down.
XTo install: push cover ;up.
XTurn rotary knob :through 90°.
Cover ;is locked.
Low-beam headlamps (halogen head-
lamps)
XRemove the cover in the front wheel housing
(Ypage 104).
XTurn housing cover :counter-clockwise and
remove it.
XTurn bulb holder ;counter-clockwise and
pull out.
XPull the bulb out of bulb holder ;.
104Replacing bulbs
Lights and windshield wipers
Page 122 of 318
Notes on breaking-in a new vehicle
Important safety notes
The sensor system of some driving and driving
safety systems adjusts automatically while a
certain distance is being driven after the vehiclehas been delivered or after repairs. Full system
effectiveness is not reached until the end of this
teach-in procedure.
New and replaced brake pads and discs only
reach their optimum braking effect after several hundred kilometers of driving. Compensate for
this by applying greater force to the brake pedal.
The first 1000 miles (1500 km)
The more you look after the engine when it is
new, the more satisfied you will be with its per-
formance in the future.
RYou should therefore drive at varying vehicle
and engine speeds for the first 1000 miles
(1500 km).
RAvoid heavy loads, e.g. driving at full throttle,during this period.
RChange gear in good time, before the tach-
ometer needle is Ôof the way to the red area
of the tachometer.
RDo not manually shift to a lower gear to brake
the vehicle.
RTry to avoid depressing the accelerator pedal
beyond the point of resistance (kickdown).
RIdeally, for the first 1000 miles (1500 km),
driv ein progra mE.
Addition al breaking-in notes for Mercedes-AMG
vehicles:
RDo not drive faster than 85 mph (140 km/h)
for the first 1,000 miles (1,500 km).
ROnly allow the engine to reach a maximum
engine speed of 4,500 rpm briefly.
RChange gear in good time.
After 1,000 miles (1,500 km), you can increase
the engine speed gradually and bring the vehicle
to full speed.
You should also observe these notes on break-
ing-in if the engine or parts of the drive train on
your vehicle have been replaced.
Always observe the maxim
um permissible
speed.
Driving
Important safety notes
GWARNING
Objects in the driver's footwell can restrict the pedal travel or obstruct a depressed pedal.
The operating and road safety of the vehicle is
jeopardized. There is a risk of an accident.
Make sure that all objects in the vehicle are
stowed correctly, and that they cannot enter
the driver's footwell. Install the floormats
securely and as specified in order to ensure
sufficient clearance for the pedals. Do not use
loose floormats and do not place floormats on
top of one another.
GWARNING
Unsuitable footwear can hinder correct usage of the pedals, e.g.:
Rshoes with thick soles
Rshoes with high heels
Rslippers
There is a risk of an accident.
Wear suitable footwear to ensure correct
usage of the pedals.
GWARNING
If you switch off the ignition while driving,
safety-relevant functions are only available
with limitations, or not at all. This could affect, for example, the power steering and the brake
boosting effect. You will require considerably
more effort to steer and brake. There is a risk
of an accident.
Do not switch off the ignition while driving.
GWARNING
If the parking brake has not been fully
released when driving, the parking brake can:
Roverheat and cause a fire
Rlose its hold function.
There is a risk of fire and an accident. Release
the parking brake fully before driving off.
120Driving
Driving and parking
Page 123 of 318

!Do not warm up the engine with the vehicle
stationary. Drive off immediately. Avoid high
engine speeds and driving at full throttle until
the engine has reached its operating temper- ature.
Only shift the automatic transmission to the
desired drive position when the vehicle is sta-
tionary.
Where possible, avoid spinning the drive
wheels when pulling away on slippery roads.
You could otherwise damage the drive train.
!Mercedes-AMG vehicles: avoid full-load
operation and engine speeds greater than
5000 rpm when the engine is cold. This helps
to protect the engine and avoids uncomfort-
able driving.
SmartKey positions
SmartKey
gTo remove the SmartKey
(shift the transmission to position P)
1Power supply for some consumers, such as
the windshield wipers
2Ignition (power supply for all consumers)
and drive position
3To start the engine
iThe SmartKey can be turned in the ignition
lock even if it is not the correct SmartKey for
the vehicle. The ignition is not switched on.
The engine cannot be started.
Start/Stop button
General notes
Vehicles with KEYLESS-GO are equipped with
SmartKeys featuring the integrated KEYLESS-
GO function and a detachable Start/Stop but-
ton.
A check which periodically establishes a radio
connection between the vehicle and the Smart-
Key determines whether a valid SmartKey is in
the vehicle. This occurs, for example, when
starting the engine.
When you insert the Start/Stop button into the
ignition lock, the system needs approximately
two seconds recognition time. You can then use
the Start/Stop button.
Pressing the Start/Stop button several times in
succession corresponds to the different Smart-
Key positions in the ignition lock. This is only the
case if you are not depressing the brake pedal.
If you depress the brake pedal and press the
Start/Stop button, the engine starts immedi-
ately.
To start the vehicle without actively using the
SmartKey:
Rthe Start/Stop button must be inserted in the
ignition lock.
Rthe SmartKey must be in the vehicle.
Rthe vehicle must not be locked with the
SmartKey or KEYLESS-GO (Ypage 70)
Do not keep the KEYLESS-GO key:
Rwith electronic devices, e.g. a mobile phone
or another SmartKey.
Rwith metallic objects, e.g. coins or metal foil.
Rinside metallic objects, e.g. a metal case
This can affect the functionality of KEYLESS-GO.
If you lock the vehicle with the SmartKey remote
control or with KEYLESS-GO, after a short time:
Ryou will not be able to switch on the ignition
with the Start/Stop button.
Ryou will no longer be able to start the engine
with the Start/Stop button until the vehicle is
unlocked again
If you lock the vehicle centrally using the button
on the front door (
Ypage 75), you can continue
to start the engine with the Start/Stop button.
The engine can be switched off while the vehicle
is in motion by pressing and holding the Start/
Stop button for three seconds. This function
Driving121
Driving and parking
Z