2017 MERCEDES-BENZ CLA-Class Parking
[x] Cancel search: ParkingPage 22 of 318

Removingth etowin geye .............. .277
Towing a trailer
ESP
®(Electronic Stability Pro-
gram) ............................................... 66
Towing away
Important safety guidelines ........... 276
Installing the towing eye ................ 277
Notes for 4MATIC vehicles ............ 279
Removing the towing eye ...............2 77
Transporting the vehicle ................ 278
With both axles on the ground ....... 278
With front axle raised ..................... 277
Towing eye ......................................... 266
Traffic reports
see also Digital Operator's Man-
ual ..................................................2 27
Transmission
see Automatic transmission
Transmission position display
(DIRECT SELECT lever) ......................129
Transporting the vehicle .................. 278
Trim pieces (cleaning instruc-
tions) ..................................................2 64
Trip computer (on-board com-
puter) ..................................................1 77
Trip odometer
Calling up ....................................... 177
Resetting (on-board computer) ...... 178
Trunk
Emergency release .......................... 80
Emergency release button ...............8 0
Important safety notes .................... 77
Opening (automatically from out-
side) .................................................7 8
Opening (from outside the vehi-
cle, HANDS-FREE ACCESS) .............. 78
Opening automatically from
inside ............................................... 79
Opening/closing (manually from
outside) ............................................ 77
Trunk emergency release button .......80
Trunk lid
Display message ............................ 213
Opening dimensions ...................... 314
Trunk load (maximum) ...................... 314
Turn signals
Display message ............................ 199 Replacing bulbs (front) ................... 105
Swi
tching o
n/off ........................... 100
Two-way radio
Frequencies ................................... 307
Installation ..................................... 307
Transmission output (maximum) .... 307
Type identification plate
see Vehicle identification plate
U
UnlockingEmergency unlocking ....................... 76
From inside the vehicle (central
unlocking button) ............................. 75
Upshift indicator (on-board com-
puter, Mercedes-AMG vehicles) ....... 185
USB devices
Connecting to the Media Inter-
face ............................................... 232
V
Vanity mirror (in the sun visor) ........ 240
Vehicle
Correct use ...................................... 27
Data acquisition ............................... 28
Display message ............................ 211
Equipment ....................................... 24
Individual settings .......................... 183
Limited Warranty ............................. 28
Loading .......................................... 292
Locking (in an emergency) ............... 76
Locking (SmartKey) .......................... 69
Lowering ........................................ 305
Maintenance .................................... 25
Parking for a long period ................ 142
Pulling away ................................... 124
Raising ........................................... 303
Reporting problems .........................2 7
Securing from rolling away ............ 302
Transporting .................................. 278
Unlocking (in an emergency) ........... 76
Unlocking (SmartKey) ...................... 69
Vehicle data ................................... 314
Vehicle data
Roof load (maximum) ..................... 314
Trunk load (maximum) ................... 314
20Index
Page 33 of 318

Cockpit
FunctionPage
:Steering wheel paddle shift-
ers135
;Combination switch100
=Instrument cluster32
?Horn
ADIRECT SELECT lever129
BParking Assist PARKTRONIC
warning display161
COverhead control panel38
FunctionPage
DClimate control systems109
EIgnition lock121
FAdjusts the steering wheel94
GCruise control lever148
HElectric parking brake141
ILight switch99
JDiagnostics connection27
KOpens the hood254
Cockpit31
At a glance
Page 34 of 318

Instrument cluster
FunctionPage
:Speedometer wit hsegments17 4
Warning and indicator lamps:
L Low-beam headlamps100
T Parking lamp s100
K High-beam headlamps100
÷ ESP®21 9
Electric parking brak e
applie d(red)
F (USAonly)
! (Canada only)222
! Electric parking brak e
(yellow)22 2
· Distanc ewarning22 5
å ESP®OF F219
! ABSmalfunctioning21 8
Brake s217
$ (USAonly)
J (Canada only)
FunctionPage
;#! Turn signals100
=Multifunction display176
?Tachometer174
6 Restrain tsystem40
ü Seat belt no tfastene d216
M SPORT handlin gmod e
(Mercedes-AM Gvehicles)22 0
R Rear fog lamp100
; CheckEngin e222
h Tirepressur emonitor22 6
ACoolan ttemperature gauge17 5
Warning and indicator lamps:
? Coolan tto ohot/cold22 3
BFue llevel indicator
Warning and indicator lamps:
æ Reserve fuel222
32Instrument cluster
At a glance
Page 36 of 318

Center console
Center console, upper section
FunctionPage
:Multimedia system (see the
separate operating instruc-
tions)
;cSeat heating93
Mercedes-AMG vehicles:
AMG adaptive sport suspen-
sion system (left side)
158
Mercedes-AMG vehicles:
adjusts the exhaust flap of
the AMG performance
exhaust system (right side)
126
=cParking Assist
PARKTRONIC161
FunctionPage
?è ECO start/stop func-
tion124
A£ Hazard warning lamps101
BPASSENGER AIR BAG indica-
tor lamp40
CDYNAMIC SELECT button127
åMercedes-AMG vehi-
cles: ESP®65
34Center console
At a glance
Page 56 of 318

GWARNING
If you leave children unsupervised in the vehi-
cle, they could set it in motion by, for example:
Rrelease the parking brake.
Rshift the automatic transmission out of the
parking position P.
Rstart the engine.
In addition, they may operate vehicle equip-
ment and become trapped. There is a risk of
an accident and injury.
When leaving the vehicle, always take the
SmartKey with you and lock the vehicle. Never
leave children unsupervised in the vehicle.
GWARNING
If persons, particularly children are subjected to prolonged exposure to extreme heat or
cold, there is a risk of injury, possibly even
fatal. Never leave children unattended in the
vehicle.
GWARNING
If the child restraint system is subjected to
direct sunlight, parts may get very hot. Chil-
dren may burn themselves on these parts,
particularly on the metal parts of the child
restraint system. There is a risk of injury.
If you leave the vehicle, taking the child with
you, always ensure that the child restraint
system is not exposed to direct sunlight. Pro- tect it with a blanket, for example. If the child
restraint system has been exposed to direct
sunlight, let it cool down before securing the
child in it. Never leave children unattended in
the vehicle.
Always ensure that all vehicle occupants have
their seat belts fastened correctly and are sitting
properly. Particular attention must be paid to
children.
Observe the safety notes on the seat belt
(
Ypage 41) and the notes on correct use of seat
belts (Ypage 42).
A booster seat may be necessary to achieve
proper seat belt positioning for children over
41 lbs (18 kg) until they reach a height where a three-point seat belt can be properly fastened
without a booster seat.
Special seat belt retractor
GWARNING
If the seat belt is released while driving, the
child restraint system will no longer be
secured properly. The special seat belt retrac- tor is disabled and the inertia real draws in a
portion of the seat belt. The seat belt cannot
be immediately refastened. There is an
increased risk of injury, possibly even fatal.
Stop the vehicle immediately, paying atten-
tion to road and traffic conditions. Reactivate
the special seat belt retractor and secure the
child restraint system properly.
All seat belts except the driver's seat belt are
equipped with a special seat belt retractor.
When activated, the special seat belt retractor
ensures that the seat belt will not slacken once
the child restraint system has been secured.
Installing a child restraint system:
XAlways comply with the child restraint system
manufacturer's installation instructions.
XPull the seat belt smoothly from the belt out-
let.
XEngage the seat belt tongue in the belt buckle.
Activating the special seat belt retractor:
XPull the seat belt out fully and let the inertia
reel retract it again.
While the seat belt is retracting, you should
hear a ratcheting sound. The special seat belt
retractor is activated.
XPush the child seat restraint system down so
that the seat belt is tight and does not loosen.
Removing a child restraint system and deacti-
vating the special seat belt retractor:
XAlways comply with the child restraint system
manufacturer's installation instructions.
XPress the release button of the belt buckle,
hold the belt tongue firmly and guide it back
towards the belt outlet.
The special seat belt retractor is deactivated.
54Children in the vehicle
Safety
Page 60 of 318

Rearward-facing child restraint system
If it is absolutely necessary to install a rearward-
facing child restraint system on the front-
passenger seat, always make sure that the
front-passenger front air bag is deactivated.
Only if the PASSENGER AIR BAG OFF indicator
lamp is permanently lit (
Ypage 40) is the front-
passenger front air bag deactivated.
Always observe the child restraint system man-
ufacturer's installation and operating instruc-
tions.
Forward-facing child restraint system
If it is absolutely necessary to install a forward-
facing child restraint system on the front-
passenger seat, always move the front-
passenger seat as far back as possible. Fully
retract the seat cushion length. The entire base
of the child restraint system must always rest on
the seat cushion of the front-passenger seat.
The backrest of the child restraint system must
lie as flat as possible against the backrest of the front-passenger seat. The child restraint system
must not touch the roof or be subjected to a load
by the head restraint. Adjust the angle of the
seat backrest and the head restraint position
accordingly. Always make sure that the shoul-
der belt strap is correctly routed from the vehi-
cle belt outlet to the shoulder belt guide on the
child restraint system. The shoulder belt strap
must be routed forwards and downwards from
the vehicle belt outlet. If necessary, adjust the
vehicle belt outlet and the front-passenger seat
accordingly.
Always observe the child restraint system man-
ufacturer's installation and operating instruc-
tions.
Child-proof locks
Important safety notes
GWARNING
If children are traveling in the vehicle, they
could:
Ropen doors, thus endangering other people
or road users
Rexit the vehicle and be caught by oncoming
traffic
Roperate vehicle equipment and become
trapped
There is a risk of an accident and injury.
Always activate the child-proof locks and
override feature if children are traveling in the vehicle. When leaving the vehicle, always take
the key with you and lock the vehicle. Never
leave children unattended in the vehicle.
Override feature for:
Rthe rear doors (Ypage 59)
Rthe rear side windows (Ypage 59)
GWARNING
If you leave children unsupervised in the vehi-
cle, they could set it in motion by, for example:
Rrelease the parking brake.
Rshift the automatic transmission out of the
parking position P.
Rstart the engine.
In addition, they may operate vehicle equip-
ment and become trapped. There is a risk of
an accident and injury.
When leaving the vehicle, always take the
SmartKey with you and lock the vehicle. Never
leave children unsupervised in the vehicle.
GWARNING
If persons, particularly children are subjected to prolonged exposure to extreme heat or
cold, there is a risk of injury, possibly even
fatal. Never leave children unattended in the
vehicle.
58Children in the vehicle
Safety
Page 63 of 318

Important safety notes
iObserveth e"Importan tsafet ynotes" sec -
tion (Ypage 60).
GWARNIN G
If BA Sis malfunctioning ,th ebraking distanc e
in an emergenc ybraking situation is
increased. Ther eis aris kof an accident.
In an emergenc ybraking situation ,depress
th ebrak epedal wit hfull force .AB Sprevents
th ewheels from locking.
Braking
XKee pth ebrak epedal firmly depressed until
th eemergenc ybraking situation is over.
AB Sprevents th ewheels from locking.
The brakes will function as usual once you
release th ebrak epedal .BA Sis deactivated.
Active Brake Assist
General information
iObserv eth e"Importan tsafet ynotes" sec -
tion (Ypage 60).
Active Brake Assist consist sof adistanc ewarn -
ing function wit han autonomous braking func-
tion and braking assistanc eappropriat eto th e
situation .
Active Brake Assist can help you to minimiz eth e
ris kof acollision wit hth evehicl etraveling in
fron tor reduce th eeffects of suc h acollision .
If Active Brake Assist detects that there is aris k
of collision ,you will be warned visually and
acoustically. If you do no treac tto th evisual and
audible collision warning ,autonomous braking
can be initiate din critical situations. If you apply
th ebrak eyourself in acritical situation ,Adap-
tive Brake Assist support syou wit hbraking
assistanc eappropriat eto th esituation .
Important safety notes
Detection of hazardous situation scan be par-
ticularly impaired by:
Rthere is dirt on th esensor sor anythin gelse
covering th esensor s
Rthere is snow or heav yrain
Rthere is interferenc eby other radar source s
Rthere are strongradar reflections, for exam-
ple in parking garages
Ra narrow vehicl eis traveling in front, e.g. a
motorbike
Ra vehicl eis traveling in fron ton adifferen tlin e
Rne wvehicles or after servicing is carrie dout
on th eActive Brake Assist system
Observ eth eimportant safet ynote sin th e
"Breaking-in notes" section (
Ypage 120).
Followin gdamag eto th efron ten dof th evehicle,
hav eth econfiguration and operation of th e
radar sensor checke dat aqualified specialist
workshop. This also applie sto collision sat low
speeds wher eno visible damag eto th efron tof
th evehicl eis apparent.
Activating/deactivating
Active Brake Assist is active after every ignition
cycle.
You can activat eor deactivat eActive Brake
Assist (
Ypage 182) in th eon-board computer.
When deactivated, th edistanc ewarning func-
tion and th eautonomous braking function are
also deactivated.
If Active Brake Assist is deactivated, th eæ
symbol appear sin th eassistanc egraphic dis-
play.
Distance warning function
Gene ral information
The distanc ewarning function can help you to
minimiz eth eris kof afront-en dcollision wit h a
vehicl eahead or reduce th eeffects of suc h a
collision .If th edistanc ewarning function
detects that there is aris kof acollision ,you will
be warned visually and acoustically.
Import ant safety notes
iObserveth e"Importan tsafet ynotes" sec -
tion for driving safet ysystems (Ypage 60).
GWARNIN G
The distanc ewarning function does no treact:
Rto people or animals
Rto oncomin gvehicles
Rto crossing traffic
Rwhen cornering
Driving safety systems61
Safety
Z
Page 71 of 318
SmartKey
Important safety notes
GWARNING
If children are left unsupervised in the vehicle,
they could:
Ropen the doors, thus endangering other
people or road users.
Rget out and disrupt traffic.
Roperate the vehicle's equipment.
Additionally, children could set the vehicle in
motion if, for example, they:
Rrelease the parking brake.
Rshifting the automatic transmission out of
park position P
RStart the engine.
There is a risk of an accident and injury.
When leaving the vehicle, always take the
SmartKey with you and lock the vehicle. Never
leave children or animals unattended in the
vehicle. Always keep the SmartKey out of
reach of children.
GWARNING
If you attach heavy or large objects to the
SmartKey, the SmartKey could be uninten-
tionally turned in the ignition lock. This could
cause the engine to be switched off. There is a risk of an accident.
Do not attach any heavy or large objects to the
SmartKey. Remove any bulky key rings before
inserting the SmartKey into the ignition lock.
!Keep the SmartKey away from strong mag-
netic fields. Otherwise, the remote control
function could be affected.
Strong magnetic fields can occur in the vicin-
ity of powerful electrical installations.
Do not keep the SmartKey:
Rwith electronic devices, e.g. a mobile phone
or another SmartKey.
Rwith metallic objects, e.g. coins or metal foil.
Rinside metallic objects, e.g. a metal case
Vehicles with KEYLESS-GO start function: do
not keep the SmartKey in the trunk. Otherwise, the SmartKey may not be detected, e.g. when
starting the engine using the Start/Stop button.
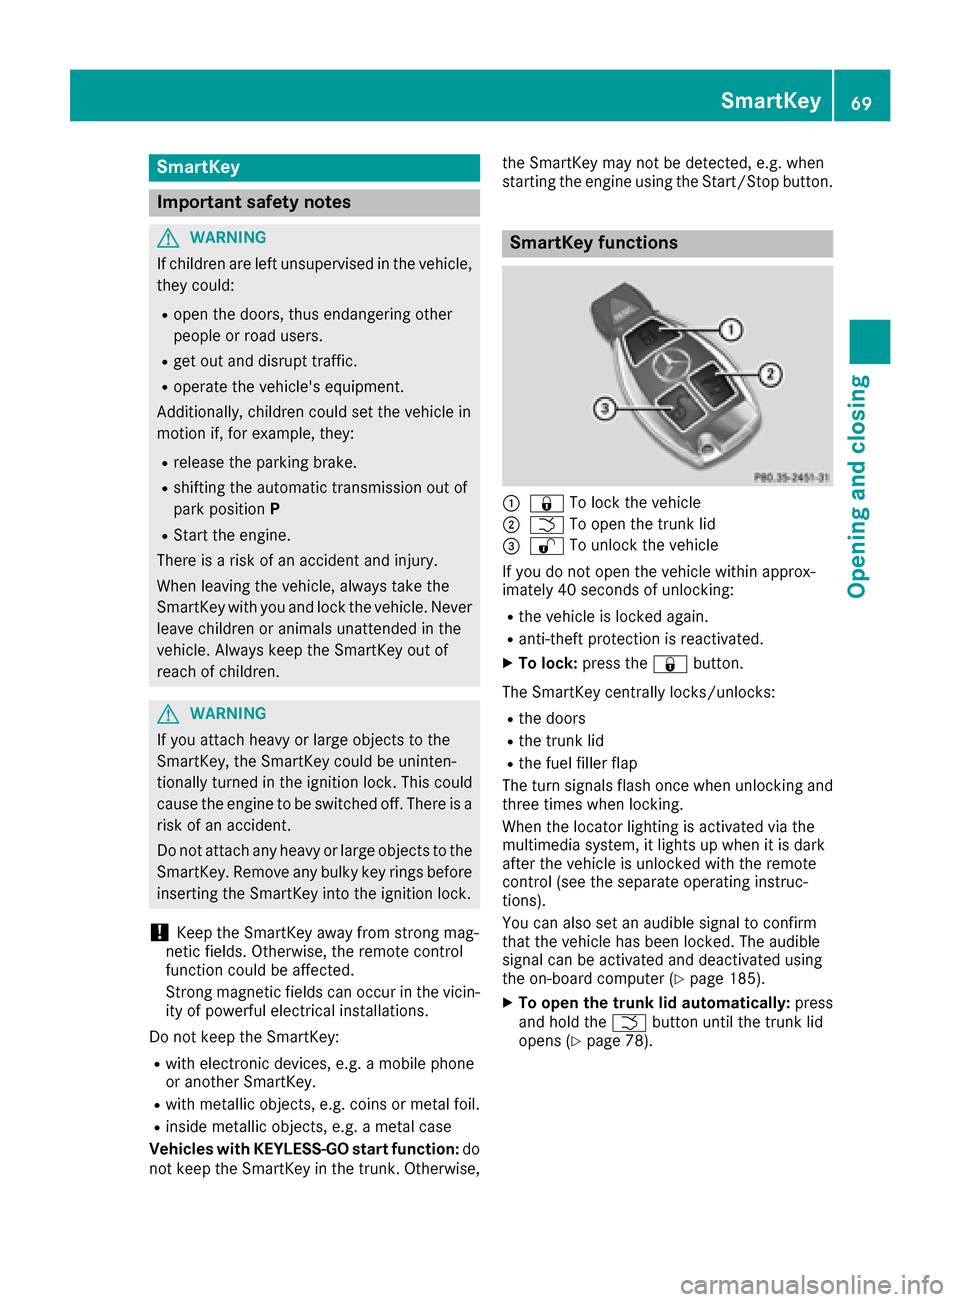
SmartKey functions
:&
To lock the vehicle
;FTo open the trunk lid
=%To unlock the vehicle
If you do not open the vehicle within approx-
imately 40 seconds of unlocking:
Rthe vehicle is locked again.
Ranti-theft protection is reactivated.
XTo lock: press the &button.
The SmartKey centrally locks/unlocks:
Rthe doors
Rthe trunk lid
Rthe fuel filler flap
The turn signals flash once when unlocking and
three times when locking.
When the locator lighting is activated via the
multimedia system, it lights up when it is dark
after the vehicle is unlocked with the remote
control (see the separate operating instruc-
tions).
You can also set an audible signal to confirm
that the vehicle has been locked. The audible
signal can be activated and deactivated using
the on-board computer (
Ypage 185).
XTo open the trunk lid automatically: press
and hold the Fbutton until the trunk lid
opens (
Ypage 78).
SmartKey69
Opening and closing
Z