2017 MERCEDES-BENZ C-Class SEDAN clock
[x] Cancel search: clockPage 27 of 178

Operating the control for vehicle and
sound settings X
Touch the touch-sensitive surface with two
fingers, spaced slightly apart.
X Turn both fingers clockwise.
The control setting is increased.
or X Turn both fingers counter-clockwise.
The control setting is decreased.
Moving the map X
Use one finger to press the touch-sensitive
surface until you reach the pressure point.
The crosshair is shown. X
Touch the touch-sensitive surface again with
one finger.
X Swipe your finger in any direction.
The map is moved is the direction of move-
ment.
Zooming in on the map X
Touch the touch-sensitive surface with two
fingers, spaced slightly apart.
X Glide your fingers away from each other.
The map scale is magnified.
Zooming out of the map X
Touch the touch-sensitive surface with two
fingers, spaced far apart.
X Glide your fingers towards each other.
The map scale is reduced. Touchpad
25Overview and operation
Page 39 of 178

X
To select Daylight Saving Time
Daylight Saving Time: turn and
press the controller.
A list of available options for setting summer
time appears.
X To select Automatic
Automatic, On OnorOff
Off: turn and
press the controller. Setting Function
Automatic
Automatic The summer and
standard time are
automatically
changed over.
On On The clock is advanced
one hour ahead of
standard time. Off Off The standard time for
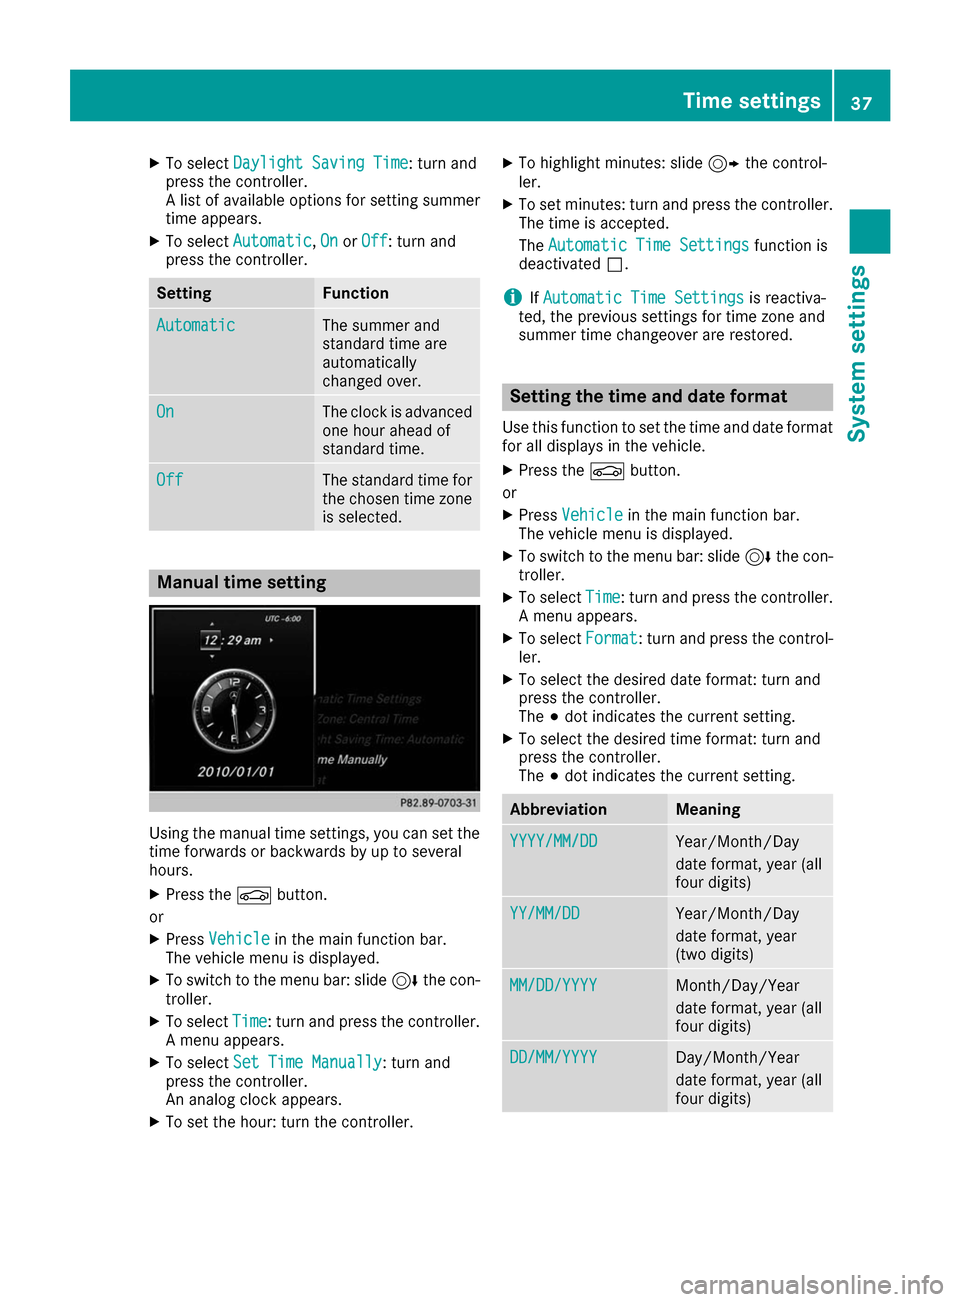
the chosen time zone is selected. Manual time setting
Using the manual time settings, you can set the
time forwards or backwards by up to several
hours.
X Press the 00D4button.
or X Press Vehicle Vehicle in the main function bar.
The vehicle menu is displayed.
X To switch to the menu bar: slide 6the con-
troller.
X To select Time
Time: turn and press the controller.
A menu appears.
X To select Set Time Manually
Set Time Manually: turn and
press the controller.
An analog clock appears.
X To set the hour: turn the controller. X
To highlight minutes: slide 9the control-
ler.
X To set minutes: turn and press the controller.
The time is accepted.
The Automatic Time Settings Automatic Time Settings function is
deactivated 0053.
i If
Automatic Time Settings Automatic Time Settings is reactiva-
ted, the previous settings for time zone and
summer time changeover are restored. Setting the time and date format
Use this function to set the time and date format for all displays in the vehicle.
X Press the 00D4button.
or X Press Vehicle Vehicle in the main function bar.
The vehicle menu is displayed.
X To switch to the menu bar: slide 6the con-
troller.
X To select Time
Time: turn and press the controller.
A menu appears.
X To select Format
Format: turn and press the control-
ler.
X To select the desired date format: turn and
press the controller.
The 003Bdot indicates the current setting.
X To select the desired time format: turn and
press the controller.
The 003Bdot indicates the current setting. Abbreviation Meaning
YYYY/MM/DD YYYY/MM/DD Year/Month/Day
date format, year (all
four digits)
YY/MM/DD YY/MM/DD Year/Month/Day
date format, year
(two digits)
MM/DD/YYYY MM/DD/YYYY Month/Day/Year
date format, year (all
four digits)
DD/MM/YYYY DD/MM/YYYY Day/Month/Year
date format, year (all
four digits) Time settings
37System settings Z
Page 66 of 178

X
Select 3D
3D.
The 3D POI turns on its own axis.
X To exit the all-round view, press the control-
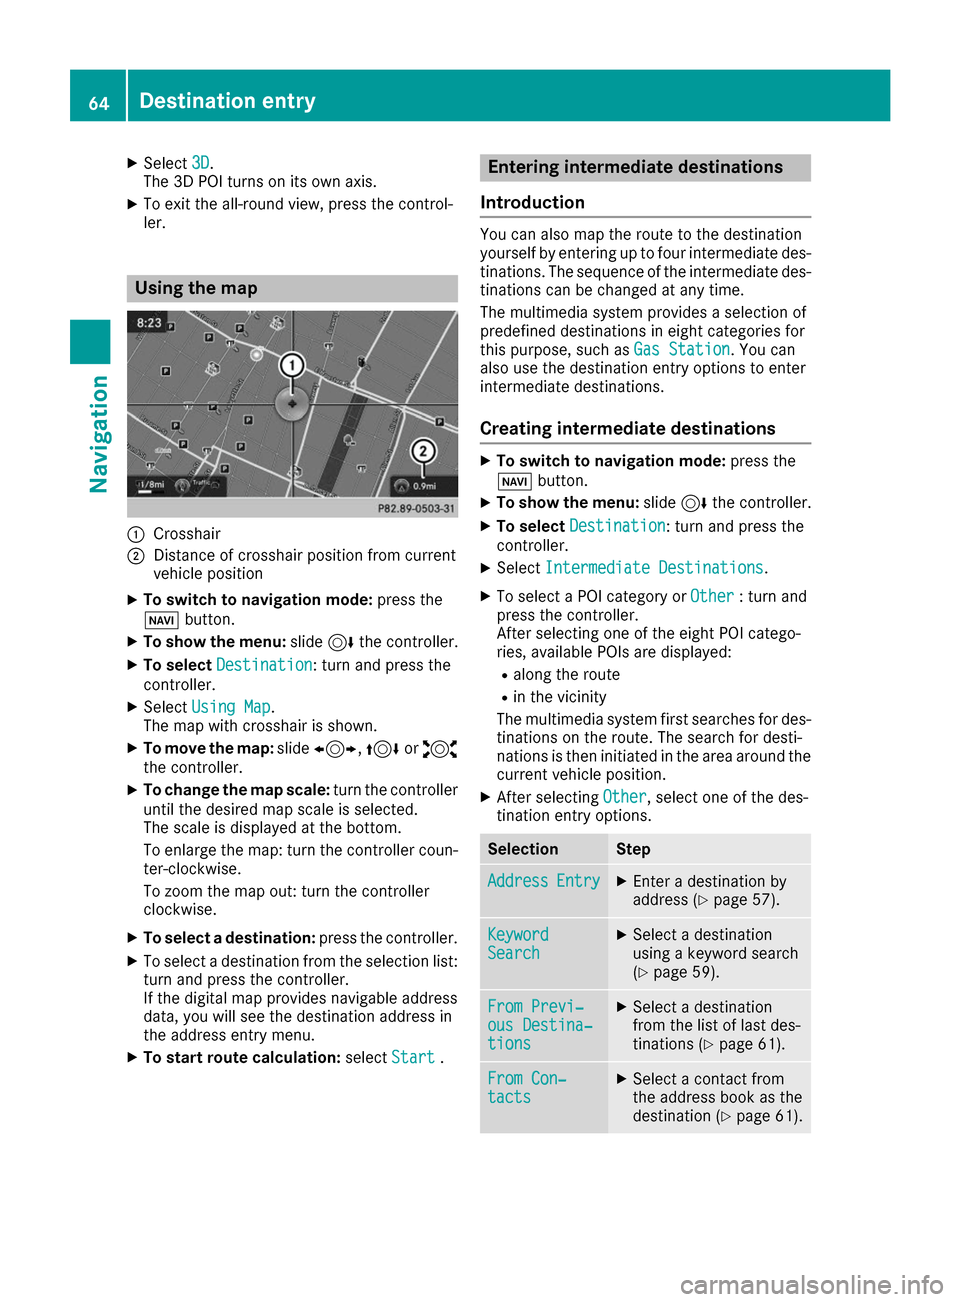
ler. Using the map
0043
Crosshair
0044 Distance of crosshair position from current
vehicle position
X To switch to navigation mode: press the
00BE button.
X To show the menu: slide6the controller.
X To select Destination
Destination: turn and press the
controller.
X Select Using Map Using Map.
The map with crosshair is shown.
X To move the map: slide1, 4or2
the controller.
X To change the map scale: turn the controller
until the desired map scale is selected.
The scale is displayed at the bottom.
To enlarge the map: turn the controller coun- ter-clockwise.
To zoom the map out: turn the controller
clockwise.
X To select a destination: press the controller.
X To select a destination from the selection list:
turn and press the controller.
If the digital map provides navigable address
data, you will see the destination address in
the address entry menu.
X To start route calculation: selectStart
Start . Entering intermediate destinations
Introduction You can also map the route to the destination
yourself by entering up to four intermediate des- tinations. The sequence of the intermediate des-
tinations can be changed at any time.
The multimedia system provides a selection of
predefined destinations in eight categories for
this purpose, such as Gas Station Gas Station. You can
also use the destination entry options to enter
intermediate destinations.
Creating intermediate destinations X
To switch to navigation mode: press the
00BE button.
X To show the menu: slide6the controller.
X To select Destination
Destination: turn and press the
controller.
X Select Intermediate Destinations
Intermediate Destinations .
X To select a POI category or Other
Other: turn and
press the controller.
After selecting one of the eight POI catego-
ries, available POIs are displayed:
R along the route
R in the vicinity
The multimedia system first searches for des-
tinations on the route. The search for desti-
nations is then initiated in the area around the
current vehicle position.
X After selecting Other Other, select one of the des-
tination entry options. Selection Step
Address
Address
Entry
Entry X
Enter a destination by
address (Y page 57). Keyword Keyword
Search Search X
Select a destination
using a keyword search
(Y page 59). From Previ‐ From Previ‐
ous Destina‐ ous Destina‐
tions tions X
Select a destination
from the list of last des-
tinations (Y page 61). From Con‐ From Con‐
tacts tacts X
Select a contact from
the address book as the
destination (Y page 61).64
Destination entryNavigation
Page 138 of 178

If available, you will see:
R the track that is currently being played
R the artist of the track that is currently being
played
R the album name
R the channel abbreviation
R the logo of the station or Artist Experience ®
Back to radio display:
X To select Info
Info: slide 6and press the con-
troller. Satellite radio
General notes
The satellite radio mode requires satellite radio
equipment and registration with a satellite radio provider.
Note that the categories and channels shown in
the illustrations depend on the program content offered by the provider. The illustrations and
descriptions in these operating instructions may therefore differ from the channels and catego-
ries offered by the provider.
Satellite radio mode may be temporarily unavail- able or interrupted for a variety of reasons.
These include environmental or topographical
conditions as well as other factors beyond the
control of Mercedes-Benz USA, LLC. This means operation may not be possible in certain areas.
These include:
R tunnels
R parking garages
R locations inside or next to buildings
R locations in the vicinity of other structures
Sirius XM ®
Satellite Radio offers more than 140
digital-quality radio channels, providing 100%
commercial-free music, sports, news and enter-
tainment.
Sirius XM ®
Satellite Radio uses a fleet of high-
performance satellites to broadcast around the
clock throughout the USA and Canada.
The satellite radio program is available for a
monthly fee. Details are available from the Sirius
XM ®
Service Center and at
http://www.siriusxm.com (USA) or
http://www.siriusxm.ca (Canada).
Your new Mercedes-Benz vehicle comes with
Sirius XM ®
Satellite Radio pre-installed at the factory. This service is free for a six-month trial
period. About a month before the trial period
ends, information will be provided on how to
extend this subscription. An acoustic signal
sounds and a message is shown, describing how
the subscription can be extended.
i Sirius, XM and all related marks and logos
are trademarks of Sirius XM Radio Inc. and its
subsidiaries. All other marks, channel names
and logos are the property of their respective
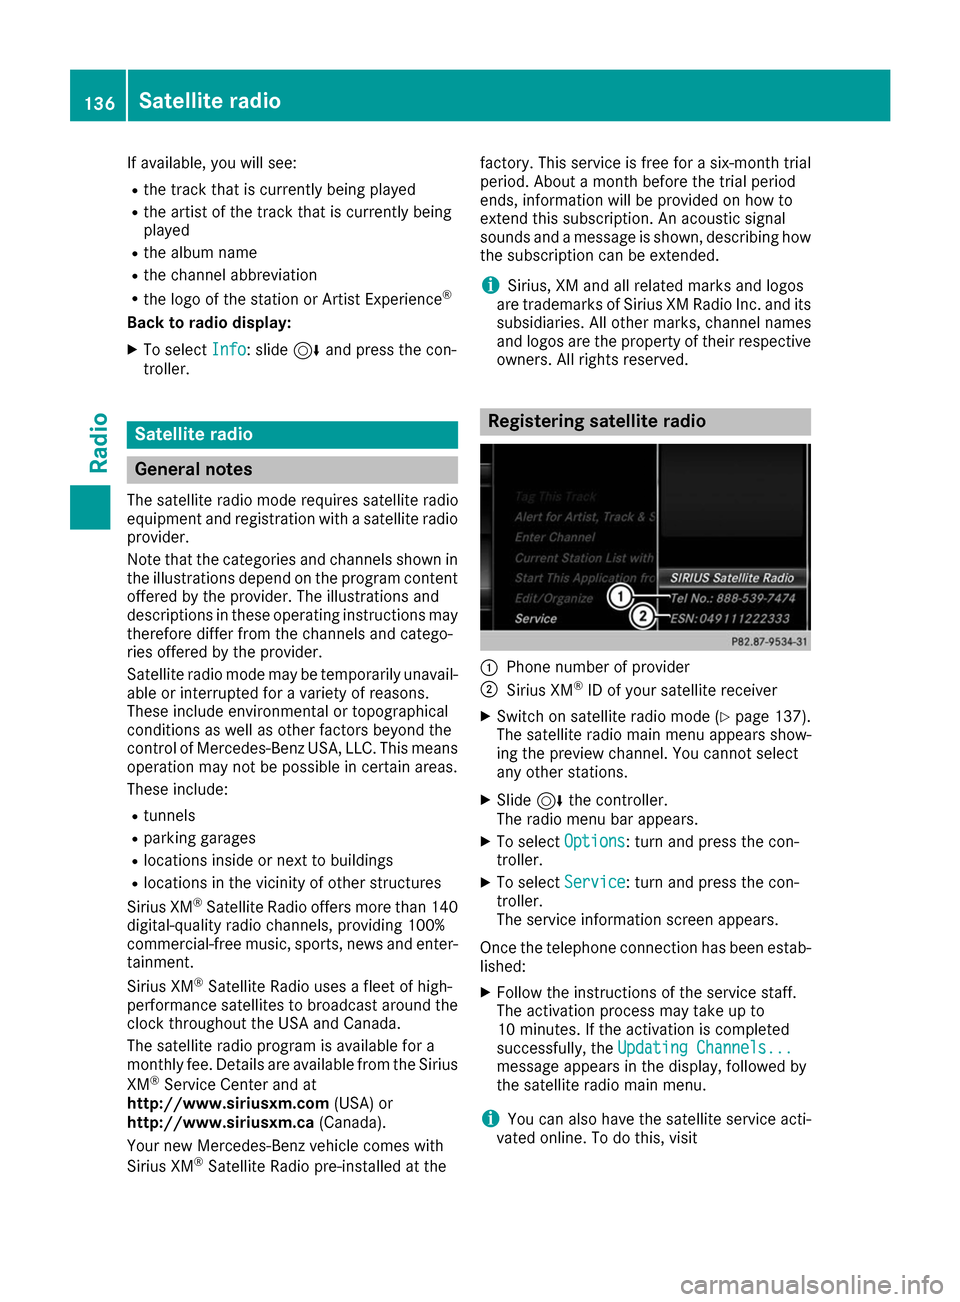
owners. All rights reserved. Registering satellite radio
0043
Phone number of provider
0044 Sirius XM ®
ID of your satellite receiver
X Switch on satellite radio mode (Y page 137).
The satellite radio main menu appears show-
ing the preview channel. You cannot select
any other stations.
X Slide 6the controller.
The radio menu bar appears.
X To select Options
Options: turn and press the con-
troller.
X To select Service
Service: turn and press the con-
troller.
The service information screen appears.
Once the telephone connection has been estab-
lished:
X Follow the instructions of the service staff.
The activation process may take up to
10 minutes. If the activation is completed
successfully, the Updating Channels... Updating Channels...
message appears in the display, followed by
the satellite radio main menu.
i You can also have the satellite service acti-
vated online. To do this, visit 136
Satellite radioRadio
Page 164 of 178

Setting the picture format
The following screen format options are availa-
ble for the DVD currently being played:
R Auto Auto
R 16:9
16:9
R 4:3
4:3
R Zoom
Zoom
X To set the picture format: turn and press the
controller.
The dot before the menu entry shows the
selected format. Showing the DVD's control menu
Most DVDs have their own control menuwhich
can be operated using the controller.
Showing the DVD's control menu
X To show DVD functions: in full screen video
mode, press the controller.
The DVD functions menu is shown.
X To select Menu
Menu from the DVD functions menu:
turn and press the controller.
The DVD functions menu is hidden and the
DVD's menu entries (e.g. scenes, language,
trailers) are displayed.
X To select a menu entry: turn and press the
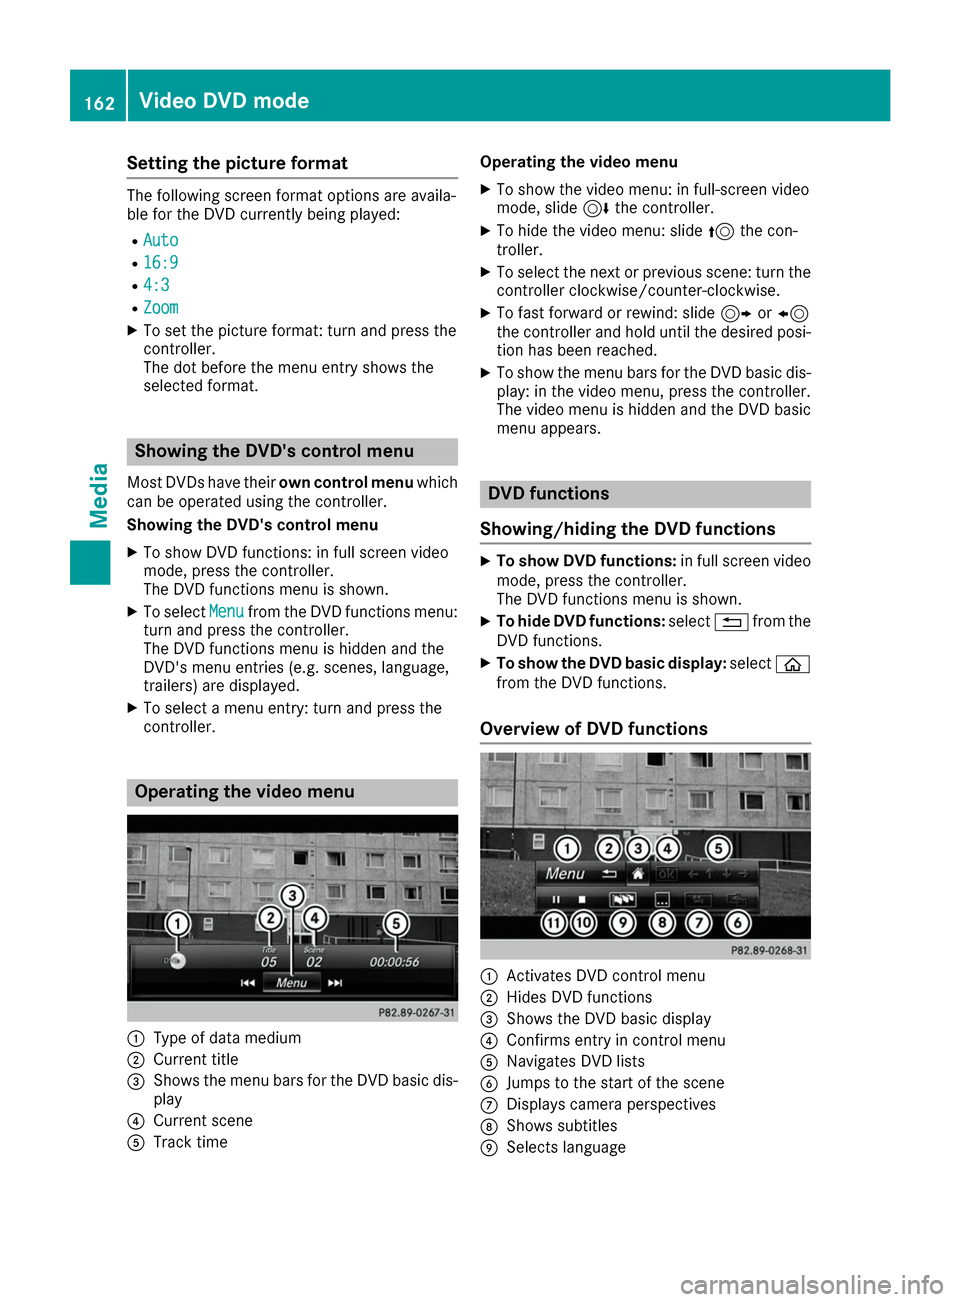
controller. Operating the video menu
0043
Type of data medium
0044 Current title
0087 Shows the menu bars for the DVD basic dis-
play
0085 Current scene
0083 Track time Operating the video menu
X To show the video menu: in full-screen video
mode, slide 6the controller.
X To hide the video menu: slide 5the con-
troller.
X To select the next or previous scene: turn the
controller clockwise/counter-clockwise.
X To fast forward or rewind: slide 9or8
the controller and hold until the desired posi- tion has been reached.
X To show the menu bars for the DVD basic dis-
play: in the video menu, press the controller.
The video menu is hidden and the DVD basic
menu appears. DVD functions
Showing/hiding the DVD functions X
To show DVD functions: in full screen video
mode, press the controller.
The DVD functions menu is shown.
X To hide DVD functions: select0038from the
DVD functions.
X To show the DVD basic display: select00E2
from the DVD functions.
Overview of DVD functions 0043
Activates DVD control menu
0044 Hides DVD functions
0087 Shows the DVD basic display
0085 Confirms entry in control menu
0083 Navigates DVD lists
0084 Jumps to the start of the scene
006B Displays camera perspectives
006C Shows subtitles
006D Selects language 162
Video DVD modeMedia
Page 166 of 178

The maximum image resolution is
20 megapixels.
It is not possible to view a picture from the driv-
er's side while the vehicle is in motion. Displaying pictures
X In media mode, slide 6the controller.
X To select Search Search: turn and press the control-
ler.
The category list appears.
X To select Photos Photos: turn and press the control-
ler.
A directory list appears. Folders and picture
files can be shown.
X Select a folder or picture.
If there is no picture on the data medium, an
empty list is shown.
Searching for pictures on other data media X You can search for pictures on other data
media.
In the directory list, slide 8the controller.
The device list appears.
X To select a data medium with picture files:
turn the controller and press to confirm.
A directory list appears. Folders and picture
files can be shown.
X Select a folder or picture. Starting a slide show
X While viewing a picture, press the controller.
The image menu appears.
X To select Start Slideshow
Start Slideshow: turn and press
the controller.
The slide show starts.
X To end the slide show: press the controller.
The image menu appears.
X Select End Slide Show
End Slide Show. Changing the picture view
X
While viewing a picture, press the controller.
The image menu appears.
X To select Turn Clockwise Turn Clockwise: turn the control-
ler and press to confirm.
The picture rotates 90 degrees.
X Select Turn Counterclockwise Turn Counterclockwise.
The picture rotates 90 degrees.
X Select Zoom In
Zoom In.
The size of the picture increases. After you
have zoomed into the picture, you can move
the section of the picture.
X To move the section of the picture: slide 4
and 1 the controller.
X To revert to the original size: press the con-
troller.
or
X Press the 0038button. Closing the picture viewer
X While viewing a picture, press the controller.
X To select Close Picture Viewer Close Picture Viewer: turn and
press the controller.
The multimedia system returns to the last
accessed media function. 164
Picture viewerMedia