2017 MERCEDES-BENZ C-Class cooling
[x] Cancel search: coolingPage 7 of 178

B
Back button......................................... 21
Blootooth®
Connecting a different mobile
phone .............................................. 94
Bluetooth
®
Activating audio mode ................... 153
Activating/deactivating ................... 39
Audio device mode and searching
for mobile phones .......................... 152
Basic display (audio mode) ............ 152
Connecting audio devices .............. 149
De-authorizing (de-registering) a
device ............................................ 152
Device list ...................................... 150
Displaying connection details .......... 95
Displaying details ........................... 152
Entering the passcode ..................... 93
External authorization (audio
device) ........................................... 151
General information ......................... 39
Increasing the volume using
COMAND ....................................... 154
Interface .......................................... 90
Introduction ..................................... 90
Reconnecting an audio device ....... 151
Searching for a mobile phone .......... 92
Selecting a playback option ........... 154
Selecting a track ............................ 153
Starting and stopping playback ..... 153
Starting playback if the Blue-
tooth
®audio device has been
stopped ......................................... 153
Telephony ........................................ 91
Telephony notes .............................. 90
Burmester
®surround sound sys-
tem
Balance/fader ............................... 164
Calling up the sound menu ............ 164
Equalizer ........................................ 164
Equipment ..................................... 164
Surround sound ............................. 165
Buttons and controller ........................ 20
C
Call lists
Displaying details ........................... 110
Opening and selecting an entry ..... 109
Saving an entry in the address
book .............................................. 110
Calling up the compass display ......... 87
Car pool lanes ...................................... 55
Category list (music search) ............ 144
CD
Inserting ........................................ 141
Notes on discs ............................... 140
Characters
Entering (navigation) ........................ 30
Climate control
Calling up climate control
(COMAND) ....................................... 48
Calling up the climate control bar
(COMAND) ....................................... 47
COMAND ......................................... 47
Cooling with air dehumidification
(COMAND) ....................................... 49
Ionization (COMAND) ....................... 48
Overview .......................................... 47
Perfume atomizer (COMAND) .......... 48
Pre-entry climate control
(COMAND) ....................................... 48
Pre-entry climate control at
departure time (COMAND) ............... 48
Pre-entry climate control using
the key (COMAND) .......................... 48
Setting the air distribution
(COMAND) ....................................... 47
Setting the airflow (COMAND) ......... 47
Setting the climate mode
(COMAND) ....................................... 48
Setting the temperature
(COMAND) ....................................... 47
Switching ionization on/off
(COMAND) ....................................... 48
Switching on/off (COMAND) ........... 49
Climate control bar
Calling up ......................................... 47
COMAND
Basic display menu .......................... 28
Basic functions ................................ 27
Display ............................................. 19
Index5
Page 49 of 178

Opening the camera cover for clean-
ing
XTo selectOpen Camera Coverin the rear
view camera menu: turn and press the con-
troller.
The Please Wait...
message appears for
approximately three seconds.
The camera cover opens.
The camera cover closes automatically if:
Rthe ignition is switched off
Rthe vehicle pulls away
Climate control settings
Overview
You can adjust the climate control settings
using the climate control bar (Ypage 47) or
the climate control menu (Ypage 48).
You can set the most important climate control
functions, such as temperature (
Ypage 47),
airflow (Ypage 47) and air distribution
(Ypage 47) using the climate control bar. The
climate control bar is visible in most displays.
You can find all available climate control func-
tions in the climate control menu. You can use
the climate control bar (
Ypage 47) to switch
to the climate control menu.
Settings in the climate control bar
Overview
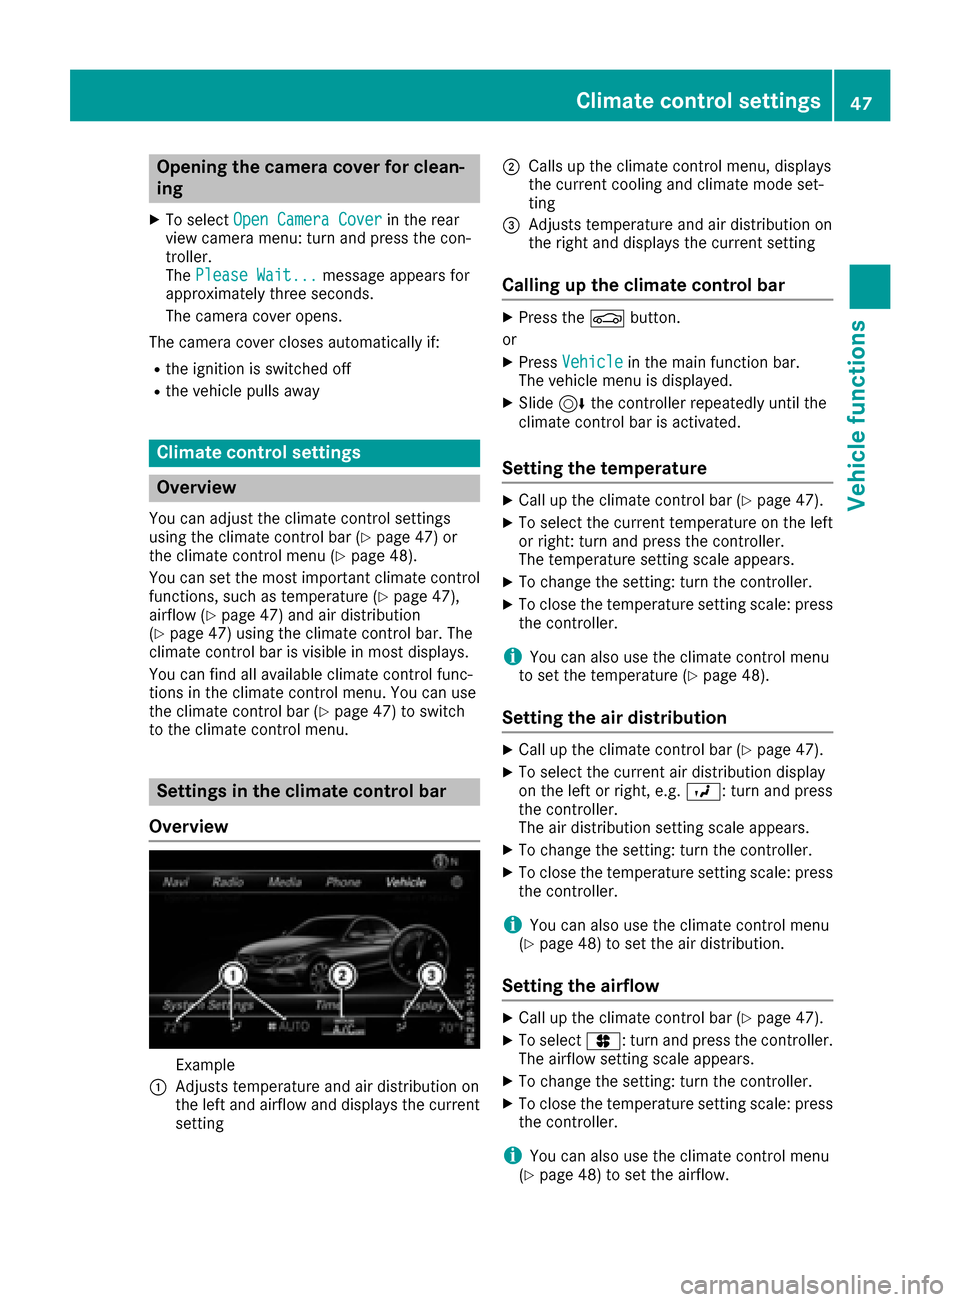
Example
:Adjusts temperature and air distribution on
the left and airflow and displays the current
setting
;Calls up the climate control menu, displays
the current cooling and climate mode set-
ting
=Adjusts temperature and air distribution on
the right and displays the current setting
Calling up the climate control bar
XPress the Øbutton.
or
XPress Vehiclein the main function bar.
The vehicle menu is displayed.
XSlide 6the controller repeatedly until the
climate control bar is activated.
Setting the temperature
XCall up the climate control bar (Ypage 47).
XTo select the current temperature on the left
or right: turn and press the controller.
The temperature setting scale appears.
XTo change the setting: turn the controller.
XTo close the temperature setting scale: press the controller.
iYou can also use the climate control menu
to set the temperature (Ypage 48).
Setting the air distribution
XCall up the climate control bar (Ypage 47).
XTo select the current air distribution display
on the left or right, e.g. O: turn and press
the controller.
The air distribution setting scale appears.
XTo change the setting: turn the controller.
XTo close the temperature setting scale: press
the controller.
iYou can also use the climate control menu
(Ypage 48) to set the air distribution.
Setting the airflow
XCall up the climate control bar (Ypage 47).
XTo select J: turn and press the controller.
The airflow setting scale appears.
XTo change the setting: turn the controller.
XTo close the temperature setting scale: press the controller.
iYou can also use the climate control menu
(Ypage 48) to set the airflow.
Climate control settings47
Vehicle functions
Z
Page 51 of 178

XCallup the climate control menu (Ypage 48).
XTo select Pre-entry Climate Ctrl. atDepartureTime: turn and press the control-
ler.
A rotary menu appears.
XTo select the setting: turn the controller.
The menu symbol, text and image show the
selected setting.
XTo exit the menu: press the %button.
Settings in the bottom bar of the cli-
mate control menu
Activating/deactivating climate con-
trol
This setting ismade inthe bottom bar of the
clim ate control menu.
XCall up the climate control menu (Ypage 48).
XSlide6 the controller repeatedly untilthe
bottom bar is activated.
XTo select OClimate Ctrl On: turn and
press the controller.
The climate control is switched on Oor off
ª dependin g on the settings.
If the clim ate control is switched off:
Rtheclim ate control setting functions are
deactivate d.
Rtheblower is swit ched off.
Rthe air recirculation flaps are closed
Switching cooling with air dehumidifi-
cation on/off
This settingismade inthe bottom bar of the
clim ate control menu.
XCall up the climate control menu (Ypage 48).
XSlide6 the controller repeatedly untilthe
bottom bar isactivated.
XTo select OA/C: turn and press the control-
ler.
XSwit ch co olingwit h air dehumidif ication on
O or off ª.
iThe current status of the co oling function is
displ ayed inthe clim ate control bar: A/C ON
– activated, A/C OFF – deactivated
(
Ypage 47).
iDeactivating the cooling with air dehumidi-
fication function reduces fuel consumption.
Synchronizing the climate control set-
tings
Use OSync(synchronization) to select the cli-
mate control setting for all zones together Oor
separate lyª.
This setting is made in the bottom bar of the
clim ate control menu.
XCall up the climate control menu (Ypage 48).
XSlide 6the controller repeatedly until the
bottom bar is activated.
XTo select OSync: turn and press the con-
troller.
XSwit ch the synchronization function on Oor
off ª.
For further information on synchronizing climate
control settings (see the vehicle Operator's
Manual).
DYNAMIC SELECT
General notes
You can use DYNAMIC SELECTto configure the
foll owin g settings for the Individual drive pro-
gram:
RDrive system
RSuspension
RSt eering
RClimate control
RECO start/stop function
In addition, current vehicle and engine data is
visualized via the two further Vehicle
Dataand
Engine Datamenus.
iIn a few countries, the ECO start/stop func-
tion isdeactivated at the factory due to the
availab lefuel grade. In this case, the ECO
start /stop function is not availab leregardless
of the display in the multimedia system dis-
play.
The ECO Assist setting is availab leon
PLUG‑ IN HYBRID vehicles.
In Mercedes-AMG vehicles, you can use
DYNAMIC
SELECTto configure the foll owing set-
tings for the Individual drive program:
RDrive system
RSuspension
DYNAMIC SELECT49
Vehicle functions
Z