2017 MERCEDES-BENZ C-Class ECO mode
[x] Cancel search: ECO modePage 7 of 178

B
Back button......................................... 21
Blootooth®
Connecting a different mobile
phone .............................................. 94
Bluetooth
®
Activating audio mode ................... 153
Activating/deactivating ................... 39
Audio device mode and searching
for mobile phones .......................... 152
Basic display (audio mode) ............ 152
Connecting audio devices .............. 149
De-authorizing (de-registering) a
device ............................................ 152
Device list ...................................... 150
Displaying connection details .......... 95
Displaying details ........................... 152
Entering the passcode ..................... 93
External authorization (audio
device) ........................................... 151
General information ......................... 39
Increasing the volume using
COMAND ....................................... 154
Interface .......................................... 90
Introduction ..................................... 90
Reconnecting an audio device ....... 151
Searching for a mobile phone .......... 92
Selecting a playback option ........... 154
Selecting a track ............................ 153
Starting and stopping playback ..... 153
Starting playback if the Blue-
tooth
®audio device has been
stopped ......................................... 153
Telephony ........................................ 91
Telephony notes .............................. 90
Burmester
®surround sound sys-
tem
Balance/fader ............................... 164
Calling up the sound menu ............ 164
Equalizer ........................................ 164
Equipment ..................................... 164
Surround sound ............................. 165
Buttons and controller ........................ 20
C
Call lists
Displaying details ........................... 110
Opening and selecting an entry ..... 109
Saving an entry in the address
book .............................................. 110
Calling up the compass display ......... 87
Car pool lanes ...................................... 55
Category list (music search) ............ 144
CD
Inserting ........................................ 141
Notes on discs ............................... 140
Characters
Entering (navigation) ........................ 30
Climate control
Calling up climate control
(COMAND) ....................................... 48
Calling up the climate control bar
(COMAND) ....................................... 47
COMAND ......................................... 47
Cooling with air dehumidification
(COMAND) ....................................... 49
Ionization (COMAND) ....................... 48
Overview .......................................... 47
Perfume atomizer (COMAND) .......... 48
Pre-entry climate control
(COMAND) ....................................... 48
Pre-entry climate control at
departure time (COMAND) ............... 48
Pre-entry climate control using
the key (COMAND) .......................... 48
Setting the air distribution
(COMAND) ....................................... 47
Setting the airflow (COMAND) ......... 47
Setting the climate mode
(COMAND) ....................................... 48
Setting the temperature
(COMAND) ....................................... 47
Switching ionization on/off
(COMAND) ....................................... 48
Switching on/off (COMAND) ........... 49
Climate control bar
Calling up ......................................... 47
COMAND
Basic display menu .......................... 28
Basic functions ................................ 27
Display ............................................. 19
Index5
Page 15 of 178

Gesture control ................................ 23
Handwriting recognition ...................25
Operating the touchpad ...................2 3
Overview .......................................... 22
Quick access for Audio .................... 27
Quick access for telephone .............2 7
Switching ......................................... 23
Switching input line ......................... 26
Track
Selecting (CD, DVD, MP3) .............. 143
Traffic reports
Calling up a list ................................ 77
Real-time traffic report .................... 78
Trunk lid opening height restric-
tion
Activating/deactivating
(COMAND) ....................................... 45
U
Updating the digital map .................... 86
USB audio mode
Selecting a track ............................ 143
USB devices
Connecting to the Media Inter-
face ............................................... 142
see Audio CD/DVD and MP3 mode
V
Vehicle Data acquisition ............................... 15
Vehicle settings
Calling up ......................................... 43
Video
see Video DVD
Video DVD
Control option ................................ 157
DVD menu ..................................... 160
DVD's control menu ...................... 159
Full-screen mode ........................... 158
Function restrictions ...................... 157
Menu options ................................. 158
Notes on discs ............................... 157
Overview ........................................ 158
Overview of DVD functions ............ 159
Pause function ............................... 160
Picture settings .............................. 158
Playing conditions .......................... 157 Safety notes .................................. 156
Selecting a scene/chapter ............ 160
Stop function ................................. 160
Switching to ................................... 157
Video menu ................................... 159
Voice Control System
Settings ........................................... 37
see Voice Control System
Volume, adjusting
Navigation messages ....................... 27
W
Weather map (SIRIUS)Activating/deactivating display
levels ............................................. 170
Calling up ....................................... 169
Legend ........................................... 172
Moving ........................................... 169
Showing/hiding the menu ............. 169
Storm overview .............................. 173
Storm watch areas ......................... 172
Time stamp .................................... 172
Weather memory (SIRIUS)
Selecting an area ........................... 169
Storing an area .............................. 169
Web browser
Entering a web address ................. 125
WiFi
Activating ......................................... 37
Connecting the device ..................... 37
Index13
Page 23 of 178

For Mercedes-AMG vehicles with a switchable AMG Performance exhaust system:
DRTurning: adjusts the volume
RPressing: switches the multimedia system on/off
EAdjusts the volume of the AMG sports exhaust system (see the vehicle Oper-
ator's Manual)
Back button
You can use the%button to exit a menu or to
call up the basic display of the current operating
mode.
XTo exit the menu: briefly press the%
button.
The multimedia system changes to the next
higher menu level in the current operating
mode.
XTo call up the basic display: press the%
button for longer than two seconds.
The multimedia system changes to the basic
display of the current operating mode.
Controller
The controller in the center console lets you:
Rselect menu items on the display
Renter characters
Rselect a destination on the map
Rsave entries
The controller can be:
Rturned 3
Rslid left or right 1
Rslid forwards or back 4
Rslid diagonally2
Rpressed briefly or pressed and held 7
Favorites button
With the favorites button, you can select, add or
edit favorites.
XPress the favorites button on the controller.
The favorites are displayed.
XTo select a favorite: turn and press the con-
troller.
Other functions (
Ypage 32).
Touchpad
Multimedia system with touchpad: alternatively,
you can use the touchpad to select and enter
information (
Ypage 22).
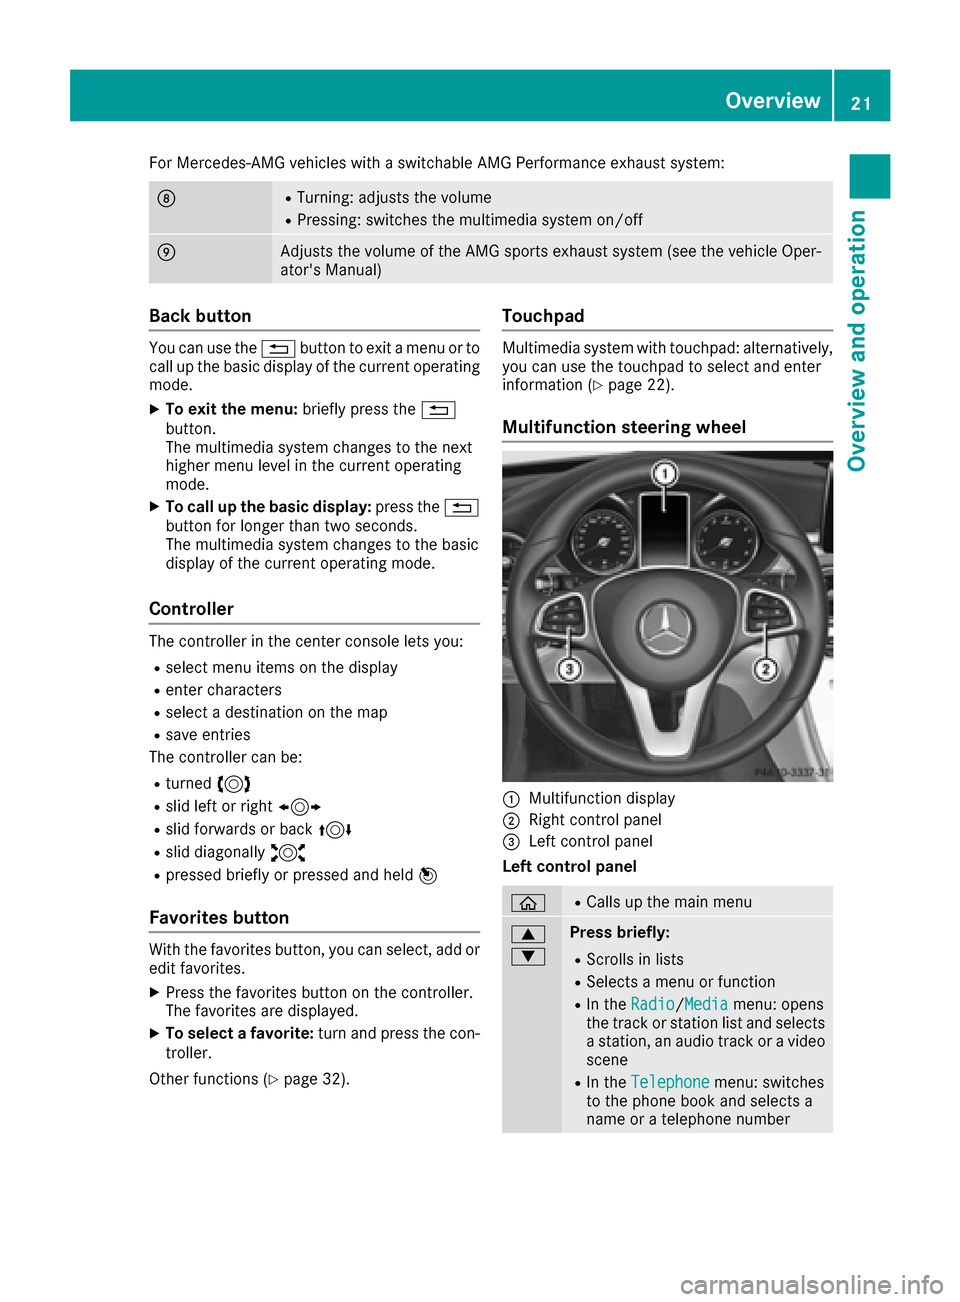
Multifunction steering wheel
:Multifunction display
;Right control panel
=Left control panel
Left control panel
òRCalls up the main menu
9
:Press briefly:
RScrolls in lists
RSelects a menu or function
RIn the Radio/Mediamenu: opens
the track or station list and selects
a station, an audio track or a video
scene
RIn the Telephonemenu: switches
to the phone book and selects a
name or a telephone number
Overview21
Overview and operation
Page 30 of 178

Adjusting the volumefor phone calls
You can adjust thevolume for hands-free mod e
during atelephon ecall .
XTurn th ethumbwheel to th eright of th econ-
troller .
or
XPress th eW orX buttonon th emulti-
function steering wheel.
iSetting th evolume for th eVoic eControl
Syste mvoice output ;see th eseparat eoper -
ating instructions.
Switching the sound on oroff
Media source sound
XPress th ethumbwheel to th eright of th econ-
troller .
or
XPress th e8 buttonon th emultifunction
steering wheel.
iIf th eaudio output is switched off ,th estatus
lin ewill sho wthe8 symbol. If you switch
th emedia source or chang eth evolume, th e
soun dis automatically switched on .
iEven if thesoun dis switched off ,you will still
hear navigation system announcements .
Switching navigationannouncements
off and onagain
XTo switch off navigation announcements:
press th ethumbwheel to th eright of th econ-
troller during th eannouncement.
The Spoken drivin grecommendations
hav ebee ndeactivated.message
appears.
XTo switch navigation announcement son
again: switch th emultimedia system off and
then on again (
Ypage 27).
or
XStart ane wrout ecalculation (Ypage 58).
or
XWhil erout eguidance is active ,sho wthe
men uand select
(Ypage 74) .
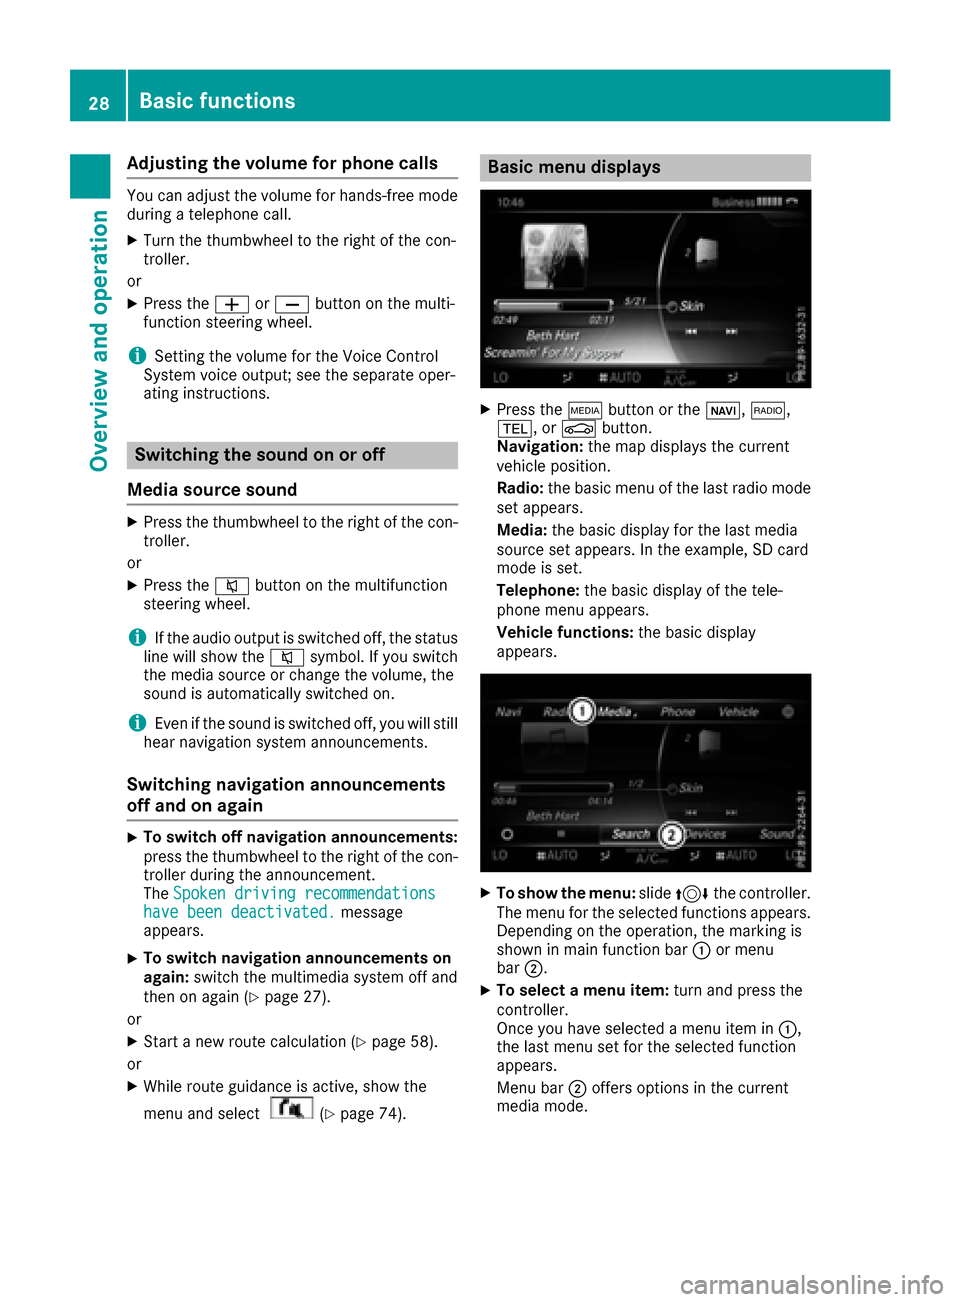
Basic menu displays
XPress theÕ buttonor th eß, $,
%, orØ button.
Navigation: themap displays th ecurren t
vehicl eposition .
Radio :th ebasic men uof th elast radi omod e
set appears.
Media: thebasic display for th elast media
source set appears. In th eexample, SD car d
mod eis set .
Telephone: thebasic display of th etele-
phone men uappears.
Vehicle functions: thebasic display
appears.
XTo sho wth emenu: slide4 thecontroller .
The men ufor th eselected function sappears.
Dependin gon th eoperation ,th emarking is
shown in main function bar :or men u
bar ;.
XTo select amen uitem: turnand press th e
controller .
Once you hav eselected amen uitem in :,
th elast men uset for th eselected function
appears.
Men ubar ;offers option sin th ecurren t
media mode.
28Basic functions
Overview and operation
Page 36 of 178

Your multimediasyste mequipment
These operatin ginstruction sdescribe all th e
standar dan doptional equipment of your multi-
media system, as available at th etime of going
to press. Country-specifi cdifference sare pos -
sible. Bear in min dthat your vehicle may no t
feature all function sdescribed here. Thi salso
applies to safety-relevan tsystems an dfunc-
tions.
Read th einformation on qualifie dspecialis t
workshop sin th evehicle Operator's Manual.
Important safet ynotes
GWARNING
If you operat emobile communication equip-
men twhil edriving, you will be distracted from
traffic conditions. You could also los econtro l
of th evehicle. There is aris kof an accident.
Only operat ethis equipment when th evehicle
is stationary.
You mus tobserv eth elegal requirements fo rth e
country in whic hyou are currentl ydrivin gwhen
operatin gmobile communication sequipment in
th evehicle.
Display settings
Setting th ebrightness
The brightness detecte dby th edisplay ligh tsen -
sor affects th esetting option sfo rthis function .
XPress theØ button.
or
XPress Vehicl ein themain function bar .
The vehicle men uis displayed.
XTo selec tSystem Settings:slid e6 ,turn
an dpress th econtroller to confirm .
A men uappears .
XTo selec tDispla y:turn an dpress th econ-
troller.
A men uappears .
XSelectBrightness.
A contro lappears .
XSelectth edesire dbrightness.
Display design
The display feature soptimize ddesign sfo rday-
time an dnight-time operation .You can set th e
design by manually selecting day or night design
or opt fo ran automatic setting .
XPress theØ button.
or
XPress Vehicl ein themain function bar .
The vehicle men uis displayed.
XTo selec tSystem Settings:slid e6 ,turn
an dpress th econtroller to confirm .
A men uappears .
XTo selec tDispla y:turn an dpress th econ-
troller.
A men uappears .
XSelectDa yMode,Nigh tModeor Auto.
The #dot indicates th ecurren tsetting .
DesignExplanation
DayModeThe display is set perma-
nently to day design .
NightModeThe display is set perma-
nently to night design .
AutomaticIn theAutomati csetting,
th emultimedia syste m
evaluates th ereadings
from th eautomatic vehi-
cl e ligh tsensor an dauto-
matically switches th edis -
play design .
34Display settings
System settings
Page 47 of 178

XCallupVehicle Settings(Ypage 43).
XTo select Automatic Locking: turn and
press the controller.
The function switches on or off, dependin g on
the previous setting.
You can find further information on the locking
feature inthe veh icleOperator's Manual.
Setting the switch-off delay time
Interior lighting switch-off delay time
The interior lighting isactivated for the duration
of the switch-off delay time when the SmartKey
is removed from the ignition lock.
XCall upVehicle Settings(Ypage 43).
XTo select Interior Lighting DelayedSwitch-off: turn and press the controller.
The setting element isactive.
XTo change the delayed switch-off time: turn
and press the controller.
You can find further information on the interior
lighting inthe veh icleOperator's Manual.
Exterior lighting switch-off delay time
Ifyou switch on the Exterior LightingDelayed Switch-offfunction, the exterior
lighting is switched on for a short time after the
engine is switched off. The light switch must be
set to Ã; see the veh icleOperator's Manual.
The exterior lighting remains on for 60 seconds
after the engine is switched off. Ifyou close all
the doors and the tailgate, the exterior lighting
swit ches off after the set time.
XCall upVehicle Settings(Ypage 43).
XTo select Exterior Lighting DelayedSwitch-off: turn and press the controller.
The setting element isactive.
XTo change the delayed switch-off time: turn
and press the controller.
Activating/deactivating the trunk lid
opening height restriction
Activating the Trunk Opening-heightRestrictionfunctionallowsyou to avoid
bumping the trunk lidon a low garage cei ling, for
example. Setting via the multimed iasystem is
availab lefor the Sedan and Coupe.
XCall up Vehicle Settings(Ypage 43 ).
XTo select Trunk Opening-heightRestriction: turn and press the controller.
The function switches on or off, depending on
the previous setting.
360° camera
General notes
The 360° camera covers the immediate sur-
roundings of the vehicle and assists you, for
instance when parking or at exits with reduced
visibility.
The 360° camera is only an aid. It is not a
replacement for your attention to your imm edi-
ate surroundings. You are always responsible
for safe maneuvering and parking. Make sure
that no persons or animals are inthe maneu-
vering range.
For more information on the 360° camera see
the vehicle Operator's Manual.
Displaying the 360° camera image
The 360° camera image can be displayed if:
Ryour vehicle isequipped with a 360° camera
Rthe 360°Camerafunction isswitched on; see
the vehicle Operator's Manual
XPress the Øbutton.
or
XPress Vehicleinthe main function bar.
The vehicle menu isdisplayed.
XTo select 360° Camera: turn and press the
controller.
The 360° camera image appears in split-
screen mode.
You willsee the previous view on the display if,
when the function is switched on:
Ryou turn the SmartKey to position 1in the
ignition lock
Ryou select transmission position P
Rwhen you are driving at moderate speeds
Switching the display off manually
XTo select &: slide 6and press the con-
troller.
360° camera45
Vehicle functions
Z
Page 48 of 178

Switching the display on automatically
XYou can automatically switch the 360° Cam-
era display using reverse gear (Ypage 46).
Switching automatic mode of the
360° camera on/off
This function activates the 360° camera when
reverse gear is engaged.
XPress theØbutton.
or
XPress Vehiclein the main function bar.
The vehicle menu is displayed.
XTo switch to the menu bar:slide 6the
controller.
XTo select System Settings: turn and press
the controller.
XTo select 360° Camera: turn and press the
controller.
The menu 360° Camera
appears.
XSelectActivation by R gear.
The function is switched on Oor off ª,
depending on the previous status.
Opening the camera cover for clean-
ing
XTo select Open Camera Coverin the 360°
camera menu: turn the controller and press to
confirm.
The Please Wait...
message appears for
approximately three seconds.
The camera cover opens.
The camera cover closes automatically if:
Rthe ignition is switched off
Rthe vehicle exceeds a moderate speed
Rear view camera
General notes
The rear view camera covers the immediate sur-
roundings behind the vehicle and assists you
when parking.
The rear view camera is only an aid. It is not a
replacement for your attention to your immedi-
ate surroundings. You are always responsible
for safe maneuvering and parking. When maneu- vering or parking, make sure that there are no
persons, animals or objects in the area in which
you are maneuvering.
You can find further information about the rear
view camera in the vehicle Operator's Manual.
Switching automatic mode of the rear
view camera on/off
This function activates the rear view camera
when reverse gear is engaged.
XPress the
Øbutton.
or
XPress Vehiclein the main function bar.
The vehicle menu is displayed.
XSlide 6the controller.
XTo select System Settings: turn and press
the controller.
XSelect Rear View Camera.
XSelectActivation by R gear.
The function is switched on Oor off ª,
depending on the previous status.
When you start the vehicle and engage
reverse gear, the camera cover opens auto-
matically if the function is activated. The area
behind the vehicle is shown with guide lines in
the display; see the vehicle Operator's Man-
ual.
For further information on the rear view camera;
see the vehicle Operator's Manual.
Object detection
The rear view camera can detect moving and
stationary objects. If, for example, a pedestrian
or another vehicle is detected, these objects are
marked with bars. The system is able to detect
and mark stationary objects when your vehicle
is moving. Moving objects will always be detec-
ted and marked.
Switching object detection on/off
XTo select ObjectDetectionin the rear view
camera menu: turn and press the controller.
The function is switched on Oor off ª,
depending on the previous status.
46Rear view camera
Vehicle functions
Page 49 of 178

Opening the camera cover for clean-
ing
XTo selectOpen Camera Coverin the rear
view camera menu: turn and press the con-
troller.
The Please Wait...
message appears for
approximately three seconds.
The camera cover opens.
The camera cover closes automatically if:
Rthe ignition is switched off
Rthe vehicle pulls away
Climate control settings
Overview
You can adjust the climate control settings
using the climate control bar (Ypage 47) or
the climate control menu (Ypage 48).
You can set the most important climate control
functions, such as temperature (
Ypage 47),
airflow (Ypage 47) and air distribution
(Ypage 47) using the climate control bar. The
climate control bar is visible in most displays.
You can find all available climate control func-
tions in the climate control menu. You can use
the climate control bar (
Ypage 47) to switch
to the climate control menu.
Settings in the climate control bar
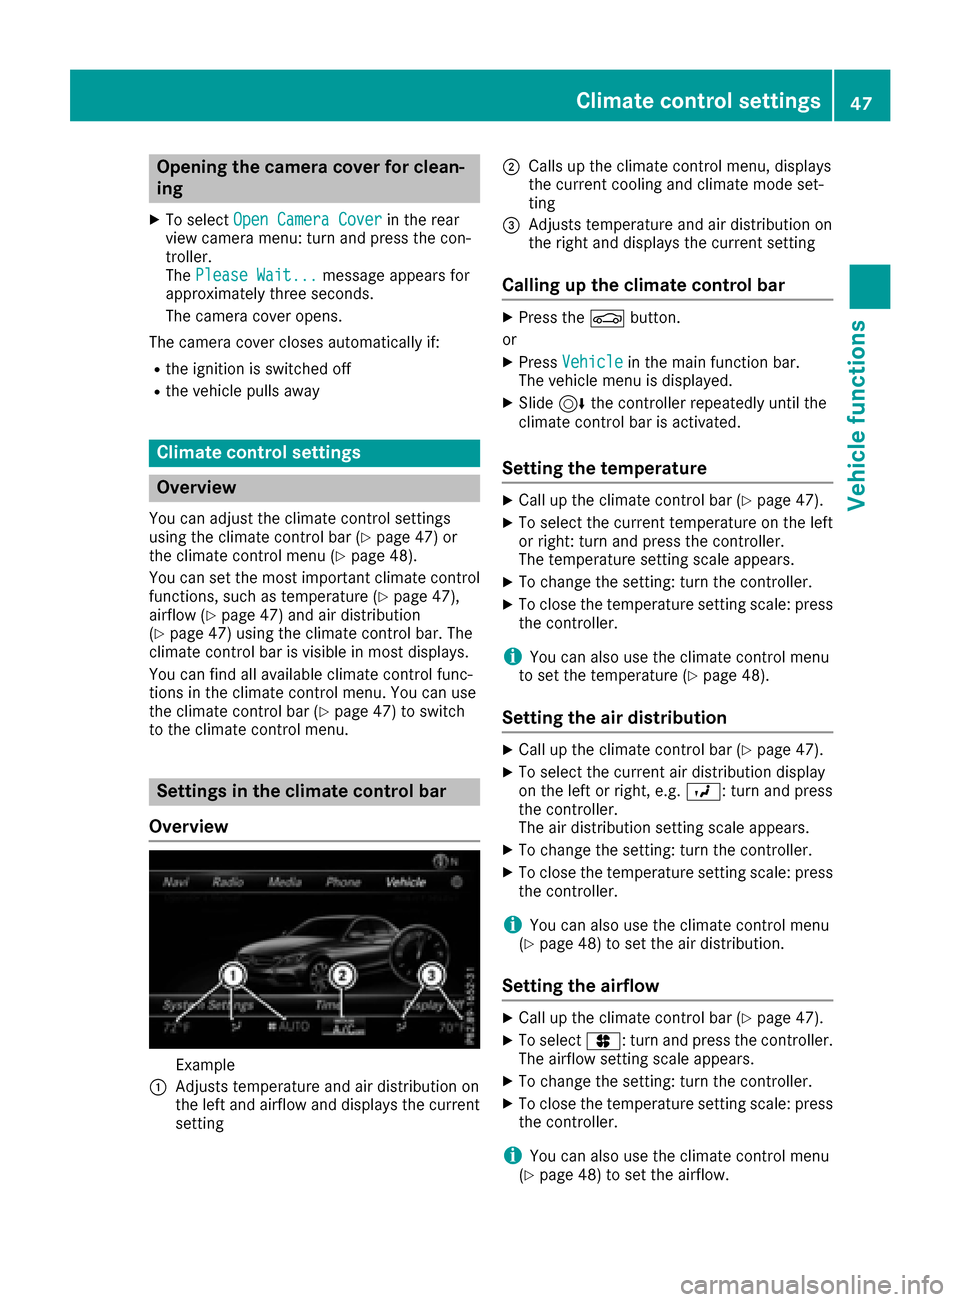
Overview
Example
:Adjusts temperature and air distribution on
the left and airflow and displays the current
setting
;Calls up the climate control menu, displays
the current cooling and climate mode set-
ting
=Adjusts temperature and air distribution on
the right and displays the current setting
Calling up the climate control bar
XPress the Øbutton.
or
XPress Vehiclein the main function bar.
The vehicle menu is displayed.
XSlide 6the controller repeatedly until the
climate control bar is activated.
Setting the temperature
XCall up the climate control bar (Ypage 47).
XTo select the current temperature on the left
or right: turn and press the controller.
The temperature setting scale appears.
XTo change the setting: turn the controller.
XTo close the temperature setting scale: press the controller.
iYou can also use the climate control menu
to set the temperature (Ypage 48).
Setting the air distribution
XCall up the climate control bar (Ypage 47).
XTo select the current air distribution display
on the left or right, e.g. O: turn and press
the controller.
The air distribution setting scale appears.
XTo change the setting: turn the controller.
XTo close the temperature setting scale: press
the controller.
iYou can also use the climate control menu
(Ypage 48) to set the air distribution.
Setting the airflow
XCall up the climate control bar (Ypage 47).
XTo select J: turn and press the controller.
The airflow setting scale appears.
XTo change the setting: turn the controller.
XTo close the temperature setting scale: press the controller.
iYou can also use the climate control menu
(Ypage 48) to set the airflow.
Climate control settings47
Vehicle functions
Z