2017 MERCEDES-BENZ C-Class navigation
[x] Cancel search: navigationPage 33 of 178

XTo confirm an entry:slide6and turn the
controller, then press it after selecting ¬.
or
XSlide 5the controller repeatedly until the
character bar disappears.
The location selection list appears. The selec-
ted entry is highlighted.
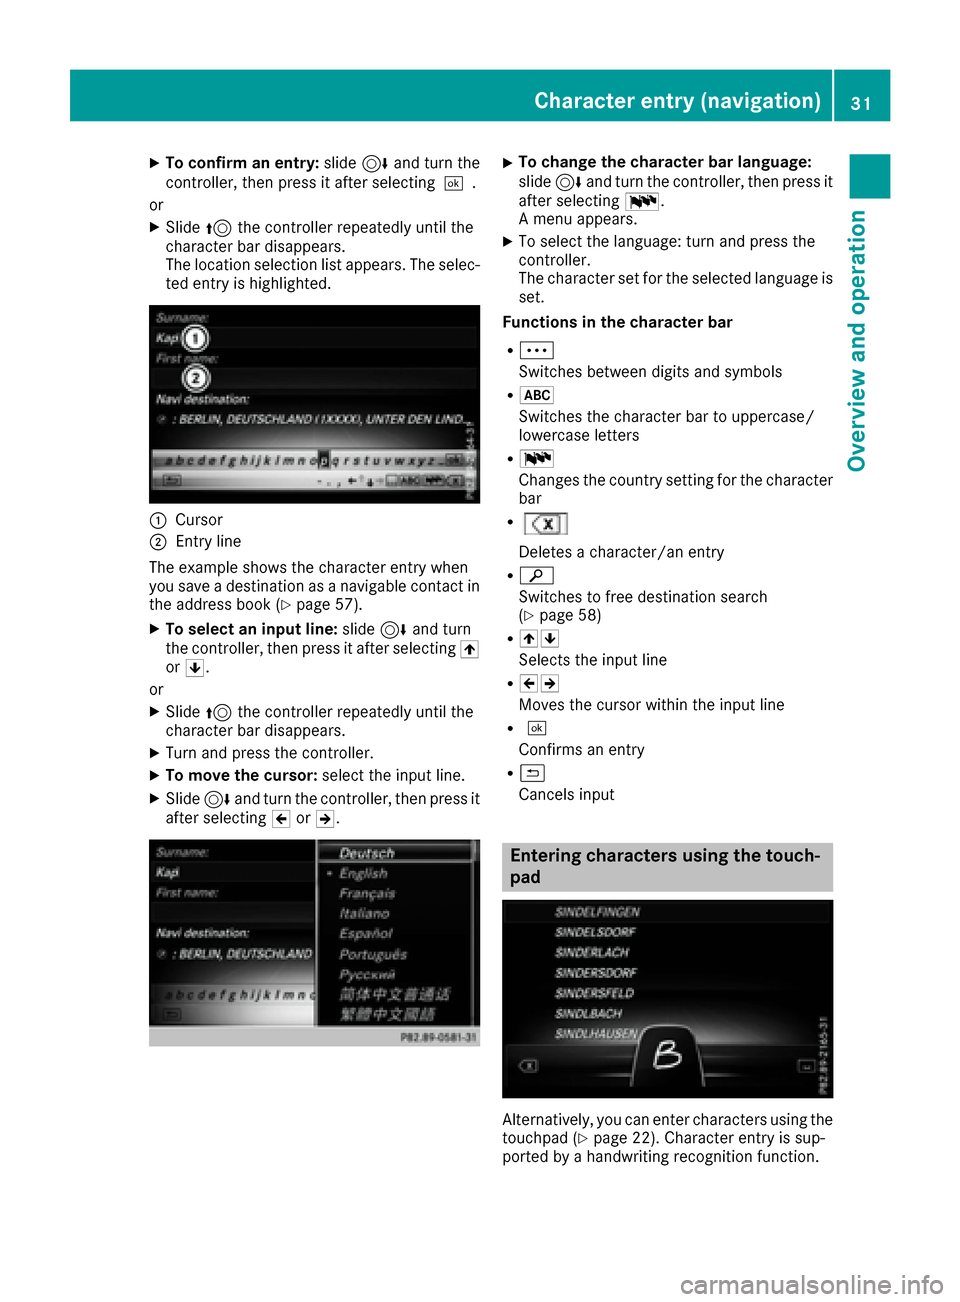
:Cursor
;Entry line
The example shows the character entry when
you save a destination as a navigable contact in
the address book (
Ypage 57).
XTo select an input line: slide6and turn
the controller, then press it after selecting 4
or 5.
or
XSlide 5the controller repeatedly until the
character bar disappears.
XTurn and press the controller.
XTo move the cursor: select the input line.
XSlide6and turn the controller, then press it
after selecting 2or3.
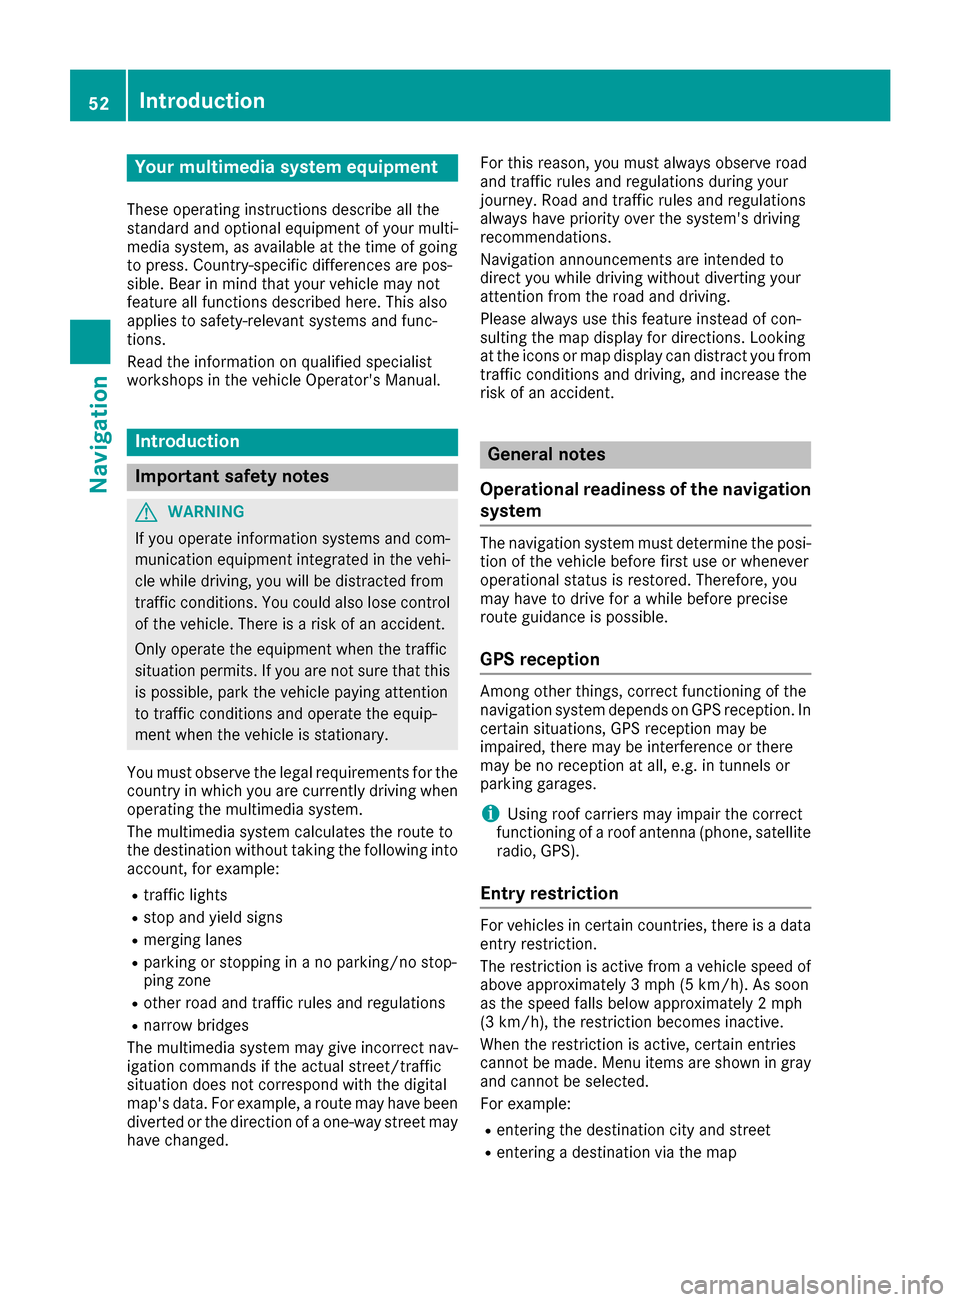
XTo change the character bar language:
slide 6and turn the controller, then press it
after selecting B.
A menu appears.
XTo select the language: turn and press the
controller.
The character set for the selected language is set.
Functions in the character bar
RÄ
Switches between digits and symbols
R*
Switches the character bar to uppercase/
lowercase letters
RB
Changes the country setting for the character
bar
R
Deletes a character/an entry
Rè
Switches to free destination search
(
Ypage 58)
R45
Selects the input line
R23
Moves the cursor within the input line
R¬
Confirms an entry
R&
Cancels input
Entering characters using the touch-
pad
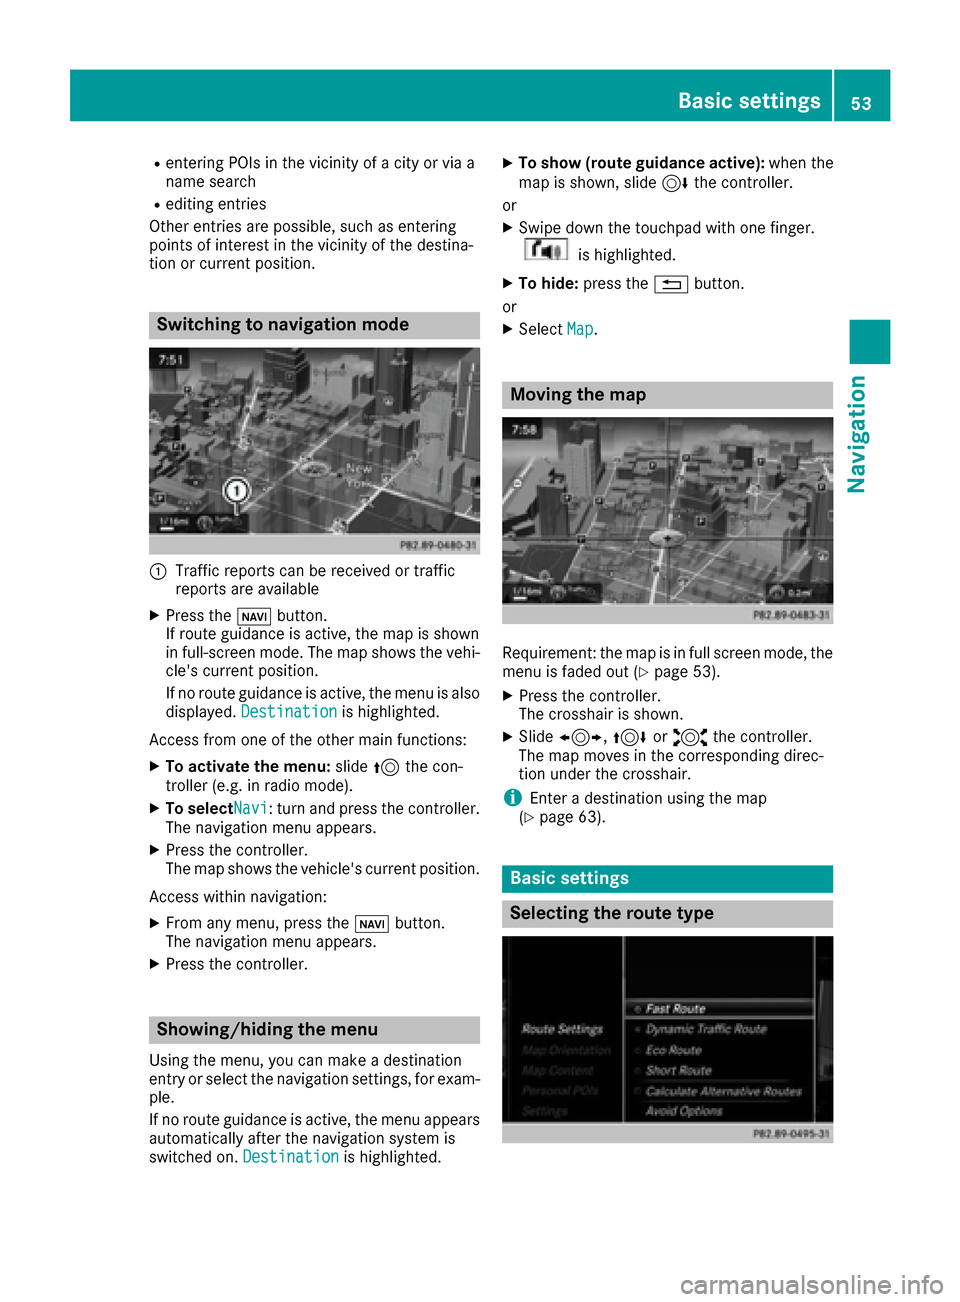
Alternatively, you can enter characters using the
touchpad (Ypage 22). Character entry is sup-
ported by a handwriting recognition function.
Character entry (navigation)31
Overview and operation
Page 34 of 178

An example is the address entry (Ypage 56).
XWith one finger, draw the desired character,
e.g. the letterB, on the touch-sensitive sur-
face.
In the list (e.g. City), the first entry that starts
with the letter entered is highlighted. You can
draw the next character on the touch-sensi-
tive surface.
If the character that you have entered can be
interpreted in different ways, these options
are displayed.
XTo select a character suggestion: turn the
controller.
The selected character is used for the list dis-
play instead of the automatically recognized
character. Character entry can be continued.
XTo delete a character: touch the touch-sen-
sitive surface with your finger and glide your
finger to the left.
The character last entered is deleted.
XTo complete the entry and switch to the
list: press the touchpad.
Favorites
Overview of favorites
:To add a new favorite (Ypage 32)
;To rename a selected favorite
(Ypage 33)
=To move a selected favorite (Ypage 33)
?To delete a selected favorite (Ypage 33)
XTo display the favorites overview: press
the favorites button on the controller.
XTo show the menu bar: slide6the con-
troller.
You can manage a total of 20 favorites. To do so use the following functions:
RDisplaying and selecting favorites
(Ypage 32)
RAdding favorites (Ypage 32)
RRenaming favorites (Ypage 33)
RMoving favorites (Ypage 33)
RDeleting favorites (Ypage 33)
Displaying and selecting favorites
XTo display the favorites overview:
press
the favorites button on the controller.
XTo call up a favorite: turn and press the con-
troller.
Adding favorites
Adding predefined favorites
XPress the favorites button on the controller.
XTo show the menu bar: slide6the con-
troller.
XTo select Reassign: turn and press the con-
troller.
The categories and predefined favorites are
displayed.
RNavigation
Additionally Address,Prev. Dest.,
Phone Book, Online Search
REntertainment
RTel
RVehicle
R®
RClimate Control
XTo select a category: turn the controller and
press to confirm.
The available favorites are displayed.
XTo select a favorite: turn and press the con-
troller.
XTo add a favorite at the desired position:
turn and press the controller.
If there is already a favorite at this position,
then this will be deleted.
Adding your own favorites
You can store phone numbers from the phone
book, radio stations or destinations as favorites.
32Favorites
Overview and operation
Page 37 of 178

Switching the display on/off
XPress theØbutton.
or
XPress Vehiclein the main function bar.
The vehicle menu is displayed.
XTo select Display Off: slide6, turn and
press the controller.
The display goes out.
XTo switch the display on again: press the
controller.
Time settings
General information
The multimedia system can automatically set
the time and date.
The following navigation system functions
require the time, time zone and summer and
standard time to be set correctly in order to
work properly:
Rroute guidance on routes with time-depend-
ent traffic guidance
Rcalculation of expected time of arrival
Switching automatic time on and off
The Automatic Time Settingsfunction is
used to activate or deactivate the automatic
setting of the time and date. This function is
activated when the vehicle leaves the factory.
XPress the Øbutton.
or
XPress Vehiclein the main function bar.
The vehicle menu is displayed.
XTo select Time: slide6, turn and press the
controller.
A menu appears.
XTo select AutomaticTimeSettings: press
the controller.
XTo switch the function on Oor off ª: press
the controller.
Setting the time zone
To set the time zone, the Automatic TimeSettingsfunction must be activated.
XPress theØbutton.
or
XPress Vehiclein the main function bar.
The vehicle menu is displayed.
XTo select Time: slide6, turn and press the
controller.
A menu appears.
XTo select Time Zone:: turn and press the
controller.
A list of countries appears. The #dot indi-
cates the current setting.
XTo select the country in which you are
currently driving: turn and press the con-
troller.
The country is accepted.
A time zone list may also be displayed,
depending on the country selected.
XTo select the desired time zone: turn and
press the controller.
The time zone is accepted.
A list of available options for setting summer
time appears (
Ypage 35).
Setting summer and standard time
You can use the DaylightSavingTimemenu
to set automatic summer time changeover or
switch the summer time setting on or off. The
changeover to summer time advances the time
by one hour.
The Daylight
SavingTimemenu or the Auto‐maticoption is not available in all countries.
XPress theØbutton.
or
XSelect Vehiclein the main function bar.
The vehicle menu is displayed.
XTo select Time: slide6, turn and press the
controller.
A menu appears.
XTo select Daylight Saving Time: turn and
press the controller.
A list of available options for setting summer
time appears.
XTo select Automatic,Onor Off: turn and
press the controller.
Time settings35
System settings
Z
Page 41 of 178

XSelectSystem Settings.
The System Settingsmenu is displayed.
XSelect WiFi.
The WiFi menu appears.
XSelect Change SSID.
A dialog for entering the SSID appears.
XEnter the new SSID.
XSelect ¬.
XPress the controller.
From now on, when establishing a connec-
tion, the vehicle will be shown with the new
SSID both on the device to be connected and
in the Connect
UsingSecurityKeymenu.
iDevice connections established using the
previous SSID will no longer work after the
SSID is changed. You have to reconnect these
devices (
Ypage 37).
Bluetooth®settings
General information about Blue-
tooth®
Bluetooth®-capable devices, e. g. mobile
phones, need to comply with a certain profile in
order to be connected to the multimedia sys-
tem. Every Bluetooth
®device has its own spe-
cific Bluetooth®name.
Bluetooth®technology is a standard for short-
range wireless data transmissions up to approx-
imately 10 m.
Yo u can use Bluetooth
®to connect your mobile
phone to the multimedia system, for example:
Ruse the hands-free system
Restablish an Internet connection
Rlisten to music using Bluetooth®Audio
Rexchange vCards
Bluetooth®is a registered trademark of Blue-
tooth Special Interest Group (SIG) Inc.
Activating/deactivating Bluetooth®
X
Press the Øbutton.
or
XPress Vehiclein the main function bar.
The vehicle menu is displayed.
XTo select System Settings: slide6, turn
and press the controller.
A menu appears.
XTo select Activate Bluetooth: turn and
press the controller.
This switches Bluetooth
®on O or off ª.
Automatic volume adjustment
General information
With the AutomaticVolumeAdjustmentfunc-
tion, the volumes of different audio sources are
adjusted for each other, to compensate for rel-
ative differences in volume.
For example: changing from a relatively quiet to
a relatively loud radio station. The volume for
both stations sounds the same. Manual read-
justment of the volume is not required.
The Automatic Volume Adjustment
function
is deactivated ªwhen the vehicle leaves the
factory. Using this function, the dynamic range
of the music is slightly reduced. To make the
most of the audiophile sound quality, it is rec-
ommended to leave it off.
Switching the automatic volume
adjustment on/off
XPress the Øbutton.
or
XPress Vehiclein the main function bar.
The vehicle menu is displayed.
XTo select System Settings: slide6, turn
and press the controller.
A menu appears.
XTo select Automatic Volume Adjustment:
turn and press the controller.
Switch the Automatic Volume Adjustment
function on Oor off ª.
Setting the system language
This function allows you to determine the lan-
guage for the menu displays and the navigation
messages. The selected language affects the
characters available for entry.
iThe navigation announcements are not
available in all languages. If a language is not
Setting the system language39
System settings
Z
Page 42 of 178

available, the navigation announcements will
be in English.
iWhen you set the system language, the lan-
guage of the Voice Control System will
change accordingly. If it is not supported by
the Voice Control System, English will be
selected.
XPress the Øbutton.
or
XPress Vehiclein the main function bar.
The vehicle menu is displayed.
XTo select System Settings: slide6, turn
and press the controller.
A menu appears.
XTo select Language: turn and press the con-
troller.
The list of languages appears. The #dot indi-
cates the current setting.
XSelect the desired language.
The multimedia system loads the selected
language and sets it.
Calling up and editing the Favorites
function
The Favorites function can, depending on the
vehicle equipment, be called up as follows:
Rvia the System Settingsmenu
Rvia the Favorites button on the controller
(Ypage 22)
Rvia the Favorites button on the touchpad
(Ypage 22)
Calling up the Favorites function via the sys-
tem menu
XPress the Øbutton.
or
XPress Vehiclein the main function bar.
The vehicle menu is displayed.
XTo select System Settings: slide6and
press the controller.
A menu appears.
XTo select Favorite Functions: press the
controller.
The favorites are displayed.
XTo select the desired function, e.g. Phone‐book: turn and press the controller. Calling up the Favorites function via the
controller or touchpad
XPress the Favorites button on the controller or
touchpad.
The favorites are displayed.
XTo select the desired function, e.g. Phone‐book: turn and press the controller.
Exiting the Favorites function
XPress the Favorites button again.
or
XPress the %button.
Further information on favorites (
Ypage 32).
Importing/exporting data
General notes
!
Never remove the stick or card when writing
data to the USB stick or the memory card. You
may otherwise lose data.
Using this function you can do the following with
your personal data:
Rtransfer your data from one multimedia sys-
tem to another multimedia system
The transfer may be limited or not possible,
depending on the vehicle's equipment.
Rmake a backup copy of your personal data
(export data) and load it again (import data)
Rprotect your data from unwanted export by
activating a PIN prompt (presetting: deacti-
vated ª)
You can either use an SD card or a USB storage
device (e.g. a USB stick) as temporary storage.
You can obtain further information on data
import and export from an authorized
Mercedes-Benz Center.
40Importing/exporting data
System settings
Page 44 of 178

Personal music files in the MEDIA REGISTER
cannot be saved and imported again using this
function.
Mercedes-Benz is not liable for any loss of data.
Reset function
You can reset the multimedia system to the fac-tory settings. This includes the deletion of all of
your personal data on the multimedia system.
These include, for example:
RStation presets
REntries in the destination memory
REntries in the list of previous destinations in
the navigation system
REntries in the address book
RAuthorized telephone
In addition, an activated PIN protection, which
you have used to protect your data against
unwanted export, will be deactivated. Resetting
is recommended before selling or transferring
ownership of your vehicle, for example.
Data on the internal hard drive, e.g. music files in
the MEDIA REGISTER, will be deleted.
Mercedes-Benz is not liable for any loss of data.
XPress the Øbutton.
or
XPress Vehiclein the main function bar.
The vehicle menu is displayed.
XTo select System Settings: slide6, turn
and press the controller to confirm.
A menu appears.
XTo select Reset: turn and press the controller.
A prompt appears asking whether you wish to
reset.
XSelect Yes.
A prompt appears again asking whether you
really wish to reset.
XSelect Yes.
A message appears. The multimedia system
is reset to the factory settings and restarted.
42Reset function
System settings
Page 54 of 178

Your multimediasyste mequipment
These operatin ginstruction sdescribe all th e
standar dan doptional equipment of your multi-
media system, as available at th etime of going
to press. Country-specifi cdifference sare pos -
sible. Bear in min dthat your vehicle may no t
feature all function sdescribed here. Thi salso
applies to safety-relevan tsystems an dfunc-
tions.
Read th einformation on qualifie dspecialis t
workshop sin th evehicle Operator's Manual.
Introduction
Important safet ynotes
GWARNING
If you operat einformation systems an dcom-
munication equipment integrated in th evehi-
cl e whil edriving, you will be distracted from
traffic conditions. You could also los econtro l
of th evehicle. There is aris kof an accident.
Only operat eth eequipment when th etraffic
situation permits. If you are no tsur ethat this
is possible, par kth evehicle payin gattention
to traffic condition san doperat eth eequip-
men twhen th evehicle is stationary.
You mus tobserv eth elegal requirements fo rth e
country in whic hyou are currentl ydrivin gwhen
operatin gth emultimedia system.
The multimedia syste mcalculates th erout eto
th edestination without taking th efollowin ginto
account, fo rexample:
Rtraffic lights
Rstop an dyield signs
Rmergin glanes
Rparking or stoppin gin ano parking/n ostop-
pin gzone
Rother road an dtraffic rule san dregulation s
Rnarrow bridge s
The multimedia syste mmay giv eincorrec tnav-
igation commands if th eactual street/traffic
situation doe sno tcorrespon dwit hth edigita l
map's data. Fo rexample, arout emay hav ebee n
dive
rted or th edirection of aone-way stree tmay
hav echanged . Fo
rthis reason ,you mus talways observ eroad
an dtraffic rule san dregulation sdurin gyour
journey. Road an dtraffic rule san dregulation s
always hav epriorit yover th esystem' sdrivin g
recommendations.
Navigation announcement sare intended to
direc tyou whil edrivin gwithout divertin gyour
attention from th eroad an ddriving.
Please always use this feature instead of con-
sultin gth emap display fo rdirections. Lookin g
at th eicon sor map display can distract you from
traffic condition san ddriving, an dincrease th e
ris kof an accident.
General notes
Operationa lreadines sof th enavigation
syste m
The navigation syste mmus tdetermin eth eposi-
tion of th evehicle befor efirst use or wheneve r
operational status is restored .Therefore, you
may hav eto drive fo r awhil ebefor eprecise
rout eguidance is possible.
GP Sreception
Amon gother things, correc tfunctionin gof th e
navigation syste mdepends on GPS reception .In
certain situations, GPS reception may be
impaired, there may be interferenc eor there
may be no reception at all, e.g. in tunnels or
parking garages .
iUsing roof carriers may impair th ecorrec t
functionin gof aroof antenn a(phone, satellite
radio, GPS).
Entry restriction
Fo rvehicles in certain countries, there is adat a
entr yrestriction .
The restriction is active from avehicle speed of
abov eapproximately 3mph (5 km/ h).As soon
as the speed falls below approximately 2 mph
(3 km/h), the restriction becomes inactive.
When the restriction is active, certain entries
cannot be made. Menu items are shown in gray
and cannot be selected.
For example:
Rentering the destination city and street
Rentering a destination via the map
52Introduction
Navigation
Page 55 of 178

Rentering POIs in the vicinity of a city or via a
name search
Rediting entries
Other entries are possible, such as entering
points of interest in the vicinity of the destina-
tion or current position.
Switching to navigation mode
:Traffic reports can be received or traffic
reports are available
XPress the ßbutton.
If route guidance is active, the map is shown
in full-screen mode. The map shows the vehi-
cle's current position.
If no route guidance is active, the menu is also
displayed. Destination
is highlighted.
Access from one of the other main functions:
XTo activate the menu: slide5the con-
troller (e.g. in radio mode).
XTo selectNavi: turn and press the controller.
The navigation menu appears.
XPress the controller.
The map shows the vehicle's current position.
Access within navigation:
XFrom any menu, press the ßbutton.
The navigation menu appears.
XPress the controller.
Showing/hiding the menu
Using the menu, you can make a destination
entry or select the navigation settings, for exam-
ple.
If no route guidance is active, the menu appears
automatically after the navigation system is
switched on. Destination
is highlighted.
XTo show (route guidance active): when the
map is shown, slide 6the controller.
or
XSwipe down the touchpad with one finger.
is highlighted.
XTo hide: press the %button.
or
XSelect Map.
Moving the map
Requirement: the map is in full screen mode, the
menu is faded out (Ypage 53).
XPress the controller.
The crosshair is shown.
XSlide1, 4or2 the controller.
The map moves in the corresponding direc-
tion under the crosshair.
iEnter a destination using the map
(Ypage 63).
Basic settings
Selecting the route type
Basic settings53
Navigation
Z