2017 MERCEDES-BENZ C-Class lan
[x] Cancel search: lanPage 16 of 178

Operating safety
Important safety notes
GWARNING
If you operate information systems and com-
munication equipment integrated in the vehi-
cle while driving, you will be distracted from
traffic conditions. You could also lose control
of the vehicle. There is a risk of an accident.
Only operate the equipment when the traffic
situation permits. If you are not sure that this
is possible, park the vehicle paying attention
to traffic conditions and operate the equip-
ment when the vehicle is stationary.
You must observe the legal requirements for the
country in which you are currently driving when
operating the multimedia system.
The multimedia system calculates the route to
the destination without taking account of the
following, for example:
Rtraffic lights
Rstop and yield signs
Rmerging lanes
Rparking or stopping in a no parking/no stop-
ping zone
Rother road and traffic rules and regulations
Rnarrow bridges
The multimedia system can give incorrect navi-
gation commands if the actual street/traffic sit-
uation does not correspond with the digital
map's data. Digital maps do not cover all areas
nor all routes in an area. For example, a route
may have been diverted or the direction of a one-
way street may have changed.
For this reason, you must always observe road
and traffic rules and regulations during your
journey. Road and traffic rules and regulations
always have priority over the system's driving
recommendations.
Navigation announcements are intended to
direct you while driving without diverting your
attention from the road and driving.
Please always use this feature instead of con-
sulting the map display for directions. Looking
at the icons or map display can distract you from
traffic conditions and driving, and increase the
risk of an accident. Bear in mind that at a speed of only 30 mph
(approximately 50 km/
h), your vehicle covers a
distance of 44 feet (approximately 14 m) every
second.
This equipment complies with FCC radiation
exposure limits set forth for uncontrolled equip-
ment and meet s t
he FCC radio frequency (RF)
Exposure Guidelines in Supplement C to OET65.
This equipment has very low levels of RF energy
that is deemed to comply without maximum
permissive exposure evaluation (MPE). How-
ever, it is recommended to install it at a distance
of at least 8 inches (approx. 20 cm) between the
radiation source and a person's body (not
including limbs such as hands, wrists, feet and
legs).
GWARNING
Modifications to electronic components, their software as well as wiring can impair their
function and/or the function of other net-
worked components. In particular, systems
relevant to safety could also be affected. As a
result, these may no longer function as inten-
ded and/or jeopardize the operating safety of
the vehicle. There is an increased risk of an
accident and injury.
Never tamper with the wiring as well as elec-
tronic components or their software. You
should have all work to electrical and elec-
tronic equipment carried out at a qualified
specialist workshop.
Declarations of conformity
Vehicle components which receive
and/or transmit radio waves
USA only: The wireless devices of this vehicle
comply with Part 15 of the FCC Rules. Operation
is subject to the following two conditions:
1) These devices may not cause interference,
and
2) These devices must accept any interference,
including interference that may cause undesired
operation of the device.
Changes or modifications not expressly
approved by the party responsible for compli-
ance could void the user's authority to operate
the equipment.
14Introduction
Page 27 of 178

Zooming out of the map
XTouch the touch-sensitive surface with two
fingers, spaced far apart.
XGlide your fingers towards each other.
The map scale is reduced.
Handwriting recognition
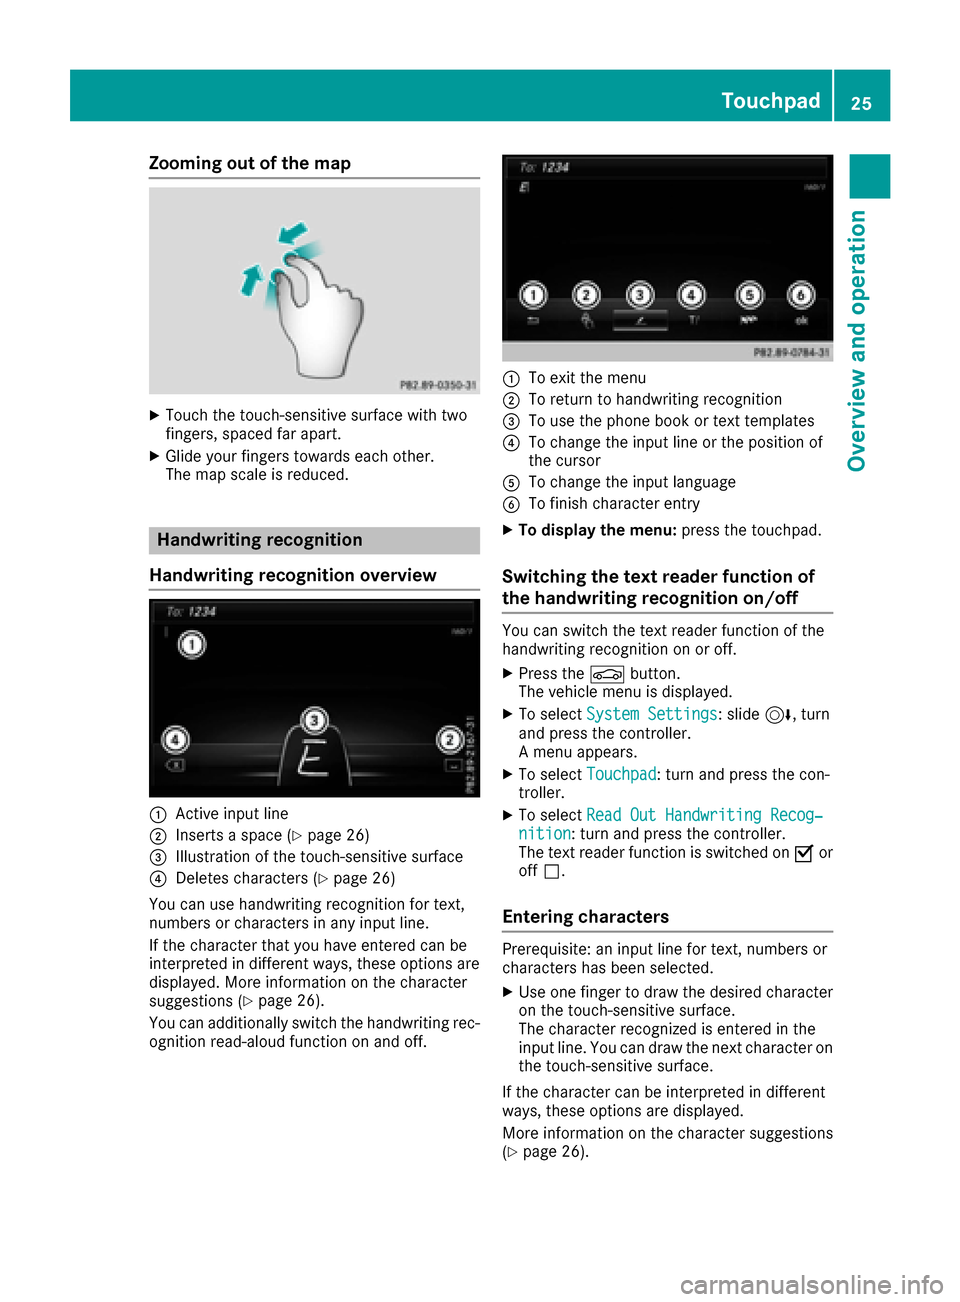
Handwriting recognition overview
:Active input line
;Inserts a space (Ypage 26)
=Illustration of the touch-sensitive surface
?Deletes characters (Ypage 26)
You can use handwriting recognition for text,
numbers or characters in any input line.
If the character that you have entered can be
interpreted in different ways, these options are
displayed. More information on the character
suggestions (
Ypage 26).
You can additionally switch the handwriting rec-
ognition read-aloud function on and off.
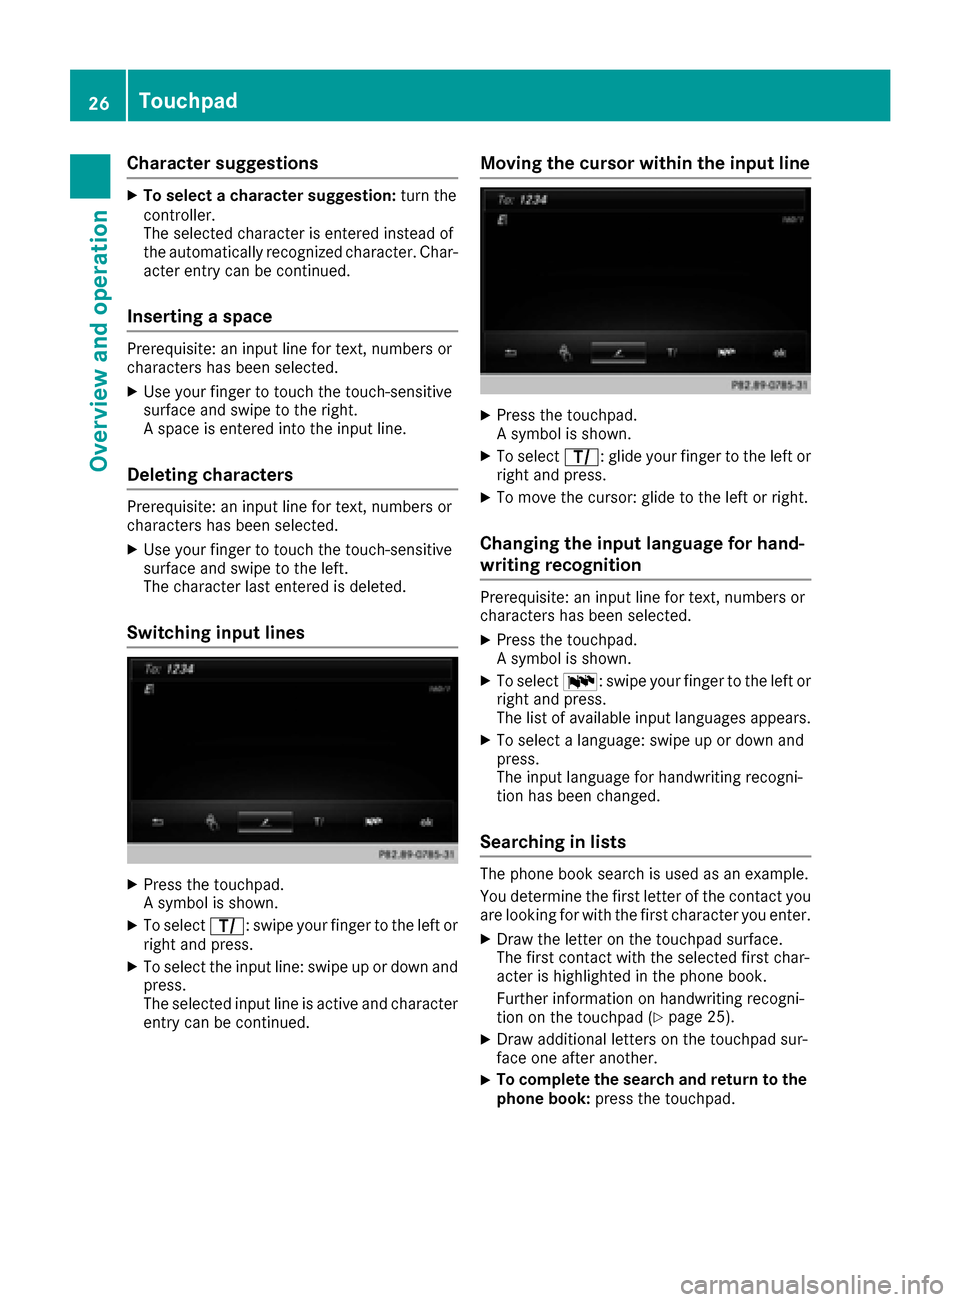
:To exit the menu
;To return to handwriting recognition
=To use the phone book or text templates
?To change the input line or the position of
the cursor
ATo change the input language
BTo finish character entry
XTo display the menu: press the touchpad.
Switching the text reader function of
the handwriting recognition on/off
You can switch the text reader function of the
handwriting recognition on or off.
XPress theØbutton.
The vehicle menu is displayed.
XTo select System Settings: slide6, turn
and press the controller.
A menu appears.
XTo select Touchpad: turn and press the con-
troller.
XTo select Read Out Handwriting Recog‐nition: turn and press the controller.
The text reader function is switched on Oor
off ª.
Entering characters
Prerequisite: an input line for text, numbers or
characters has been selected.
XUse one finger to draw the desired character
on the touch-sensitive surface.
The character recognized is entered in the
input line. You can draw the next character on
the touch-sensitive surface.
If the character can be interpreted in different
ways, these options are displayed.
More information on the character suggestions
(
Ypage 26).
Touchpad25
Overview and operation
Page 28 of 178

Character suggestions
XTo select a character suggestion:turn the
controller.
The selected character is entered instead of
the automatically recognized character. Char-
acter entry can be continued.
Inserting a space
Prerequisite: an input line for text, numbers or
characters has been selected.
XUse your finger to touch the touch-sensitive
surface and swipe to the right.
A space is entered into the input line.
Deleting characters
Prerequisite: an input line for text, numbers or
characters has been selected.
XUse your finger to touch the touch-sensitive
surface and swipe to the left.
The character last entered is deleted.
Switching input lines
XPress the touchpad.
A symbol is shown.
XTo select p: swipe your finger to the left or
right and press.
XTo select the input line: swipe up or down and press.
The selected input line is active and character
entry can be continued.
Moving the cursor within the input line
XPress the touchpad.
A symbol is shown.
XTo select p: glide your finger to the left or
right and press.
XTo move the cursor: glide to the left or right.
Changing the input language for hand-
writing recognition
Prerequisite: an input line for text, numbers or
characters has been selected.
XPress the touchpad.
A symbol is shown.
XTo select B: swipe your finger to the left or
right and press.
The list of available input languages appears.
XTo select a language: swipe up or down and
press.
The input language for handwriting recogni-
tion has been changed.
Searching in lists
The phone book search is used as an example.
You determine the first letter of the contact you
are looking for with the first character you enter.
XDraw the letter on the touchpad surface.
The first contact with the selected first char-
acter is highlighted in the phone book.
Further information on handwriting recogni-
tion on the touchpad (
Ypage 25).
XDraw additional letters on the touchpad sur-
face one after another.
XTo complete the search and return to the
phone book: press the touchpad.
26Touchpad
Overview and operation
Page 32 of 178

XTo change the country setting of the char-acter bar: to switch to the bottom line of the
character bar: slide 6the controller.
XTo select B, turn and press the controller.
The available languages are displayed.
XTurn and press the controller.
Functions in the character bar
RÄ
Switches between digits and symbols
R*
Switches the character bar to uppercase/
lowercase letters
RB
Changes the country setting for the character
bar
R
Deletes a character/an entry
R45
Selects the input line
R23
Moves the cursor within the input line
R¬
Confirms an entry
R&
Cancels input
RS
Inserts a paragraph
Character entry (navigation)
Character entry options
You can enter characters using the controller or the touchpad. With the controller, you enter
characters using a character bar. To enter using
the touchpad, draw the character in the entry
field. The multimedia system supports this using
a handwriting recognition function.
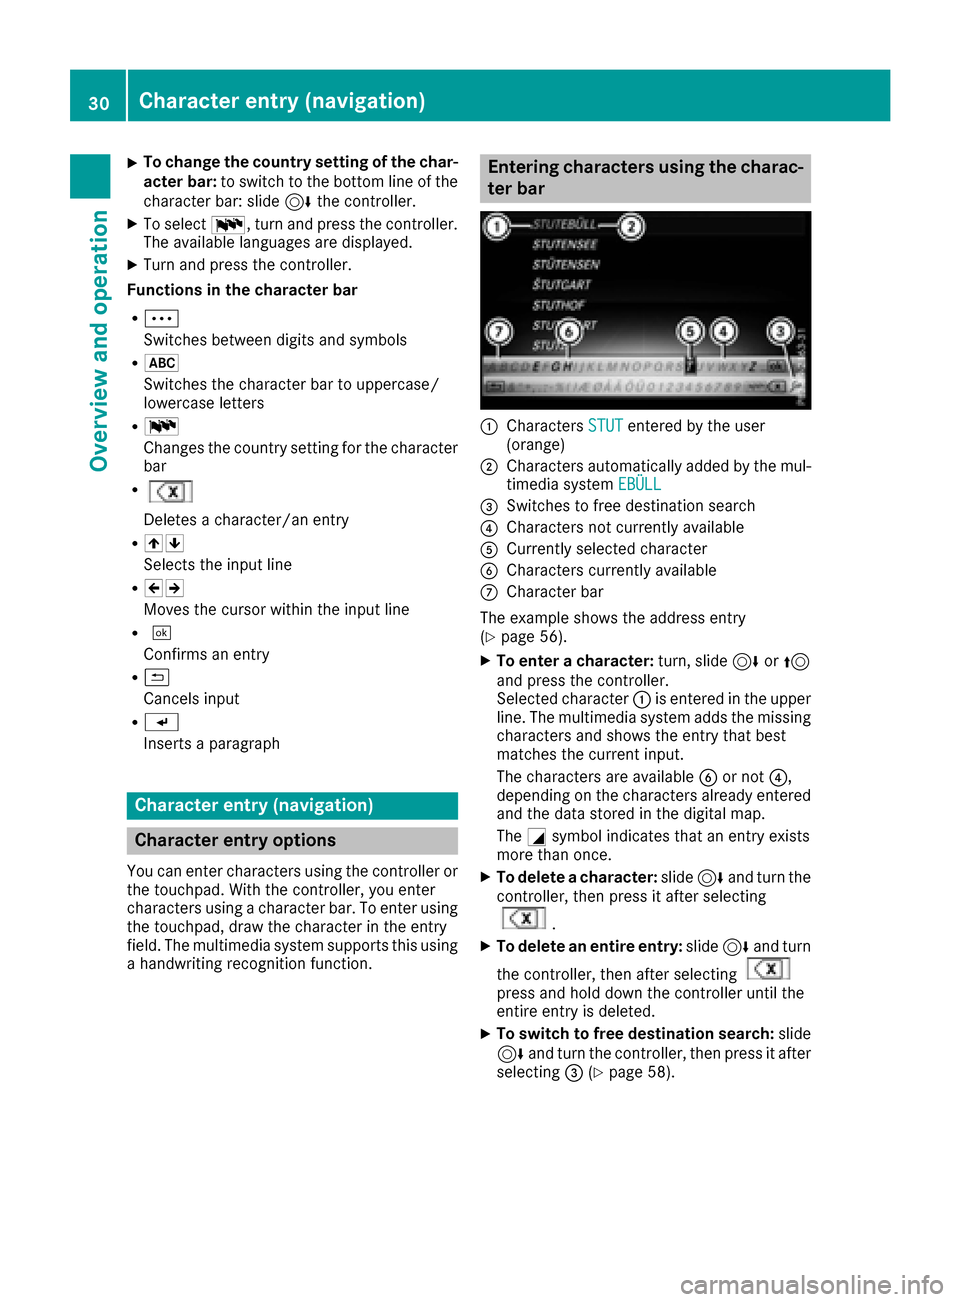
Entering characters using the charac-
ter bar
:Characters STUTentered by the user
(orange)
;Characters automatically added by the mul-
timedia system EBÜLL
=Switches to free destination search
?Characters not currently available
ACurrently selected character
BCharacters currently available
CCharacter bar
The example shows the address entry
(
Ypage 56).
XTo enter a character: turn, slide6or5
and press the controller.
Selected character :is entered in the upper
line. The multimedia system adds the missing
characters and shows the entry that best
matches the current input.
The characters are available Bor not ?,
depending on the characters already entered
and the data stored in the digital map.
The Gsymbol indicates that an entry exists
more than once.
XTo delete a character: slide6and turn the
controller, then press it after selecting
.
XTo delete an entire entry: slide6and turn
the controller, then after selecting
press and hold down the controller until the
entire entry is deleted.
XTo switch to free destination search: slide
6 and turn the controller, then press it after
selecting =(
Ypage 58).
30Character entry (navigation)
Overview and operation
Page 33 of 178

XTo confirm an entry:slide6and turn the
controller, then press it after selecting ¬.
or
XSlide 5the controller repeatedly until the
character bar disappears.
The location selection list appears. The selec-
ted entry is highlighted.
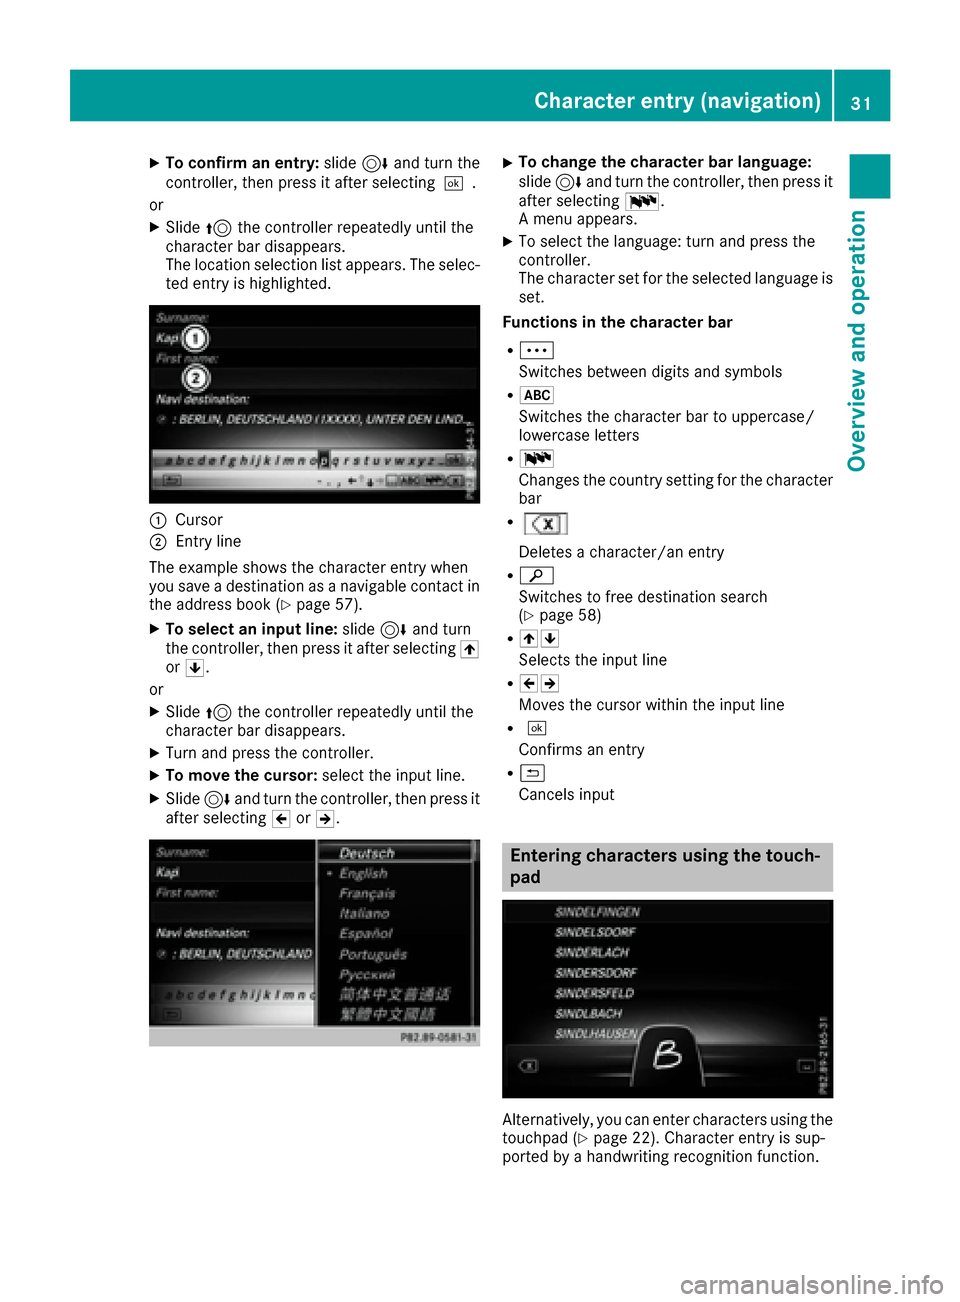
:Cursor
;Entry line
The example shows the character entry when
you save a destination as a navigable contact in
the address book (
Ypage 57).
XTo select an input line: slide6and turn
the controller, then press it after selecting 4
or 5.
or
XSlide 5the controller repeatedly until the
character bar disappears.
XTurn and press the controller.
XTo move the cursor: select the input line.
XSlide6and turn the controller, then press it
after selecting 2or3.
XTo change the character bar language:
slide 6and turn the controller, then press it
after selecting B.
A menu appears.
XTo select the language: turn and press the
controller.
The character set for the selected language is set.
Functions in the character bar
RÄ
Switches between digits and symbols
R*
Switches the character bar to uppercase/
lowercase letters
RB
Changes the country setting for the character
bar
R
Deletes a character/an entry
Rè
Switches to free destination search
(
Ypage 58)
R45
Selects the input line
R23
Moves the cursor within the input line
R¬
Confirms an entry
R&
Cancels input
Entering characters using the touch-
pad
Alternatively, you can enter characters using the
touchpad (Ypage 22). Character entry is sup-
ported by a handwriting recognition function.
Character entry (navigation)31
Overview and operation
Page 36 of 178

Your multimediasyste mequipment
These operatin ginstruction sdescribe all th e
standar dan doptional equipment of your multi-
media system, as available at th etime of going
to press. Country-specifi cdifference sare pos -
sible. Bear in min dthat your vehicle may no t
feature all function sdescribed here. Thi salso
applies to safety-relevan tsystems an dfunc-
tions.
Read th einformation on qualifie dspecialis t
workshop sin th evehicle Operator's Manual.
Important safet ynotes
GWARNING
If you operat emobile communication equip-
men twhil edriving, you will be distracted from
traffic conditions. You could also los econtro l
of th evehicle. There is aris kof an accident.
Only operat ethis equipment when th evehicle
is stationary.
You mus tobserv eth elegal requirements fo rth e
country in whic hyou are currentl ydrivin gwhen
operatin gmobile communication sequipment in
th evehicle.
Display settings
Setting th ebrightness
The brightness detecte dby th edisplay ligh tsen -
sor affects th esetting option sfo rthis function .
XPress theØ button.
or
XPress Vehicl ein themain function bar .
The vehicle men uis displayed.
XTo selec tSystem Settings:slid e6 ,turn
an dpress th econtroller to confirm .
A men uappears .
XTo selec tDispla y:turn an dpress th econ-
troller.
A men uappears .
XSelectBrightness.
A contro lappears .
XSelectth edesire dbrightness.
Display design
The display feature soptimize ddesign sfo rday-
time an dnight-time operation .You can set th e
design by manually selecting day or night design
or opt fo ran automatic setting .
XPress theØ button.
or
XPress Vehicl ein themain function bar .
The vehicle men uis displayed.
XTo selec tSystem Settings:slid e6 ,turn
an dpress th econtroller to confirm .
A men uappears .
XTo selec tDispla y:turn an dpress th econ-
troller.
A men uappears .
XSelectDa yMode,Nigh tModeor Auto.
The #dot indicates th ecurren tsetting .
DesignExplanation
DayModeThe display is set perma-
nently to day design .
NightModeThe display is set perma-
nently to night design .
AutomaticIn theAutomati csetting,
th emultimedia syste m
evaluates th ereadings
from th eautomatic vehi-
cl e ligh tsensor an dauto-
matically switches th edis -
play design .
34Display settings
System settings
Page 39 of 178

Text reader settings
XPress theØbutton.
or
XPress Vehiclein the main function bar.
The vehicle menu is displayed.
XTo select System Settings: slide6, turn
and press the controller to confirm.
A menu appears.
XTo select Text Reader Speed: turn and
press the controller.
A list appears.
XSelect Fast,Mediumor Slow.
The #dot indicates the current setting.
Voice Control System settings
Opening/closing the help window
i
If the set system language is not supported
by the Voice Control System, English will be
selected.
The help window also shows you information on
audible instructions:
Rduring individualization
Rduring subsequent operation of the Voice
Control System
XPress the Øbutton.
or
XPress Vehiclein the main function bar.
The vehicle menu is displayed.
XTo select System Settings: slide6, turn
and press the controller to confirm.
A menu appears.
XTo select VoiceControl: turn and press the
controller.
XSelect Help Window.
You have switched the help window on Oor
off ª.
More information on the Voice Control System
is available in the separate operating instruc-
tions.
Individualization
Using individualization, you can fine-tune the
Voice Control System to your own voice. This
will help improve voice recognition (see the sep-
arate operating instructions).
WiFi
Overview
Establishing a WiFi connection between the mul-
timedia system and a WiFi-enabled device, such
as a tablet computer or smartphone, requires
the following:
RWiFi must be activated on the multimedia sys-
tem and on the device to be connected.
If the multimedia system is to be used as a WiFi
hotspot:
RThe multimedia system must be connected to
an Internet-enabled mobile phone via Blue-
tooth
®or USB.
RThe Internet access data for the mobile phone
network provider must be selected or set in
the multimedia system.
RAn Internet connection must be established
on the multimedia system.
Activating WiFi
XTo select Vehiclefrom the main function bar:
turn and press the controller.
XTo switch to the menu bar: slide 6the con-
troller.
XSelect System Settings.
The System Settingsmenu is displayed.
XSelect WiFi.
The WiFi menu appears.
XSelect Activate.
XPress the controller.
Switch the connection on Oor off ª,
depending on the previous setting.
Connecting the device
General notes
iThe exact WiFi connection procedure may
vary depending on the device to be connec-
ted. Follow the instructions that are shown in
the display. Further information; see the man-
ufacturer's operating instructions.
Connecting a device via WPS PIN
Requirement: for this type of connection, the
device to be connected must support "Connect
using WPS PIN".
WiFi37
System settings
Z
Page 40 of 178

XTo selectVehiclefrom the main function bar:
turn and press the controller.
XTo switch to the menu bar: slide 6the con-
troller.
XSelect System Settings.
The System Settingsmenu is displayed.
XSelect WiFi.
The WiFi menu appears.
XSelect Connect via WPS PIN.
XSelect the vehicle from the device to be con-
nected and "Connect using WPS PIN". The
vehicle is displayed with the SSID MB WLAN
XXXXX.
The device to be connected generates a PIN.
XAlso enter this PIN into the multimedia sys-
tem.
Connecting the device by pressing a
button (push button)
Requirement: for this type of connection, the
device to be connected must support "Connect
via push button".
XTo select Vehiclefrom the main function bar:
turn and press the controller.
XTo switch to the menu bar: slide 6the con-
troller.
XSelect System Settings.
The System Settingsmenu is displayed.
XSelect WiFi.
The WiFi menu appears.
XSelect Connect via WPS PBC.
XSelect the vehicle from the device to be con-
nected and ConnectviaWPSPBC. The vehi-
cle is displayed with the SSID MB WLAN
XXXXX.
XSelectContinuein the multimedia system.
Connecting the device via the security
key
XTo select Vehiclefrom the main function bar:
turn and press the controller.
XTo switch to the menu bar: slide 6the con-
troller.
XSelect System Settings.
The System Settingsmenu is displayed.
XSelect WiFi.
The WiFi menu appears.
XSelect Connect Using Security Key.
XSelect the vehicle from the device to be con-
nected. The vehicle is displayed with the SSID
MB WLAN XXXXX
.
XEnter the security key that appears on the
multimedia system display into the device to
be connected.
XConfirm the entry.
Generating a new security key
XTo select Vehiclefrom the main function bar:
turn and press the controller.
XTo switch to the menu bar: slide 6the con-
troller.
XSelect System Settings.
The System Settingsmenu appears.
XSelect WiFi.
The WiFi menu appears.
XSelect Generate Security Key.
XSelectRegenerate.
A new security key is generated.
XTo save the security key: turn the controller
and select Save.
The WiFi menu appears. The new security key
will now be displayed and verified when a
connection is established via the security key.
The connection must be re-established with
the newly created security key.
iDevice connections established using the
previous security key will no longer work after
the security key is changed. You have to
reconnect these devices (
Ypage 37).
Changing the name of the SSID
XTo select Vehiclefrom the main function bar:
turn and press the controller.
XTo switch to the menu bar: slide 6the con-
troller.
38WiFi
System settings