2017 MERCEDES-BENZ B-Class window
[x] Cancel search: windowPage 142 of 202
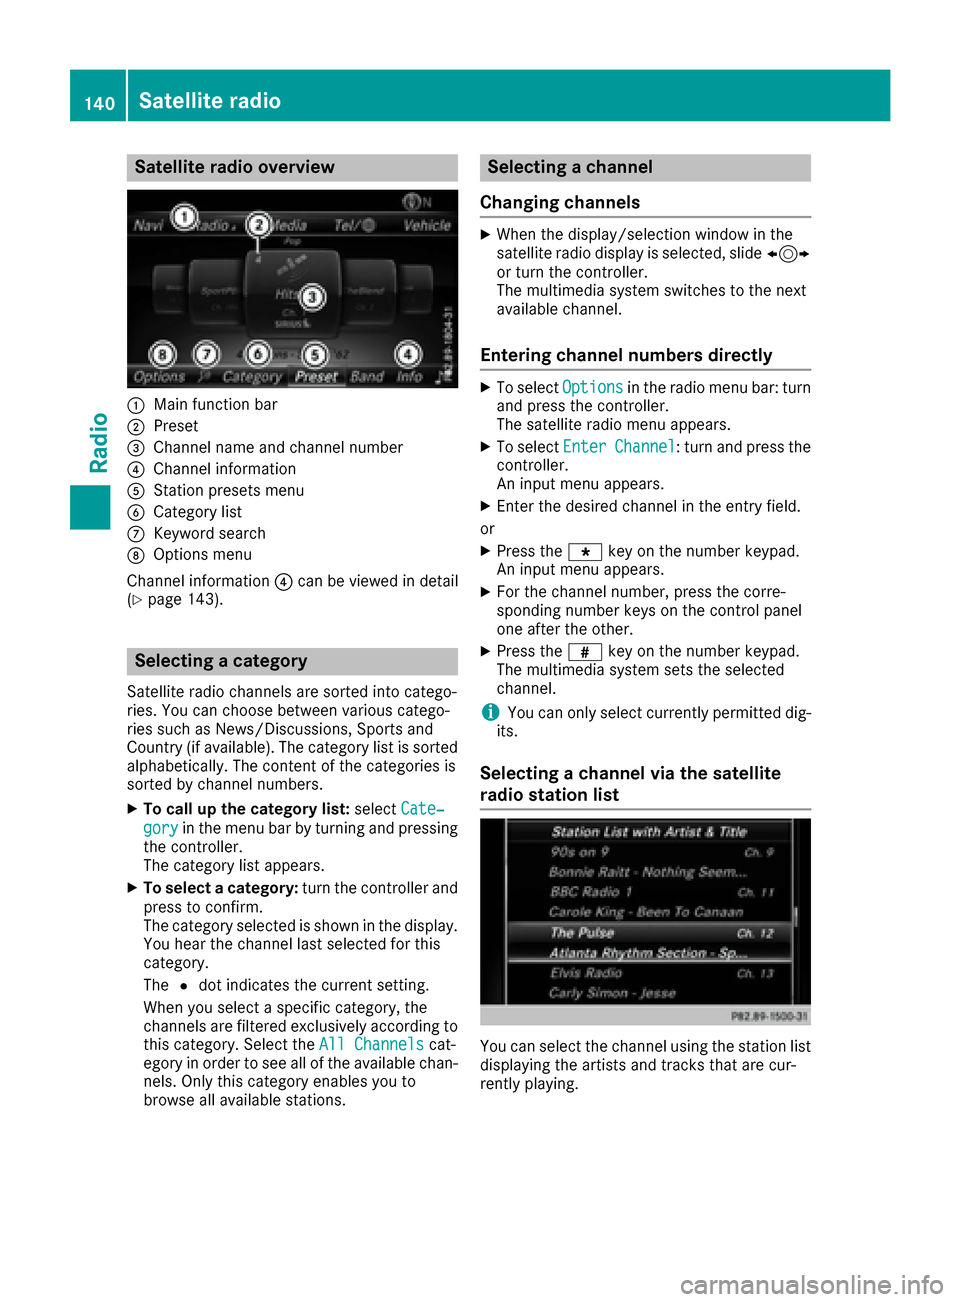
Satellite radio overview
:Main function bar
;Preset
=Channel name and channel number
?Channel information
AStation presets menu
BCategory list
CKeyword search
DOptions menu
Channel information ?can be viewed in detail
(
Ypage 143).
Selecting a category
Satellite radio channels are sorted into catego-
ries. You can choose between various catego-
ries such as News/Discussions, Sports and
Country (if available). The category list is sorted
alphabetically. The content of the categories is
sorted by channel numbers.
XTo call up the category list: selectCate‐
goryin the menu bar by turning and pressing
the controller.
The category list appears.
XTo select a category: turn the controller and
press to confirm.
The category selected is shown in the display.
You hear the channel last selected for this
category.
The #dot indicates the current setting.
When you select a specific category, the
channels are filtered exclusively according to
this category. Select the All Channels
cat-
egory in order to see all of the available chan-
nels. Only this category enables you to
browse all available stations.
Selecting a channel
Changing channels
XWhen the display/selection window in the
satellite radio display is selected, slide 1
or turn the controller.
The multimedia system switches to the next
available channel.
Entering channel numbers directly
XTo select Optionsin the radio menu bar: turn
and press the controller.
The satellite radio menu appears.
XTo select EnterChannel: turn and press the
controller.
An input menu appears.
XEnter the desired channel in the entry field.
or
XPress the gkey on the number keypad.
An input menu appears.
XFor the channel number, press the corre-
sponding number keys on the control panel
one after the other.
XPress the zkey on the number keypad.
The multimedia system sets the selected
channel.
iYou can only select currently permitted dig-
its.
Selecting a channel via the satellite
radio station list
You can select the channel using the station list
displaying the artists and tracks that are cur-
rently playing.
140Satellite radio
Radio
Page 144 of 202
Music and sports alerts
General notes
This function makes it possible to store a pro-
gram alert for your favorite artists, tracks or
sporting events.
You can store up to 30 music and sports alerts
(favorites).
Music alerts can only be saved whilst a track is
being played. You can also specify sports alerts
via the menu option. The system then continu-
ously searches through all the channels. If a
match is found with a saved message, you will
be informed. A window appears with the respec-
tive information.
Setting a music alert
XTo select Optionsin the radio menu bar: turn
and press the controller.
XTo select Alert for Artist, Track &SportsEvent: turn and press the controller.
A menu appears.
XSelect Add New Alert.
A window with a prompt appears.
XSelect ArtistorTrack.
The alert is set for the current artist or track.
iIf an alert cannot be set, the No AlertsAvailablemessage appears.
Setting a sports alert
XTo selectOptionsin the menu bar: turn and
press the controller.
XTo select Alert for Artist, Track &SportsEvent: turn and press the controller.
A menu appears.
XSelect Manage Sports Alerts.
A menu appears.
XSelect Select New Alerts.
A menu appears.
XSelect the desired team from a league, e.g.
college, NBA, NHL, NFL or MLB.
The alert function for the sports team is
added.
A window with music and sport alerts
appears
XTo select Change ToorIgnore: turn and
press the controller.
If you select Change To
, the channel is
changed and the favorite artist or track is
played.
If you select Ignore
, the current channel will
continue playing.
Editing music and sports alerts
XTo select Alert for Artist, Track &SportsEvent: turn and press the controller.
A menu appears.
XSelect Manage Music AlertsorManageSports Alerts.
A list of set alerts appears.
Switching music and sport alerts on/off
XWith Oorª in front of Activate MusicAlertsyou can determine whether music
alerts should be switched on or off.
XWith Oorª in front of ActivateSportsAlertsyou can determine whether sport
alerts should be switched on or off.
Tagging music tracks
If the channel supports this function, you are
able to transfer the music track currently playing
to an Apple
®device. You can then purchase it in
the iTunes®store.
XTo select Optionsin the radio menu bar: turn
and press the controller.
XTo select Tag This Track: turn and press
the controller.
A message about saving this music track on
the Apple
®device appears.
142Satellite radio
Radio
Page 160 of 202

Selecting a track
The function is not supported by all Bluetooth®
audio devices.
Some mobile phones impair function with
regard to the following criteria:
Rthe number of tracks that can be selected.
Rthe time period until the next or previous trackis played.
XUse the multifunction steering wheel to
switch to the media menu in the on-board
computer; see the vehicle Operator's Manual.
XTo skip forwards or backwards to a track:
press the 9or: button on the multi-
function steering wheel.
XRapid scroll: press and hold the 9
or : button on the multifunction steering
wheel until the desired track is reached.
If you press and hold the 9or: but-
tons, the rapid scrolling speed increases after
a short time.
Further ways to select tracks (
Ypage 150).
iIn rapid scroll, track names are not shown,
but instead only Track 1, Track 2 etc. The
playback times for the tracks played are not
displayed. This is available as an optional
function starting with AVRCP Version 1.3.
There is also no music search option available
with Bluetooth
®Audio.
Selecting playback options
If the Bluetooth®audio device supports the cor-
responding function, the following options are
available:
RNormal Track Sequence: the tracks are
played in the normal order (e.g. track 1, 2, 3
etc.).
Audio data playback is determined by the
order in which the tracks are written to the
data medium. Alphabetical order is the most
common. Once all the tracks in a folder have
been played, the tracks in the next folder are
played.
RRandomTrackList: the current track list is
played in random order (e.g. 3, 8, 5 etc.).
RRandom Medium: all tracks on the data
medium are played in random order (e.g.
track 3, 8, 5 etc.). Playback options are optional functions and
are not, or only partially, supported by Blue-
tooth
®audio devices.
Selecting playback options
XSlide 6the controller.
XTo select Options: turn and press the con-
troller.
XSelect Playback Mode.
A # dot indicates the current setting.
XSelect the desired option.
If you select Random Track List, you will
see a corresponding message in the display or
selection window.
Increasing the volume in the multime-
dia system
XSlide 6the controller.
XTo select Options: turn and press the con-
troller.
XTo select Volume: turn and press the control-
ler.
A menu appears. The #dot indicates the cur-
rent setting.
XSelect StandardorBoost.
iIf play back on the Bluetooth®audio player
is too quiet, the Boostfunction may be used.
It is recommended however, that you
increase the volume on the Bluetooth
®audio
player directly.
Operation with the Media Interface
General notes
Media Interface is a universal interface for the
connection of mobile audio and video devices.
Media Interface in the multimedia system has
two USB connections.
The USB connection sockets are located in the
stowage compartment under the armrest
(
Ypage 144).
158Operation with the Media Interface
Media
Page 184 of 202
The same AUX jacks (AUX drive) can be found in the rear-compartment drive (Ypage 183).
Remote control
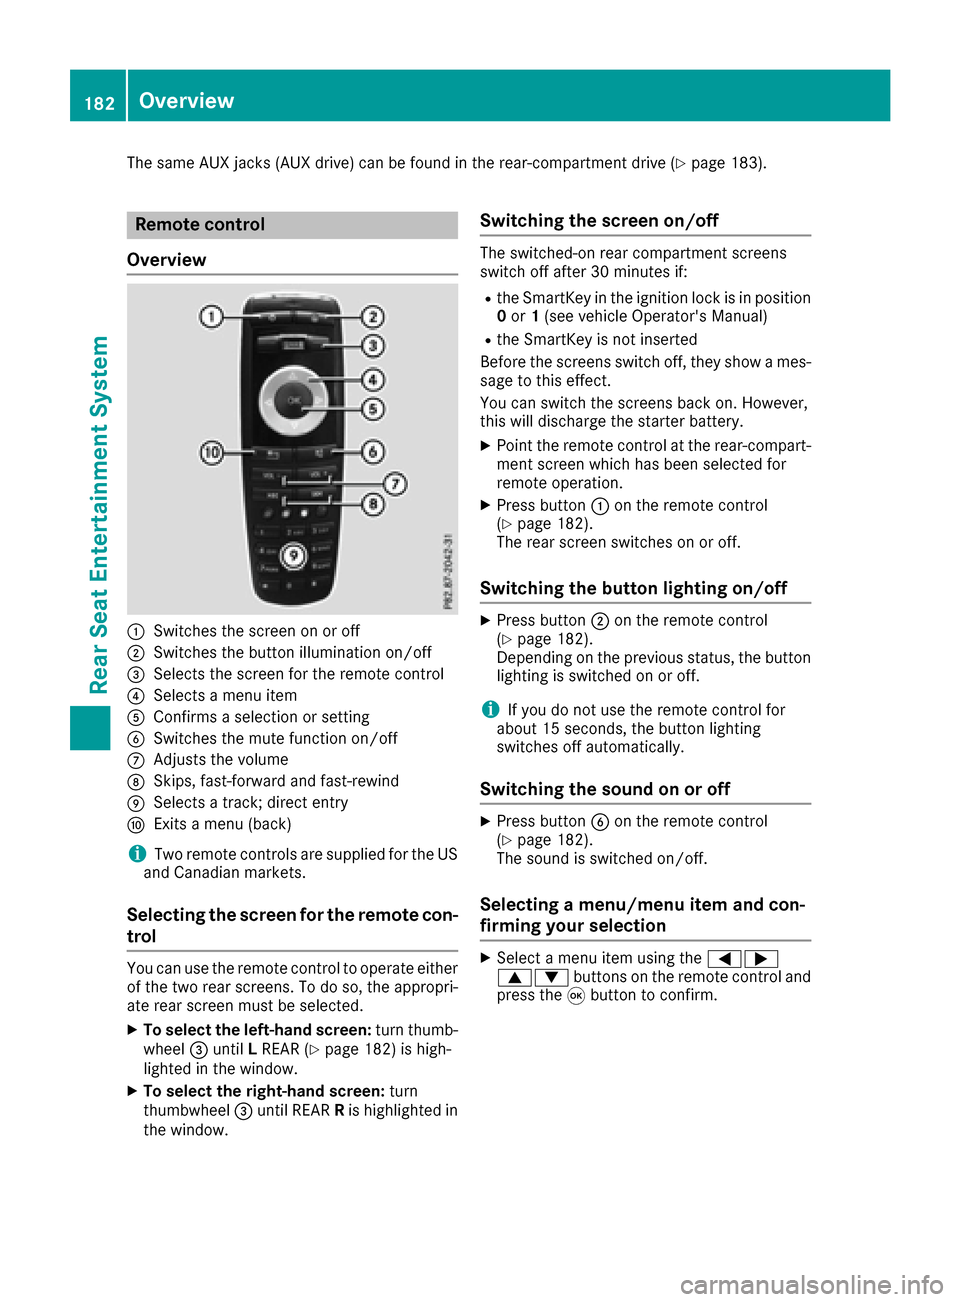
Overview
:Switches the screen on or off
;Switches the button illumination on/off
=Selects the screen for the remote control
?Selects a menu item
AConfirms a selection or setting
BSwitches the mute function on/off
CAdjusts the volume
DSkips, fast-forward and fast-rewind
ESelects a track; direct entry
FExits a menu (back)
iTwo remote controls are supplied for the US
and Canadian markets.
Selecting the screen for the remote con-
trol
You can use the remote control to operate either
of the two rear screens. To do so, the appropri-
ate rear screen must be selected.
XTo select the left-hand screen: turn thumb-
wheel =until LREAR (Ypage 182) is high-
lighted in the window.
XTo select the right-hand screen: turn
thumbwheel =until REAR Ris highlighted in
the window.
Switching the screen on/off
The switched-on rear compartment screens
switch off after 30 minutes if:
Rthe SmartKey in the ignition lock is in position 0 or 1(see vehicle Operator's Manual)
Rthe SmartKey is not inserted
Before the screens switch off, they show a mes-
sage to this effect.
You can switch the screens back on. However,
this will discharge the starter battery.
XPoint the remote control at the rear-compart- ment screen which has been selected for
remote operation.
XPress button :on the remote control
(Ypage 182).
The rear screen switches on or off.
Switching the button lighting on/off
XPress button ;on the remote control
(Ypage 182).
Depending on the previous status, the button
lighting is switched on or off.
iIf you do not use the remote control for
about 15 seconds, the button lighting
switches off automatically.
Switching the sound on or off
XPress button Bon the remote control
(Ypage 182).
The sound is switched on/off.
Selecting a menu/menu item and con-
firming your selection
XSelect a menu item using the =;
9: buttons on the remote control and
press the 9button to confirm.
182Overview
Rear Seat Entertainment System
Page 191 of 202
Selecting a track
Via skip function
XPress the =or; button on the remote
control.
or
XPress the EorF button.
The skip forward function skips to the next
track.
If the elapsed track time has passed 8 sec-
onds, the function skips back to the beginning of the track. If the elapsed time is shorter, it
will skip to the start of the previous track.
If the Random tracks
orRandom folderplayback option has been selected, the track
order is random.
Via track list
In audio CD mode, the track list contains all
tracks on the disc currently playing. In audio
DVD mode, the track list contains all tracks in
the currently active group.
In MP3 mode, the track list shows all tracks in
the currently active folder as well as the folder
structure, allowing you to select any track on the
MP3 CD.
XSelect Tracks(audio CD/DVD mode) or
Folder(MP3 mode) using
the :=; buttons on the remote
control, and confirm by pressing the 9but-
ton.
or
XPress the 9button when the selection win-
dow is active.
The track list appears. The #dot indicates the
current track.
XSelect a track using the 9:buttons
and press the 9button to confirm.
By entering the track number directly
XPress the hbutton on the remote control.
The track entry display appears.
Example: track 2
XPress the ·button. Example: track 23
XPress the
·and¸ buttons in quick
succession.
XWait for approximately three seconds after
making the entry.
You will hear the track which has been
entered. The corresponding basic menu then
reappears.
iIt is not possible to enter numbers that
exceed the number of tracks on the CD or in
the currently active folder.
Fast forwarding/rewinding
XWith the selection window active, press the
= or; button on the remote control
repeatedly until you reach the desired posi-
tion.
or
XPress and hold the EorF button until
the desired position has been reached.
Selecting a folder
This function is available in MP3 mode.
XSelect Folderin MP3 mode using
the :=; buttons on the remote
control and press the 9button to confirm.
or
XPress the 9button when the selection win-
dow is active.
The folder content appears.
XTo switch to the superordinate folder:
select symbol Uusing the 9: but-
tons on the remote control and press the 9
button to confirm.
The display shows the next folder up.
XTo select a folder: select a folder by pressing
the 9: button and confirm by pressing
the 9button.
You will see the tracks in the folder.
XSelect a track using the 9:buttons
and press the 9button to confirm.
The track is played and the selected folder is
now the active folder.
Pause function
This function is available in audio DVD mode.
Audio CD/DVD and MP3 mode189
Rear Seat Entertainment System
Z
Page 192 of 202
XTo pause playback:selectËusing
the :=; buttons on the remote
control and press the 9button to confirm.
The Ë display changes to Ì.
XTo continue playback: selectÌand
press the 9button to confirm.
The Ì display changes to Ë.
Stop function
This function is available in audio DVD mode.
XTo interrupt playback: selectÉusing
the :=; buttons on the remote
control and press the 9button to confirm.
The Ë display changes to Ì.
XTo continue playback: selectÌand
press the 9button to confirm.
Playback continues from the point where it
was interrupted.
XTo stop playback: while playback is inter-
rupted, select Éagain and press the 9
button to confirm.
Playback stops and returns to the beginning
of the DVD. Ìis highlighted.
XTo restart playback: selectÌand press
the 9button to confirm.
Playback starts from the beginning of the
DVD.
Setting the audio format
The content of an audio DVD can be divided into
up to 9 groups. The availability and type of group
depends on the respective DVD. A group can
contain music of different sound qualities
(stereo and multichannel formats, for example),
or bonus tracks.
XSelect DVD-Ausing the :=; but-
tons on the remote control and press 9to
confirm.
XSelect Groupusing the 9: buttons
and press the 9button to confirm.
The list of available audio formats appears.
The #dot indicates the format currently
selected.
XSelect an audio format using the 9:
buttons and press the 9button to confirm.
XTo exit the menu: press the=or;
button.
Playback options
XSelect CD,DVD-Aor MP3using
the :=; buttons on the remote
control and press the 9button to confirm.
A list appears. The #dot indicates the play-
back option currently selected.
XSelect Normal track sequence,Randomtracksor Random folderusing the
9: buttons and press the 9button to
confirm.
The option is switched on. For all options
except Normal track sequence
, you will
see a corresponding display in the selection
window.
iIf you switch the data carrier which you are
currently listening to, the Normal track
sequenceoption is activated automatically. If
an option is selected, it remains selected after
the Rear Seat Entertainment System is
switched on or off.
Switching track information on/off
(MP3 mode only)
If the function is switched on, folder and track
names are displayed.
If the function is switched off, disc and file
names are displayed.
XSelect MP3using the :=; buttons
on the remote control and press the 9button
to confirm.
XSelect Display track informationusing
the 9: buttons and press the 9but-
ton to confirm.
The function is switched on Oor off ª,
depending on the previous status.
Video DVD mode
Important safety notes
GWARNING
The CD/DVD drive is a class 1 laser product.
If you open the housing of the CD/DVD drive,
there is a risk of exposure to invisible laser
radiation. This laser radiation could damage
your retina. There is a risk of injury.
190Video DVD mode
Rear Seat Entertainment System
Page 198 of 202

Additional setting options:
XAdjust thebrightness, contrast and color
(Ypage 186).
XChange the picture format (Ypage 187).
XAdjust the sound settings (Ypage 186).
AUX mode
Introduction
You can connect external video sources with a
sound and video signal to the Rear Seat Enter-
tainment System:
Rone external video source to each of the rear
screens (AUX display)
Rone external video source to the rear-com-
partment disc drive (AUXdrive)
Operating the external video source; see the
manufacturer's operating instructions.
For further details about externalvideo sources,
please consult an authorized Mercedes-Benz
Center.
Connecting AUX equipment
AUX drive jacks
The AUX drive jacks are located on the rear-
compartment drive to the right of the þ
(
Ypage 183) button.
AUX display jacks
The AUX display jacks are on the sideof the two
rear screens (Ypage 181).
Connecting audio and video cables
XIn sert the audio plugs for the left and right
signals into the corresponding Land Rjacks.
XInsert the videoplug into the Vjack.
Activating AUX mode
AUX drive
Requir ements: the external video source iscon-
nected to the rear-compartment drive and play-
back isselected.
XSelect Auxinthe menu using the
9=; buttons on the remote con-
trol and press the 9button to confirm.
The AUX menu appears.
XSelect Sourcefrom the AUX menu and press
the 9button to confirm.
XSelect Disc drive Auxand press the 9
button to confirm.
Playback starts. Ifan external video source
does not provide a video picture, an audio
menu appears.
Displaying AUX
Requirements: the external video source is con-
nected to the rear-compartment screen and
playback isselected.
XSelect a screen using the thumbwheel on the
remote control (Ypage 182) until "L REAR"
(left-hand screen) or "R REAR"(right-hand
screen) is highlighted in the window.
XSelect Auxinthe menu using the
9=; buttons on the remote con-
trol and press the 9button to confirm.
XSelect Sourcefrom the AUX menu and press
the 9button to confirm.
XSelect DisplayAuxand press the 9button
to confirm.
Playback starts. Ifan external video source
does not provide a video picture, an audio
menu appears.
Adjusting treble and bass
XSelect TrebleorBassinthe AUX menu and
press the 9button on the remote control to
confirm.
A scale appears.
XSelect a setting using the 9or: but-
ton and press the 9button to confirm.
196AUX mode
Rear Seat Entertainment System