2017 MAZDA MODEL 6 warning light
[x] Cancel search: warning lightPage 4 of 46

2
Driver’s View
CLOCK ( P. 1 2 )
INFORMATION D I S P L AY
( P. 7 )
S E AT
WARMERSC L I M AT E
CONTROL
( P. 3 4 )
PASSENGER
AIRBAG OFF INDICATOR
1
HAZARD
WARNING
12V ACCESSORY SOCKET
PUSH
BUTTON
S TA R T
( P. 4 )
H E AT E D
STEERING WHEEL
( P. 9 )
WIPER/
WASHER
( P. 2 8 )
NAVIGATION/AUDIO
(WITH MAZDA CONNECT)
( P P. 11-12 , 17-18 )
1 This indicator light turns on to remind you that the front passenger’s front/side
airbags and seat belt pretensioner will not deploy during a collision. The reason for
this is that the sensor has determined that an adult is not sitting in the front passenger seat.
NOTE: If a smaller adult sits on the front passenger seat, the sensors might detect the adult as being
a child depending on the person’s physique and may deactivate the front passenger’s front/side
airbags and seat belt pretensioner. Always wear your seat belt and secure children in the rear seats in
appropriate child restraints. See the Owner’s Manual for important information on this safety feature.
www.MazdaUSA.com
Page 8 of 46

6
TIRE PRESSURE MONITORING SYSTEM (TPMS)
For your safety, the Mazda6 is equipped with TPMS that detects low
tire pressure in one or more tires. If the tire pressure starts getting
low in one or more tires, the system alerts the driver by turning on a
light in the instrument cluster (pp. 35-36) and sounding an alarm.
What to do? Don’t ignore the TPMS warning light. Stop and check your
tire pressure (when tires are cold) and inflate them to the proper pressure.
Properly inflated tires are safer, last longer, and increase fuel economy.
In the following cases, the TPMS must be “initialized” so the system can
operate normally.
• The tire pressure is adjusted (up or down) in one or more tires.
•
A tir
e rotation is performed.
•
Any t
ire or wheel is replaced.
•
The v
ehicle’s battery is disconnected, replaced or completely dead.
Initialization Process (TPMS Warning Light is Illuminated)
1 Park the vehicle in a safe place and firmly apply the parking brake.
2 Let t
he tires cool, then adjust the tire pressure to the specified
pressure (see tire label located on the driver’s
side door opening) on all four (4) tires.
3 Swi
tch the ignition ON, but leave the vehicle parked.
4 Pus
h and hold the TPMS “Set Switch”
(left side of dash) until the TPMS warning light
in the instrument cluster flashes twice and
a beep sound is heard once.
Tires
CAUTION: If the TPMS “Set Switch” is pushed without adjusting the tire
pressure, the system cannot detect the normal tire pressure. The TPMS
warning light may not turn on, even if the tire pressure is low, or it may turn on
if the tire pressure is normal.
NOTE: Drastic changes in temperature or altitude can affect the pressure in the
tires, causing the TPMS warning light to turn on. Verify the tire pressures when
driving through extreme temperature or altitude changes.
www.MazdaUSA.com
Page 11 of 46

9
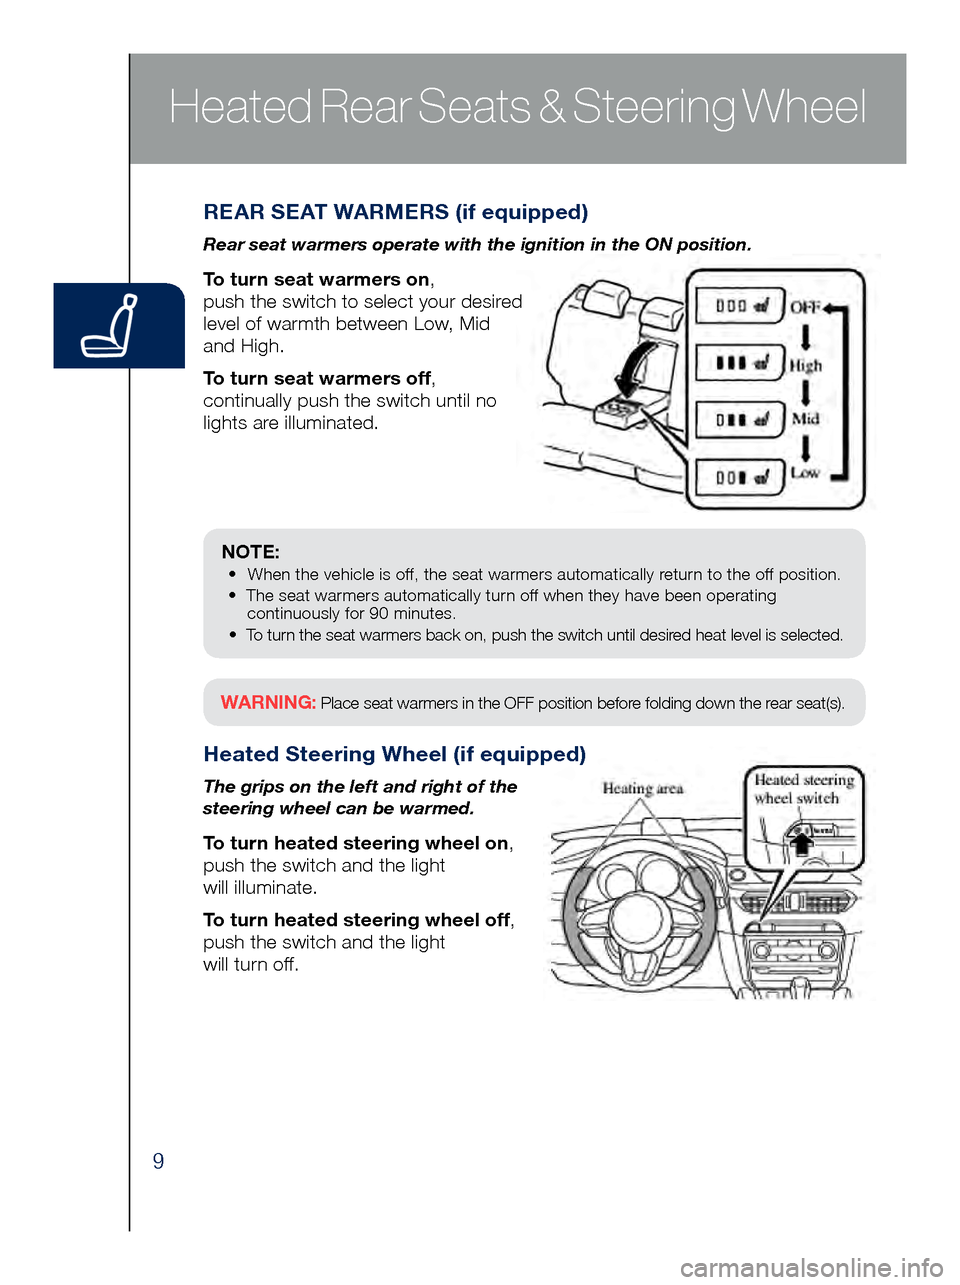
REAR SEAT WARMERS (if equipped)
Rear seat warmers operate with the ignition in the ON position.
To turn seat warmers on,
push the switch to select your desired
level of warmth between Low, Mid
and High.
To turn seat warmers off,
continually push the switch until no
lights are illuminated.
Heated Steering Wheel (if equipped)
The grips on the left and right of the
steering wheel can be warmed.
To turn heated steering wheel on,
push the switch and the light
will illuminate.
To turn heated steering wheel off,
push the switch and the light
will turn off.
Heated Rear Seats & Steering Wheel
NOTE: • When the vehicle is off, the seat warmers automatically return to the off position.
• The seat warmers automatically turn off when they have been operating
continuously for 90 minutes.
•
To turn the seat warmers back on, push the switch until desir
ed heat level is selected.
WARNING: Place seat warmers in the OFF position before folding down the rear seat(s).
Page 21 of 46

19
Mazda Radar Cruise Control
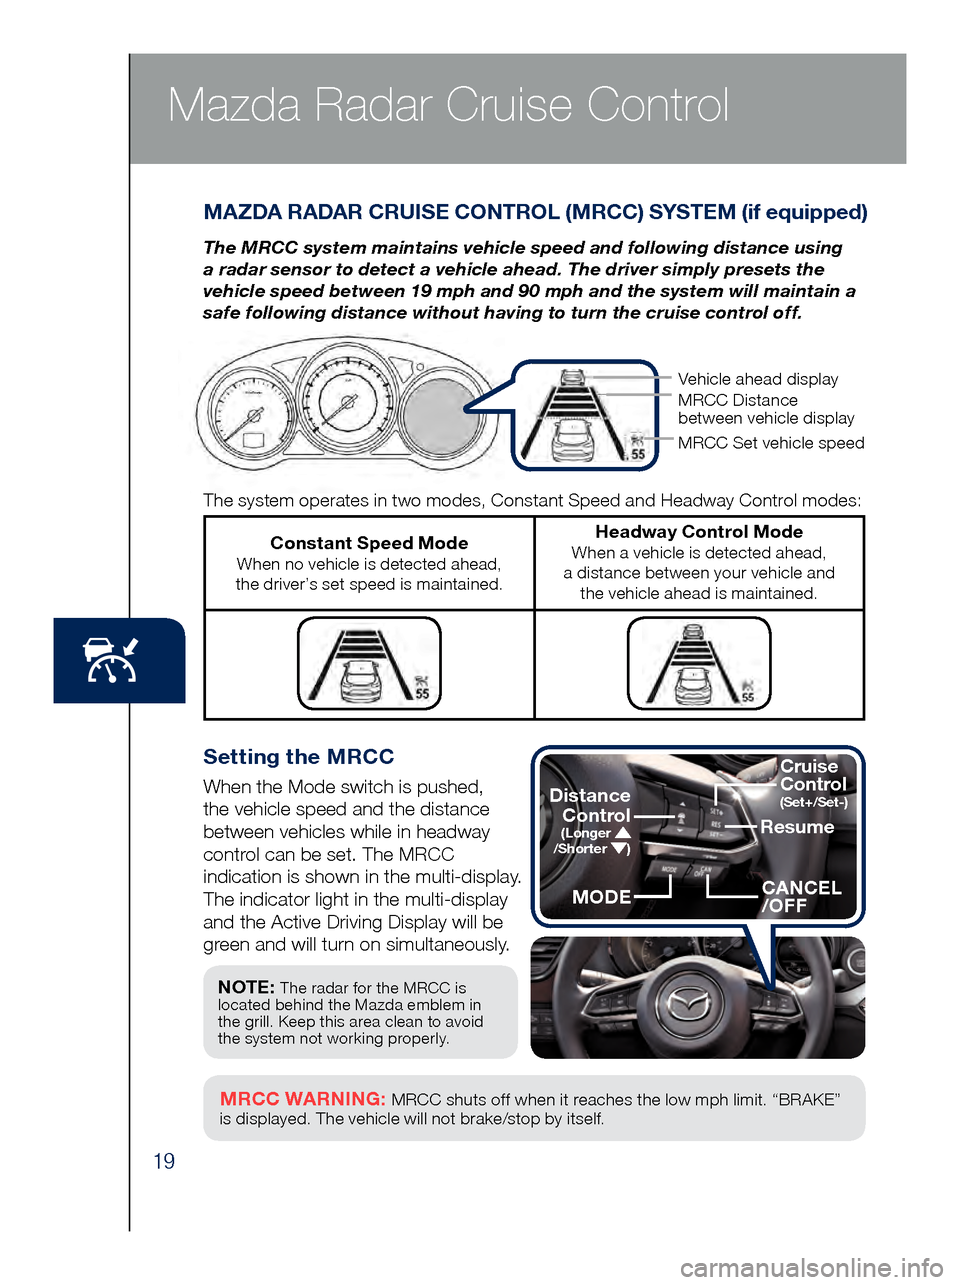
Setting the MRCC
When the Mode switch is pushed,
the vehicle speed and the distance
between vehicles while in headway
control can be set. The MRCC
indication is shown in the multi-display.
The indicator light in the multi-display
and the Active Driving Display will be
green and will turn on simultaneously.
MAZDA RADAR CRUISE CONTROL (MRCC) SYSTEM (if equipped)
The MRCC system maintains vehicle speed and following distance using
a radar sensor to detect a vehicle ahead. The driver simply presets the
vehicle speed between 19 mph and 90 mph and the system will maintain a
safe following distance without having to turn the cruise control off.
MRCC WARNING: MRCC shuts off when it reaches the low mph limit. “BRAKE”
is displayed. The vehicle will not brake/stop by itself.
The system operates in two modes, Constant Speed and Headway Control modes:
Constant Speed Mode When no vehicle is detected ahead,
the driver’s set speed is maintained.
Headway Control Mode When a vehicle is detected ahead,
a distance between your vehicle and the vehicle ahead is maintained.
NOTE: The radar for the MRCC is
located behind the Mazda emblem in
the grill. Keep this area clean to avoid
the system not working properly.
Vehicle ahead display
MRCC Distance
between vehicle display
MRCC Set vehicle speed
Resume
CANCEL
/OFF
Cruise
Control
(Set+/Set-)Distance
Control
(Longer /Shorter )
MODE
Page 22 of 46

20
Mazda Radar Cruise Control
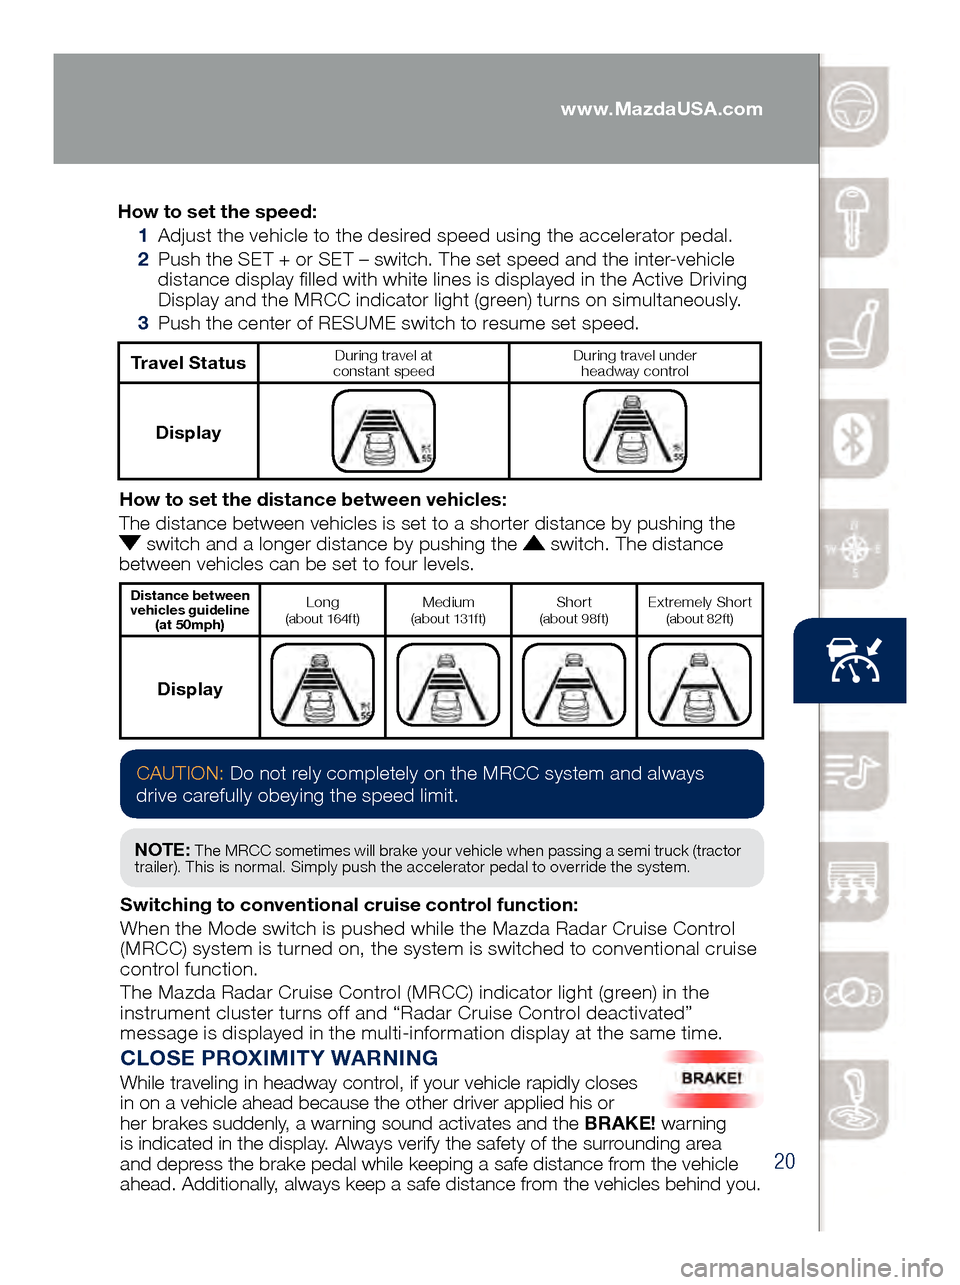
CLOSE PROXIMITY WARNING
While traveling in headway control, if your vehicle rapidly closes
in on a vehicle ahead because the other driver applied his or
her brakes suddenly, a warning sound activates and the BRAKE! warning
is indicated in the display. Always verify the safety of the surrounding area
and depress the brake pedal while keeping a safe distance from the vehicle
ahead. Additionally, always keep a safe distance from the vehicles behind you.
How to set the speed:
1 Adjus
t the vehicle to the desired speed using the accelerator pedal.
2 Pus
h the SET + or SET – switch. The set speed and the inter-vehicle
distance display filled with white lines is displayed in the Active Driving
Display and the MRCC indicator light (green) turns on simultaneously.
3 Pus
h the center of RESUME switch to resume set speed.
Travel StatusDuring travel at
constant speed During travel under
headway control
Display
How to set the distance between vehicles:
The distance between vehicles is set to a shorter distance by pushing th\
e
switch and a longer distance by pushing the switch. The distance
between vehicles can be set to four levels.
Distance between
vehicles guideline (at 50mph)Long (about 164ft)Medium
(about 131ft)Shor t (about 98ft)Extremely Shor t (about 82ft)
Display
CAUTION: Do not rely completely on the MRCC system and always
drive carefully obeying the speed limit.
NOTE: The MRCC sometimes will brake your vehicle when passing a semi truck (tractor
trailer). This is normal. Simply push the accelerator pedal to override the system.
Switching to conventional cruise control function:
When the Mode switch is pushed while the Mazda Radar Cruise Control
(MRCC) system is turned on, the system is switched to conventional cruise
control function.
The Mazda Radar Cruise Control (MRCC) indicator light (green) in the
instrument cluster turns off and “Radar Cruise Control deactivated”
message is displayed in the multi-information display at the same time.
www.MazdaUSA.com
Page 25 of 46

23Use the LDWS switch to
turn system ON or OFF.
WARNING: LDWS is only a supplementary system to
warn the driver that the vehicle may be deviating from
its lane ; however, the LDWS has limitations. Do not rely
solely on the LDWS. Relying solely on the LDWS may
cause an unexpected accident resulting in death or
serious injury. Always pay attention to the direction in
which the vehicle is traveling and drive safely.
NOTE: Any driver input (e.g., turn signal, steering or acceleration) will cancel warning.
Lane-keep Assist System and
Lane Departure Warning System
LAN E-KEEP ASSIST SYSTEM (LAS) and
LANE DEPARTURE WARNING SYSTEM (LDWS) (if equipped)
The Lane-keep Assist System (LAS) and Lane
Departure Warning System (LDWS) recognize the
painted lane lines using the Forward Sensing Camera
(FSC) installed on the windshield.
• If the vehicle deviates from its lane
at speeds above 37 mph, the
system alerts the driver to provide
steering assistance and uses the
following indications to help
the driver stay within the lines.
Indicator Light Active Driving Display Condition
No indicator light
The painted lane lines on
the road are not recognized
or the vehicle speed is less
than 44 mph.
No indicator light
The painted lane lines
are recognized at vehicle
speeds of 44 mph or more.
Flashes + warning sound OR
Warning is triggered
when vehicle deviates from
its lane.
OR
LDWS OFF
Page 27 of 46

25
Blind Spot Monitoring System
NOTE: Do not rely completely on the BSM system and be sure to look over
your shoulder before changing lanes:
•
The B
SM system can assist the driver in confirming the safety of the surroundings,
but is not a complete substitute.
•
The dr
iver is responsible for ensuring safe lane changes and other maneuvers.
•
Alw
ays pay attention to the direction in which the vehicle is traveling and the
vehicle’s surroundings.
•
The B
SM system does not operate when the vehicle speed is lower than
about 6.2 mph.
Turning BSM System Off
Turning the BSM system off will turn off both the light and sound
indicators. To manually turn the BSM system off, push the BSM
OFF switch on the dash. The BSM OFF indicator will illuminate
in the instrument cluster when the BSM system is off. The BSM
system will retain the last setting before the ignition was turned off.
BLIND SPOT MONITORING (BSM) SYSTEM (if equipped)
The Blind Spot Monitoring (BSM) system is designed to assist the driver
by monitoring the blind spots to the rear of the vehicle on both sides.
• If your vehicle speed is about 6.2 mph or more, the BSM will
war
n you of vehicles in the detection area by illuminating the
BSM warning lights located on the left and right door mirrors.
•
If yo
u operate a turn signal in the direction of an illuminated BSM warning
light, the system will also warn you with a beep and warning light flash.
•
BSM s
ensors are located under the left and right rear bumper areas.
The BSM system may not operate properly if the rear bumper gets too
dirty, so keep the rear bumper area clean.
Refer to your Owner’s Manual for complete details.
Your Vehicle
Detection Areas
Image is for
reference.
Page 37 of 46

35
TACHOMETERSPEEDMETER
Lane Departure War ning System
(LDWS) and Lane-keep Assist
System (LAS) System On (WHITE)/
Lane Detected (GREEN)
(pp. 23)
AFS
OFF
Adaptive Front-Lighting System
(AFS) OFF
(p. 29)TCS
OFF
Traction Control System (TCS) OFF
Traction Control System (TCS)/
Dynamic Stability Contr
ol (DSC) On: TCS/DSC malfunction
Flashing: TCS/DSC operating
Blind Spot Monitoring (BSM) OFF/
Rear Cross Traf fic Alert
(RCTA) System (pp. 25-26)
SPORT Mode On (p. 38)
Lights On (Exterior)
High Beam Control On
Headlight High Beams On
Air Bag/Front Seat Belt
Pretensioner System Malfunction
Check Engine
Seat Belt Unbuckled/Malfunction
Engine Oil Level
LED Headlight
Brake Pedal Operation Demand
Turn Signals/Hazar d
Tire Pressur e Monitoring System
(TPMS) (p. 6) On/Warning Beep: Low tire pressure in one
or more tires. Flashing: TPMS Malfunction
Cruise Main On (WHITE)
Cruise Set On (GREEN)
Mazda Radar Cruise Control
On ( AMBER), Set (GREEN) (pp. 19-20)
Anti-lock Brake System
(ABS) Malfunction
Shift Position
Security System
Smart Brake Support (SBS) and
Smart City Brake Support (SCBS)
Flashing Red: SBS and SCBS are operating.
Amber: SBS and/or SCBS malfunction.
SBS and SCBS are turned of f.
TPMS NOTE: Low ambient temperature and/or high altitude may cause tire pressures to
change and turn the TPMS warning light on. If the warning light comes on, see p. 6.
OUTSIDE
TEMPERATURE DISPLAY
The outside temperature unit can be
switched between °C and °F using System
Settings in the infotainment system.
IMPORTANT: When your Mazda
Connect display setting is set on “AUTO”, the instrument cluster and display may become dimmer when the headlights are
on. If the display and instrument cluster become too dim or too bright when
the headlights are on, simply rotate the
dimmer knob located on your instrument cluster to adjust the brightness.
GLOSSARY OF WARNING AND INDICATOR LIGHTS
TCS OFF
Instrument Cluster Type A
(with Multi-Information Display)