2017 MAZDA MODEL 6 mirror
[x] Cancel search: mirrorPage 238 of 578

4–114
When Driving
i-ACTIVSENSE
Under the following conditions, the radar sensors (rear) cannot detect target objects or it
may be difficult to detect them.
The vehicle speed when reversing is about 15 km/h (9 mph) or faster. The radar sensor (rear) detection area is obstructed by a nearby wall or parked
vehicle. (Reverse the vehicle to a position where the radar sensor detection area is no
longer obstructed.)
Y our v ehicle
A vehicle is approaching directly from the rear of your vehicle.
Y our v ehicle
The vehicle is parked on a slant.
Y our v ehicle
Directly after the Blind Spot Monitoring (BSM) system becomes operable.
In the following cases, it may be difficult to view the illumination/flashing of the Blind
Spot Monitoring (BSM) warning indicator lights equipped on the door mi\
rrors.
Snow or ice adheres to the door mirrors. The front door glass is fogged or covered in snow, frost or dirt.
Turn off the Rear Cross Traffic Alert (RCTA) system while pulling a trailer or while an
accessory such as a bicycle carrier is installed to the rear of the vehicle. Otherwise,
the radio waves emitted by the radar will be blocked causing the system \
to not operate
normally.
Mazda6_8FH2-EA-16F_Edition2.indb 1142016/07/07 13:45:11
Page 270 of 578

4–14 6
When Driving
i-ACTIVSENSE
*Some models.
Forward Sensing Camera (FSC)*
Your vehicle is equipped with a Forward Sensing Camera (FSC). The Forward Sensing
Camera (FSC) is positioned near the rearview mirror and used by the fo\
llowing systems.
High Beam Control System (HBC) Lane-keep Assist System (LAS) & Lane Departure Warning System (LDWS) Traffic Sign Recognition System (TSR) Smart City Brake Support (SCBS) Smart Brake Support (SBS)
The Forward Sensing Camera (FSC) determines the conditions ahead of th\
e vehicle while
traveling at night and detects traffic lanes. The distance in which the Forward Sensing
Camera (FSC) can detect objects varies depending on the surrounding co\
nditions.
WARNING
Do not modify the suspension:
If the vehicle height or inclination is changed, the system will not be able to correctly
detect vehicles ahead. This will result in the system not operating normally or mistakenly
operating, which could cause a serious accident.
CAUTION
Do not apply accessories, stickers or film to the windshield near the Forward Sensing
Camera (FSC).
If the area in front of the Forward Sensing Camera (FSC) lens is obstructed, it will cause
the system to not operate correctly. Consequently, each system may not operate normally
which could lead to an unexpected accident.
Do not disassemble or modify the Forward Sensing Camera (FSC).
Disassembly or modification of the Forward Sensing Camera (FSC) will cause a malfunction
or mistaken operation. Consequently, each system may not operate normally which could
lead to an unexpected accident.
Mazda6_8FH2-EA-16F_Edition2.indb 1462016/07/07 13:45:20
Page 271 of 578

4–147
When Driving
i-ACTIVSENSE
Heed the following cautions to assure the correct operation of the Forward Sensing Camera
(FSC).
Be careful not to scratch the Forward Sensing Camera (FSC) lens or allow it to get dirty. Do not remove the Forward Sensing Camera (FSC) cover. Do not place objects on the dashboard which reflect light. Always keep the windshield glass around the camera clean by removing dirt or fogging.
Use the windshield defroster to remove fogging on the windshield.
Consult an Authorized Mazda Dealer regarding cleaning the interior side of the
windshield around the Forward Sensing Camera (FSC).
Consult an Authorized Mazda Dealer before performing repairs around the Forward
Sensing Camera (FSC).
The Forward Sensing Camera (FSC) is installed to the windshield. Consult an Authorized
Mazda Dealer for windshield repair and replacement.
When cleaning the windshield, do not allow glass cleaners or similar cleaning fluids to
get on the Forward Sensing Camera (FSC) lens. In addition, do not touch the Forward
Sensing Camera (FSC) lens.
When performing repairs around the rearview mirror, consult an Authorized Mazda
Dealer.
Consult an Authorized Mazda Dealer regarding cleaning of the camera lens. Do not hit or apply strong force to the Forward Sensing Camera (FSC) or the area around
it. If the Forward Sensing Camera (FSC) is severely hit or if there are cracks or damage
caused by flying gravel or debris in the area around it, stop using the following systems
and consult an Authorized Mazda Dealer.
High Beam Control System (HBC) Lane-keep Assist System (LAS) & Lane Departure Warning System (LDWS) Traffic Sign Recognition System (TSR) Smart City Brake Support (SCBS) Smart Brake Support (SBS)
The direction in which the Forward Sensing Camera (FSC) is pointed has been finely
adjusted. Do not change the installation position of the Forward Sensing Camera (FSC)
or remove it. Otherwise, it could result in damage or malfunction.
Always use tires for all wheels that are of the specified size, and the same manufacturer,
brand, and tread pattern. In addition, do not use tires with significantly different wear
patterns on the same vehicle as the system may not operate normally.
The Forward Sensing Camera (FSC) includes a function for detecting a soiled windshield
and informing the driver, however, depending on the conditions, it may not detect plastic
shopping bags, ice or snow on the windshield. In such cases, the system cannot accurately
determine a vehicle ahead and may not be able to operate normally. Always drive carefully
and pay attention to the road ahead.
Mazda6_8FH2-EA-16F_Edition2.indb 1472016/07/07 13:45:20
Page 290 of 578

4–16 6
When Driving
Rear View Monitor
Viewing the Display
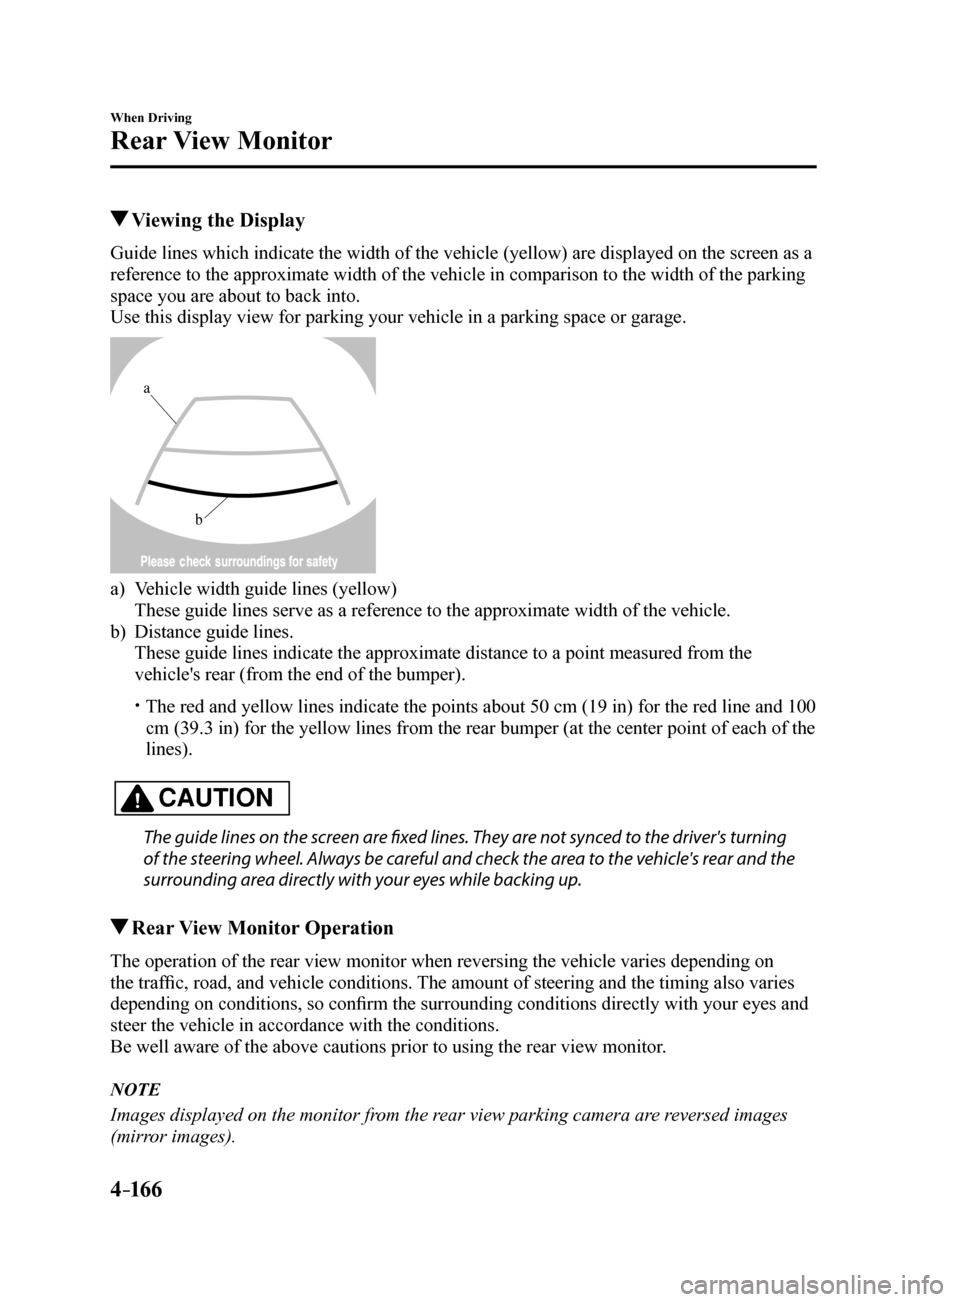
Guide lines which indicate the width of the vehicle (yellow) are displayed on the screen as a
reference to the approximate width of the vehicle in comparison to the w\
idth of the parking
space you are about to back into.
Use this display view for parking your vehicle in a parking space or gar\
age.
b
a
a) Vehicle width guide lines (yellow)
These guide lines serve as a reference to the approximate width of the v\
ehicle.
b) Distance guide lines.
These guide lines indicate the approximate distance to a point measured \
from the
vehicle's rear (from the end of the bumper).
The red and yellow lines indicate the points about 50 cm (19 in) for t\
he red line and 100
cm (39.3 in) for the yellow lines from the rear bumper (at the center\
point of each of the
lines).
CAUTION
The guide lines on the screen are fixed lines. They are not synced to the driver's turning
of the steering wheel. Always be careful and check the area to the vehicle's rear and the
surrounding area directly with your eyes while backing up.
Rear View Monitor Operation
The operation of the rear view monitor when reversing the vehicle varies\
depending on
the traffic, road, and vehicle conditions. The amount of steering and the timing also varies
depending on conditions, so confirm the surrounding conditions directly with your eyes and
steer the vehicle in accordance with the conditions.
Be well aware of the above cautions prior to using the rear view monitor.
NOTE
Images displayed on the monitor from the rear view parking camera are reversed images
(mirror images).
Mazda6_8FH2-EA-16F_Edition2.indb 1662016/07/07 13:45:23
Page 378 of 578

5–84
Interior Features
Interior Equipment
*Some models.
Sunvisors
When you need a sunvisor, lower it for use
in front or swing it to the side.
Sunvisor
Side Extension Sunvisors*
The visor extender extends the sunvisor's
range of sun shading.
To use, pull it out.
CAUTION
When moving the sunvisor, retract the
visor extender to its original position.
Otherwise, the visor extender could hit
the rearview mirror.
Vanity Mirrors
To use the vanity mirror, lower the
sunvisor.
If your vehicle is equipped with a vanity
mirror light, it will illuminate when you
open the cover.
To prevent the battery from being
discharged, the vanity mirror will only
illuminate in the tilt range shown in the
figure.
of f
off
on
Mazda6_8FH2-EA-16F_Edition2.indb 842016/07/07 13:46:03
Page 431 of 578

6–45
Maintenance and Care
Owner Maintenance
Light Bulbs
Overhead lights/
Front map lights
V anity mirror
lights
Headlights (Low beam)
Headlights (High beam) Daytime running lights/
P arking lights
Headlights (Lo w beam)
Headlights (High beam)/
Daytime running lights
Front turn signal lights/
Front side-marker lights
P arking lights Brake lights/T
aillights
Rear side-marker lights
Rear turn signal lights
T
aillights (T runk lid side)
Re
verse lights
High-mount
brake light
License plate lights
T
runk light
Rear map lights
Side turn signal lights Courtesy lights
Ov erhead lights/
Front map lights Side turn signal lights Courtesy lights
With LED Headlights
With Halogen Headlights
V anity mirror
lights
F og lights
Some models.
Brake lights Brake lights/T aillights
T aillights
Rear side-marker lights
Rear turn signal lights
T
aillights (T runk lid side)
Re
verse lights
High-mount
brake light
License plate lights
T
runk light
Rear map lights
Signature wing illumination
F
og lights
Front turn signal lights/
Front side-marker lights
Mazda6_8FH2-EA-16F_Edition2.indb 452016/07/07 13:46:16
Page 441 of 578

6–55
Maintenance and Care
Owner Maintenance
*Some models.
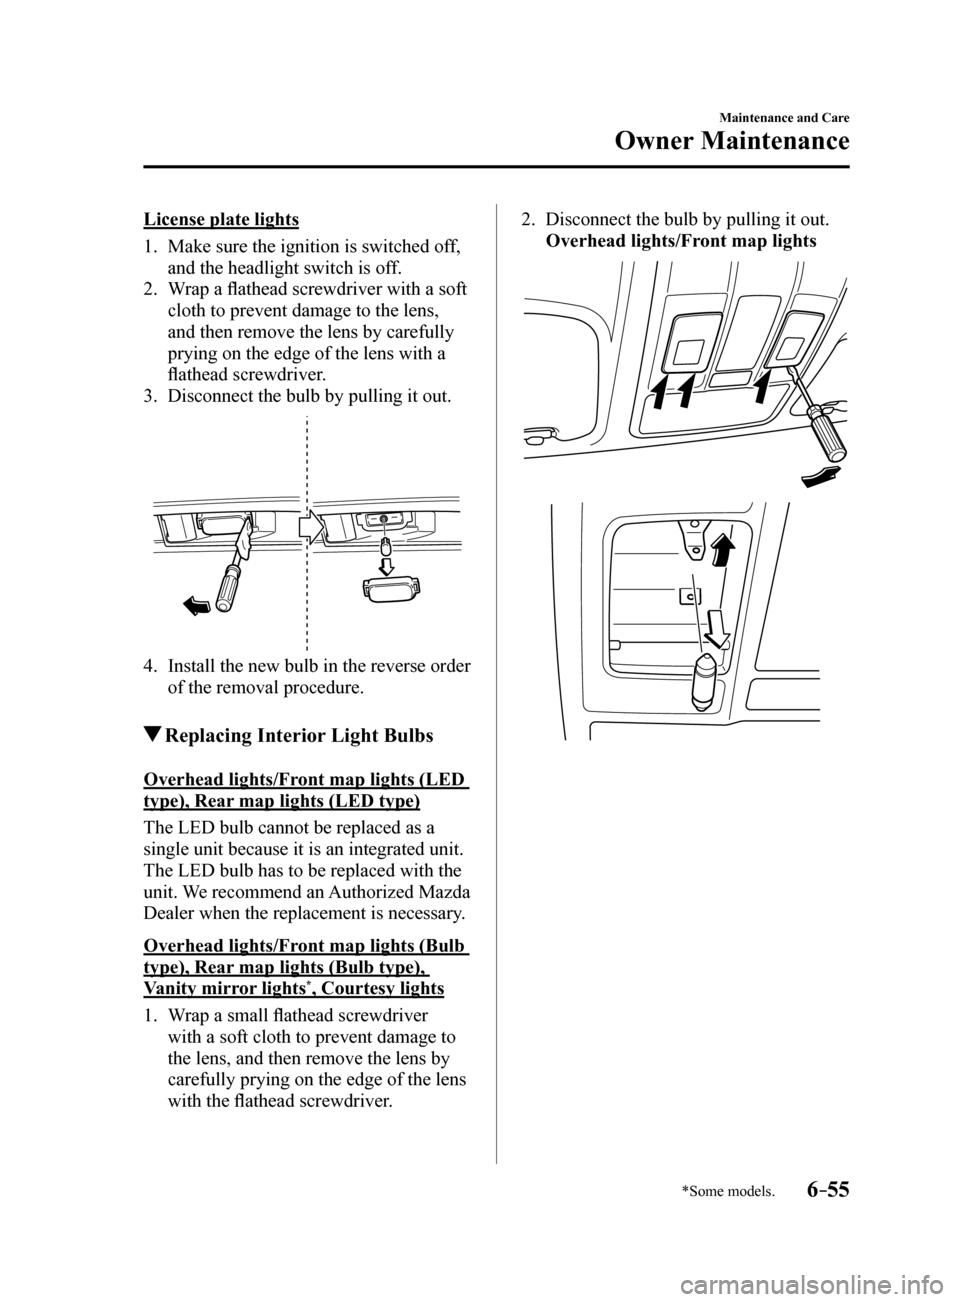
License plate lights
1. Make sure the ignition is switched off,
and the headlight switch is off.
2. Wrap a flathead screwdriver with a soft
cloth to prevent damage to the lens,
and then remove the lens by carefully
prying on the edge of the lens with a
flathead screwdriver.
3. Disconnect the bulb by pulling it out.
4. Install the new bulb in the reverse order
of the removal procedure.
Replacing Interior Light Bulbs
Overhead lights/Front map lights (LED
type), Rear map lights (LED type)
The LED bulb cannot be replaced as a
single unit because it is an integrated unit.
The LED bulb has to be replaced with the
unit. We recommend an Authorized Mazda
Dealer when the replacement is necessary.
Overhead lights/Front map lights (Bulb
type), Rear map lights (Bulb type),
Vanity mirror lights
*, Courtesy lights
1. Wrap a small flathead screwdriver
with a soft cloth to prevent damage to
the lens, and then remove the lens by
carefully prying on the edge of the lens
with the flathead screwdriver. 2.
Disconnect the bulb by pulling it out.
Overhead lights/Front map lights
Mazda6_8FH2-EA-16F_Edition2.indb 552016/07/07 13:46:20
Page 442 of 578

6–56
Maintenance and Care
Owner Maintenance
*Some models.
Rear map lights
Vanity mirror lights*
Courtesy lights
3. Install the new bulb in the reverse order
of the removal procedure.
Trunk light
1. Press both sides of the lens cap to
remove it.
2. Disconnect the bulb by pulling it out.
3. Install the new bulb in the reverse order
of the removal procedure.
Mazda6_8FH2-EA-16F_Edition2.indb 562016/07/07 13:46:21