Page 265 of 564

Park the booster vehicle close to the hood
of the disabled vehicle, making sure the two
vehicles do not touch.
Connecting the Jumper Cables
WARNINGS
Do not attach the cables to fuel lines,
engine rocker covers, the intake
manifold or electrical components as
grounding points. Stay clear of moving parts.
To avoid reverse polarity connections, make
sure that you correctly identify the positive
(+) and negative (-) terminals on both the
disabled and booster vehicles before
connecting the cables. Do not attach the end of the positive
cable to the studs or L-shaped eyelet
located above the positive (+) terminal of
your vehicle ’s battery. High current may flow
through and cause damage to the fuses. Do not connect the end of the second
cable to the negative (-) terminal of the
battery to be jumped. A spark may cause an
explosion of the gases that surround the
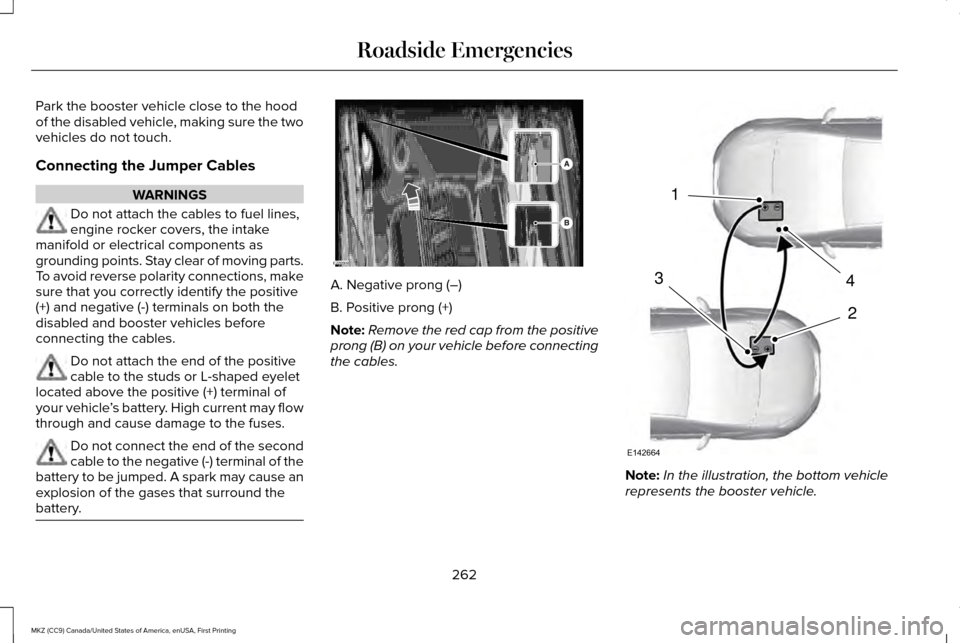
battery. A. Negative prong (–)
B. Positive prong (+)
Note:
Remove the red cap from the positive
prong (B) on your vehicle before connecting
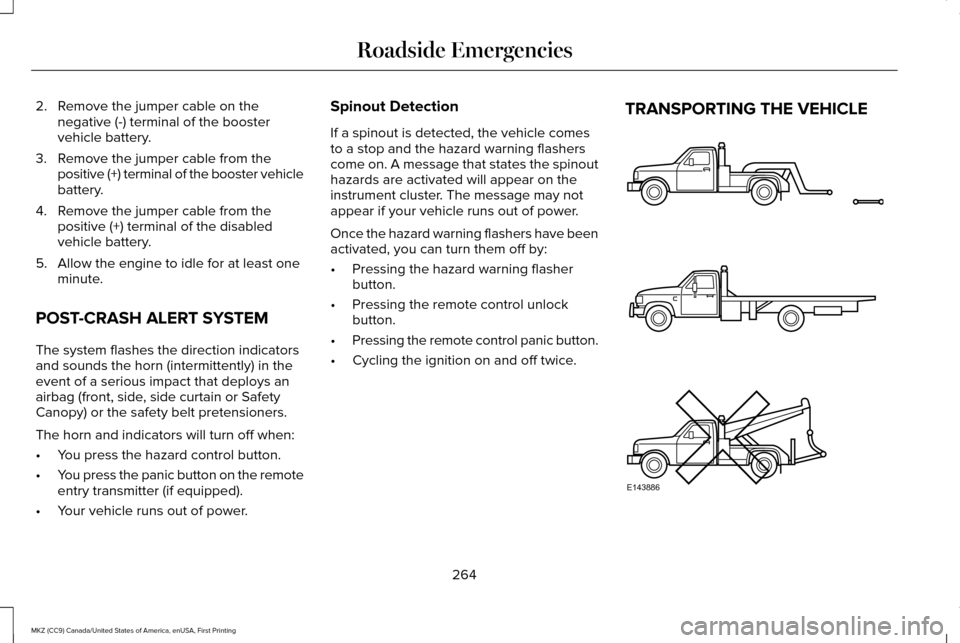
the cables. Note:
In the illustration, the bottom vehicle
represents the booster vehicle.
262
MKZ (CC9) Canada/United States of America, enUSA, First Printing Roadside EmergenciesE226509 4
2
1
3
E142664
Page 267 of 564

2. Remove the jumper cable on the
negative (-) terminal of the booster
vehicle battery.
3. Remove the jumper cable from the positive (+) terminal of the booster vehicle
battery.
4. Remove the jumper cable from the positive (+) terminal of the disabled
vehicle battery.
5. Allow the engine to idle for at least one minute.
POST-CRASH ALERT SYSTEM
The system flashes the direction indicators
and sounds the horn (intermittently) in the
event of a serious impact that deploys an
airbag (front, side, side curtain or Safety
Canopy) or the safety belt pretensioners.
The horn and indicators will turn off when:
• You press the hazard control button.
• You press the panic button on the remote
entry transmitter (if equipped).
• Your vehicle runs out of power. Spinout Detection
If a spinout is detected, the vehicle comes
to a stop and the hazard warning flashers
come on. A message that states the spinout
hazards are activated will appear on the
instrument cluster. The message may not
appear if your vehicle runs out of power.
Once the hazard warning flashers have been
activated, you can turn them off by:
•
Pressing the hazard warning flasher
button.
• Pressing the remote control unlock
button.
• Pressing the remote control panic button.
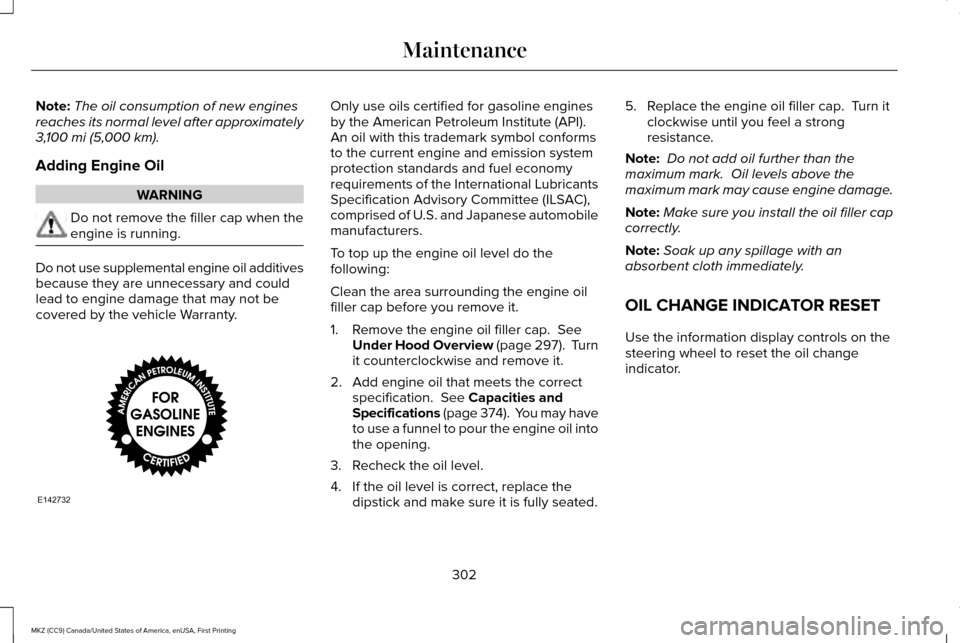
• Cycling the ignition on and off twice. TRANSPORTING THE VEHICLE
264
MKZ (CC9) Canada/United States of America, enUSA, First Printing Roadside EmergenciesE143886
Page 278 of 564
FUSE SPECIFICATION CHART
Power Distribution Box
WARNINGS
Always disconnect the battery before
servicing high-current fuses. WARNINGS
To reduce risk of electrical shock,
always replace the cover to the power
distribution box before reconnecting the
battery or refilling fluid reservoirs. The power distribution box is in the engine
compartment. It has high-current fuses that
protect your vehicle's main electrical systems
from overloads.
If you disconnect and reconnect the battery,
you will need to reset some features. See
Changing the 12V Battery (page 312).
275
MKZ (CC9) Canada/United States of America, enUSA, First Printing Fuses
Page 295 of 564
CHANGING A FUSE
Fuses
WARNING
Always replace a fuse with one that
has the specified amperage rating.
Using a fuse with a higher amperage rating
can cause severe wire damage and could
start a fire. If electrical components in the vehicle are
not working, a fuse may have blown. Blown
fuses are identified by a broken wire within
the fuse. Check the appropriate fuses before
replacing any electrical components.
292
MKZ (CC9) Canada/United States of America, enUSA, First Printing FusesE217331
Page 298 of 564

GENERAL INFORMATION
Have your vehicle serviced regularly to help
maintain its roadworthiness and resale value.
There is a large network of authorized
dealers that are there to help you with their
professional servicing expertise. We believe
that their specially trained technicians are
best qualified to service your vehicle properly
and expertly. They are supported by a wide
range of highly specialized tools developed
specifically for servicing your vehicle.
If your vehicle requires professional service,
an authorized dealer can provide the
necessary parts and service. Check your
warranty information to find out which parts
and services are covered.
Use only recommended fuels, lubricants,
fluids and service parts conforming to
specifications. Motorcraft® parts are
designed and built to provide the best
performance in your vehicle.
Precautions
•
Do not work on a hot engine.
• Make sure that nothing gets caught in
moving parts.
• Do not work on a vehicle with the engine
running in an enclosed space, unless you
are sure you have enough ventilation.
• Keep all open flames and other burning
material (such as cigarettes) away from
the battery and all fuel related parts.
Working with the Engine Off
1. Set the parking brake and shift to park (P).
2. Switch off the engine.
3. Block the wheels.
Working with the Engine On WARNING
To reduce the risk of vehicle damage
and/or personal burn injuries, do not
start your engine with the air cleaner
removed and do not remove it while the
engine is running. 1. Set the parking brake and shift to park
(P).
2. Block the wheels.
OPENING AND CLOSING THE
HOOD 1. To open the hood, go inside the vehicle
and pull the hood release handle located
under the left-hand side of the instrument
panel.
295
MKZ (CC9) Canada/United States of America, enUSA, First Printing MaintenanceE142457
Page 299 of 564
2.
Go to the front of the vehicle and find the
secondary release lever, which is located
under the front of the hood, near the
Lincoln badge.
3. Release the hood latch by pushing the secondary release lever to your left,
toward the passenger side of the vehicle. 4. Raise the hood. A gas strut will support
the hood.
5. To close the hood, lower the hood and apply closing force to the hood as it
drops the last 8 to 11 inches (20 to 30
centimeters). Note:
Make sure that the hood is closed fully
before operating your vehicle. A warning
indicator will appear in the information
display if not closed properly.
296
MKZ (CC9) Canada/United States of America, enUSA, First Printing Maintenance
Page 305 of 564

Note:
The oil consumption of new engines
reaches its normal level after approximately
3,100 mi (5,000 km).
Adding Engine Oil WARNING
Do not remove the filler cap when the
engine is running.
Do not use supplemental engine oil additives
because they are unnecessary and could
lead to engine damage that may not be
covered by the vehicle Warranty. Only use oils certified for gasoline engines
by the American Petroleum Institute (API).
An oil with this trademark symbol conforms
to the current engine and emission system
protection standards and fuel economy
requirements of the International Lubricants
Specification Advisory Committee (ILSAC),
comprised of U.S. and Japanese automobile
manufacturers.
To top up the engine oil level do the
following:
Clean the area surrounding the engine oil
filler cap before you remove it.
1. Remove the engine oil filler cap.
See
Under Hood Overview (page 297). Turn
it counterclockwise and remove it.
2. Add engine oil that meets the correct specification.
See Capacities and
Specifications (page 374). You may have
to use a funnel to pour the engine oil into
the opening.
3. Recheck the oil level.
4. If the oil level is correct, replace the dipstick and make sure it is fully seated. 5. Replace the engine oil filler cap. Turn it
clockwise until you feel a strong
resistance.
Note: Do not add oil further than the
maximum mark. Oil levels above the
maximum mark may cause engine damage.
Note: Make sure you install the oil filler cap
correctly.
Note: Soak up any spillage with an
absorbent cloth immediately.
OIL CHANGE INDICATOR RESET
Use the information display controls on the
steering wheel to reset the oil change
indicator.
302
MKZ (CC9) Canada/United States of America, enUSA, First Printing MaintenanceE142732
Page 306 of 564

From the main menu scroll to:
Action and description
Message
Press the right arrow button,
then from this menu scroll to
the following message.
Settings
Press the right arrow button,
then from this menu scroll to
the following message.
Vehicle
Press the right arrow button,
then from this menu scroll to
the following message.
Oil Life
Press and hold the OK button
until the instrument cluster
displays the following
message.
Hold OK to
Reset
Reset Successful
When the oil change indicator
resets the instrument cluster
displays 100%.
Remaining Life
{00}% Action and description
Message
If the instrument cluster
displays one of the following
messages, repeat the
process.
Not Reset
Reset Cancelled
ENGINE COOLANT CHECK WARNINGS
Do not add engine coolant when the
engine is hot. Steam and scalding
liquids released from a hot cooling system
can burn you badly. Also, spilling coolant on
hot engine parts can burn you. Do not put engine coolant in the
windshield washer fluid container. If
sprayed on the windshield, engine coolant
could make it difficult to see through the
windshield. WARNINGS
To reduce the risk of personal injury,
make sure the engine is cool before
unscrewing the coolant pressure relief cap.
The cooling system is under pressure. Steam
and hot liquid can come out forcefully when
you loosen the cap slightly. Do not add coolant further than the
MAX mark.
When the engine is cold, check the
concentration and level of the coolant at the
intervals listed in the scheduled maintenance
information.
See Scheduled Maintenance
(page 495).
Note: Make sure that the coolant level is
between the
MIN and MAX marks on the
coolant reservoir.
Note: Coolant expands when it is hot. The
level may extend beyond the
MAX mark.
303
MKZ (CC9) Canada/United States of America, enUSA, First Printing Maintenance