2017 LINCOLN MKC Light assembly
[x] Cancel search: Light assemblyPage 89 of 538
GENERAL INFORMATION
Condensation in Lamp Assemblies
Exterior lamps have vents to accommodate
normal changes in air pressure.
Condensation can be a natural by-product
of this design. When moist air enters the
lamp assembly through the vents, there is a
possibility that condensation can occur when
the temperature is cold. When normal
condensation occurs, a fine mist can form on
the interior of the lens. The fine mist
eventually clears and exits through the vents
during normal operation.
Clearing time may take as long as 48 hours
under dry weather conditions.
Examples of acceptable condensation are:
•
The presence of a fine mist (no streaks,
drip marks or large droplets).
• A fine mist covers less than 50% of the
lens. Examples of unacceptable condensation are:
•
A water puddle inside the lamp.
• Streaks, drip marks or large droplets
present on the interior of the lens.
If you see any unacceptable condensation,
have your vehicle checked by an authorized
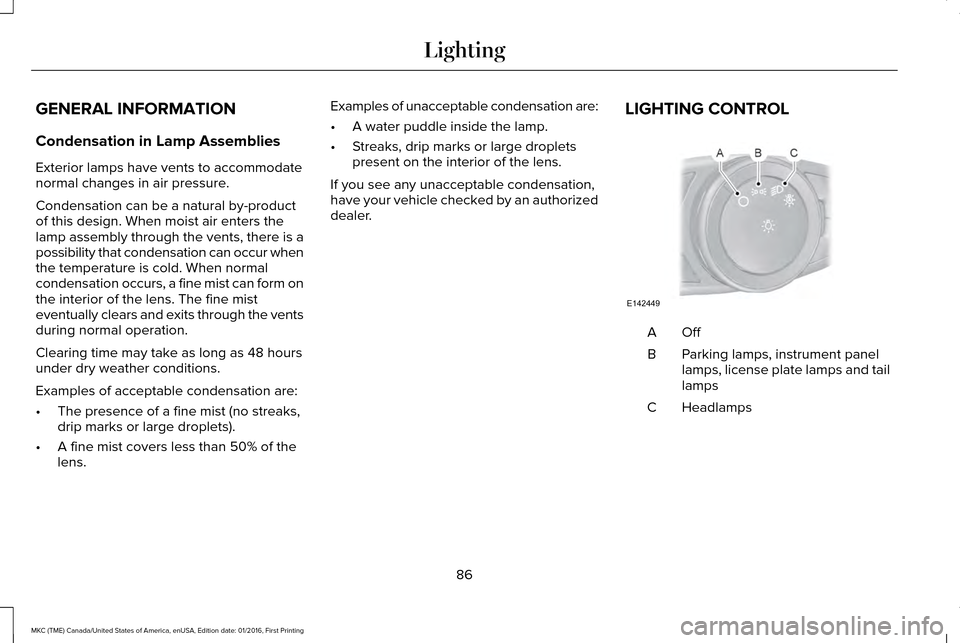
dealer. LIGHTING CONTROL OffA
Parking lamps, instrument panel
lamps, license plate lamps and tail
lamps
B
Headlamps
C
86
MKC (TME) Canada/United States of America, enUSA, Edition date: 01/2016, First Printing LightingE142449
Page 302 of 538

Rear Window Wiper Blade
1. Lift the wiper arm.
Note:
Do not hold the wiper blade when
lifting the wiper arm.
Note: Make sure that the wiper arm does
not spring back against the glass when the
wiper blade is not attached.
2. Remove the wiper blade. Note:
Make sure that the wiper blade locks
into place.
ADJUSTING THE HEADLAMPS
Vertical Aim Adjustment
The assembly plant properly aims the
headlamps on your vehicle. If your vehicle
has been in an accident, have the alignment
of your headlamps checked by your
authorized dealer. 8 feet (2.4 meters)
A
Center height of lamp to ground
B 25 feet (7.6 meters)
C
Horizontal reference line
D
1. Park the vehicle directly in front of a wall
or screen on a level surface,
approximately 25 feet (7.6 meters) away.
2. Measure the height of the headlamp bulb
center from the ground and mark an 8
foot (2.4 meter) horizontal reference line
on the vertical wall or screen at this
height.
Note: To see a clearer light pattern for
adjusting, you may want to block the light
from one headlamp while adjusting the
other.
3. Switch on the low beam headlamps to light the wall or screen and open the
hood.
299
MKC (TME) Canada/United States of America, enUSA, Edition date: 01/2016, First Printing MaintenanceE183236 E142592
Page 303 of 538

4. On the wall or screen, you will observe
a flat zone of high intensity light located
at the top of the right hand portion of the
beam pattern. If the top edge of the high
intensity light zone is not at the horizontal
reference line, you will need to adjust the
headlamp. 5. Locate the vertical adjuster on each
headlamp. Turn the adjuster either
clockwise or counterclockwise in order
to aim the headlamp.
6. Close the hood and switch off the lamps.
Horizontal Aim Adjustment
Horizontal aim is not required for this vehicle
and is non-adjustable. REMOVING A HEADLAMP
To gain access to the headlamp securing
bolts and to remove the headlamp assembly,
you must first remove the front fascia and
front bumper assemblies. We recommend
you see an authorized dealer.
CHANGING A BULB WARNINGS
Switch all of the lamps and the ignition
off. Failure to follow this warning could
result in serious personal injury. Bulbs can become hot. Let the bulb
cool down before removing it. Failure
to do so could result in personal injury. Install in the reverse order unless otherwise
stated.
High Intensity Discharge Headlamp (If
Equipped)
These lamps operate at a high voltage. See
an authorized dealer if they fail.
300
MKC (TME) Canada/United States of America, enUSA, Edition date: 01/2016, First Printing MaintenanceE142465 E171165
Page 304 of 538

Front Direction Indicator
1. Remove the headlamp. See Removing
a Headlamp (page 300).
2. Turn the bulb holder counterclockwise and remove it.
3. Remove the bulb by pulling it straight out.
LED Lamps
LED lamps are not serviceable items. See an
authorized dealer if they fail. The following lamps are LED:
•
Side direction indicators.
• Approach lamp.
• Brake and rear lamps.
• Rear direction indicators.
• Reversing lamps.
• Central high mounted brake lamp.
License Plate Lamp 1. Use a suitable tool, for example a
screwdriver, to carefully remove the
lamp.
2. Remove the lamp.
3. Turn the bulb holder counterclockwise and remove it.
4. Remove the bulb by pulling it straight out.
BULB SPECIFICATION CHART
The specified replacement bulbs are in the
chart below. Headlamp bulbs must be
marked with an authorized D.O.T.
(Department of Transportation) for North
America to affirm lamp performance, light
brightness and pattern and safe visibility. The
correct bulbs will not damage the lamp
assembly or void the lamp assembly warranty
and will provide quality bulb burn time.
301
MKC (TME) Canada/United States of America, enUSA, Edition date: 01/2016, First Printing MaintenanceE171167 3
2
1
E72789
Page 322 of 538
*Standard load: A class of P-metric or
Metric tires designed to carry a
maximum load at set pressure. For
example: For P-metric tires
35 psi
(2.4 bar) or 36 psi (2.5 bar) depending
on tires size and for Metric tires 36 psi
(2.5 bar). Increasing the inflation
pressure beyond this pressure will not
increase the tire ’s load carrying
capability.
*
Extra load: A class of P-metric or Metric
tires designed to carry a heavier
maximum load at
42 psi (2.9 bar).
Increasing the inflation pressure beyond
this pressure will not increase the tire ’s
load carrying capability.
*
kPa: Kilopascal, a metric unit of air
pressure.
*PSI: Pounds per square inch, a standard
unit of air pressure.
*
Cold tire pressure: The tire pressure
when the vehicle has been stationary
and out of direct sunlight for an hour or
more and prior to the vehicle being
driven for
1 mi (1.6 km). *
Recommended inflation pressure: The
cold inflation pressure found on the
Safety Compliance Certification Label
(affixed to either the door hinge pillar,
door-latch post, or the door edge that
meets the door-latch post, next to the
driver's seating position), or Tire Label
located on the B-Pillar or the edge of the
driver door.
*
B-pillar: The structural member at the
side of the vehicle behind the front door.
*
Bead area of the tire: Area of the tire
next to the rim.
*
Sidewall of the tire: Area between the
bead area and the tread.
*
Tread area of the tire: Area of the
perimeter of the tire that contacts the
road when mounted on the vehicle.
*
Rim: The metal support (wheel) for a
tire or a tire and tube assembly upon
which the tire beads are seated. Information Contained on the Tire
Sidewall
Both United States and Canada Federal
regulations require tire manufacturers
to place standardized information on the
sidewall of all tires. This information
identifies and describes the fundamental
characteristics of the tire and also
provides a U.S. DOT Tire Identification
Number for safety standard certification
and in case of a recall.
319
MKC (TME) Canada/United States of America, enUSA, Edition date: 01/2016, First Printing Wheels and Tires
Page 336 of 538

The tire pressure monitoring system
complies with part 15 of the FCC rules and
with RSS-210 of Industry Canada. Operation
is subject to the following two conditions: (1)
This device may not cause harmful
interference, and (2) This device must accept
any interference received, including
interference that may cause undesired
operation.
Changing Tires With a Tire Pressure
Monitoring System Note:
Each road tire is equipped with a tire
pressure sensor located inside the wheel
and tire assembly cavity. The pressure
sensor is attached to the valve stem. The
pressure sensor is covered by the tire and
is not visible unless the tire is removed. Take
care when changing the tire to avoid
damaging the sensor
You should always have your tires serviced
by an authorized dealer.
Check the tire pressure periodically (at least
monthly) using an accurate tire gauge. See
Inflating Your Tires in this chapter. Understanding Your Tire Pressure
Monitoring System
The tire pressure monitoring system
measures pressure in your four road tires
and sends the tire pressure readings to your
vehicle. The low tire pressure warning light
will turn on if the tire pressure is significantly
low. Once the light is illuminated, your tires
are under-inflated and need to be inflated to
the manufacturer’
s recommended tire
pressure. Even if the light turns on and a
short time later turns off, your tire pressure
still needs to be checked.
When Your Temporary Spare Tire is
Installed
When one of your road tires needs to be
replaced with the temporary spare, the
system will continue to identify an issue to
remind you that the damaged road wheel
and tire assembly needs to be repaired and
put back on your vehicle.
To restore the full function of the tire
pressure monitoring system, have the
damaged road wheel and tire assembly
repaired and remounted on your vehicle.
333
MKC (TME) Canada/United States of America, enUSA, Edition date: 01/2016, First Printing Wheels and TiresE142549
Page 338 of 538

Customer action required
Possible cause
Low tire pressure warning light
Make sure tires are at the proper pressure. See Inflating your tires
in this chapter. After inflating your tires to the manufacturer’s
recommended pressure as shown on the Tire Label (located on
the edge of driver’ s door or the B-Pillar), the vehicle must be driven
for at least two minutes over 20 mph (32 km/h) before the light
turns off.
Tire(s) under-inflated
Solid warning light
Repair the damaged road wheel and tire assembly and reinstall
it on the vehicle to restore system function. For a description on
how the system functions, see When your temporary spare tire
is installed in this section.
Spare tire in use
If the tires are properly inflated and the spare tire is not in use but
the light remains on, contact your authorized dealer as soon as
possible.
TPMS malfunction
Repair the damaged road wheel and tire assembly and reinstall
it on the vehicle to restore system function. For a description on
how the system functions, see
When your temporary spare tire
is installed in this section.
Spare tire in use
Flashing warning light
If the tires are properly inflated and the spare tire is not in use but
the light remains on, contact your authorized dealer as soon as
possible.
TPMS malfunction
335
MKC (TME) Canada/United States of America, enUSA, Edition date: 01/2016, First Printing Wheels and Tires