2017 LINCOLN MKC safety bag
[x] Cancel search: safety bagPage 108 of 538

Door Ajar
Displays when the ignition is on
and any door is not completely
closed.
Electric Park Brake It will illuminate or flash when the
electric parking brake has a
malfunction. See Electric Parking
Brake (page 185).
Engine Coolant Temperature Illuminates when the engine
coolant temperature is high. Stop
the vehicle as soon as possible,
switch off the engine and let cool.
See
Engine Coolant Check (page 291). Engine Oil If it illuminates with the engine
running or when you are driving,
this indicates a malfunction. Stop
your vehicle as soon as it is safe to do so
and switch the engine off. Check the engine
oil level. See Engine Oil Check (page 290).
Note: Do not resume your journey if it
illuminates despite the level being correct.
Have the system checked by your authorized
dealer immediately.
Fasten Safety Belt It will illuminate and a chime will
sound to remind you to fasten your
safety belt.
See Seatbelt
Reminder (page 36).
Front Airbag If it fails to illuminate when you
start your vehicle, continues to
flash or remains on, it indicates a
malfunction. Have the system checked by
an authorized dealer. Heads Up Display
(If Equipped) A red beam of lights will illuminate
on the windshield in certain
instances when using adaptive
cruise control or the collision warning system.
It will also illuminate momentarily when you
start your vehicle to make sure the display
works.
High Beam It will illuminate when you switch
the high beam headlamps on. It
will flash when you use the
headlamp flasher.
Hood Ajar Displays when the ignition is on
and the hood is not completely
closed.
Low Fuel Level It will illuminate when the fuel level
is low or the fuel tank is nearly
empty. Refuel as soon as possible.
105
MKC (TME) Canada/United States of America, enUSA, Edition date: 01/2016, First Printing Instrument Cluster E146190 E156133 E159324
Page 141 of 538

SITTING IN THE CORRECT
POSITION
WARNINGS
Sitting improperly, out of position or
with the seatback reclined too far can
take weight off the seat cushion and affect
the decision of the passenger sensing
system, resulting in serious injury or death
in the event of a crash. Always sit upright
against your seat back, with your feet on the
floor. Do not recline the seatback as this can
cause the occupant to slide under the
safety belt, resulting in serious injury in the
event of a crash. Do not place objects higher than the
seatback to reduce the risk of serious
injury in the event of a crash or during heavy
braking. When you use them properly, the seat, head
restraint, safety belt and airbags will provide
optimum protection in the event of a crash.
We recommend that you follow these
guidelines:
•
Sit in an upright position with the base of
your spine as far back as possible.
• Do not recline the seatback more than
30 degrees.
• Adjust the head restraint so that the top
of it is level with the top of your head and
as far forward as possible. Make sure that
you remain comfortable. •
Keep sufficient distance between
yourself and the steering wheel. We
recommend a minimum of 10 in (25 cm)
between your breastbone and the airbag
cover.
• Hold the steering wheel with your arms
slightly bent.
• Bend your legs slightly so that you can
press the pedals fully.
• Position the shoulder strap of the safety
belt over the center of your shoulder and
position the lap strap tightly across your
hips.
Make sure that your driving position is
comfortable and that you can maintain full
control of your vehicle.
HEAD RESTRAINTS WARNINGS
Fully adjust the head restraint before
you sit in or operate your vehicle. This
will help minimize the risk of neck injury in
the event of a crash. Do not adjust the head
restraint when your vehicle is moving.
138
MKC (TME) Canada/United States of America, enUSA, Edition date: 01/2016, First Printing SeatsE68595
Page 242 of 538

The gross combined weight must never
exceed the Gross Combined Weight
Rating.
Note:
For trailer towing information
refer to the RV and Trailer Towing Guide
available at an authorized dealer. WARNINGS
Do not exceed the GVWR or the
GAWR specified on the Safety
Compliance Certification label. Do not use replacement tires with
lower load carrying capacities than
the original tires because they may
lower your vehicle ’s GVWR and GAWR
limitations. Replacement tires with a
higher limit than the original tires do not
increase the GVWR and GAWR
limitations. Exceeding any vehicle weight
rating limitation could result in
serious damage to your vehicle,
personal injury or both. Steps for determining the correct load
limit:
1.
Locate the statement "The combined
weight of occupants and cargo
should never exceed XXX kg or XXX
lb." on your vehicle ’s placard.
2. Determine the combined weight of
the driver and passengers that will
be riding in your vehicle.
3. Subtract the combined weight of the
driver and passengers from XXX kg
or XXX lb.
4. The resulting figure equals the available amount of cargo and
luggage load capacity. For example,
if the “XXX” amount equals 1,400 lb.
and there will be five 150 lb.
passengers in your vehicle, the
amount of available cargo and
luggage load capacity is 650 lb.
(1400-750 (5 x 150) = 650 lb.) 5.
Determine the combined weight of
luggage and cargo being loaded on
the vehicle. That weight may not
safely exceed the available cargo
and luggage load capacity calculated
in Step 4.
6. If your vehicle will be towing a trailer,
load from your trailer will be
transferred to your vehicle. Consult
this manual to determine how this
reduces the available cargo and
luggage load capacity of your
vehicle.
Helpful examples for calculating the
available amount of cargo and
luggage load capacity
Suppose your vehicle has a 1400-pound
(635-kilogram) cargo and luggage
capacity. You decide to go golfing. Is
there enough load capacity to carry you,
four of your friends and all the golf bags?
You and four friends average 220
pounds (99 kilograms) each and the golf
bags weigh approximately 30 pounds
(13.5 kilograms) each. The calculation
would be: 1400 - (5 x 220) - (5 x 30) =
239
MKC (TME) Canada/United States of America, enUSA, Edition date: 01/2016, First Printing Load Carrying
Page 243 of 538

1400 - 1100 - 150 = 150 pounds. Yes, you
have enough load capacity in your
vehicle to transport four friends and your
golf bags. In metric units, the calculation
would be: 635 kilograms - (5 x 99
kilograms) - (5 x 13.5 kilograms) = 635 -
495 - 67.5 = 72.5 kilograms.
Suppose your vehicle has a 1400-pound
(635-kilogram) cargo and luggage
capacity. You and one of your friends
decide to pick up cement from the local
home improvement store to finish that
patio you have been planning for the
past two years. Measuring the inside of
the vehicle with the rear seat folded
down, you have room for twelve
100-pound (45-kilogram) bags of
cement. Do you have enough load
capacity to transport the cement to your
home? If you and your friend each weigh
220 pounds (99 kilograms), the
calculation would be: 1400 - (2 x 220) -
(12 x 100) = 1400 - 440 - 1200 = - 240
pounds. No, you do not have enough
cargo capacity to carry that much
weight. In metric units, the calculation
would be: 635 kilograms - (2 x 99
kilograms) - (12 x 45 kilograms) = 635 -
198 - 540 = -103 kilograms. You will need
to reduce the load weight by at least
240 pounds (104 kilograms). If you
remove three 100-pound (45-kilogram)
cement bags, then the load calculation
would be:1400 - (2 x 220) - (9 x 100) =
1400 - 440 - 900 = 60 pounds. Now you
have the load capacity to transport the
cement and your friend home. In metric
units, the calculation would be: 635
kilograms - (2 x 99 kilograms) - (9 x 45
kilograms) = 635 - 198 - 405 = 32
kilograms.
The above calculations also assume that
the loads are positioned in your vehicle
in a manner that does not overload the
front or the rear gross axle weight rating
specified for your vehicle on the Safety
Compliance Certification label.
Special Loading Instructions for
Owners of Pick-up Trucks and Utility-
type Vehicles WARNING
Loaded vehicles may handle
differently than unloaded vehicles.
Take extra precautions, such as slower
speeds and increased stopping
distance, when driving a heavily loaded
vehicle. 240
MKC (TME) Canada/United States of America, enUSA, Edition date: 01/2016, First Printing Load Carrying
Page 259 of 538

WARNING
Do not connect the end of the second
cable to the negative (-) terminal of the
battery to be jumped. A spark may cause an
explosion of the gases that surround the
battery. Jump Starting
1. Start the engine of the booster vehicle
and rev the engine moderately, or press
the accelerator gently to keep your
engine speed between 2000 and 3000
rpms, as shown in your tachometer.
2. Start the engine of the disabled vehicle.
3. After starting the disabled vehicle, run both vehicle engines for an additional
three minutes before disconnecting the
jumper cables.
Removing the Jumper Cables
Remove the jumper cables in the reverse
order that they were connected. 1. Remove the jumper cable from the
ground metal surface or connecting
point, if available.
2. Remove the jumper cable on the negative (-) terminal of the booster
vehicle's battery.
3. Remove the jumper cable from the positive (+) terminal of the booster
vehicle's battery.
4. Remove the jumper cable from the positive (+) terminal of the disabled
vehicle's battery.
After starting your disabled vehicle and
removing the jumper cables, allow your
vehicle to idle for several minutes so the
battery can recharge.
POST-CRASH ALERT SYSTEM
The system flashes the direction indicators
and sounds the horn (intermittently) in the
event of a serious impact that deploys an
airbag (front, side, side curtain or Safety
Canopy) or the safety belt pretensioners.
256
MKC (TME) Canada/United States of America, enUSA, Edition date: 01/2016, First Printing Roadside Emergencies4
1
3
2
E142665
Page 311 of 538

When washing:
•
Take care when using a power washer
to clean the engine. The high-pressure
fluid could penetrate the sealed parts
and cause damage.
• Do not spray a hot engine with cold water
to avoid cracking the engine block or
other engine components.
• Spray Motorcraft Engine Shampoo and
Degreaser on all parts that require
cleaning and pressure rinse clean. In
Canada, use Motorcraft Engine Shampoo.
• Never wash or rinse the engine while it
is hot or running; water in the running
engine may cause internal damage.
• Never wash or rinse any ignition coil,
spark plug wire or spark plug well, or the
area in and around these locations.
• Cover the battery, power distribution box,
and air filter assembly to prevent water
damage when cleaning the engine. CLEANING THE WINDOWS AND
WIPER BLADES
Car wash chemicals and environmental
fallout can result in windshield and wiper
blade contamination. Dirty windshield and
wipers will result in poor windshield wiper
operation. Keep the windshield and wiper
blades clean to maintain windshield wiper
performance.
To clean the windshield and wiper blades:
•
Clean the windshield with a non-abrasive
glass cleaner. When cleaning the interior
of the windshield, avoid getting any glass
cleaner on the instrument panel or door
panels. Wipe any glass cleaner off these
surfaces immediately.
• For windshields contaminated with tree
sap, chemicals, wax or bugs, clean the
entire windshield using steel wool (no
greater than 0000 grade) in a circular
motion and rinse with water.
• Clean the wiper blades with isopropyl
rubbing alcohol or windshield washer
concentrate. Note:
Do not use razor blades or other
sharp objects to clean or remove decals from
the inside of the heated rear window. The
vehicle warranty does not cover damage
caused to the heated rear window grid lines.
CLEANING THE INTERIOR WARNINGS
Do not use cleaning solvents, bleach
or dye on the vehicle
’s safety belts, as
these actions may weaken the belt webbing. On vehicles equipped with
seat-mounted airbags, do not use
chemical solvents or strong detergents. Such
products could contaminate the side airbag
system and affect performance of the side
airbag in a collision. Note:
Follow the same procedure for
cleaning leather seats when cleaning leather
interior. See Cleaning Leather Seats (page
311).
308
MKC (TME) Canada/United States of America, enUSA, Edition date: 01/2016, First Printing Vehicle Care
Page 312 of 538
Note:
Do not use household cleaning
products or glass cleaners, which can stain
and discolor the fabric and affect the flame
retardant abilities of the seat materials.
For fabric, carpets, cloth seats, safety belts
and seats equipped with side airbags:
• Remove dust and loose dirt with a
vacuum cleaner.
• Remove light stains and soil with
Motorcraft Professional Strength Carpet
& Upholstery Cleaner. For grease or tar stains:
•
Spot clean the area with Motorcraft Spot
and Stain Remover (Motorcraft
Multi-Purpose Cleaner in Canada).
• If a ring forms on the fabric after spot
cleaning, clean the entire area
immediately (but do not oversaturate) or
the ring will set.
Cleaning Black Label or Presidential
Interior (If Equipped)
Note: Alcantara microfiber cloth fabric is
made of polyester microfiber with
micro-porous polyurethane. Using
commercially available fabric cleaners can
cause permanent damage. Note:
Do not use commercially available
leather and vinyl cleaning products on
Alcantara microfiber cloth fabric.
Note: Lincoln Black Label or Presidential
vehicles may have Alcantara microfiber cloth
fabric on the seats, headliner, floor mats and
door panels.
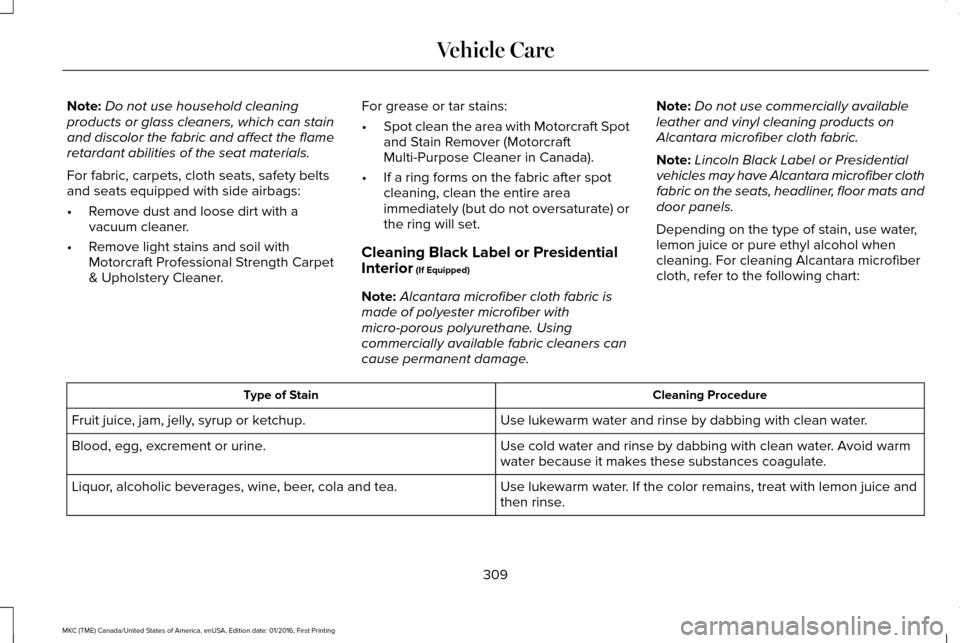
Depending on the type of stain, use water,
lemon juice or pure ethyl alcohol when
cleaning. For cleaning Alcantara microfiber
cloth, refer to the following chart: Cleaning Procedure
Type of Stain
Use lukewarm water and rinse by dabbing with clean water.
Fruit juice, jam, jelly, syrup or ketchup.
Use cold water and rinse by dabbing with clean water. Avoid warm
water because it makes these substances coagulate.
Blood, egg, excrement or urine.
Use lukewarm water. If the color remains, treat with lemon juice and
then rinse.
Liquor, alcoholic beverages, wine, beer, cola and tea.
309
MKC (TME) Canada/United States of America, enUSA, Edition date: 01/2016, First Printing Vehicle Care
Page 380 of 538
•
DISP: Switch the display on or off. You
can also touch the screen to switch the
display back on.
• Temperature, fan and climate control
buttons:
Control the temperature, fan
speed or settings of the climate control
system. See Climate Control (page 133).
911 Assist WARNINGS
Unless the 911 Assist setting is set on
before a crash, the system will not dial
for help which could delay response time,
potentially increasing the risk of serious
injury or death after a crash. Do not wait for 911 Assist to make an
emergency call if you can do it yourself.
Dial emergency services immediately to
avoid delayed response time which could
increase the risk of serious injury or death
after a crash. If you do not hear 911 Assist
within five seconds of the crash, the system
or phone may be damaged or non-functional. WARNINGS
Always place your phone in a secure
location in your vehicle so it does not
become a projectile or get damaged in a
crash. Failure to do so may cause serious
injury to someone or damage the phone
which could prevent 911 Assist from working
properly. Note:
The SYNC 911 Assist feature must be
set on before the incident.
Note: The SYNC 911 Assist feature only
operates in the U.S., Canada or in a territory
in which 911 is the emergency number.
Note: Before setting this feature on, make
sure that you read the 911 Assist Privacy
Notice later in this section for important
information.
Note: If any user sets 911 Assist to on or off,
that setting applies for all paired phones. If
911 Assist is switched off and the phone is
connected to SYNC, an icon displays on the
status bar. Note:
Every phone operates differently.
While SYNC 911 Assist works with most
cellular phones, some may have trouble
using this feature.
If a crash deploys an airbag (excluding knee
airbags and rear inflatable safety belts [if
equipped]) or activates the fuel pump
shut-off, your SYNC-equipped vehicle may
be able to contact emergency services by
dialing 911 through a paired and connected
Bluetooth-enabled phone. You can learn
more about the 911 Assist feature, by visiting: Website
owner.lincoln.com
www.syncmyride.ca
www.syncmaroute.ca
For important information about airbag
deployment and the fuel pump shut-off
please see the Supplementary Restrains and
Roadside Emergencies sections of your
owner manual.
To switch 911 Assist on and off please view
the settings information. See Settings (page
434
).
377
MKC (TME) Canada/United States of America, enUSA, Edition date: 01/2016, First Printing SYNC™ 3