2017 LINCOLN CONTINENTAL air condition
[x] Cancel search: air conditionPage 324 of 584

6. Do not disconnect the sensor.
7. Pull the air filter assembly up to
disconnect it from the seated grommets
located under the air filter assembly.
8. Rotate the air filter assembly 90 degrees
counterclockwise. Make sure the rubber
hose is still connected to the air filter
assembly.
9. Tighten the clamp.
You can now access the transmission fluid
level indicator. Checking the fluid level
Low fluid level
If the fluid level is below the MIN range of
the dipstick, add fluid to reach the hash mark
level.
Note:
If the fluid level is below the MIN level,
do not drive the vehicle. An underfill
condition may cause shift or engagement
concerns or possible damage. Correct fluid level Check the transmission fluid at the normal
operating temperatures between 180°F
(82°C) and 200°F (93°C) on a level surface.
Drive your vehicle until you warm it up to the
normal operating temperature after
approximately 20 mi (30 km).
Target the transmission fluid level within the
cross-hatch area if at the normal operating
temperature between 180°F (82°C) and 200°F
(93°C).
321
Continental (CPL) Canada/United States of America, enUSA, First Printing MaintenanceE173400 E158842 E158843
Page 325 of 584

High fluid level
If the fluid level is above the MAX range of
the dipstick, remove fluid to reach the
hashmark level.
Note:
Fluid level above the MAX level may
cause shift or engagement concerns or
possible damage. An overheating condition
can cause high fluid levels. If you operate
your vehicle for an extended period at high
speeds, in city traffic during hot weather or
pulling a trailer, you should switch your
vehicle off until your vehicle reaches normal
operating temperatures. Depending on
vehicle use, cooling times could take up to
30 minutes or longer. Adjusting Automatic Transmission Fluid
Levels
Before adding any fluid, make sure the
correct type is used. The type of fluid used
is normally indicated on the dipstick and in
the Technical Specifications section in this
chapter.Note:
An overfill condition of transmission
fluid may cause shift or engagement
concerns or possible damage.
Do not use supplemental transmission fluid
additives, treatments or cleaning agents. The
use of these materials may affect
transmission operation and result in damage
to internal transmission components.
Reinstall the air filter assembly. After you
check the fluid level and adjust as necessary,
do the following:
1. Switch the engine off.
2. Loosen the clamp holding the air filter assembly to the rubber hose.
3. Seat the air filter assembly back into the
grommets by pushing down on the air
filter assembly.
4. Tighten the clamp.
5. Install and tighten the two bolts that attach the air filter assembly to the front
of the vehicle.
6. Install the bolt cover.
7. Reinstall the harness retaining clip into the front of the air filter assembly.
322
Continental (CPL) Canada/United States of America, enUSA, First Printing MaintenanceE158844 E158845 E158846
Page 341 of 584

Note:
Test any cleaner or stain remover on
an inconspicuous area.
You should:
• Remove dust and loose dirt with a
vacuum cleaner.
• Clean and treat spills and stains as soon
as possible.
Do not use the following products as these
may damage the leather:
• Oil and petroleum or silicone-based
leather conditioners.
• Household cleaners.
• Alcohol solutions.
• Solvents or cleaners intended specifically
for rubber, vinyl and plastics. REPAIRING MINOR PAINT
DAMAGE
Authorized dealers have touch-up paint to
match your vehicle
’s color. Your vehicle color
code is printed on a sticker on the front,
left-hand side door jamb. Take your color
code to your authorized dealer to make sure
you get the correct color.
Before repairing minor paint damage, use a
cleaner such as Motorcraft Bug and Tar
Remover to remove particles such as bird
droppings, tree sap, insect deposits, tar
spots, road salt and industrial fallout.
Always read the instructions before using
cleaning products.
CLEANING THE WHEELS
Note: Do not apply a cleaning chemical to
warm or hot wheel rims and covers.
Note: Some automatic car washes may
cause damage to the finish on your wheel
rims and covers. Note:
Industrial-strength or heavy-duty
cleaners in combination with brush agitation
to remove brake dust and dirt, could wear
away the clear coat finish over a period time.
Note: Do not use hydrofluoric acid-based or
high caustic-based wheel cleaners, steel
wool, fuels or strong household detergents.
Note: If you intend parking your vehicle for
an extended period after cleaning the
wheels with a wheel cleaner, drive your
vehicle for a few minutes before doing so.
This will reduce the risk of increased
corrosion of the brake discs.
Alloy wheels and wheel covers are coated
with a clear coat paint finish. To maintain
their condition we recommend that you:
• Clean the wheels weekly using
Motorcraft Wheel and Tire Cleaner. Apply
using manufacturer's instructions.
• Use a sponge to remove heavy deposits
of dirt and brake dust accumulation.
338
Continental (CPL) Canada/United States of America, enUSA, First Printing Vehicle Care
Page 345 of 584

depends upon the actual conditions of
their use, however, and may depart
significantly from the norm due to
variations in driving habits, service
practices, and differences in road
characteristics and climate.
Traction AA A B C
WARNING
The traction grade assigned to this
tire is based on straight-ahead
braking traction tests, and does not
include acceleration, cornering,
hydroplaning or peak traction
characteristics. The traction grades, from highest to
lowest are AA, A, B, and C. The grades
represent the tire
’s ability to stop on wet
pavement as measured under controlled
conditions on specified government test
surfaces of asphalt and concrete. A tire
marked C may have poor traction
performance. Temperature A B C WARNING
The temperature grade for this tire
is established for a tire that is
properly inflated and not overloaded.
Excessive speed, underinflation, or
excessive loading, either separately or
in combination, can cause heat buildup
and possible tire failure. The temperature grades are A (the
highest), B and C, representing the tire
’s
resistance to the generation of heat and
its ability to dissipate heat when tested
under controlled conditions on a
specified indoor laboratory test wheel.
Sustained high temperature can cause
the material of the tire to degenerate
and reduce tire life, and excessive
temperature can lead to sudden tire
failure. The grade C corresponds to a
level of performance which all passenger car tires must meet under the
Federal Motor Vehicle Safety Standard
No. 139. Grades B and A represent
higher levels of performance on the
laboratory test wheel than the minimum
required by law.
Glossary of Tire Terminology
•
Tire label: A label showing the
original equipment tire sizes,
recommended inflation pressure and
the maximum weight the vehicle can
carry.
• Tire Identification Number:
A
number on the sidewall of each tire
providing information about the tire
brand and manufacturing plant, tire
size and date of manufacture. Also
referred to as DOT code.
• Inflation pressure: A measure of the
amount of air in a tire.
342
Continental (CPL) Canada/United States of America, enUSA, First Printing Wheels and Tires
Page 353 of 584

Note:
If you overfill the tire, release air
by pressing on the metal stem in the
center of the valve. Then recheck the
pressure with your tire gauge.
4. Replace the valve cap.
5. Repeat this procedure for each tire,
including the spare.
Note: Some spare tires operate at a
higher inflation pressure than the other
tires. For T type mini-spare tires, see the
Dissimilar spare wheel and tire
assembly information for a description.
Store and maintain at 60 psi (4.15 bar).
For full-size and dissimilar spare tires,
see the Dissimilar spare wheel and tire
assembly information for a description.
Store and maintain at the higher of the
front and rear inflation pressure as
shown on the Tire Label.
6. Visually inspect the tires to make
sure there are no nails or other
objects embedded that could poke
a hole in the tire and cause an air
leak. 7. Check the sidewalls to make sure
there are no gouges, cuts or bulges.
Inspecting Your Tires and Wheel Valve
Stems
Periodically inspect the tire treads for
uneven or excessive wear and remove
objects such as stones, nails or glass
that may be wedged in the tread
grooves. Check the tire and valve stems
for holes, cracks, or cuts that may permit
air leakage and repair or replace the tire
and replace the valve stem. Inspect the
tire sidewalls for cracking, cuts, bruises
and other signs of damage or excessive
wear. If internal damage to the tire is
suspected, have the tire demounted and
inspected in case it needs to be repaired
or replaced. For your safety, tires that
are damaged or show signs of excessive
wear should not be used because they
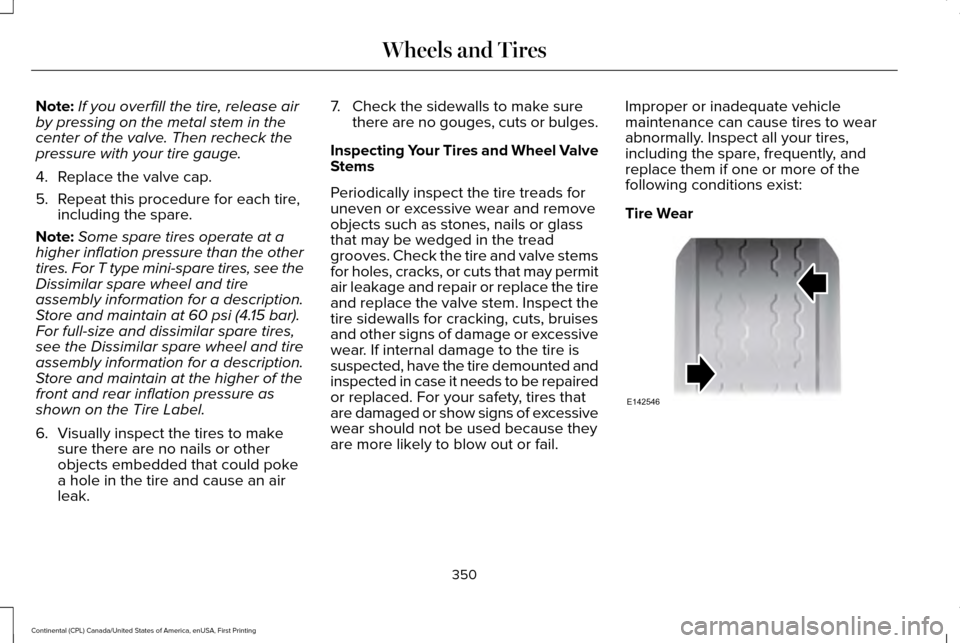
are more likely to blow out or fail. Improper or inadequate vehicle
maintenance can cause tires to wear
abnormally. Inspect all your tires,
including the spare, frequently, and
replace them if one or more of the
following conditions exist:
Tire Wear
350
Continental (CPL) Canada/United States of America, enUSA, First Printing Wheels and TiresE142546
Page 358 of 584

temperatures drop to approximately 45°F
(7°C) or below (depending on tire wear and
environmental conditions) or in snow and ice
conditions. Like any tire, summer tire
performance is affected by tire wear and
environmental conditions. If you must drive
in those conditions, we recommend using
Mud and Snow (M+S, M/S), All-season or
Snow tires.
Always store your summer tires indoors at
temperatures above 20ºF (-7ºC). The rubber
compounds used in these tires lose flexibility
and may develop surface cracks in the tread
area at temperatures below 20ºF (-7ºC). If
the tires have been subjected to 20ºF (-7ºC)
or less, warm them in a heated space to at
least 40ºF (5ºC) for at least 24 hours before
installing them on a vehicle, or moving the
vehicle with the tires installed, or checking
tire inflation. Do not place tires near heaters
or heating devices used to warm the room
where the tires are stored. Do not apply heat
or blow heated air directly on the tires.
Always inspect the tires after storage periods
and before use. USING SNOW CHAINS WARNING
Snow tires must be the same size, load
index, and speed rating as those
originally provided by Ford. Use of any tire
or wheel not recommended by Ford can
affect the safety and performance of your
vehicle, which could result in an increased
risk of loss of vehicle control, vehicle rollover,
personal injury, and death. Additionally, the
use of non-recommended tires and wheels
could cause steering, suspension, axle,
transfer case, or power transfer unit failure.
It is also strongly advised to follow the Ford
recommended tire inflation pressure found
on the Safety Compliance Certification Label
(affixed to either the door hinge pillar,
door-latch post, or the door edge that meets
the door-latch post, next to the driver’ s
seating position), or Tire Label which is
located on the B-Pillar or the edge of the
driver door. Failure to follow the tire pressure
recommendations can cause uneven
treadwear patterns and adversely affect the
way your vehicle handles. The tires on your vehicle may have
all-weather treads to provide traction in rain
and snow. However, in some climates you
may need to use snow chains.
Your vehicle may not be compatible with
snow chain or cable usage with the
factory-fitted wheels and tires. Only certain
chains or snow cables have been approved
by Ford as safe for use on your vehicle with
the following tire size: 235/50R18. You
should only install chains or cables sized at
10 mm or less in dimension as measured on
the sidewall of your tire. Not all S-class snow
chains meet these restrictions. Chains of this
size restriction will include a tensioning
device. The chains should be mounted in
pairs on the front tires only. If you need to
use chains, it is recommended that steel
wheels (of the same size and specification)
be used, as chains may chip aluminum
wheels.
Follow these guidelines when using traction
devices:
355
Continental (CPL) Canada/United States of America, enUSA, First Printing Wheels and Tires
Page 381 of 584

CAPACITIES AND SPECIFICATIONS - 2.7L ECOBOOST™
Capacities
WARNING
The air conditioning refrigerant system contains refrigerant under high \
pressure. Only qualified personnel should service the air
conditioning refrigerant system. Opening the air conditioning refrigeran\
t system can cause personal injury.
Capacity
Item
6.0 qt (5.7 L)
Engine oil (with oil filter).
10.9 qt (10.3 L)
Engine coolant (Front Wheel Drive).
11.0 qt (10.4 L)
Engine coolant (All Wheel Drive).
Between MIN/MAX on brake fluid reservoir
Brake fluid.
16.0–20.8 fl oz (473–615 ml)
Rear differential fluid (All Wheel Drive).
15.2 fl oz (450 ml)*
Power Transfer Unit fluid (All Wheel Drive).
11.6 qt (11 L)
**
Automatic transmission fluid.
Fill as required
Windshield washer fluid.
18.0 gal (68.1 L)
Fuel tank.
378
Continental (CPL) Canada/United States of America, enUSA, First Printing Capacities and Specifications
Page 387 of 584

CAPACITIES AND SPECIFICATIONS - 3.0L ECOBOOST™
Capacities
WARNING
The air conditioning refrigerant system contains refrigerant under high \
pressure. Only qualified personnel should service the air
conditioning refrigerant system. Opening the air conditioning refrigeran\
t system can cause personal injury.
Capacity
Item
6.0 qt (5.7 L)
Engine oil (with oil filter).
11.6 qt (11 L)
Engine coolant.
Between MIN/MAX on brake fluid reservoir
Brake fluid.
16.0–20.8 fl oz (473–615 ml)
Rear differential fluid (All Wheel Drive).
15.2 fl oz (450 ml)*
Power Transfer Unit fluid (All Wheel Drive).
11.6 qt (11 L)
**
Automatic transmission fluid.
Fill as required
Windshield washer fluid.
18.0 gal (68.1 L)
Fuel tank.
384
Continental (CPL) Canada/United States of America, enUSA, First Printing Capacities and Specifications