2017 LINCOLN CONTINENTAL wheel
[x] Cancel search: wheelPage 141 of 584

Navigation Display Area.
D
Status Bar.
E
Speedometer Display Area.
F
Signaling and Traffic Indication
Displays direction indicators, blind spot
information (if direction indicators are active)
and cross traffic alert.
Left Information Group
Displays incoming call information.
ADAS Display Area
Displays ACC and lane keeping system
status and warnings. Navigation Display Area
Displays navigation next turn instructions.
Status Bar
Displays distance to empty (DTE), time and
outside air temperature. Next to DTE, the
fuel gauge fill color changes to yellow in low
fuel conditions. You can switch off the status
bar in the HUD settings menu.
Speedometer Display Area
Displays current vehicle speed, speed limit
(if available in the map database) and
PRNDS.
Configuring The Head Up Display
You can control the system's options through
the information display by using the HUD,
OK and arrow buttons on the right-hand side
of your steering wheel . Here you can adjust
the display according to your height to make
viewing easier and to customize what
content to view. The system's options appear
in the instrument cluster while the updates
happen in the HUD.
Note: If HUD On is unchecked, other options
of the system are hidden.
Note: The HUD menu automatically closes
after a certain period of inactivity.
Note: The initial brightness of the HUD
image depends on the brightness of the
ambient environment. Head-Up Display (HUD)
Turns the HUD on and off.
HUD On
Follow onscreen directions to confirm or modify your settings.
Brightness
Follow onscreen directions to confirm or
modify your settings.
Vertical Position
HUD Adjustments
Horizontal Position
138
Continental (CPL) Canada/United States of America, enUSA, First Printing Information Displays
Page 146 of 584

Note: Recirculated air may also turn on and off automatically in instrument pan\
el or instrument panel and floor airflow modes during
hot weather to improve cooling efficiency.
Climate controlled seats:
Press to switch the cooled seats on and off. See Seats (page 148).
K
Fan speed control:
Adjusts the volume of air circulated in the vehicle.
L
Heated rear window:
Press to switch the heated rear window on and off. See Heated Windows and Mirrors (page 146).
M
Heated steering wheel:
Press to switch the heated steering wheel on and off.
N
Automatic Fan Settings
The AUTO button illuminates for the
following fan settings:
• When three indicators are on, the fan
automatically adjusts to the highest
speed to reach the selected temperature
as quickly as possible.
• When two indicators are on, the fan
automatically adjusts to a medium speed
to reach the selected temperature with
a reduced amount of cabin noise.
• When one indicator is on, the fan
automatically adjusts to the lowest speed
to reach the selected temperature with
the least amount of cabin noise. Note:
The system starts at the previously
selected fan setting when AUTO is switched
on.
HINTS ON CONTROLLING THE
INTERIOR CLIMATE
General Hints
Note: Prolonged use of recirculated air may
cause the windows to fog up.
Note: You may feel a small amount of air
from the footwell air vents regardless of the
air distribution setting. Note:
To reduce humidity build-up inside
your vehicle, do not drive with the system
switched off or with recirculated air always
switched on.
Note: Do not place objects under the front
seats as this may interfere with the airflow
to the rear seats.
Note: Remove any snow, ice or leaves from
the air intake area at the base of the
windshield.
Note: To improve the time to reach a
comfortable temperature in hot weather,
drive with the windows open until you feel
cold air through the air vents.
143
Continental (CPL) Canada/United States of America, enUSA, First Printing Climate Control
Page 150 of 584

Heated Wiper Park (If Equipped)
When you switch the heated rear window
on, the heated wiper park automatically turns
on.
CABIN AIR FILTER
Your vehicle is equipped with a cabin air
filter, which gives you and your passengers
the following benefits:
• It improves your driving comfort by
reducing particle concentration and
odors.
• It improves the interior compartment
cleanliness.
• It protects the climate control
components from particle deposits.
You can locate the cabin air filter behind the
glove box.
Note: Make sure you have a cabin air filter
installed at all times. This prevents foreign
objects from entering the system. Running
the system without a filter in place could
result in degradation or damage to the
system. Replace the filter at regular intervals. See
Scheduled Maintenance (page 508).
For additional cabin air filter information, or
to replace the filter, see an authorized dealer.
REMOTE START
The system adjusts the interior temperature
depending on your chosen settings during
remote start.
You cannot adjust the climate control setting
during remote start operation. When you
switch the ignition on, the climate control
system will return to the previous settings.
You can now make adjustments.
You need to switch on certain
vehicle-dependent features, such as:
• Heated seats.
• Cooled seats.
• Heated steering wheel.
• Heated mirrors.
• Heated rear window. Note:
Passenger heated and cooled seats
only remain on during remote start if they
were on when you switched the vehicle off
(if equipped).
You can adjust the default remote start
settings using the information display
controls.
See Information Displays (page
110).
Automatic Settings
In hot weather, the system is set to 72°F
(22°C). The cooled seats are set to high (if
available, and selected to AUTO in the
information display).
In moderate weather, the system either heats
or cools (based on pre-selected settings).
The rear defroster, heated mirrors and
heated or cooled seats do not automatically
switch on.
In cold weather, the system is set to 72°F
(22°C). The heated seats and heated steering
wheel are set to high (if available, and
selected to AUTO in the information display).
The rear defroster and heated mirrors
automatically switch on.
147
Continental (CPL) Canada/United States of America, enUSA, First Printing Climate Control
Page 151 of 584

SITTING IN THE CORRECT
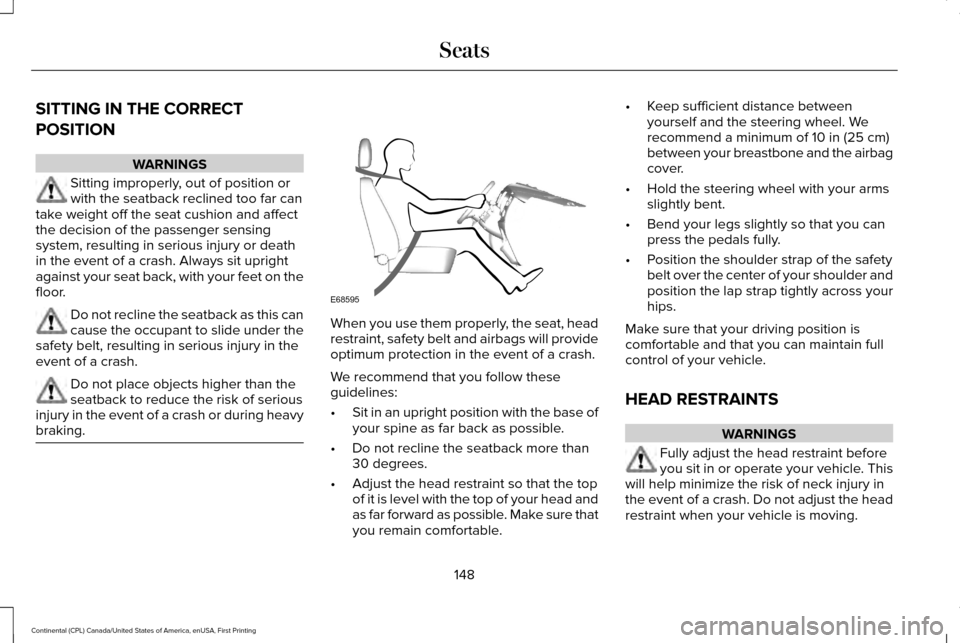
POSITION
WARNINGS
Sitting improperly, out of position or
with the seatback reclined too far can
take weight off the seat cushion and affect
the decision of the passenger sensing
system, resulting in serious injury or death
in the event of a crash. Always sit upright
against your seat back, with your feet on the
floor. Do not recline the seatback as this can
cause the occupant to slide under the
safety belt, resulting in serious injury in the
event of a crash. Do not place objects higher than the
seatback to reduce the risk of serious
injury in the event of a crash or during heavy
braking. When you use them properly, the seat, head
restraint, safety belt and airbags will provide
optimum protection in the event of a crash.
We recommend that you follow these
guidelines:
•
Sit in an upright position with the base of
your spine as far back as possible.
• Do not recline the seatback more than
30 degrees.
• Adjust the head restraint so that the top
of it is level with the top of your head and
as far forward as possible. Make sure that
you remain comfortable. •
Keep sufficient distance between
yourself and the steering wheel. We
recommend a minimum of 10 in (25 cm)
between your breastbone and the airbag
cover.
• Hold the steering wheel with your arms
slightly bent.
• Bend your legs slightly so that you can
press the pedals fully.
• Position the shoulder strap of the safety
belt over the center of your shoulder and
position the lap strap tightly across your
hips.
Make sure that your driving position is
comfortable and that you can maintain full
control of your vehicle.
HEAD RESTRAINTS WARNINGS
Fully adjust the head restraint before
you sit in or operate your vehicle. This
will help minimize the risk of neck injury in
the event of a crash. Do not adjust the head
restraint when your vehicle is moving.
148
Continental (CPL) Canada/United States of America, enUSA, First Printing SeatsE68595
Page 191 of 584

Park (P)
With the transmission in park (P), your vehicle
locks the transmission and prevents the
wheels from turning. Always come to a
complete stop before putting your vehicle
into and out of park (P). An audible chime
sounds once you select park (P).
When the ignition is turned off, the vehicle
will automatically shift into park (P). If the
ignition is turned off while the vehicle is
moving, it will first shift into neutral (N) until
a slow enough speed is reached. The vehicle
will then shift into park (P) automatically.
Automatic Return to Park
Note:
This feature will not operate when your
vehicle is in Stay in Neutral mode or neutral
tow.
Your vehicle has a safety feature that will
automatically shift your vehicle into park (P)
when any of the following conditions occur: •
You turn the ignition off
• You open the driver's door with your
safety belt unlatched
• Your safety belt is unlatched while the
driver's door is open
If you turn your vehicle off while moving, your
vehicle will first shift into neutral (N) until it
slows down enough to shift into park (P)
automatically.
Note: If you have waited an extended period
of time (2-15 minutes) before starting your
vehicle, unlatching your safety belt will cause
this feature to activate, even with the driver's
door closed.
Note: This feature may not work properly if
the door ajar switch is malfunctioning. If your
door ajar indicator does not illuminate when
you open the driver’ s door or the indicator
illuminates with the driver’ s door closed, see
your authorized dealer. Reverse (R)
With the transmission in reverse (R), your
vehicle will move backward. Always come
to a complete stop before shifting into and
out of reverse (R).
Neutral (N)
With the transmission in neutral (N), you can
start your vehicle and it is free to roll. Hold
the brake pedal down while in this position.
Stay in Neutral mode
Stay in Neutral mode allows your vehicle to
stay in neutral (N) when you exit the vehicle.
Your vehicle must be stationary to enter this
mode.
To enter Stay in Neutral mode:
1. Press the neutral (N) button on your
shifter assembly.
2. A message will appear in your information display screen prompting you
to press the neutral (N) button again to
enter Stay in Neutral mode.
3. Press the neutral (N) button again to enter Stay in Neutral mode.
188
Continental (CPL) Canada/United States of America, enUSA, First Printing Transmission
Page 192 of 584

A message will appear in your information
display screen when your vehicle has
entered Stay in Neutral mode.
Note:
During this mode the N button will
flash continuously and your instrument
cluster will display
N as the selected gear.
Exiting Stay in Neutral mode
To disable Stay in Neutral mode select
another gear. See the
Putting the Vehicle
in Gear for instructions on how to do this.
Entering a Carwash
Note: Always put your vehicle in Stay in
Neutral mode when entering an automatic
car wash. Failure to do this could result in
vehicle damage not covered by warranty.
Drive (D)
The normal driving position for the best fuel
economy.
Sport (S)
Putting the vehicle in sport (S): •
Provides additional engine braking and
extends lower gear operation to enhance
performance for uphill climbs, hilly terrain
or mountainous areas. This will increase
engine RPM during engine braking.
• Provides additional lower gear operation
through the automatic transmission shift
strategy.
• Provides gear selection more quickly and
at higher engine speeds.
SelectShift™ Automatic Transmission
Your vehicle is equipped with a SelectShift
Automatic transmission gearshift lever. The
SelectShift Automatic transmission gives you
the ability to change gears up or down as
desired. In order to prevent the engine from running
at too low an RPM, which may cause it to
stall, SelectShift still automatically makes
some downshifts if it has determined that
you have not downshifted in time. Although
SelectShift makes some downshifts for you,
it still allows you to downshift at any time as
long as the SelectShift determines that
damage will not be caused to the engine
from over-revving.
Note:
Engine damage may occur if you
maintain excessive engine revving without
shifting.
SelectShift does not automatically upshift,
even if the engine is approaching the RPM
limit. It must be shifted manually by pressing
the + button. Notice should be taken of the
shift indicator lamp, which alerts the driver
when to shift to ensure the highest level of
efficiency and fuel economy.
Pull the + paddle on the steering wheel to
activate SelectShift.
• Pull the right paddle (+) to upshift.
• Pull the left paddle (–) to downshift.
189
Continental (CPL) Canada/United States of America, enUSA, First Printing Transmission
Page 193 of 584

SelectShift in drive (D):
•
Provides a temporary manual mode for
performing more demanding maneuvers
where extra control of gear selection is
required (for example, when towing or
overtaking). This mode will hold a
selected gear for a temporary period of
time dependent on driver inputs (for
example, steering or accelerator pedal
input).
SelectShift in sport (S):
• Provides a permanent manual gear
selection where full control of gear
selection is required.
To exit Selectshift mode, shift the
transmission into drive (D). The instrument cluster displays your currently
selected gear. If a gear is requested but not
available due to vehicle conditions (low
speed, too high engine speed for requested
gear selection), the current gear will flash
three times.
Note:
At full accelerator pedal travel the
transmission will auto downshift to ensure
maximum performance.
Brake-Shift Interlock Override WARNINGS
Do not drive your vehicle until you
verify that the brake lamps are working.
When doing this procedure, you need
to take the transmission out of park (P)
which means your vehicle can roll freely. To
avoid unwanted vehicle movement, always
fully set the parking brake prior to doing this
procedure. Use wheels chocks if appropriate. If the parking brake is fully released,
but the brake warning lamp remains
illuminated, the brakes may not be working
properly. Have your vehicle checked as soon
as possible. Note:
See your authorized dealer as soon
as possible if this procedure is used.
Note: For some markets this feature is not
available.
Note: This feature only operates if your
12-volt battery has power. If the vehicle
battery voltage is not sufficient, use an
external 12 volt power source (for example,
jumper cables, a battery charger or jump
pack) to operate interlock override switch.
Use the brake-shift interlock override to
move your transmission from the park
position in the event of an electrical
malfunction. If your vehicle has a dead
battery, you need to use an external power
source.
1. Apply the parking brake and turn your ignition off before performing this
procedure.
190
Continental (CPL) Canada/United States of America, enUSA, First Printing TransmissionE144821
Page 195 of 584

USING ALL-WHEEL DRIVE
All-Wheel Drive (AWD) uses all four wheels
to power the vehicle. This increases traction,
enabling you to drive over terrain and road
conditions that a conventional two-wheel
drive vehicle cannot. The AWD system is
active all the time and requires no input from
the operator.
Note:
Your vehicle may be equipped with
Dynamic Torque Vectoring. This feature uses
all four wheels to power the vehicle and
independently controls the torque to each
rear wheel. In addition, the system has the
ability to over speed the outside rear wheel
in a turn. This increases traction and
handling performance, allowing the vehicle
to travel through road conditions and have
path following capability superior to
conventional two-wheel drive and AWD
vehicles. The Dynamic Torque Vectoring
system is active all the time and requires no
input from the operator. Note:
Your AWD vehicle is not intended for
off-road use. The AWD feature gives your
vehicle some limited off-road capabilities in
which driving surfaces are relatively level,
obstruction-free and otherwise similar to
normal on-road driving conditions. Operating
your vehicle under other than those
conditions could subject the vehicle to
excessive stress which might result in
damage which is not covered under your
warranty.
Note: When an AWD system fault is present,
the warning AWD Malfunction Service
Required displays in the information display.
The AWD system is not functioning correctly
and defaulted to front-wheel drive. When
this warning displays, have your vehicle
serviced at an authorized dealer. Note:
The
AWD OFF message may also
appear in the information display if the AWD
system overheats and defaults to front-wheel
drive. This may occur if the vehicle is
operated in extreme conditions with
excessive wheel slip, such as deep sand.
To resume normal AWD function as soon as
possible, stop the vehicle in a safe location
and stop the engine for at least 10 minutes.
After the engine has been restarted and the
AWD system has adequately cooled, the
AWD OFF
message will turn off and normal
AWD function returns. If the engine is not
stopped, the
AWD OFF message turns off
when the system cools and normal AWD
function returns.
192
Continental (CPL) Canada/United States of America, enUSA, First Printing All-Wheel Drive
(If Equipped)