Page 544 of 640

5448-2. Steps to take in an emergency
RC300h_EE(OM24740E)
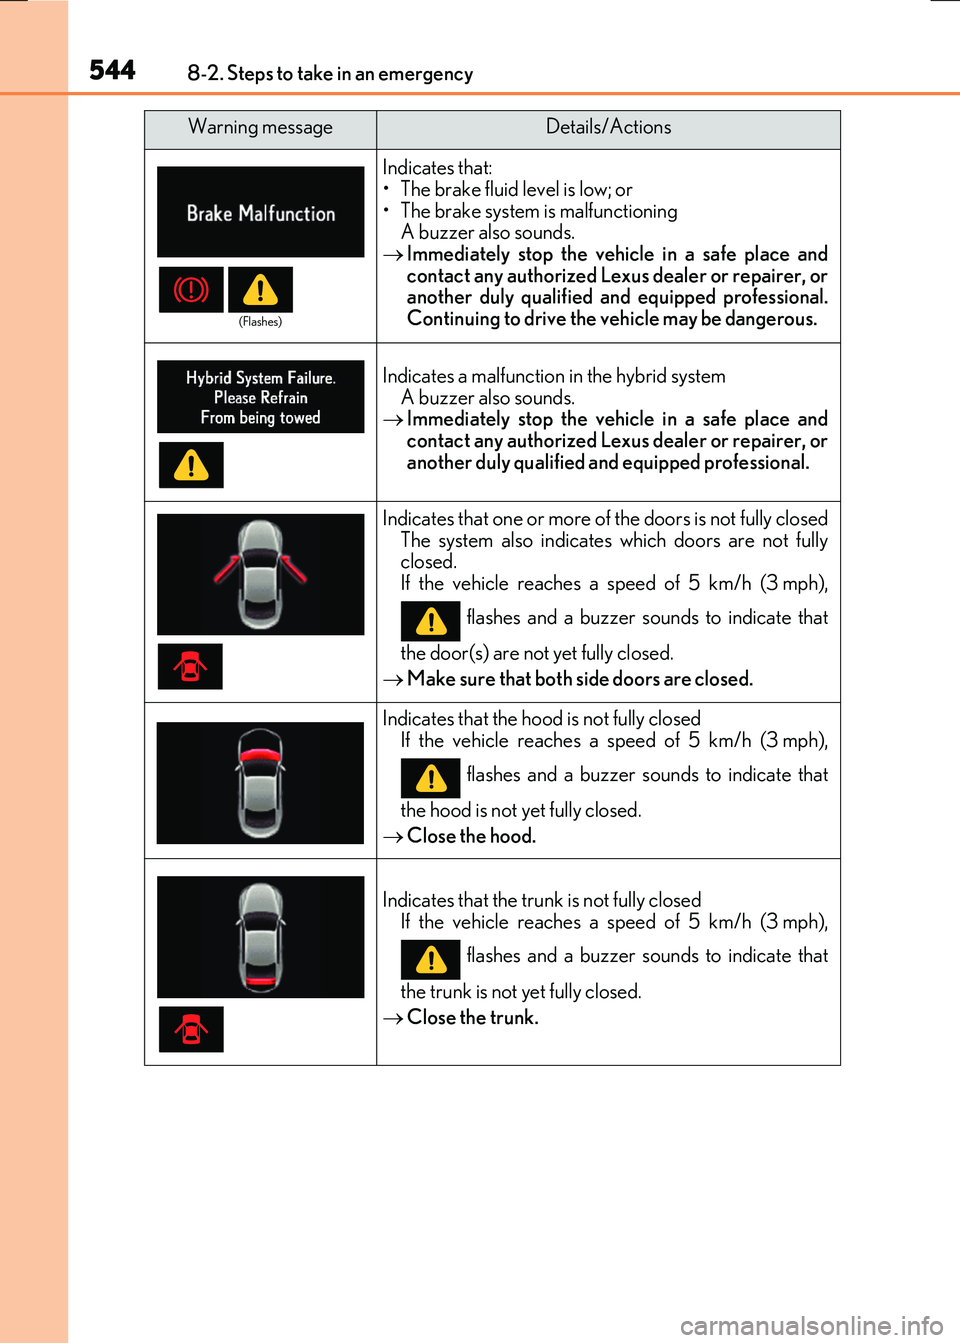
Indicates that: • The brake fluid level is low; or
• The brake system is malfunctioning A buzzer also sounds. Immediately stop the vehicle in a safe place and
contact any authorized Lexus dealer or repairer, or another duly qualified and equipped professional.Continuing to drive the vehicle may be dangerous.
Indicates a malfunction in the hybrid system A buzzer also sounds. Immediately stop the vehicle in a safe place and
contact any authorized Lexus dealer or repairer, or another duly qualified and equipped professional.
Indicates that one or more of the doors is not fully closed The system also indicates which doors are not fullyclosed.
If the vehicle reaches a speed of 5 km/h (3 mph),
flashes and a buzzer sounds to indicate that
the door(s) are not yet fully closed.
Make sure that both side doors are closed.
Indicates that the hood is not fully closed
If the vehicle reaches a speed of 5 km/h (3 mph),
flashes and a buzzer sounds to indicate that
the hood is not yet fully closed.
Close the hood.
Indicates that the trunk is not fully closed If the vehicle reaches a speed of 5 km/h (3 mph),
flashes and a buzzer sounds to indicate that
the trunk is not yet fully closed.
Close the trunk.
Warning messageDetails/Actions
(Flashes)
Page 571 of 640

5718-2. Steps to take in an emergency
8
When trouble arises
RC300h_EE(OM24740E)
Temporarily store the bottle in the trunk while it is connected to the compres-
sor.
To spread the liquid sealant evenly within the tire, immediately drive safely for
about 5 km (3 miles) below 80 km/h (50 mph).
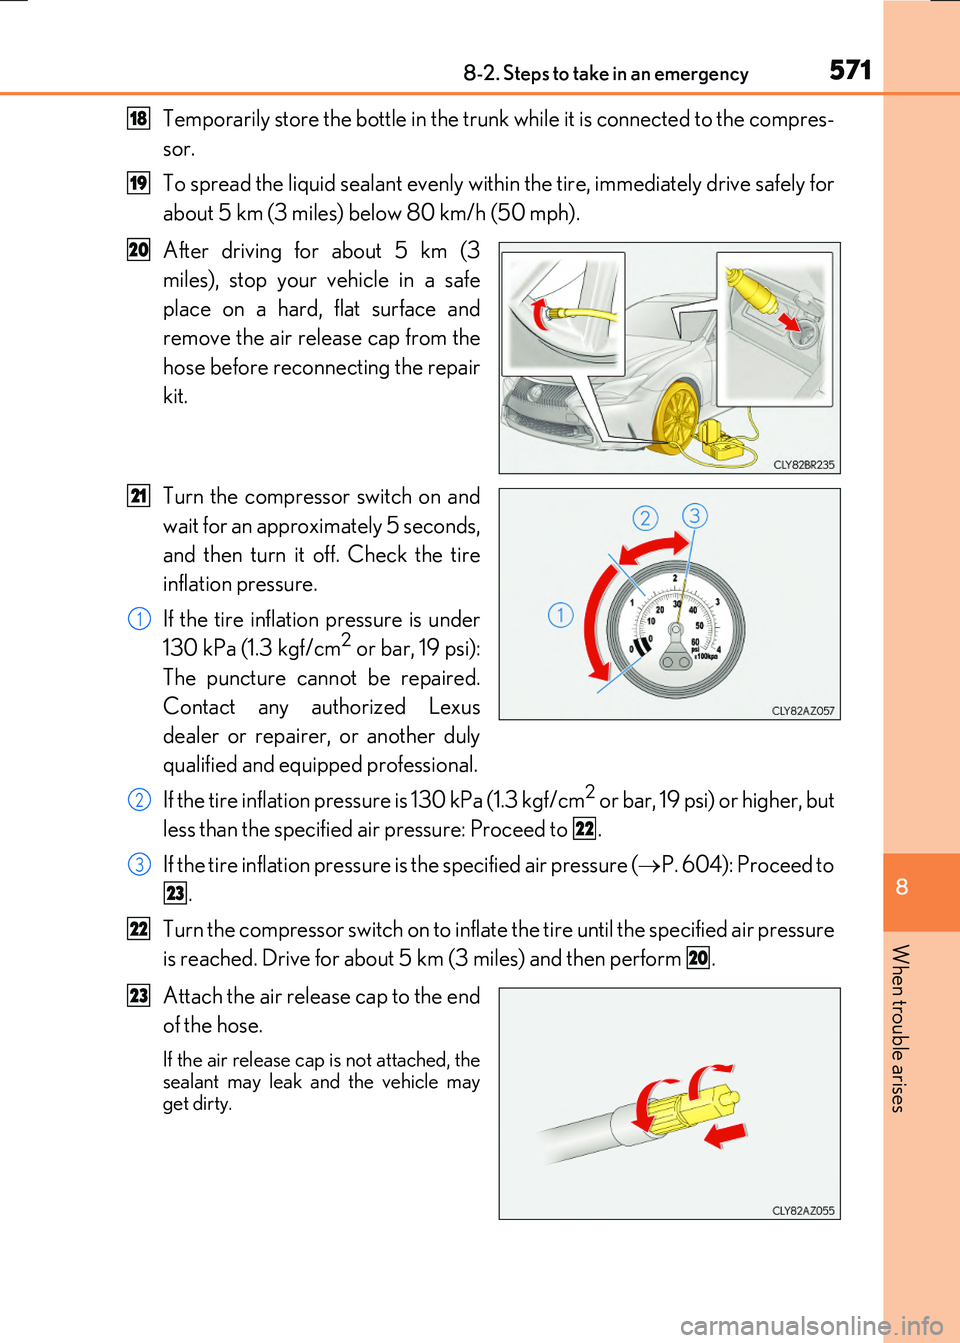
After driving for about 5 km (3
miles), stop your vehicle in a safe
place on a hard, flat surface and
remove the air release cap from the
hose before reconnecting the repair
kit.
Turn the compressor switch on and
wait for an approximately 5 seconds,
and then turn it off. Check the tire
inflation pressure.
If the tire inflation pressure is under
130 kPa (1.3 kgf/cm
2 or bar, 19 psi):
The puncture cannot be repaired.
Contact any authorized Lexus
dealer or repairer, or another duly
qualified and equipped professional.
If the tire inflation pressure is 130 kPa (1.3 kgf/cm
2 or bar, 19 psi) or higher, but
less than the specified air pressure: Proceed to .
If the tire inflation pressure is the specified air pressure ( P. 604): Proceed to
.
Turn the compressor switch on to inflate the tire until the specified air pressure
is reached. Drive for about 5 km (3 miles) and then perform .
Attach the air release cap to the end
of the hose.
If the air release cap is not attached, the
sealant may leak and the vehicle may
get dirty.
18
19
20
21
1
2
22
3
23
22
20
23
Page 575 of 640

5758-2. Steps to take in an emergency
8
When trouble arises
RC300h_EE(OM24740E)
NOTICE
■When performing an emergency repair
●Perform the emergency repair without removing the nail or screw that has punctured the tread of the tire. If the object that has punctured the tire is removed, repair by the
emergency tire puncture repair kit may not be possible.
●The kit is not waterproof. Make sure that the kit is not exposed to water, such as when it is being used in the rain.
●Do not put the kit directly onto dusty ground such as sand at the side of the road. If thekit vacuums up dust etc., a malfunction may occur.
●Make sure to stand the kit with the bottle vertical. The kit cannot work properly if it is
laid on its side.
■Handling the emergency ti re puncture repair kit
●The compressor power source should be 12 V DC suitable for vehicle use. Do not
connect the compressor to any other source.
●If gasoline splatters on the kit, the kit may deteriorate. Take care not to allow gasoline to contact it.
●Store the emergency tire puncture repair kit in the trunk. The kit may be thrown around during sudden braking and so forth, damaging the kit.
●Store the kit in its assigned place out of reach of children.
●Do not disassemble or modify the kit. Do not subject parts such as the air pressure indicator to impacts. This may cause a malfunction.
■To avoid damage to the tire pressure warning valves and transmitters
When a tire is repaired with liquid sealants, the tire pressure warning valve and trans- mitter may not operate properly. If a liquid sealant is used, contact any authorizedLexus dealer or repairer, or another duly qu alified and equipped professional or other
qualified service shop as soon as possible. After use of liquid sealant, make sure to replace the tire pressure warning valve and transmitter when repairing or replacing the tire. ( P. 486)
Page 578 of 640
5788-2. Steps to take in an emergency
RC300h_EE(OM24740E)
Use the mechanical key (P. 139) in order to perform the following operations:
■Unlocking the door
Insert the mechanical key while
pulling on the driver’s door han-
dle.
Unlocking the door.
Remove the key, return the handle, and then pull the handle again.
If the electronic key does not operate properly
If communication between the electronic key and vehicle is interrupted ( P.
157) or the electronic key cannot be used because the battery is depleted, the
smart entry & start system and wireless remote control cannot be used. In
such cases, the doors and trunk can be opened and the hybrid system can be
started by following the procedure below.
Locking and unlocking the doors and opening the trunk
1
2
3
Page 579 of 640
5798-2. Steps to take in an emergency
8
When trouble arises
RC300h_EE(OM24740E)
■Locking the door
Move the inside lock button to the
lock position.
Close the door while pulling the door handle.
■Opening the trunk
Turn the mechanical key clockwise
to open.
■Key linked functions
*: These settings must be customized at your Lexus dealer or repairer, or another duly
qualified and equipped professional.
1
2
Locks both side door
Closes the windows and moon roof (if equipped) (turn and hold)*
Unlocks the door
Opens the windows and moon roof (if equipped) (turn and hold)*
1
2
3
4
Page 605 of 640
605
9
9-1. Specifications
Vehicle specifications
RC300h_EE(OM24740E)
Light bulbs
Light bulbsWType
Exterior
Front turn signal lights (bulb type)21A
Rear turn signal lights21A
Back-up lights16B
Interior
Vanity lights8B
Footwell lights3.8B
Trunk light5B
A: Wedge base bulbs (amber)
B: Wedge base bulbs (clear)
Page 610 of 640
6109-2. Customization
RC300h_EE(OM24740E)
■Door lock ( P. 144, 150, 578)
■Smart entry & start system and wireless remote control (P. 144, 150)
FunctionDefault settingCustomized setting
Unlocking using a mechanical key
Both side
doors unlocked in one step
Driver’s door unlocked in one step, both side
doors unlocked in two steps
——O
Speed-detecting automatic doorlock functionOnOffO—O
Shifting gears to position other
than P locks both side doorsOffOnO—O
Shifting gears to P unlocks both side doorsOffOnO—O
Opening driver's door unlocksboth side doorsOnOffO—O
Locking/unlocking of the trunk
when both side doors are locked/unlockedOnOff——O
123
FunctionDefault settingCustomized setting
Operation signal (Emergency flashers)OnOffO—O
Time elapsed before automatic
door lock function is activated if door is not opened after beingunlocked
30 seconds
60 seconds
——O120 seconds
Open door warning buzzerOnOff——O
Welcome light illumination con-
trolOnOff——O
123
Page 611 of 640
611
9
9-2. Customization
Vehicle specifications
RC300h_EE(OM24740E)
■Smart entry & start system ( P. 144, 150, 155)
■Wireless remote control (P. 144, 150)
■Driving position memory* (P. 183)
*: If equipped
FunctionDefault settingCustomized setting
Smart entry & start systemOnOffO—O
Smart door unlockingBoth side doorsDriver's doorO—O
Number of consecutive doorlock operationsAs many as desired2 times——O
123
FunctionDefault settingCustomized setting
Wireless remote controlOnOff——O
Unlocking operation
Both side doors
unlocked in one step
Driver's door
unlocked in one step, both side doors unlocked in
two steps
O—O
Trunk unlocking operationPress and hold (short)
One short press
——O
Push twice
Press and hold (long)
Off
123
FunctionDefault settingCustomized setting
Selecting the door linking drivingposition memory with door
unlock operation
Driver's doorBoth side doors——O
123