Page 469 of 640

469
7
Maintenance and care
RC300h_EE(OM24740E)
7-3. Do-it-yourself maintenance
Do-it-yourself service precautions
If you perform maintenance by yourself, be sure to follow the correct proce-
dure as given in these sections.
ItemsParts and tools
12-volt battery con-
dition ( P. 481)
•Grease
• Conventional wrench (for terminal clamp bolts)
Engine/power con- trol unit coolant level
( P. 478)
• “Toyota Super Long Life Coolant” or a similar high quality ethylene glycol-based non-silicate, non-amine, non-nitriteand non-borate coolant with long-life hybrid organic acid
technology “Toyota Super Long Life Coolant” is pre-mixed with 50%coolant and 50% deionized water.
• Funnel (used only for adding coolant)
Engine oil level ( P. 474)
• “Toyota Genuine Motor Oil” or equivalent
•Rag or paper towel
• Funnel (used only for adding engine oil)
Fuses
( P. 514)• Fuse with same amperage rating as original
Light bulbs ( P. 518)
• Bulb with same number and wattage rating as original
• Phillips-head screwdriver• Flathead screwdriver
•Wrench
Radiator and condenser ( P. 480)
Tire inflation
pressure ( P. 505)• Tire pressure gauge• Compressed air source
Washer fluid ( P. 480)
• Water or washer fluid containing antifreeze (for winter use)
• Funnel (used only for adding water or washer fluid)
Page 511 of 640
5117-3. Do-it-yourself maintenance
7
Maintenance and care
RC300h_EE(OM24740E)
●Flathead screwdriver
●Small flathead screwdriver
●Lithium battery CR2032
Take out the mechanical key.
Remove the cover.
To prevent damage to the key, wrap the
tip of the screwdriver with tape.
Remove the battery cover.
To prevent damage to the key, wrap the
tip of the screwdriver with tape.
Electronic key battery
Replace the battery with a new one if it is depleted.
You will need the following items:
Replacing the battery
1
2
3
Page 520 of 640
5207-3. Do-it-yourself maintenance
RC300h_EE(OM24740E)
■Front turn signal lights (bulb type)
To ensure enough space to per-
form work, turn the steering
wheel to move the front wheel
toward the bulb to be replaced.
Remove the fender liner clip.
To remove the clip, turn the head of the clip to unlock it, then pull it out.
Disengage the fender liner from
the clamp then pull it back.
Turn the bulb base
counterclockwise.
Replacing light bulbs
1
2
3
Page 525 of 640

5257-3. Do-it-yourself maintenance
7
Maintenance and care
RC300h_EE(OM24740E)
■Replacing the following bulbs
If any of the lights listed below has burnt out, have it replaced by any autho-
rized Lexus dealer or repairer, or another duly qualified and equipped profes-
sional.
●Headlights
●Front position lights and daytime running lights
●Front turn signal lights (LED type)
●Front fog lights (if equipped)
●Side turn signal lights
●Stop/tail lights
●Stop lights
●Tail lights
●Rear fog light
●High mounted stoplight
●License plate lights
■LED lights
The lights other than the front turn signal lights (bulb type), rear turn signal lights and back-up lights each consist of a number of LE Ds. If any of the LEDs burn out, take your vehicle to any authorized Lexus dealer or repairer, or another duly qualified and
equipped professional to have the light replaced.
■Condensation build-up on the inside of the lens
Temporary condensation build-up on the inside of the headlight lens does not indicate a
malfunction. Contact any authorized Lexus dealer or repairer, or another duly qualified and equipped professional for more info rmation in the following situations:
●Large drops of water have built up on the inside of the lens.
●Water has built up inside the headlight.
■When replacing light bulbs
P. 517
Page 526 of 640
5267-3. Do-it-yourself maintenance
RC300h_EE(OM24740E)
WARNING
■Replacing light bulbs
●Turn off the lights. Do not attempt to replace the bulb immediately after turning off the lights.
The bulbs become very hot and may cause burns.
●Do not touch the glass portion of the light bulb with bare hands. When it is unavoid- able to hold the glass portion, use and hold with a clean dry cloth to avoid getting
moisture and oils on the bulb. Also, if the bulb is scratched or dropped, it may blow out or crack.
●Fully install light bulbs and any parts used to secure them. Failure to do so may result
in heat damage, fire, or wate r entering the headlight unit. This may damage the head- lights or cause condensation to build up on the lens.
■To prevent damage or fire
●Make sure bulbs are fully seated and locked.
●Check the wattage of the bulb before installing to prevent heat damage.
Page 533 of 640
5338-2. Steps to take in an emergency
8
When trouble arises
RC300h_EE(OM24740E)
Take out the towing eyelet. (P. 565)
Remove the eyelet cover using a flathead screwdriver.
To protect the bodywork, place a rag betw een the screwdriver and the vehicle body as shown in the illustration.
Insert the towing eyelet into the hole
and tighten partially by hand.
Tighten down the towing eyelet
securely using a wheel nut wrench
or hard metal bar.
Securely attach cables or chains to the towing eyelet.
Take care not to damage the vehicle body.
Enter the vehicle being towed and start the hybrid system.
If the hybrid system does not start, turn the power switch to ON mode.
Shift the shift lever to N and release the parking brake.
When the shift lever cannot be shifted: P. 227
Emergency towing procedure
1
2
Except F SPORT modelsF SPORT models
3
4
5
6
7
Page 539 of 640

5398-2. Steps to take in an emergency
8
When trouble arises
RC300h_EE(OM24740E)
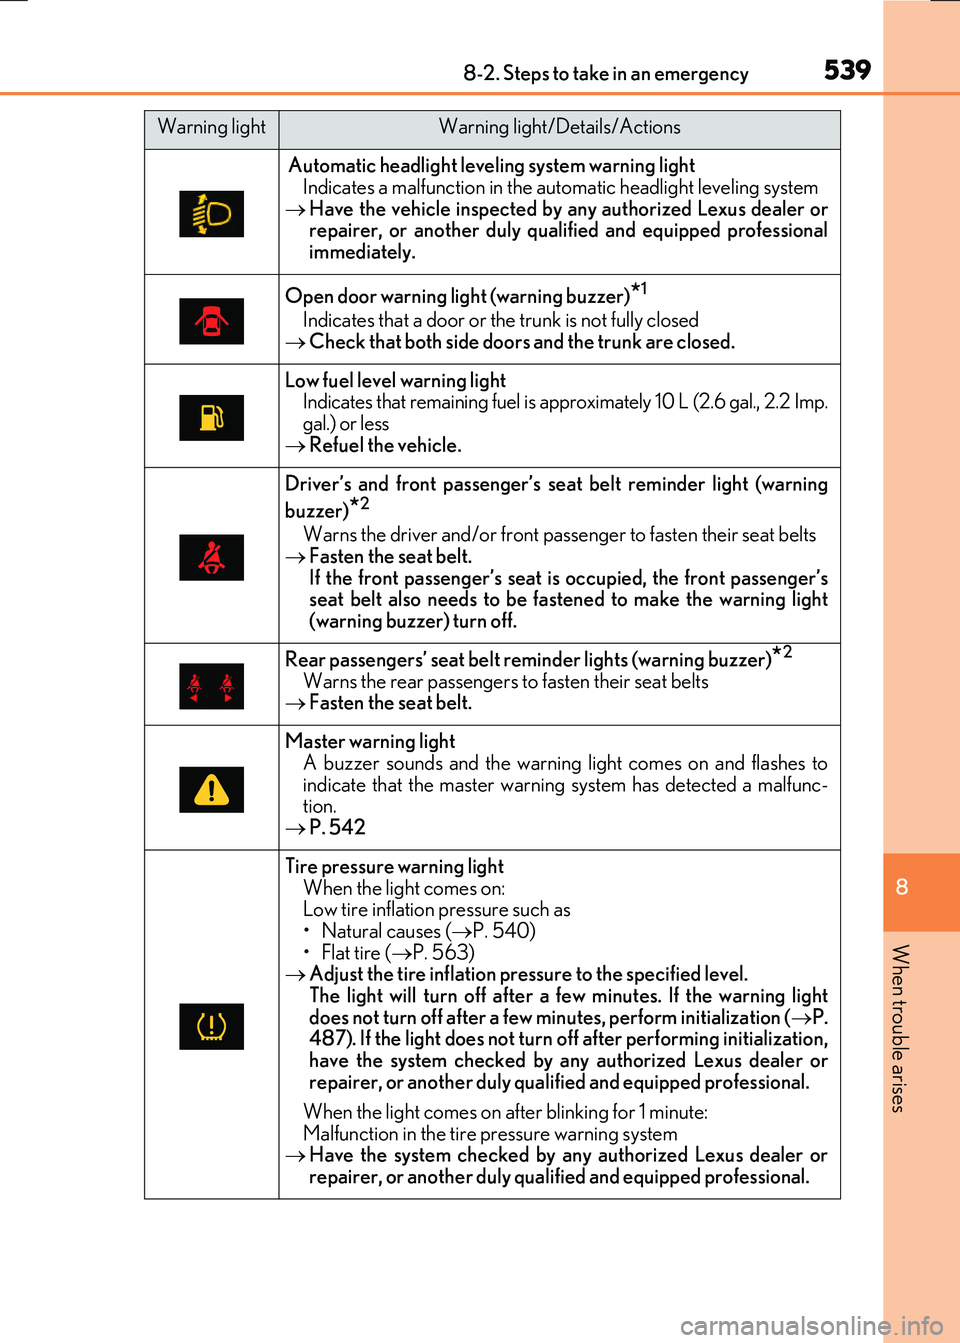
Automatic headlight leveling system warning light Indicates a malfunction in the au tomatic headlight leveling system
Have the vehicle inspected by any authorized Lexus dealer or repairer, or another duly qualified and equipped professionalimmediately.
Open door warning light (warning buzzer)*1
Indicates that a door or the trunk is not fully closed
Check that both side doors and the trunk are closed.
Low fuel level warning light Indicates that remaining fuel is approximately 10 L (2.6 gal., 2.2 Imp.gal.) or less
Refuel the vehicle.
Driver’s and front passenger’s seat belt reminder light (warning
buzzer)*2
Warns the driver and/or front passe nger to fasten their seat belts Fasten the seat belt.
If the front passenger’s seat is occupied, the front passenger’s seat belt also needs to be fastened to make the warning light(warning buzzer) turn off.
Rear passengers’ seat belt reminder lights (warning buzzer)*2
Warns the rear passengers to fasten their seat belts Fasten the seat belt.
Master warning light A buzzer sounds and the warning light comes on and flashes to
indicate that the master warnin g system has detected a malfunc- tion. P. 542
Tire pressure warning light
When the light comes on: Low tire inflation pressure such as• Natural causes ( P. 540)
• Flat tire ( P. 563) Adjust the tire inflation pressure to the specified level. The light will turn off after a few minutes. If the warning light
does not turn off after a few minutes, perform initialization ( P. 487). If the light does not turn off after performing initialization,have the system checked by any authorized Lexus dealer or
repairer, or another duly qualified and equipped professional.
When the light comes on af ter blinking for 1 minute:
Malfunction in the tire pressure warning system Have the system checked by any authorized Lexus dealer or repairer, or another duly qualified and equipped professional.
Warning lightWarning light/Details/Actions
Page 543 of 640

5438-2. Steps to take in an emergency
8
When trouble arises
RC300h_EE(OM24740E)
Warning message and warning buzzer list
Warning messageDetails/Actions
(If equipped)
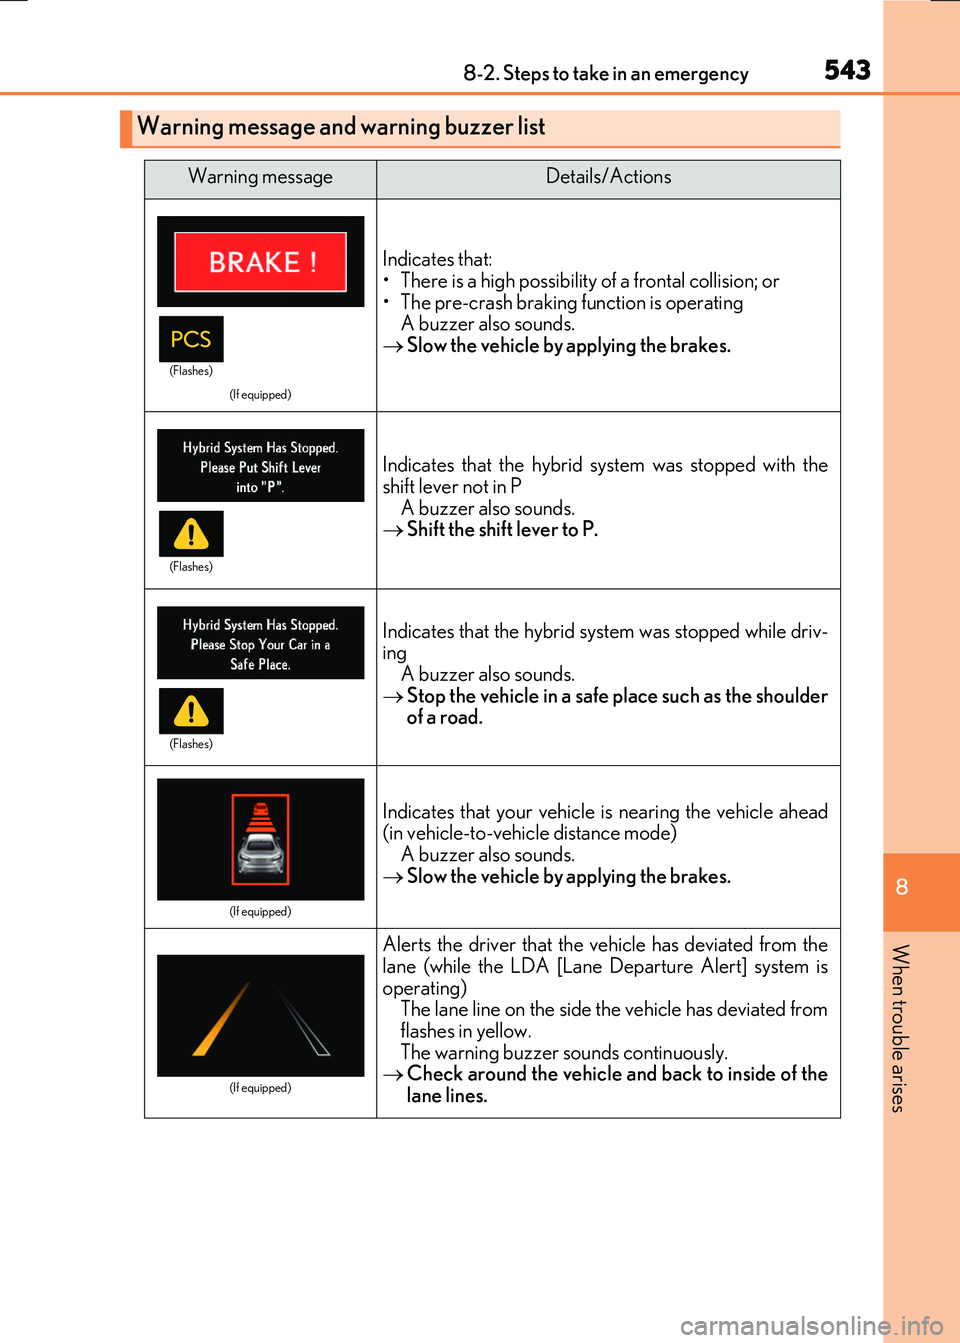
Indicates that: • There is a high possibility of a frontal collision; or
• The pre-crash braking function is operating A buzzer also sounds. Slow the vehicle by applying the brakes.
Indicates that the hybrid system was stopped with the
shift lever not in P A buzzer also sounds. Shift the shift lever to P.
Indicates that the hybrid system was stopped while driv- ingA buzzer also sounds.
Stop the vehicle in a safe place such as the shoulder of a road.
(If equipped)
Indicates that your vehicle is nearing the vehicle ahead(in vehicle-to-vehicle distance mode)
A buzzer also sounds. Slow the vehicle by applying the brakes.
(If equipped)
Alerts the driver that the vehicle has deviated from the
lane (while the LDA [Lane Departure Alert] system is operating)The lane line on the side the vehicle has deviated from
flashes in yellow. The warning buzzer sounds continuously. Check around the vehicle and back to inside of the
lane lines.
(Flashes)
(Flashes)
(Flashes)