2017 LEXUS RX300H change time
[x] Cancel search: change timePage 216 of 640

2164-2. Driving procedures
RC300h_EE(OM24740E)
Modes can be changed by pressing the power switch with brake pedal released.
(The mode changes each time the switch is pressed.)
Off*
The emergency flashers can be used.
ACCESSORY mode
Some electrical components such as the
audio system can be used.
“ACCESSORY” will be displayed on the meters.
ON mode
All electrical components can be used.
“IGNITION ON” will be displayed on the meters.
*: If the shift lever is in a position other than
P when turning off the hybrid system,
the power switch will be turned to
ACCESSORY mode, not to off.
If the hybrid system is stopped with the sh ift lever in a position other than P, the
power switch will not be turned off but instead be turned to ACCESSORY
mode. Perform the following procedure to turn the switch off:
Check that the parking brake is set.
Shift the shift lever to P.
Check that “Turn Power OFF” is displayed on the multi-information display
and then press the power switch once.
Check that “Turn Power OFF” on the multi-information display is off.
Changing power switch modes
1
2
3
When stopping the hybrid system with the shift lever in a position other
than P
1
2
3
4
Page 218 of 640

2184-2. Driving procedures
RC300h_EE(OM24740E)
■When “Check Entry & Start System” is displayed on the multi-information display
The system may be malfunctioning. Have the vehicle inspected by any authorized Lexus dealer or repairer, or another duly qua lified and equipped professional immediately.
■If the “READY” indicator does not come on
In the event that the “READY” indicator does not come on even after performing the proper procedures for starting the vehicle, contact any authorized Lexus dealer or
repairer, or another duly qualified and equipped professional immediately.
■If the hybrid system is malfunctioning
P. 543
■If the electronic key battery is depleted
P. 511
■Operation of the power switch
●If the switch is not pressed shortly and firmly, the power switch mode may not change or the hybrid system may not start.
●If attempting to restart the hybrid system immediately after turning the power switch off,
the hybrid system may not start in some cases. After turning the power switch off, please wait a few seconds before restarting the hybrid system.
■If the smart entry & start system has been deactivated by a customized setting
P. 578
WARNING
■When starting the hybrid system
Always start the hybrid system while sittin g in the driver’s seat. Do not depress the accelerator pedal while starting the hybrid system under any circumstances.
Doing so may cause an accident resu lting in death or serious injury.
■Caution while driving
If hybrid system failure occurs while the ve hicle is moving, do not lock or open the
doors until the vehicle reaches a safe and c omplete stop. Activation of the steering lock in this circumstance may lead to an accide nt, resulting in death or serious injury.
■Stopping the hybrid system in an emergency
If you want to stop the hybrid system in an emergency while driving the vehicle, press and hold the power switch for more than 2 seconds, or press it briefly 3 times or morein succession. ( P. 529)
However, do not touch the power switch while driving except in an emergency. Turning the hybrid system off while driving will not cause loss of steering or braking control, however, power assist to the steering will be lost. This will make it more difficult to steer
smoothly, so you should pull over and stop the vehicle as soon as it is safe to do so.
Page 229 of 640

2294-2. Driving procedures
4
Driving
RC300h_EE(OM24740E)
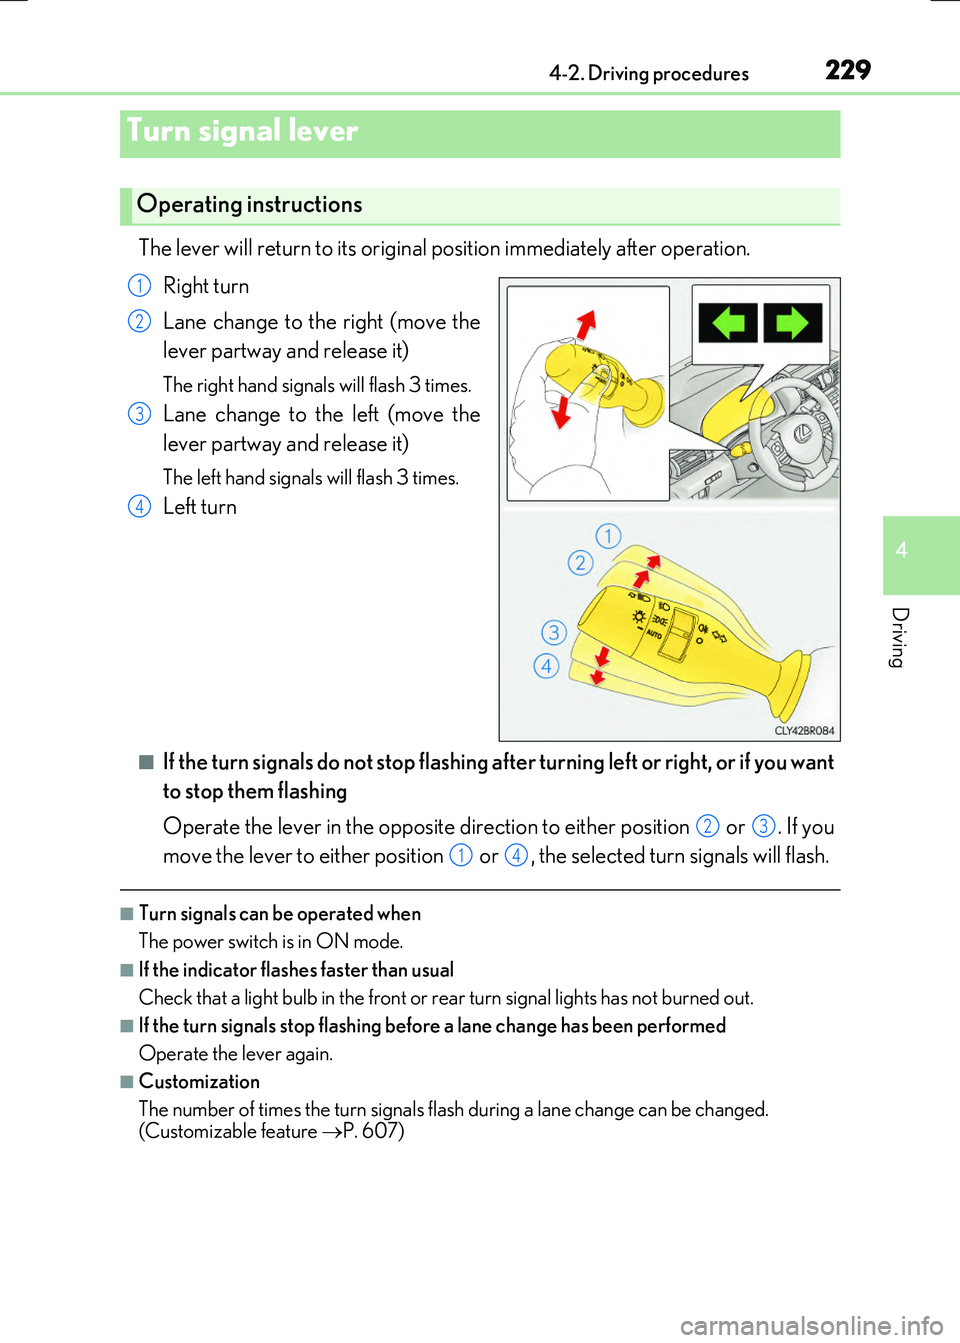
The lever will return to its original position immediately after operation.
Right turn
Lane change to the right (move the
lever partway and release it)
The right hand signals will flash 3 times.
Lane change to the left (move the
lever partway and release it)
The left hand signals will flash 3 times.
Left turn
■If the turn signals do not stop flashing after turning left or right, or if you want
to stop them flashing
Operate the lever in the opposite direction to either position or . If you
move the lever to either position or , the selected turn signals will flash.
■Turn signals can be operated when
The power switch is in ON mode.
■If the indicator flashes faster than usual
Check that a light bulb in the front or rear turn signal lights has not burned out.
■If the turn signals stop flashing before a lane change has been performed
Operate the lever again.
■Customization
The number of times the turn signals flash during a lane change can be changed.
(Customizable feature P. 607)
Turn signal lever
Operating instructions
1
2
3
4
23
14
Page 254 of 640

2544-5. Using the driving support systems
RC300h_EE(OM24740E)
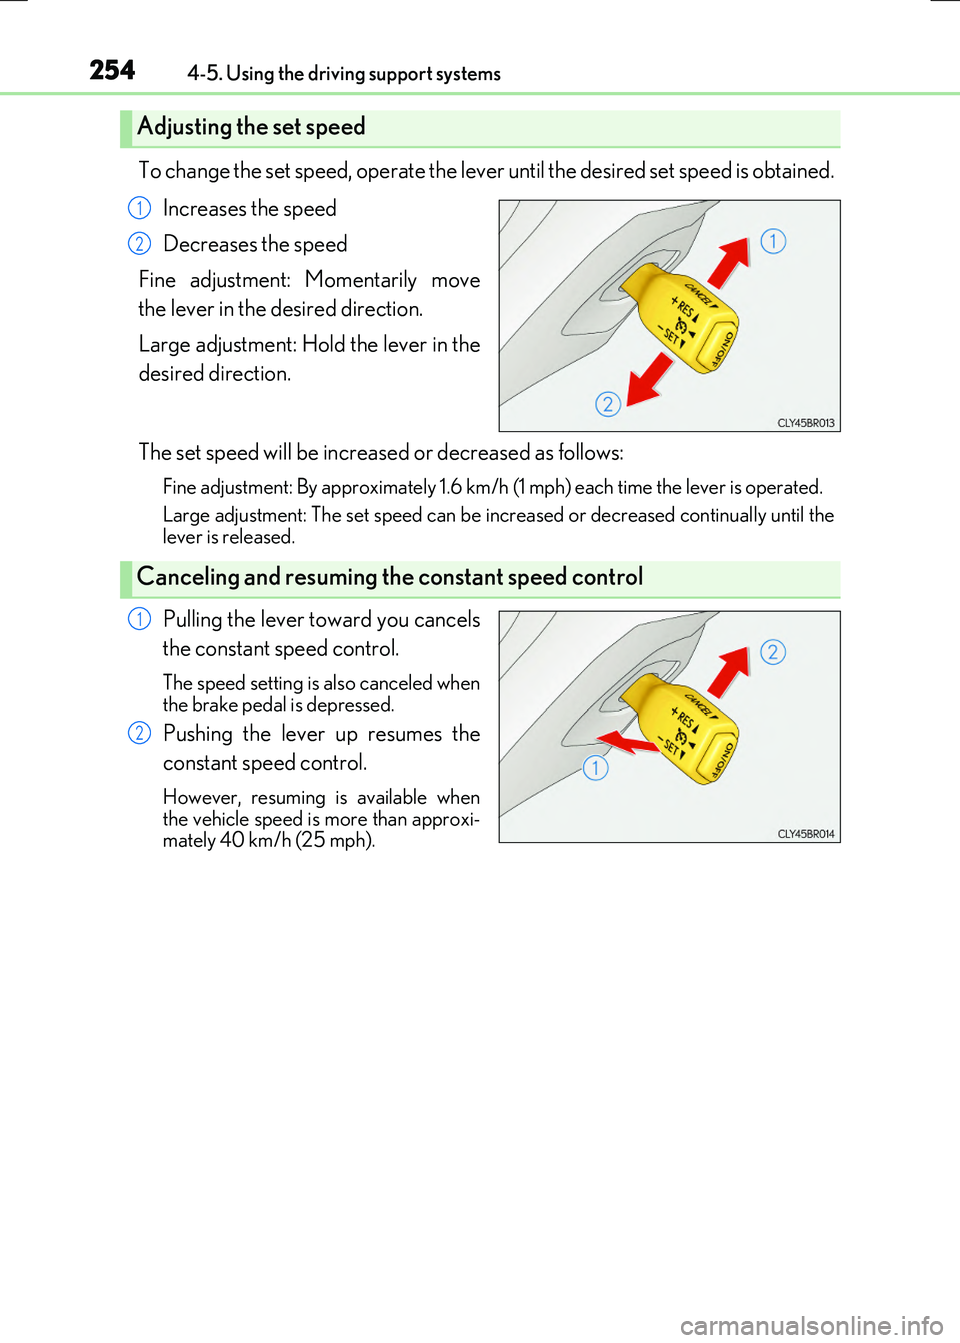
To change the set speed, operate the lever until the desired set speed is obtained.
Increases the speed
Decreases the speed
Fine adjustment: Momentarily move
the lever in the desired direction.
Large adjustment: Hold the lever in the
desired direction.
The set speed will be increased or decreased as follows:
Fine adjustment: By approximately 1.6 km/h (1 mph) each time the lever is operated.
Large adjustment: The set speed can be incr eased or decreased continually until the lever is released.
Pulling the lever toward you cancels
the constant speed control.
The speed setting is also canceled when the brake pedal is depressed.
Pushing the lever up resumes the
constant speed control.
However, resuming is available when the vehicle speed is more than approxi-mately 40 km/h (25 mph).
Adjusting the set speed
1
2
Canceling and resuming the constant speed control
1
2
Page 258 of 640

2584-5. Using the driving support systems
RC300h_EE(OM24740E)
This mode employs a radar sensor to detect the presence of vehicles up to
approximately 120 m (400 ft.) ahead, determines the current vehicle-to-vehicle
following distance, and operates to maintain a suitable following distance from
the vehicle ahead.
Note that vehicle-to-vehicle distance will close in when traveling on long downhill slopes.
Example of constant speed cruising
When there are no vehicles ahead
The vehicle travels at the speed set by the driver. The desired vehicle-to-vehicle dis- tance can also be set by operating the vehicle-to-vehicle distance control.
Example of deceleration cruising
When a preceding vehicle driving slower than the set speed appears
When a vehicle is detected running ahead of you, the system automatically deceler- ates your vehicle. When a greater reductio n in vehicle speed is necessary, the system applies the brakes (the stop lights will come on at this time). A warning tone warns you
when the system cannot decelerate sufficiently to prevent your vehicle from closing in on the vehicle ahead.
Example of follow-up cruising
When following a preceding vehicle driving slower than the set speed
The system continues follow-up cruising wh ile adjusting for changes in the speed of
the vehicle ahead in order to maintain the vehicle-to-vehicle distance set by the driver.
Example of acceleration
When there are no longer any preceding vehicles driving slower than the set
speed
The system accelerates until the set speed is reached. The system then returns to con- stant speed cruising.
Driving in vehicle-to-veh icle distance control mode
1
2
3
4
Page 260 of 640

2604-5. Using the driving support systems
RC300h_EE(OM24740E)
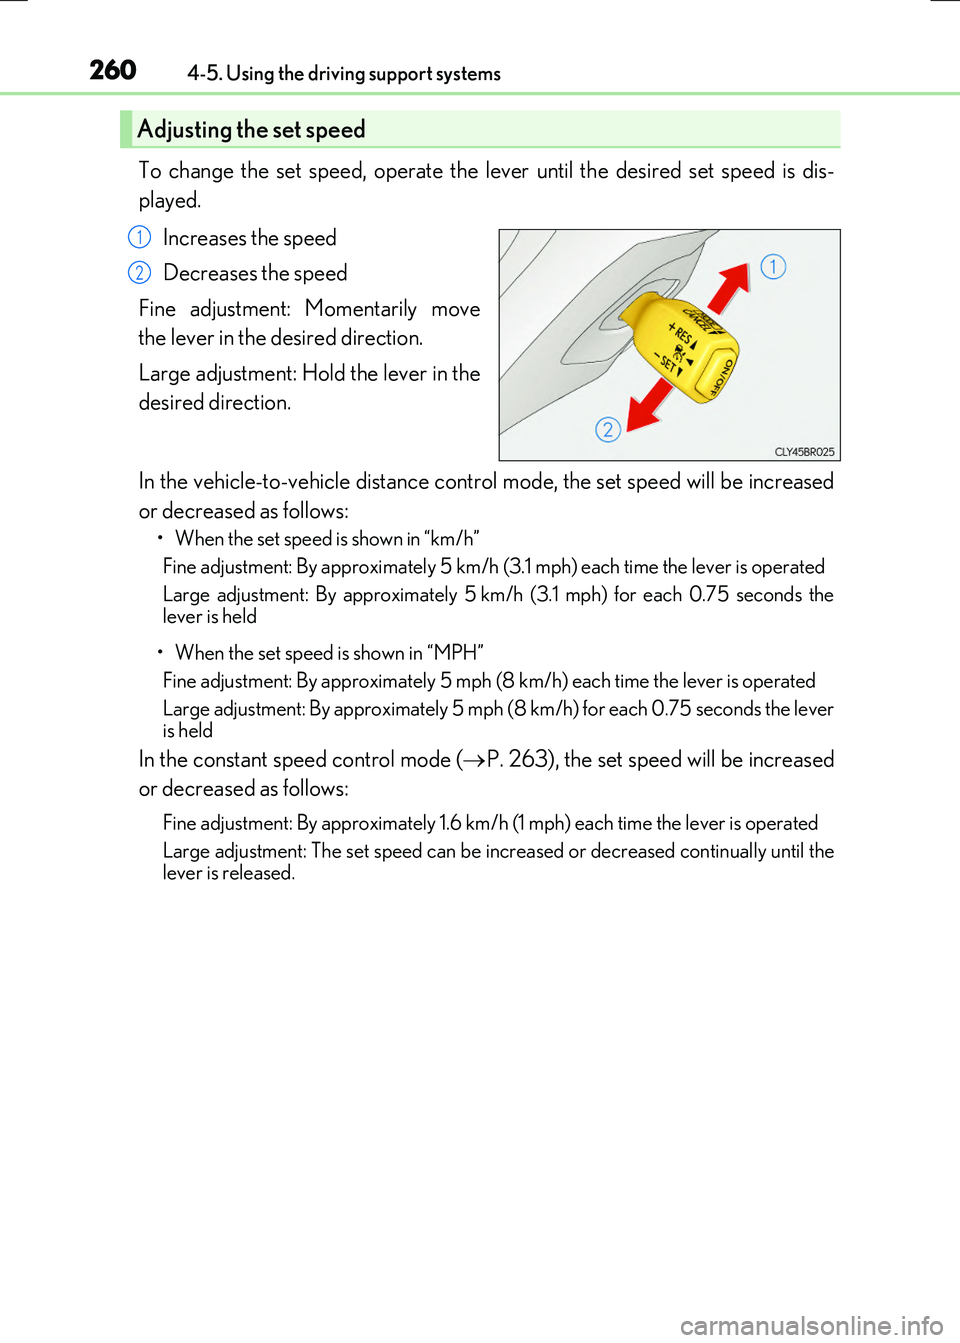
To change the set speed, operate the lever until the desired set speed is dis-
played.
Increases the speed
Decreases the speed
Fine adjustment: Momentarily move
the lever in the desired direction.
Large adjustment: Hold the lever in the
desired direction.
In the vehicle-to-vehicle distance control mode, the set speed will be increased
or decreased as follows:
• When the set speed is shown in “km/h”
Fine adjustment: By approximately 5 km/h (3.1 mph) each time the lever is operated
Large adjustment: By approximately 5 km/h (3.1 mph) for each 0.75 seconds the
lever is held
• When the set speed is shown in “MPH”
Fine adjustment: By approximately 5 mph (8 km/h) each time the lever is operated
Large adjustment: By approximately 5 mph (8 km/h) for each 0.75 seconds the lever is held
In the constant speed control mode ( P. 263), the set speed will be increased
or decreased as follows:
Fine adjustment: By approximately 1.6 km/h (1 mph) each time the lever is operated
Large adjustment: The set speed can be incr eased or decreased continually until the lever is released.
Adjusting the set speed
1
2
Page 278 of 640

2784-5. Using the driving support systems
RC300h_EE(OM24740E)
NOTICE
■To prevent damage to or incorrect operation of the LDA system
●Do not modify the headlights or attach stickers to the surface of the lights.
●Do not modify the suspension.
If any suspension parts need to be replac ed, contact any authorized Lexus dealer or repairer, or another duly qualified and equipped professional.
●Do not install or place anything on the h ood or the grille. Also, do not install a grille
guard (bull bars, kangaroo bar etc.).
●If your windshield needs repairs, contact any authorized Lexus dealer or repairer, or another duly qualified an d equipped professional.
■Camera sensor
Observe the following to ensure that the LDA system functions correctly.
●Keep the windshield clean at all times.
Performance could be affected if the windshie ld is dirty, or if raindrops, condensation or ice are adhering to the windshield.
●Do not spill liquid onto the camera sensor.
●Do not attach window tinting to the windshield.
●Do not install an antenna in front of the camera lens.
●If the area of the windshield in front of the camera sensor is fogged up, use the wind-
shield defogger to remove the fog. When it is cold, setting the heater to blow air to the feet only may cause the area ofthe windshield in front of the camera sensor to fog up. This will have a negative effect
on the images.
●Do not scratch the camera lens, or let it get dirty. When cleaning the inside of the windshield, be careful not to get any glass cleaner
etc. on the lens. Also, do not touch the lens. For lens repair, contact any authorized Lexus dealer or repairer, or another duly qual- ified and equipped professional.
●Do not change the installation position or direction of the camera sensor or remove it. The direction of the camera sensor is precisely adjusted.
●Do not subject the camera sensor to strong impact or force, and do not disassemble
the camera sensor.
●If the windshield needs to be replaced, contact any authorized Lexus dealer or repairer, or another duly qualified and equipped professional.
●Do not attach a sticker or other items to thewindshield near the camera sensor.
Page 360 of 640

360
RC300h_EE(OM24740E)
5-3. Using the audio system
Press the button to display the “Source” screen.
If the “Source” screen is not displayed, press the button again.
Select the desired audio source.
The audio source can be selected by pressing the “RADIO” or “MEDIA” button.
Press the “MODE” switch when the audio system is turned on. The audio source
changes each time the “MODE” switch is pressed.
■Rearranging the list
The listing order of the source list can be rearranged.
Move the controller to the left while on the “Source” screen.
Select “Audio source select”.
Select an item you wish to move and then select where to move the item to.
Selecting the audio source
Switching between audio sources such as radio and CD are explained in this
section.
Changing audio source
Using the steering wheel switches to change audio sources
1
2
1
2
3