Page 270 of 644
268
GX 460 _O M_ OM6 0F 6 8U _(U )4-5. Using the driving support systems
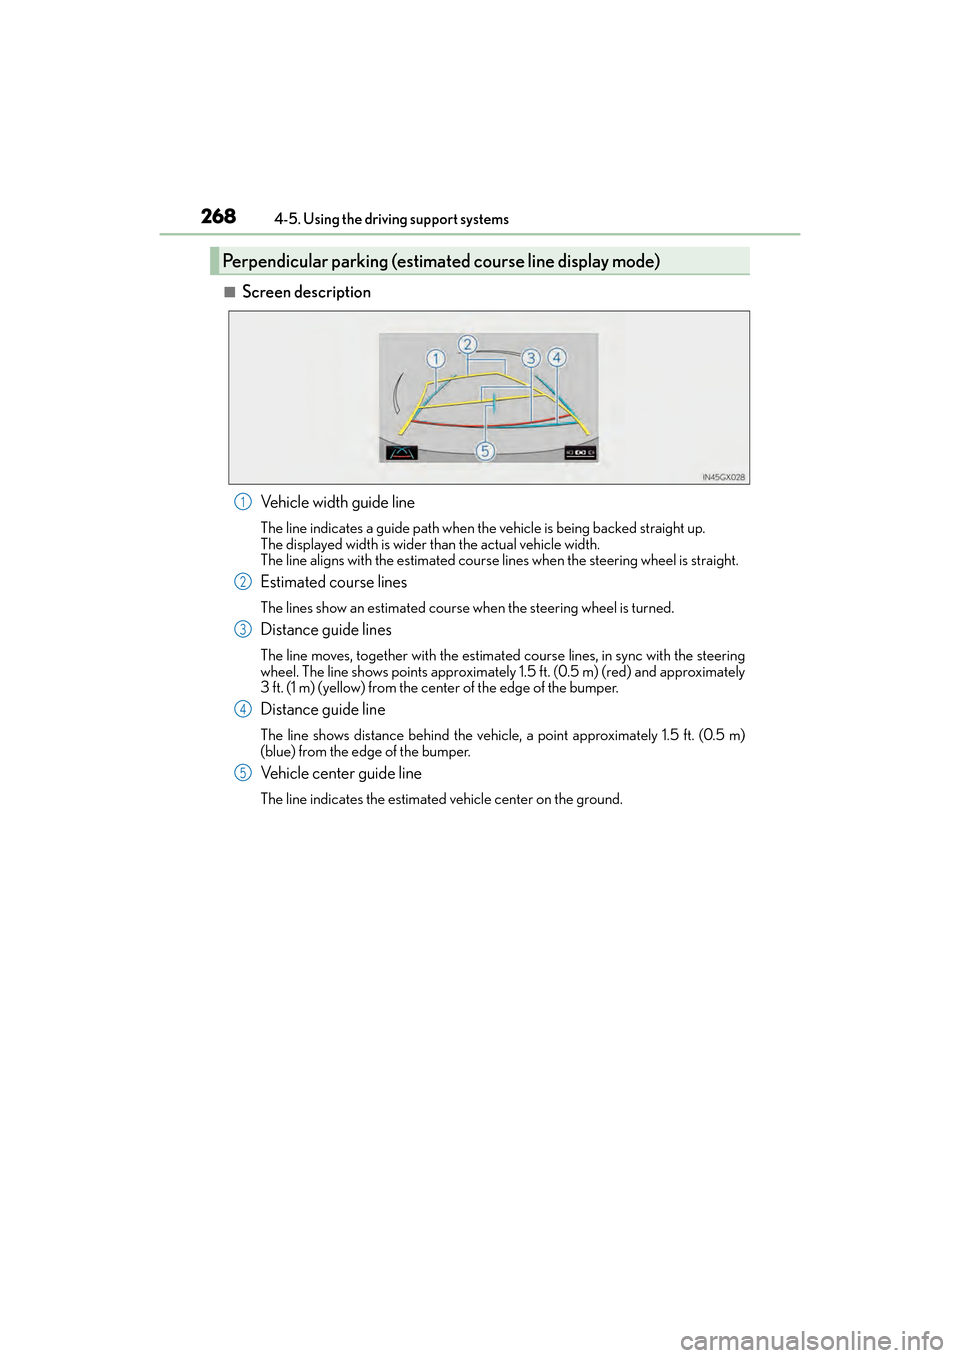
■Screen description
Vehicle width guide line
The line indicates a guide path when the vehicle is being backed straight up.
The displayed width is wider than the actual vehicle width.
The line aligns with the estimated course lines when the steering wheel is straight.
Estimated course lines
The lines show an estimated course when the steering wheel is turned.
Distance guide lines
The line moves, together with the estimated course lines, in sync with the steering
wheel. The line shows points approximately 1.5 ft. (0.5 m) (red) and approximately
3 ft. (1 m) (yellow) from the center of the edge of the bumper.
Distance guide line
The line shows distance behind the vehicle, a point approximately 1.5 ft. (0.5 m)
(blue) from the edge of the bumper.
Vehicle center guide line
The line indicates the estimated vehicle center on the ground.
Perpendicular parking (estimated course line display mode)
1
2
3
4
5
GX460_OM_OM60F68U_(U).book Page 268 Wednesday, June 8, 2016 6:37 PM
Page 272 of 644
270
GX 460 _O M_ OM6 0F 6 8U _(U )4-5. Using the driving support systems
Once the vehicle width guide lines and the parking space lines are parallel,
straighten the steering wheel and back up slowly until the vehicle has com-
pletely entered the parking space.
Stop the vehicle in an appropriate place, and finish parking.
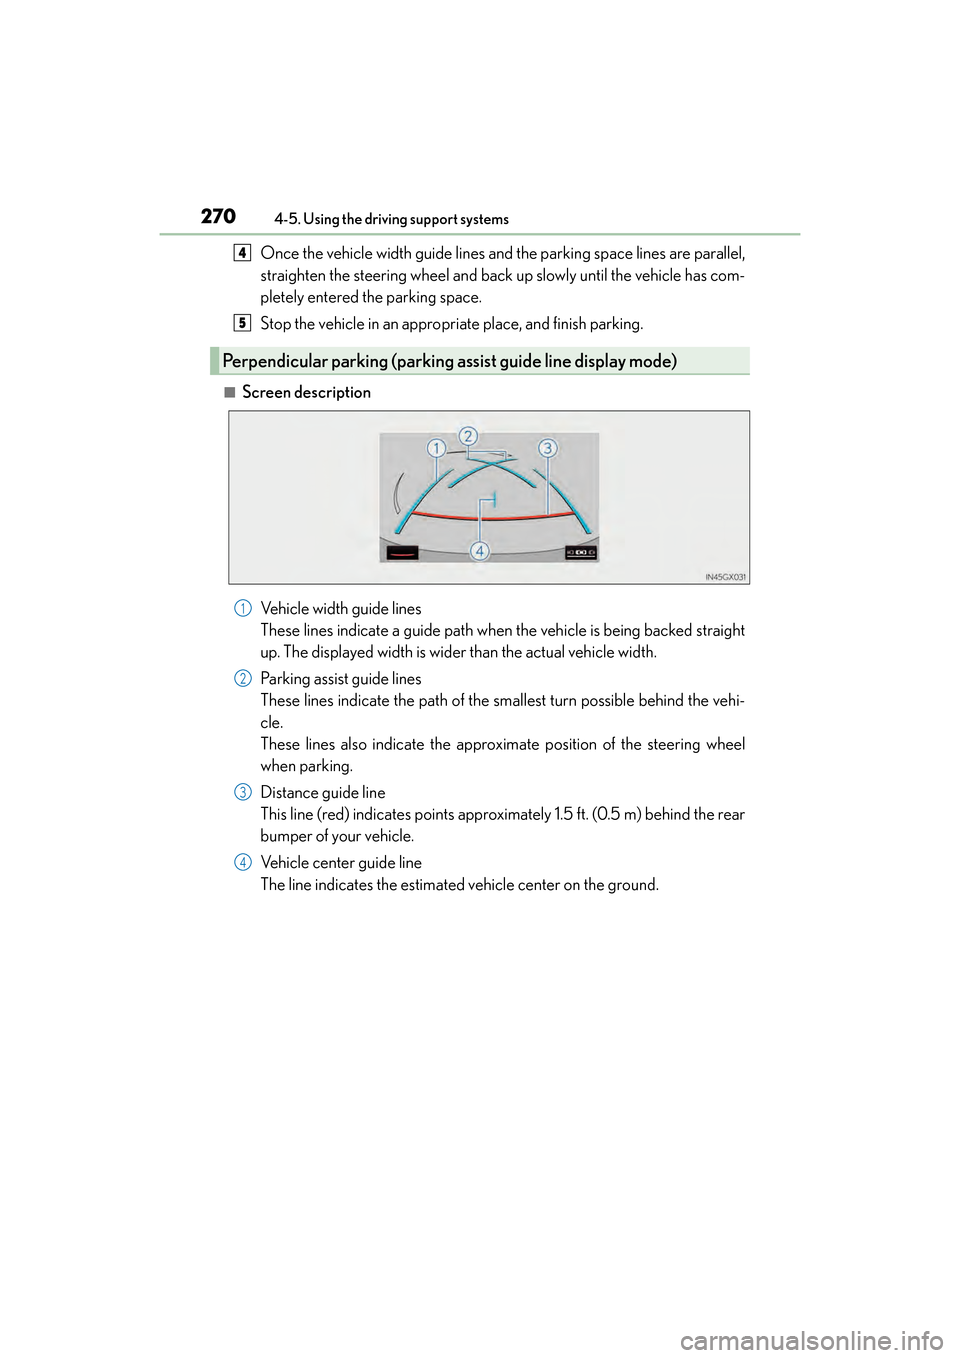
■Screen description
Vehicle width guide lines
These lines indicate a guide path when the vehicle is being backed straight
up. The displayed width is wider than the actual vehicle width.
Parking assist guide lines
These lines indicate the path of the smallest turn possible behind the vehi-
cle.
These lines also indicate the approximate position of the steering wheel
when parking.
Distance guide line
This line (red) indicates points approximately 1.5 ft. (0.5 m) behind the rear
bumper of your vehicle.
Vehicle center guide line
The line indicates the estimated vehicle center on the ground.
Perpendicular parking (parking assist guide line display mode)
4
5
1
2
3
4
GX460_OM_OM60F68U_(U).book Page 270 Wednesday, June 8, 2016 6:37 PM
Page 274 of 644
272
GX 460 _O M_ OM6 0F 6 8U _(U )4-5. Using the driving support systems
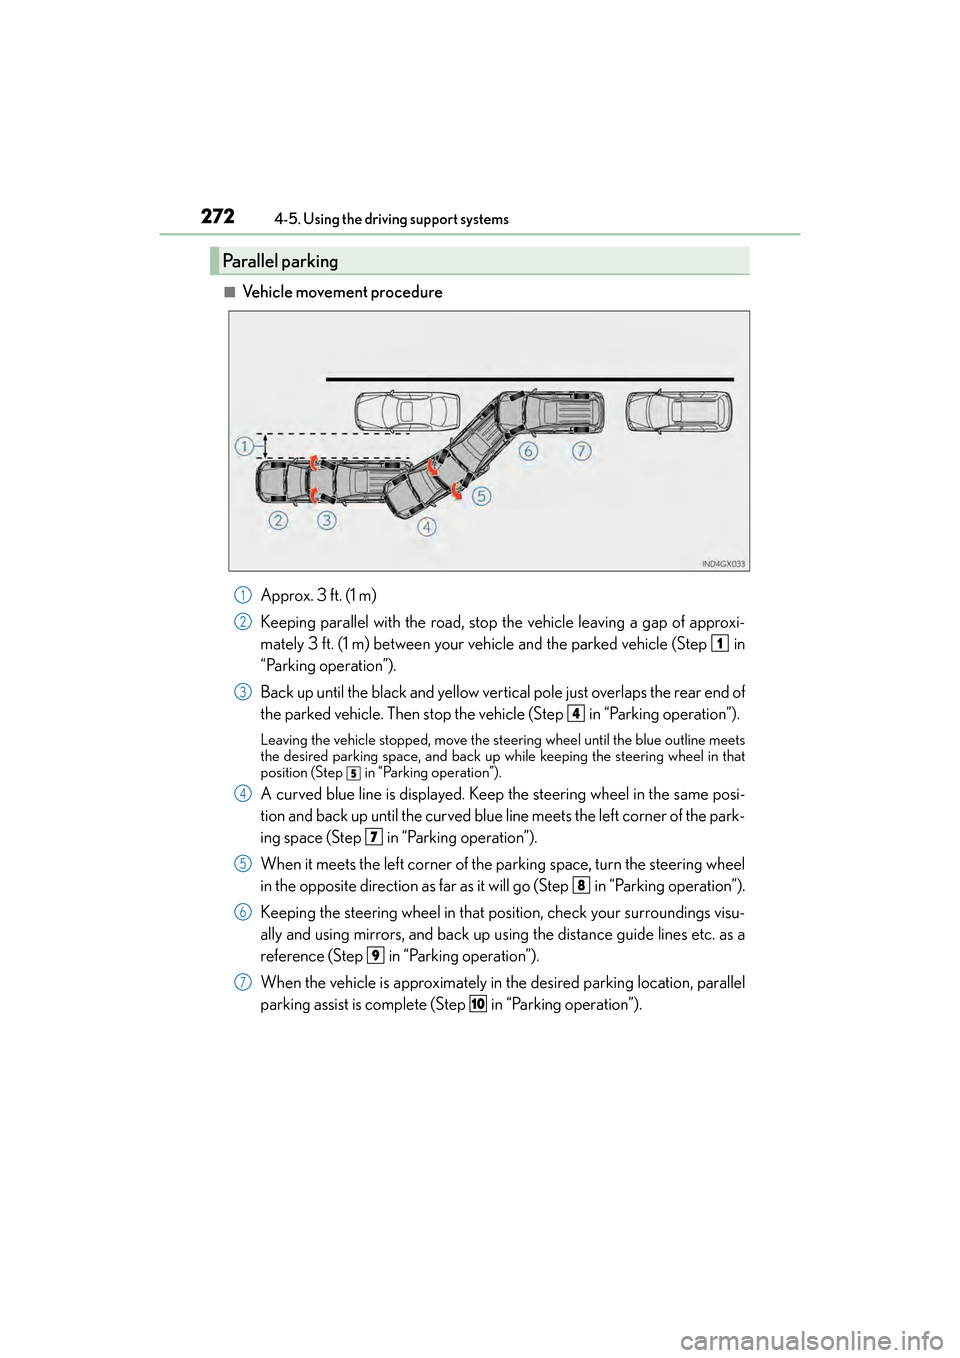
■Vehicle movement procedure
Approx. 3 f t. (1 m)
Keeping parallel with the road, stop the vehicle leaving a gap of approxi-
mately 3 ft. (1 m) between your vehicle and the parked vehicle (Step in
“Parking operation”).
Back up until the black and yellow vertical pole just overlaps the rear end of
the parked vehicle. Then stop the vehicle (Step in “Parking operation”).
Leaving the vehicle stopped, move the st eering wheel until the blue outline meets
the desired parking space, and back up while keeping the steering wheel in that
position (Step
in “Parking operation”).
A curved blue line is displayed. Keep the steering wheel in the same posi-
tion and back up until the curved blue line meets the left corner of the park-
ing space (Step in “Parking operation”).
When it meets the left corner of the parking space, turn the steering wheel
in the opposite direction as far as it will go (Step in “Parking operation”).
Keeping the steering wheel in that position, check your surroundings visu-
ally and using mirrors, and back up using the distance guide lines etc. as a
reference (Step in “Parking operation”).
When the vehicle is approximately in the desired parking location, parallel
parking assist is complete (Step in “Parking operation”).
Parallel parking
1
2
1
3
4
5
4
7
5
8
6
9
7
10
GX460_OM_OM60F68U_(U).book Page 272 Wednesday, June 8, 2016 6:37 PM
Page 276 of 644
274
GX 460 _O M_ OM6 0F 6 8U _(U )4-5. Using the driving support systems
Shift the shift lever to the R position.
Make sure the monitor displays the part behind the rear tires of the parked
vehicle, and select .
If the area is not displayed, move the vehicle to forward.
With the steering wheel straight, back up slowly to a position at which the
black and yellow vertical pole just overlaps the rear end of the parked vehi-
cle. Then stop the vehicle.
Black and yellow vertical pole
Back the vehicle up to here
2
3
4
1
2
GX460_OM_OM60F68U_(U).book Page 274 Wednesday, June 8, 2016 6:37 PM
Page 277 of 644
GX 460 _O M_ OM6 0F 6 8U _(U )
2754-5. Using the driving support systems
4
Driving
Turn the steering wheel with the vehicle stopped until the blue outline
meets the desired parking space.Blue outline
Black and yellow vertical pole
Extended line
If the extended line from the blue
outline is displayed, the parallel
parking assist is operational.
Turn the steering wheel right
Black and yellow vertical pole
Blue outline
5
1
2
3
4
5
6
GX460_OM_OM60F68U_(U).book Page 275 Wednesday, June 8, 2016 6:37 PM
Page 280 of 644
278
GX 460 _O M_ OM6 0F 6 8U _(U )4-5. Using the driving support systems
●Canceling parallel parking assist
Select .
●Vehicles with intuitive parking assist
If intuitive parking assist detects an object while you attempt to park in a
parking space on the right, the blac
k and yellow vertical pole could be
obscured by intuitive parking assist display. In this event, turn intuitive park-
ing assist switch off ( →P. 245), and operate the vehicle while checking the
safety of the surrounding area direct visually and with mirror. After the
operation, turn the switch on.
●If the message “Steering wheel turned too far, please return.” is displayed
The steering wheel has been turned too far, and the system cannot func-
tion. Return the steering wheel to its original position.
If the message is displayed before the outline is positioned over the desired
parking space, it is likely that the vehicle is too far away from the shoulder.
Check that there is a gap of approximately 3 ft. (1 m) between your vehicle
and the parked vehicle.
GX460_OM_OM60F68U_(U).book Page 278 Wednesday, June 8, 2016 6:37 PM
Page 281 of 644
GX 460 _O M_ OM6 0F 6 8U _(U )
2794-5. Using the driving support systems
4
Driving
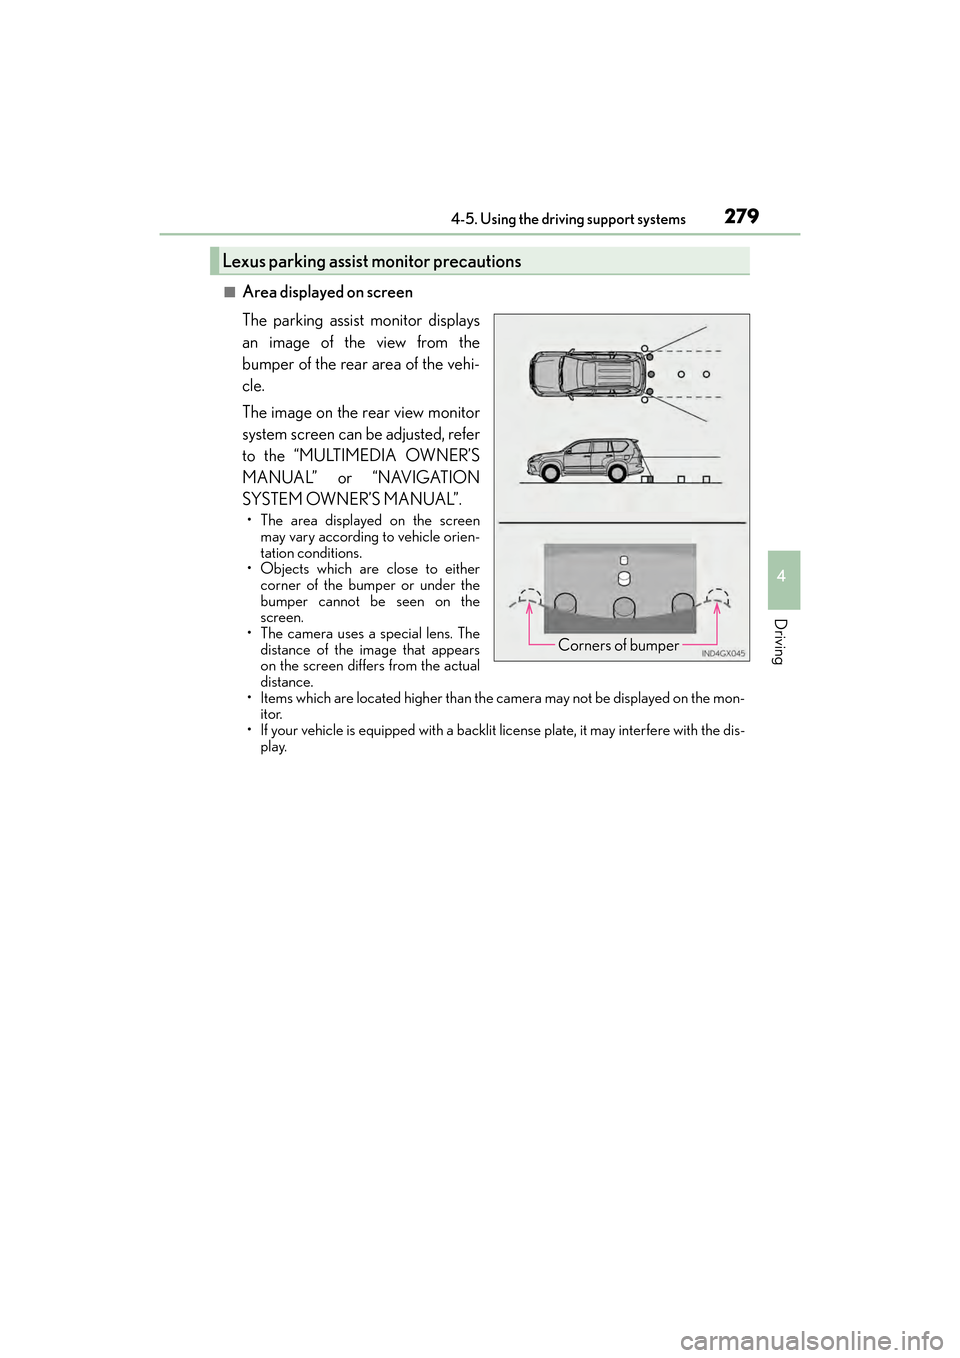
■Area displayed on screen
The parking assist monitor displays
an image of the view from the
bumper of the rear area of the vehi-
cle.
The image on the rear view monitor
system screen can be adjusted, refer
to the “MULTIMEDIA OWNER’S
MANUAL” or “NAVIGATION
SYSTEM OWNER’S MANUAL”.
• The area displayed on the screenmay vary according to vehicle orien-
tation conditions.
• Objects which are close to either corner of the bumper or under the
bumper cannot be seen on the
screen.
• The camera uses a special lens. The
distance of the image that appears
on the screen differs from the actual
distance.
• Items which are located higher than the camera may not be displayed on the mon- itor.
• If your vehicle is equipped with a backlit license plate, it may interfere with the dis-
play.
Lexus parking assist monitor precautions
Corners of bumper
GX460_OM_OM60F68U_(U).book Page 279 Wednesday, June 8, 2016 6:37 PM
Page 287 of 644

GX 460 _O M_ OM6 0F 6 8U _(U )
2854-5. Using the driving support systems
4
Driving
�‰The estimated course lines move even though the steering wheel is straight
There is a malfunction in the signals being
output by the steering sensor.Have the vehicle inspected by your Lexus
dealer.
�‰ Guide lines are not displayed
The back door is open.
Close the back door.
If this does not resolve the symptom, have
the vehicle inspected by your Lexus
dealer.
�‰“System is initializing.” is displayed
• The battery has been reinstalled.
• The steering wheel has been moved
while the battery was being reinstalled.
• Battery power is low.
• The steering sensor has been rein-
stalled.
• There is a malfunction in the signals being output by the steering sensor.Stop the vehicle, and turn the steering
wheel as far as it will go to the left and
right. (Selecting “?” on the screen displays
the operating procedure above.)
If this does not resolve the symptom, have
the vehicle inspected by your Lexus
dealer.
Likely causeSolution
GX460_OM_OM60F68U_(U).book Page 285 Wednesday, June 8, 2016 6:37 PM