Page 54 of 403
52
2. Bluetooth® SETTINGS
GX460_Navi_OM60N98U_(U)16.05.30 14:27
1Select “Device Name” .
2Enter the name and select “OK” .1Select “Connect Audio Player from” .
2Select the desired connection method.
“Vehicle”: Select to connect the audio sys-
tem to the audio player.
“Device” : Select to connect the audio play-
er to the audio system.
�z Depending on the audio player, the “Vehi-
cle” or “Device” connection method may
be best. As such, refer to the manual that
comes with the audio player.
�z To reset the connection method, select
“Default” .
CHANGING A DEVICE NAME
INFORMATION
●
Even if the device name is changed, the
name registered in your Bluetooth®
device does not change.
SETTING AUDIO PLAYER
CONNECTION METHOD
GX_Navi_OM60N98U_(U).book Page 52 Monday, May 30, 2016 2:28 PM
Page 55 of 403
53
2. Bluetooth® SETTINGS
GX460_Navi_OM60N98U_(U)16.05.30 14:27
2
BASIC FUNCTION
1Display the “Bluetooth* Setup” screen.
(→ P.45)
2Select “System Settings” .
3Select the desired item to be set.
*: Bluetooth is a registered trademark of Bluetooth SIG, Inc.
“System Settings” SCREEN
The Bluetooth® settings can be con-
firmed and changed.
No.InformationPage
Select to set Bluetooth®
connection on/off.54
Displays system name can
be changed to a desired
name.54
PIN-code used when the
Bluetooth® device was
registered. It can be
changed to a desired code.54
Device address is unique to
the device and cannot be
changed.
Select to set the phone con-
nection status display on/
off.
Select to set the connection
status display of the audio
player on/off.
Compatibility profile of the
system.
Select to reset all setup
items.
GX_Navi_OM60N98U_(U).book Page 53 Monday, May 30, 2016 2:28 PM
Page 58 of 403

56
3. OTHER SETTINGS
GX460_Navi_OM60N98U_(U)16.05.30 14:27
1Display the “General Settings” screen.
(→ P.55)
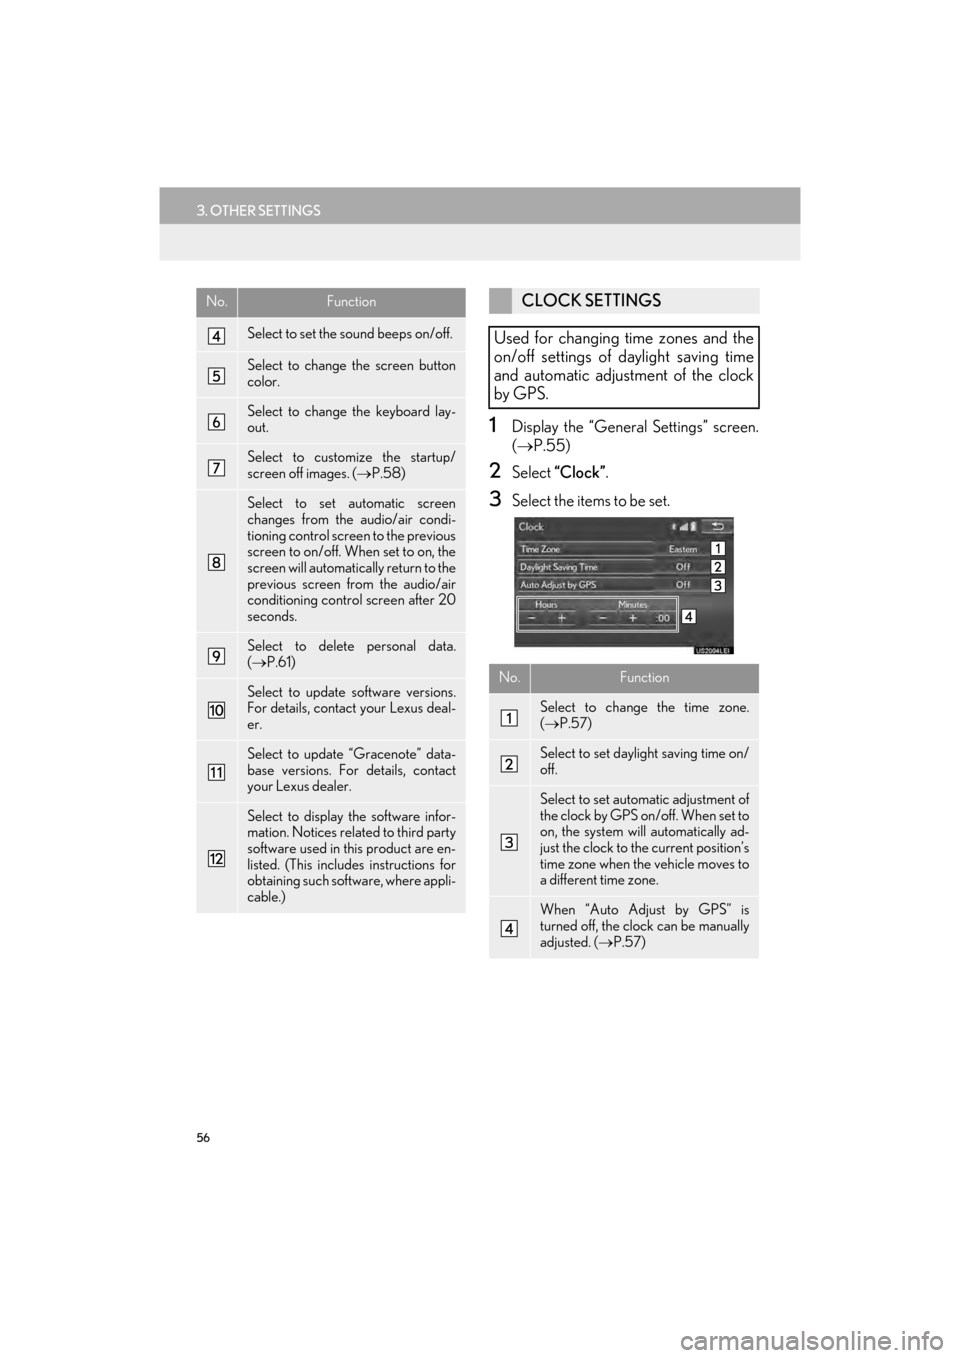
2Select “Clock” .
3Select the items to be set.
Select to set the sound beeps on/off.
Select to change the screen button
color.
Select to change the keyboard lay-
out.
Select to customize the startup/
screen off images. ( →P.58)
Select to set automatic screen
changes from the audio/air condi-
tioning control screen to the previous
screen to on/off. When set to on, the
screen will automatically return to the
previous screen from the audio/air
conditioning control screen after 20
seconds.
Select to delete personal data.
(→ P.61)
Select to update software versions.
For details, contact your Lexus deal-
er.
Select to update “Gracenote” data-
base versions. For details, contact
your Lexus dealer.
Select to display the software infor-
mation. Notices related to third party
software used in this product are en-
listed. (This includes instructions for
obtaining such software, where appli-
cable.)
No.FunctionCLOCK SETTINGS
Used for changing time zones and the
on/off settings of daylight saving time
and automatic adjustment of the clock
by GPS.
No.Function
Select to change the time zone.
( → P.57)
Select to set daylight saving time on/
off.
Select to set automatic adjustment of
the clock by GPS on/off. When set to
on, the system will automatically ad-
just the clock to the current position’s
time zone when the vehicle moves to
a different time zone.
When “Auto Adjust by GPS” is
turned off, the clock can be manually
adjusted. ( →P.57)
GX_Navi_OM60N98U_(U).book Page 56 Monday, May 30, 2016 2:28 PM
Page 63 of 403
61
3. OTHER SETTINGS
GX460_Navi_OM60N98U_(U)16.05.30 14:27
2
BASIC FUNCTION
■DELETING TRANSFERRED IMAG-
ES
1Select “Delete Images” .
2Select the images to be deleted and se-
lect “Delete” .
3Select “Yes” when the confirmation
screen appears.
1Display the “General Settings” screen.
( → P.55)
2Select “Delete Personal Data” .
3Select “Delete” .
4Select “Yes” when the confirmation
screen appears.
�z Registered or changed personal settings
will be deleted or returned to their default
conditions.
For example:
• General settings
• Navigation settings
• Audio settings
• Phone settings
• Lexus Enform settings
DELETING PERSONAL DATA
GX_Navi_OM60N98U_(U).book Page 61 Monday, May 30, 2016 2:28 PM
Page 65 of 403
63
3. OTHER SETTINGS
GX460_Navi_OM60N98U_(U)16.05.30 14:27
2
BASIC FUNCTION
No.Function
Select to adjust the volume of voice
guidance.
Select to set the voice guidance dur-
ing route guidance on/off.
Select to set the voice guidance dur-
ing audio/visual and/or air condi-
tioning system use on/off.
Select to set the voice recognition
prompts on/off.
Select to train voice recognition.
The voice command system adapt
the user accent.
When “On” is selected, expanded
voice commands can be operated
using voice commands. ( →P.287)
Select to set the voice prompt inter-
rupt on/off.
Select to set the beep sound of navi-
gation guidance.
Select to reset all setup items.
GX_Navi_OM60N98U_(U).book Page 63 Monday, May 30, 2016 2:28 PM
Page 155 of 403
153
6. TIPS FOR THE NAVIGATION SYSTEM
GX460_Navi_OM60N98U_(U)16.05.30 14:27
3
NAVIGATION SYSTEM
ABOUT THE MAP DATA
Map data for the navigation system is
contained in a SD card that is inserted in
the SD card slot located at the bottom of
the audio control panel.
Do not eject the SD card, as doing so
may deactivate the navigation system.
NOTICE
●Do not edit or delete the map data on the
SD card, as doing so may deactivate the
navigation system.
INFORMATION
●
microSDHC Logo is a trademark of
SD-3C, LLC.
GX_Navi_OM60N98U_(U).book Page 153 Monday, May 30, 2016 2:28 PM
Page 157 of 403
4
155
1
2
3
4
5
6
7
8
GX460_Navi_OM60N98U_(U)16.05.30 14:27
1. QUICK REFERENCE ............................ 158
2. SOME BASICS ......................................... 160
TURNING THE SYSTEM ON AND OFF ....................................................... 160
SELECTING AN AUDIO SOURCE............... 161
DISC SLOT.................................................................. 162
USB/AUX PORT ..................................................... 163
SOUND SETTINGS ............................................... 164
AUDIO SCREEN ADJUSTMENT................... 166
VOICE COMMAND SYSTEM........................ 167
1BASIC OPERATION
AUDIO/VISUAL SYSTEM
GX_Navi_OM60N98U_(U).book Page 155 Monday, May 30, 2016 2:28 PM
Page 158 of 403

156
GX460_Navi_OM60N98U_(U)16.05.30 14:27
1. AM/FM RADIO ........................................ 168
OVERVIEW................................................................ 168
PRESETTING A STATION ................................... 171
SELECTING A STATION FROM THE LIST ..................................................................... 171
CACHING A RADIO PROGRAM ............... 173
RADIO BROADCAST DATA SYSTEM ...... 174
TRAFFIC ANNOUNCEMENT (FM RADIO) ........................................................... 176
USING HD Radio™ TECHNOLOGY.......... 176
AVAILABLE HD Radio™ TECHNOLOGY................................................... 177
TROUBLESHOOTING GUIDE ...................... 179
2. XM Satellite Radio ................................... 180
OVERVIEW................................................................ 180
HOW TO SUBSCRIBE TO XM Satellite Radio ......................................................... 183
DISPLAYING THE RADIO ID .......................... 185
PRESETTING A CHANNEL.............................. 186
SELECTING A CHANNEL FROM THE LIST ................................................................... 186
IF THE SATELLITE RADIO TUNER MALFUNCTIONS .............................................. 187
3. INTERNET RADIO.................................. 188
LISTENING TO INTERNET RADIO .............. 188
1. CD .................................................................. 189
OVERVIEW ................................................................ 189
PLAYING AN AUDIO CD ................................ 193
PLAYING AN MP3/WMA/AAC DISC ............................................................... 194
2. DVD ............................................................... 195
OVERVIEW ................................................................ 195
DVD OPTIONS ........................................................ 199
3. USB MEMORY ....................................... 202
OVERVIEW .............................................................. 202
USB AUDIO ............................................................. 206
4. iPod................................................................ 207
OVERVIEW ............................................................... 207
iPod AUDIO ............................................................... 212
iPod VIDEO ................................................................ 213
5. Bluetooth® AUDIO.................................. 214
OVERVIEW ................................................................ 214
CONNECTING A Bluetooth® DEVICE ..... 219
LISTENING TO Bluetooth® AUDIO ............. 219
6. AUX ............................................................... 221
OVERVIEW ................................................................ 221
7. VTR ............................................................... 224
OVERVIEW ............................................................... 224
VTR OPTIONS......................................................... 226
2RADIO OPERATION3MEDIA OPERATION
GX_Navi_OM60N98U_(U).book Page 156 Monday, May 30, 2016 2:28 PM