Page 282 of 676

2824-4. Refueling
GS350_200t_GS F_OM_OM30F83E_(EE)
Opening the fuel tank cap
●Turn the engine switch off and ensure that all the doors and windows are
closed.
● Confirm the type of fuel.
■Fuel types P. 632
■Fuel tank opening for unleaded gasoline
To help prevent incorrect fueling, your vehicle has a fuel tank opening that only accom-
modates the special nozzle on unleaded fuel pumps.
Perform the following steps to open the fuel tank cap:
Before refueling the vehicle
WARNING
■When refueling the vehicle
Observe the following precautions while refueling the vehicle. Failure to do so may
result in death or serious injury.
●After exiting the vehicle and before opening the fuel door, touch an unpainted metal
surface to discharge any static electricity. It is important to discharge static electricity
before refueling because sparks resulting fr om static electricity can cause fuel vapors
to ignite while refueling.
●Always hold the grips on the fuel tank cap and turn it slowly to remove it.
A whooshing sound may be heard when the fuel tank cap is loosened. Wait until the
sound cannot be heard before fully removing the cap. In hot weather, pressurized fuel
may spray out the filler neck and cause injury.
●Do not allow anyone that has not discharged static electricity from their body to come
close to an open fuel tank.
●Do not inhale vaporized fuel.
Fuel contains substances that are harmful if inhaled.
●Do not smoke while refueling the vehicle.
Doing so may cause the fuel to ignite and cause a fire.
●Do not return to the vehicle or touch any person or object that is statically charged.
This may cause static electricity to build up, resulting in a possible ignition hazard.
■When refueling
Observe the following precautions to prevent fuel overflowing from the fuel tank:
●Securely insert the fuel nozzle into the fuel filler neck.
●Stop filling the tank after the fuel nozzle automatically clicks off.
●Do not top off the fuel tank.
Page 330 of 676

3304-5. Using the driving support systems
GS350_200t_GS F_OM_OM30F83E_(EE)
●Side road speed signs may be detected and di splayed (if positioned in sight of the cam-
era sensor) while the vehicle is traveling on the main road.
●Roundabout exit road speed signs may be detected and displayed (if positioned in sight
of the camera sensor) while traveling on a roundabout.
●On some models: The speed information displayed on the meter and t hat displayed on
the navigation system may be different due to the navigation system using map data.
■When driving vehicle in country with different speed unit
Since RSA recognizes signs based on the set un it of the meter, it is necessary to change
the set unit of the meter. Adjust the set unit of the meter to the speed unit of signs in the
current location. ( P. 641)
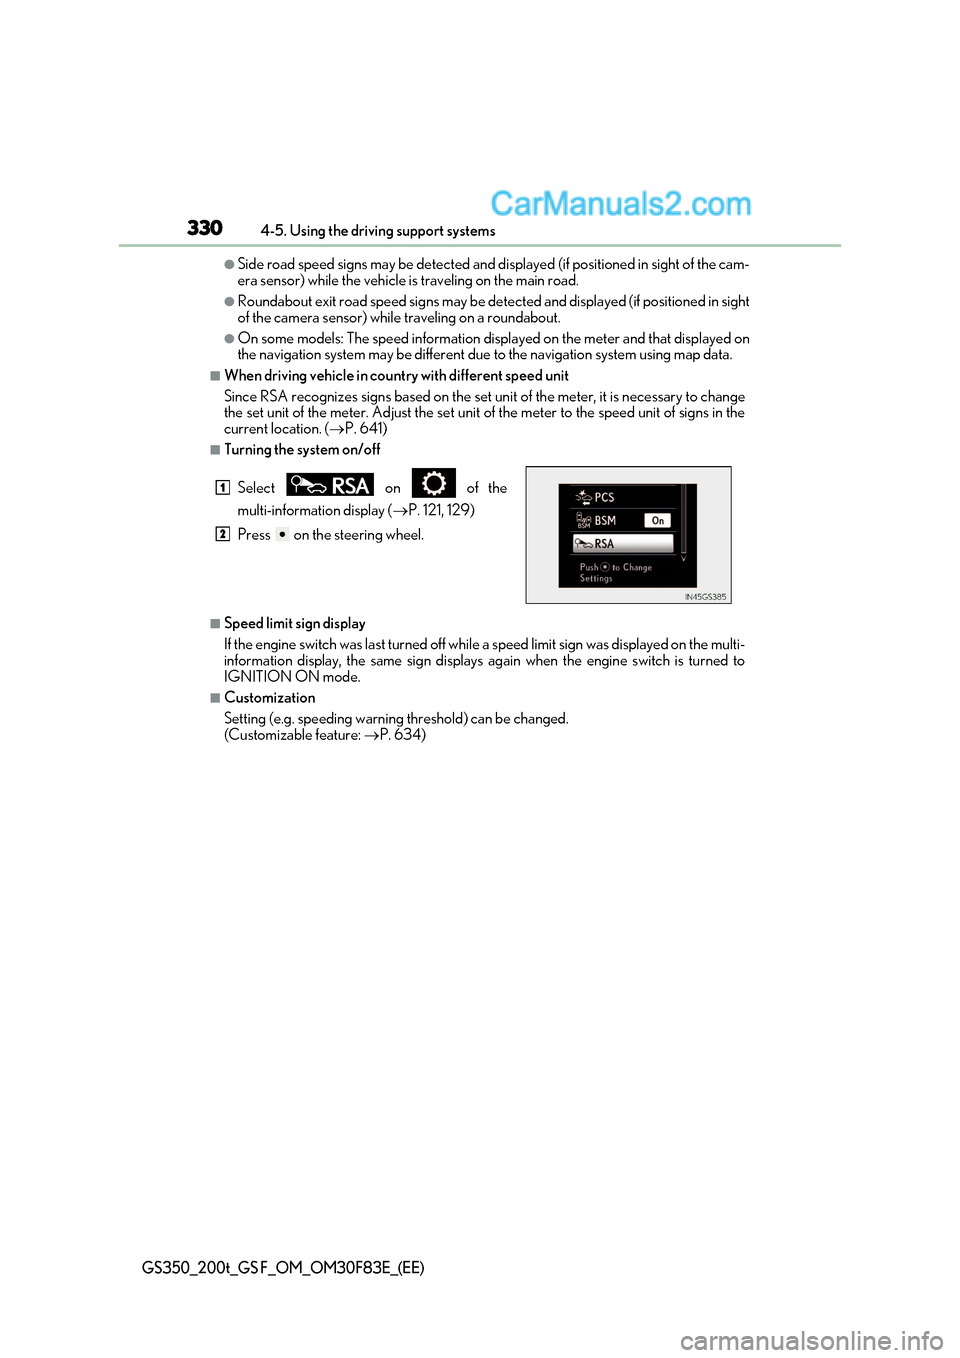
■Turning the system on/off
■Speed limit sign display
If the engine switch was last turned off while a speed limit sign was displayed on the multi-
information display, the same sign displays again when the engine switch is turned to
IGNITION ON mode.
■Customization
Setting (e.g. speeding warning threshold) can be changed.
(Customizable feature: P. 634)
Select on of the
multi-information display (
P. 121, 129)
Press on the steering wheel.
1
2
Page 337 of 676

337
4-5. Using the driving support systems
4
Driving
GS350_200t_GS F_OM_OM30F83E_(EE)
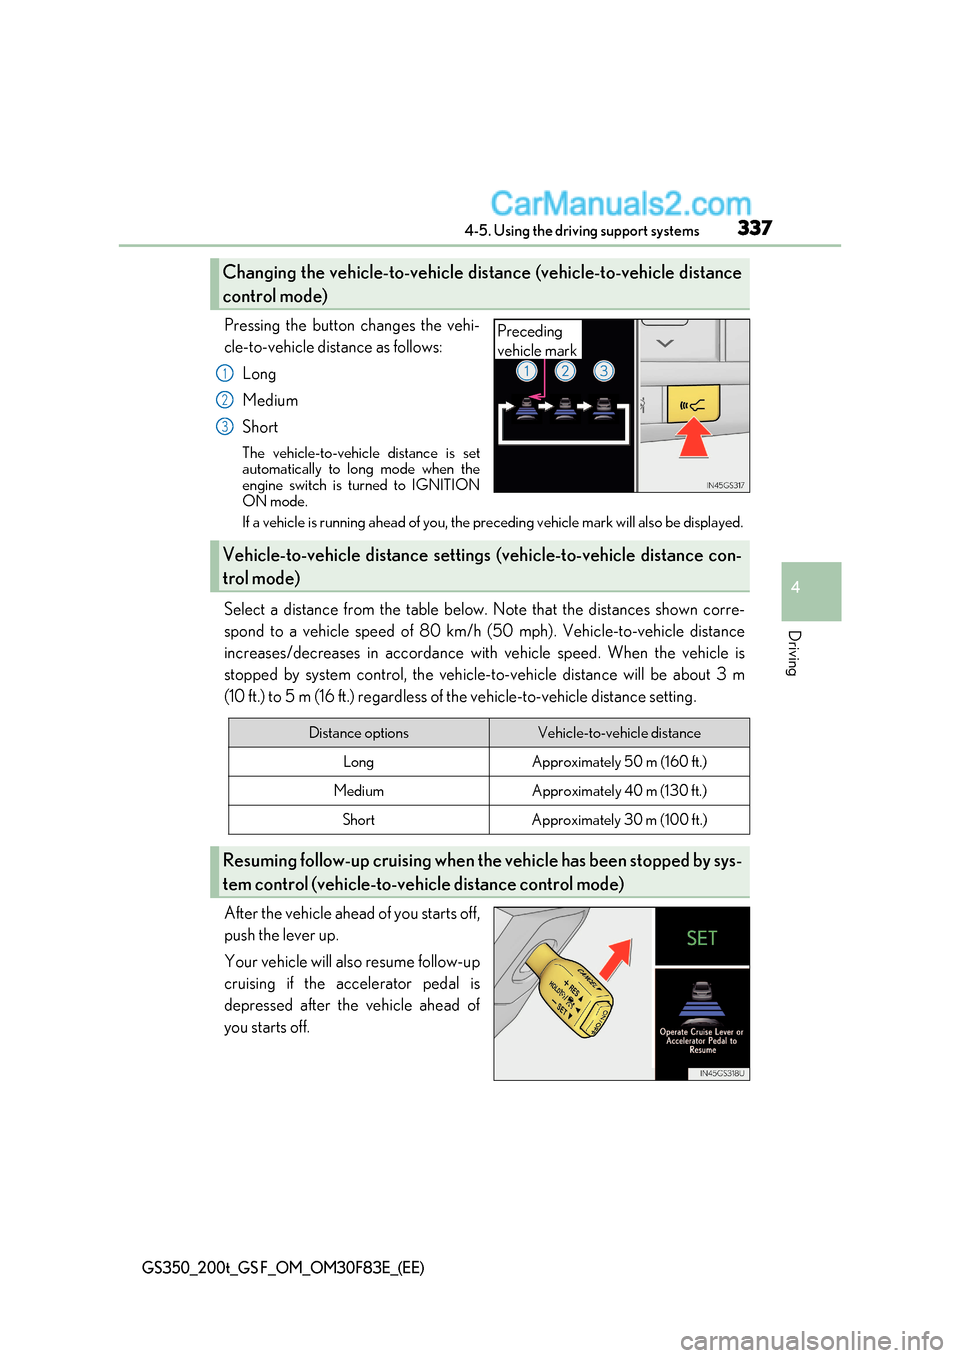
Pressing the button changes the vehi-
cle-to-vehicle distance as follows:
Long
Medium Short
The vehicle-to-vehicle distance is set
automatically to long mode when the
engine switch is turned to IGNITION
ON mode.
If a vehicle is running ahead of you, the preceding vehicle mark will also be displayed.
Select a distance from the table below. Note that the distances shown corre-
spond to a vehicle speed of 80 km/h (50 mph). Vehicle-to-vehicle distance
increases/decreases in accordance with vehicle speed. When the vehicle is
stopped by system control, the vehicle-to-vehicle distance will be about 3 m
(10 ft.) to 5 m (16 ft.) regardless of the vehicle-to-vehicle distance setting.
After the vehicle ahead of you starts off,
push the lever up.
Your vehicle will also resume follow-up
cruising if the accelerator pedal is
depressed after the vehicle ahead of
you starts off.
Changing the vehicle-to -vehicle distance (vehicle-to-vehicle distance
control mode)
Preceding
vehicle mark
1
2
3
Vehicle-to-vehicle distance setting s (vehicle-to-vehicle distance con-
trol mode)
Distance optionsVehicle-to-vehicle distance
LongApproximately 50 m (160 ft.)
MediumApproximately 40 m (130 ft.)
ShortApproximately 30 m (100 ft.)
Resuming follow-up cruising when the vehicle has been stopped by sys-
tem control (vehicle-to-vehicle distance control mode)
Page 349 of 676
349
4-5. Using the driving support systems
4
Driving
GS350_200t_GS F_OM_OM30F83E_(EE)
Pressing the button changes the vehi-
cle-to-vehicle distance as follows:
Long
Medium Short
The vehicle-to-vehicle distance is set
automatically to long mode when the
engine switch is turned to IGNITION
ON mode.
If a vehicle is running ahead of you, the preceding vehicle mark will also be displayed.
Select a distance from the table below. Note that the distances shown corre-
spond to a vehicle speed of 80 km/h (50 mph). Vehicle-to-vehicle distance
increases/decreases in accordance with vehicle speed.
Changing the vehicle-to -vehicle distance (vehicle-to-vehicle distance
control mode)
Preceding
vehicle mark
1
2
3
Vehicle-to-vehicle distance setting s (vehicle-to-vehicle distance con-
trol mode)
Distance optionsVehicle-to-vehicle distance
LongApproximately 50 m (160 ft.)
MediumApproximately 40 m (130 ft.)
ShortApproximately 30 m (100 ft.)
Page 373 of 676

373
4
4-5. Using the driving support systems
Driving
GS350_200t_GS F_OM_OM30F83E_(EE)
TVD (Torque Vectoring Differential)
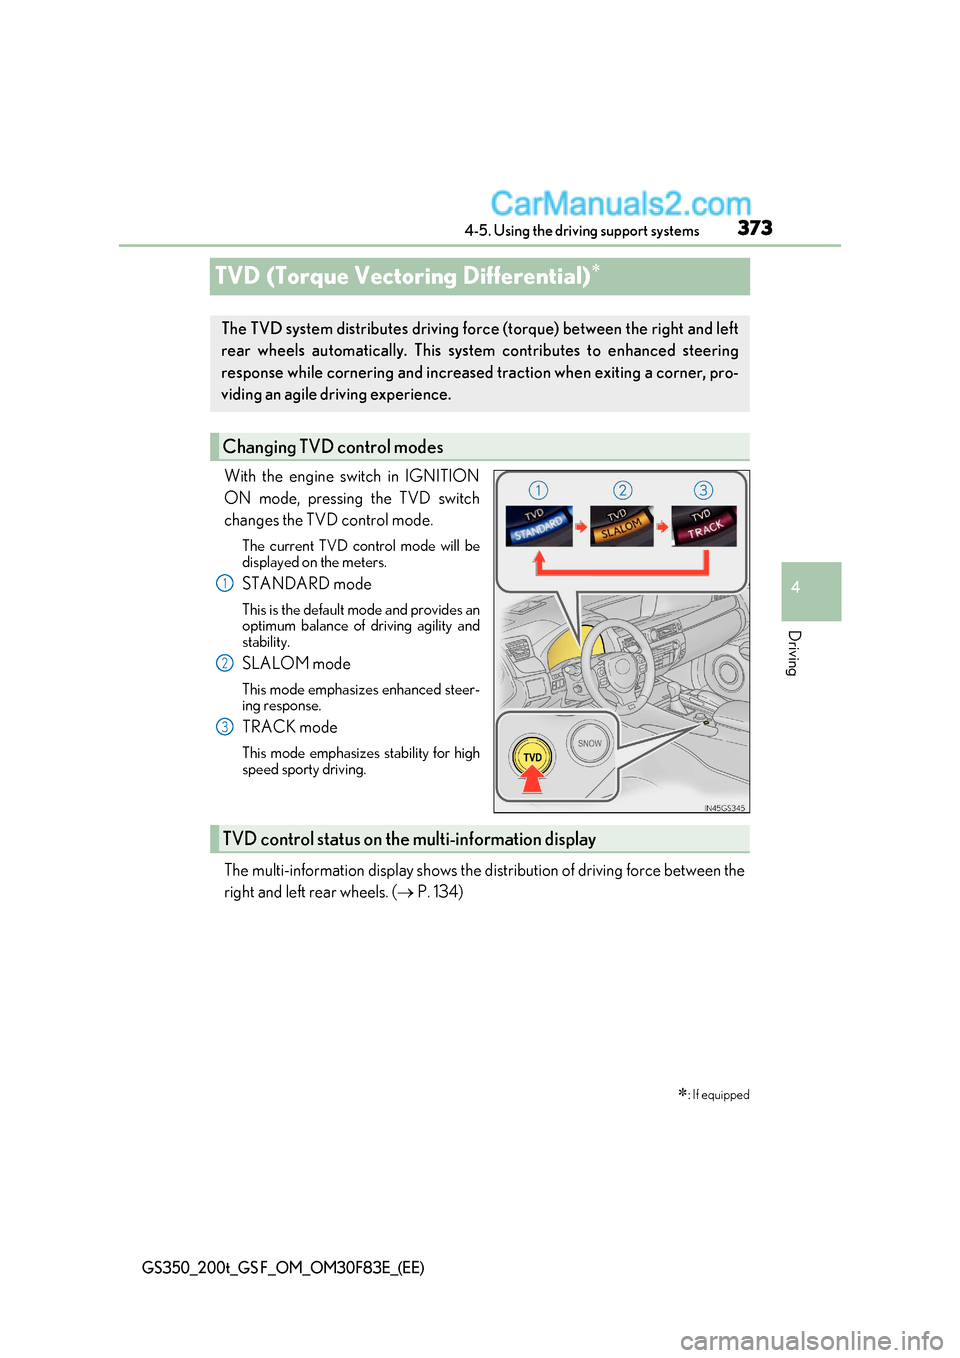
With the engine switch in IGNITION
ON mode, pressing the TVD switch
changes the TVD control mode.
The current TVD control mode will be
displayed on the meters.
STANDARD mode
This is the default mode and provides an
optimum balance of driving agility and
stability.
SLALOM mode
This mode emphasizes enhanced steer-
ing response.
TRACK mode
This mode emphasizes stability for high
speed sporty driving.
The multi-information display shows the distribution of driving force b etween the
right and left rear wheels. ( P. 134)
: If equipped
The TVD system distributes driving fo rce (torque) between the right and left
rear wheels automatically. This system contributes to enhanced steering
response while cornering and increased traction when exiting a corner, pro-
viding an agile driving experience.
Changing TVD control modes
1
2
3
TVD control status on the multi-information display
Page 374 of 676

3744-5. Using the driving support systems
GS350_200t_GS F_OM_OM30F83E_(EE)
■Automatic cancelation of the selected TVD control mode
SLALOM and TRACK mode are canceled when the engine switch is turned off. When
the engine switch is turned to IGNITION ON mode, the TVD system will be in STAN-
DARD mode.
■Automatic disabling of the TVD system
If a malfunction is detected in the TVD sy stem, a warning message will be displayed on
the multi-information display ( P. 524) and the TVD system will be disabled automati-
cally. If the system is disabled, driving force will not be distributed by the TVD but through
normal differential operation.
■To protect the system
If the TVD fluid temperature becomes excessi vely high due to driving for a long time
under extremely high load conditions, a warning message will be displayed on the multi-
information display. ( P. 524)
WARNING
■Cautions regarding the use of the system
The driver is solely responsible for safe driv ing. Do not overly rely on the TVD system.
Always drive safely, taking care to observe your surroundings.
Page 412 of 676
4125-2. Using the air conditio ning system and defogger
GS350_200t_GS F_OM_OM30F83E_(EE)
Turns the heated steering wheel on/off
The indicator light comes on when the
heater is operating.
●The heated steering wheel can be used when the engine switch is in IGNITION ON
mode.
●The heated steering wheel will automatically turn off after about 30 minutes.
■Front seat heaters and ventilators (if equipped)/rear seat heaters (if equipped)
Seat heater switches
The indicator light (yellow) on the switch comes on when the seat heater is operat- ing.
Seat ventilator switches (front seats only)
The indicator light (green) on the switch co mes on when the seat ventilator is oper-
ating.
Level indicator lights
The seat heater temperature level or the seat ventilator fan speed level (for front
seats only) is displayed.
“AUTO” indicator lights
Heated steering wheel (if equipped)
Seat heaters/seat ventilators
Front seatsRear seats
1
2
3
4
Page 415 of 676

415
5-2. Using the air conditioning system and defogger
5
Interior features
GS350_200t_GS F_OM_OM30F83E_(EE)
■The seat heaters/seat ventilators can be used when
The engine switch is in IGNITION ON mode.
■Seat heater control (vehicles without automatic mode)
The seat heater automatically changes operatio ns. If the engine switch is turned off while
the seat heater is operating, the starting operation of the heater differs depending on the
amount of time that elapses before it is turned back on.
■Automatic operation of the seat heater during Eco drive mode
If the driving mode select switch is switched to Eco drive mode in cold temperatures, the
seat heater may be automatically operated to assist heating performance.
■Automatic operation during S-FLOW mode
The front seat heater and ventilator or the rear seat heater may automatically turn off
when S-FLOW mode is turned on during automatic mode. ( P. 397)
■Button lock function (vehicle s with rear control panel)
To prevent inadvertent operation, some bu ttons on the rear armrest can be locked.
( P. 410)
■When the switch is disabled (v ehicles with rear control panel)
When the rear control panel switch cannot be operated even though the button lock
function is released, check whether the sw itch is disabled due to selecting on
Remote Touch screen. ( P. 403)
■Rear control panel illumination off function (vehicles with rear control panel)
Control panel illumination on the rear armrest can be turned off. ( P. 410)
■Customization
The automatic operation of the front seat heaters (without seat ventilators) and the auto-
matic mode settings for the front seat heaters and ventilators or the rear seat heaters can
be changed. (Customizable features: P. 647)
Current operation
Starting operation mode and amount of time elapsed
until engine switch in IGNITION ON mode
0 to 15 minutesOver 15 minutes
HiHiHi
MidMidHi
LoLoHi