Page 15 of 379
1. BASIC FUNCTION
13
GS_Navi+MM_OM30F99U_(U)16.07.11 14:00
QUICK GUIDE
1No.NameFunctionPage
“MAP” button
Press to display the current position, cancel the
screen scroll, start guidance, and repeat a voice
guidance.
76 , 7 9
“ · ” buttonPress to scroll the list screen and to change the
scale of the map*.34, 39, 80
Back buttonPress to display the previous screen.34
“MENU” buttonPress to display the “Menu” screen.14
Remote Touch
knobMove in the desired direction to select a function,
letter and screen button.
Press to enter the selected function, letter or
screen button.
34
“ENTER” buttonPress to enter the selected function, letter or
screen button.34
“HOME” buttonPress to display the home screen.18, 36
*: With navigation system
Page 33 of 379
2
31
GS_Navi+MM_OM30F99U_(U)16.07.11 14:00
1
2
3 4
5
6
7
8 9
10
1. INITIAL SCREEN ....................................... 32
2. HOW TO USE THE Remote Touch...... 34
3. HOME SCREEN OPERATION ........... 36
4. ENTERING LETTERS AND NUMBERS/LIST SCREEN
OPERATION............................................ 38
ENTERING LETTERS AND NUMBERS ....... 38
LIST SCREEN............................................................... 39
5. SCREEN ADJUSTMENT ......................... 41
6. LINKING MULTI-INFORMATION
DISPLAY AND NAVIGATION
SYSTEM...................................................... 43 1. REGISTERING/CONNECTING
Bluetooth
® DEVICE ............................... 44
REGISTERING A Bluetooth® PHONE
FOR THE FIRST TIME .......................................... 44
REGISTERING A Bluetooth
® AUDIO
PLAYER FOR THE FIRST TIME ...................... 46
PROFILES ..................................................................... 48
2. SETTING Bluetooth® DETAILS ............ 50
“Bluetooth* Setup” SCREEN ................................ 50
REGISTERING A Bluetooth® DEVICE ........... 51
DELETING A Bluetooth® DEVICE.................. 53
CONNECTING A Bluetooth® DEVICE ...... 53
EDITING THE Bluetooth® DEVICE
INFORMATION .................................................... 55
“System Settings” SCREEN .................................... 57
1. GENERAL SETTINGS............................... 61
GENERAL SETTINGS SCREEN ........................ 61
2. VOICE SETTINGS ..................................... 67
VOICE SETTINGS SCREEN ............................... 67
3. VEHICLE SETTINGS ................................ 69
MAINTENANCE ....................................................... 70
1BASIC INFORMATION BEFORE
OPERATION2Bluetooth® SETTINGS
3OTHER SETTINGS
BASIC FUNCTION
*: The Bluetooth® word mark and logos are registered trademarks owned by Bluetooth SIG, Inc.
Page 36 of 379
34
1. BASIC INFORMATION BEFORE OPERATION
GS_Navi+MM_OM30F99U_(U)16.07.11 14:00
2. HOW TO USE THE Remote Touch
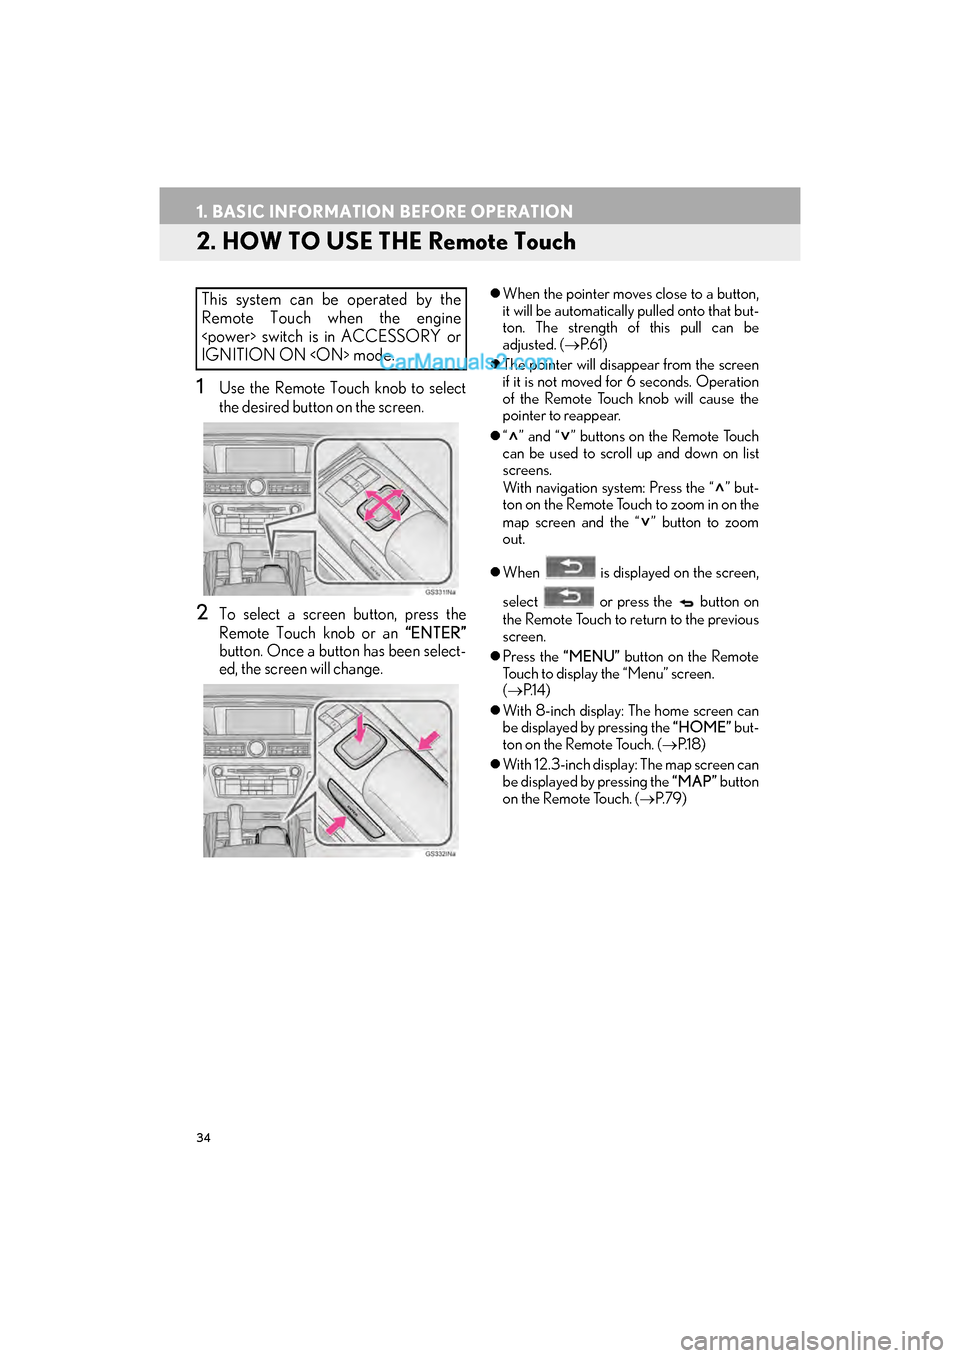
1Use the Remote Touch knob to select
the desired button on the screen.
2To select a screen button, press the
Remote Touch knob or an “ENTER”
button. Once a button has been select-
ed, the screen will change.
�z When the pointer moves close to a button,
it will be automatically pulled onto that but-
ton. The strength of this pull can be
adjusted. ( →P. 6 1 )
�z The pointer will disappear from the screen
if it is not moved for 6 seconds. Operation
of the Remote Touch knob will cause the
pointer to reappear.
�z “ ” and “ ” buttons on the Remote Touch
can be used to scroll up and down on list
screens.
With navigation system: Press the “ ” but-
ton on the Remote Touch to zoom in on the
map screen and the “ ” button to zoom
out.
�z When is displayed on the screen,
select or press the button on
the Remote Touch to return to the previous
screen.
�z Press the “MENU” button on the Remote
Touch to display the “Menu” screen.
( → P.1 4 )
�z With 8-inch display: The home screen can
be displayed by pressing the “HOME” but-
ton on the Remote Touch. ( →P.1 8 )
�z With 12.3-inch display: The map screen can
be displayed by pressing the “MAP” button
on the Remote Touch. ( →P. 7 9 )This system can be operated by the
Remote Touch when the engine
switch is in ACCESSORY or
IGNITION ON mode.
Page 41 of 379
39
1. BASIC INFORMATION BEFORE OPERATION
GS_Navi+MM_OM30F99U_(U)16.07.11 14:00
BASIC FUNCTION
2
■SELECTING ALL ITEMS
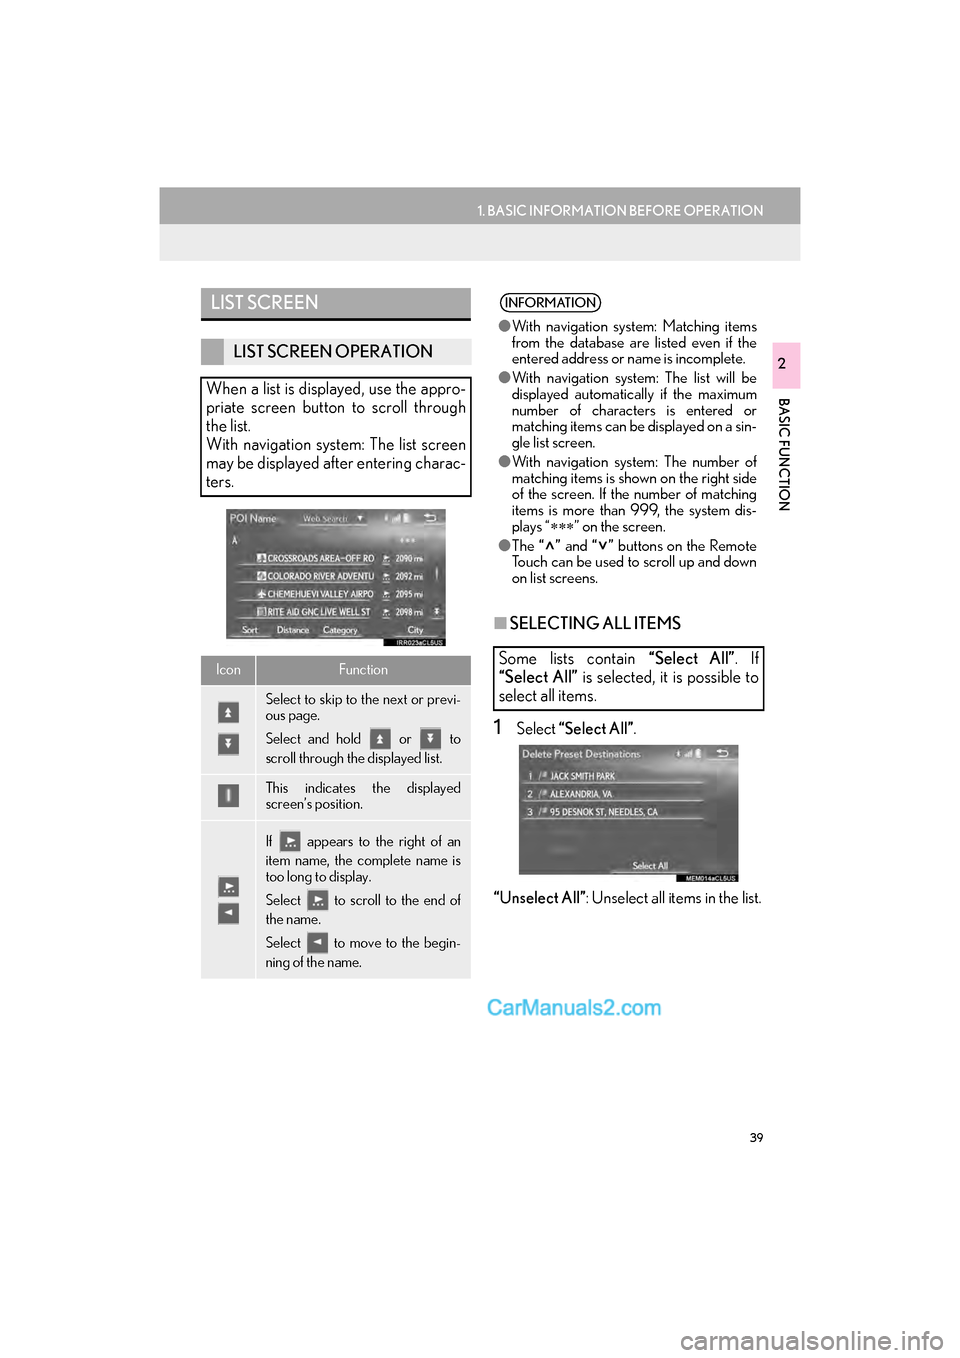
1Select “Select All” .
“Unselect All” : Unselect all items in the list.
LIST SCREEN
LIST SCREEN OPERATION
When a list is displayed, use the appro-
priate screen button to scroll through
the list.
With navigation system: The list screen
may be displayed after entering charac-
ters.
IconFunction
Select to skip to the next or previ-
ous page.
Select and hold or to
scroll through the displayed list.
This indicates the displayed
screen’s position.
If appears to the right of an
item name, the complete name is
too long to display.
Select to scroll to the end of
the name.
Select to move to the begin-
ning of the name.
INFORMATION
● With navigation system: Matching items
from the database are listed even if the
entered address or name is incomplete.
● With navigation system: The list will be
displayed automatically if the maximum
number of characters is entered or
matching items can be displayed on a sin-
gle list screen.
● With navigation system: The number of
matching items is shown on the right side
of the screen. If the number of matching
items is more than 999, the system dis-
plays “ ∗∗∗” on the screen.
● The “” and “” buttons on the Remote
Touch can be used to scroll up and down
on list screens.
Some lists contain “Select All”. If
“Select All” is selected, it is possible to
select all items.
Page 45 of 379
43
1. BASIC INFORMATION BEFORE OPERATION
GS_Navi+MM_OM30F99U_(U)16.07.11 14:00
BASIC FUNCTION
2
6. LINKING MULTI-INFORMATION DISPLAY AND NAVIGATION SYSTEM
The following functions of the navigation system are linked with the multi-information
display in the instrument cluster:• Navigation*
•Audio
etc.
These functions can be operated using multi-information display control switches on
the steering wheel. For details, refer to “Owner’s Manual”.
*: With 12.3-inch display
Page 68 of 379
66
3. OTHER SETTINGS
GS_Navi+MM_OM30F99U_(U)16.07.11 14:00
■DELETING TRANSFERRED IMAG-
ES
1Select “Delete Images”.
2Select the images to be deleted and se-
lect “Delete” .
3Select “Yes” when the confirmation
screen appears.
1Display the “General Settings” screen.
( → P.61)
2Select “Delete Personal Data” .
3Select “Delete” .
4Select “Yes” when the confirmation
screen appears.
�z Registered or changed personal settings
will be deleted or returned to their default
conditions.
For example:
• General settings
• Navigation settings*
• Audio settings
•Phone settings
•Lexus Enform settings*
DELETING PERSONAL DATANOTICE
●With navigation system: Make sure the
map microSD card is inserted when
deleting personal data. The personal data
cannot be deleted when the map
microSD card is removed. To delete the
data, after inserting the map microSD
card, turn the engine switch to
ACCESSORY or IGNITION ON
mode.
*: With 12.3-inch display
Page 77 of 379
3
75
GS_Navi+MM_OM30F99U_(U)16.07.11 14:00
1
2
3 4
5
6
7
8 9
10
1. ROUTE GUIDANCE SCREEN ........... 110
SCREEN FOR ROUTE GUIDANCE ............. 110
ROUTE OVERVIEW ............................................... 112
DURING FREEWAY DRIVING........................ 113
WHEN APPROACHING INTERSECTION .................................................... 115
TURN LIST SCREEN............................................... 116
TURN-BY-TURN ARROW SCREEN ............ 116
2. TYPICAL VOICE GUIDANCE PROMPTS ................................................. 117
3. EDITING ROUTE...................................... 118
ADDING DESTINATIONS ................................. 118
REORDERING DESTINATIONS..................... 118
DELETING DESTINATIONS ............................. 119
SETTING ROUTE PREFERENCES................. 119
SELECTING ROUTE TYPE ................................ 119
DETOUR SETTING ................................................ 120
STARTING FROM ADJACENT ROAD........ 121
1. MEMORY POINTS SETTINGS.......... 122
SETTING UP HOME ............................................. 123
SETTING UP PRESET DESTINATIONS ...... 124
SETTING UP ADDRESS BOOK ..................... 126
SETTING UP AREAS TO AVOID................... 129
DELETING PREVIOUS DESTINATIONS .................................................... 131
1. DETAILED NAVIGATION SETTINGS ................................................ 132
SCREENS FOR NAVIGATION
SETTINGS ................................................................ 132
2. TRAFFIC SETTINGS ............................... 137
SCREEN FOR TRAFFIC SETTINGS.............. 137
1. GPS (GLOBAL POSITIONING SYSTEM) .................................................. 139
LIMITATIONS OF THE NAVIGATION
SYSTEM .................................................................... 139
2. MAP DATABASE VERSION AND COVERED AREA................................. 142
MAP INFORMATION .......................................... 142
ABOUT THE MAP DATA ................................... 142
3ROUTE GUIDANCE4MEMORY POINTS
5SETUP
6TIPS FOR THE NAVIGATION
SYSTEM
NAVIGATION SYSTEM *
*: With 12.3-inch display
Page 79 of 379
77
1. BASIC OPERATION
GS_Navi+MM_OM30F99U_(U)16.07.11 14:00
NAVIGATION SYSTEM
3
*
: This function is not made available on some models.
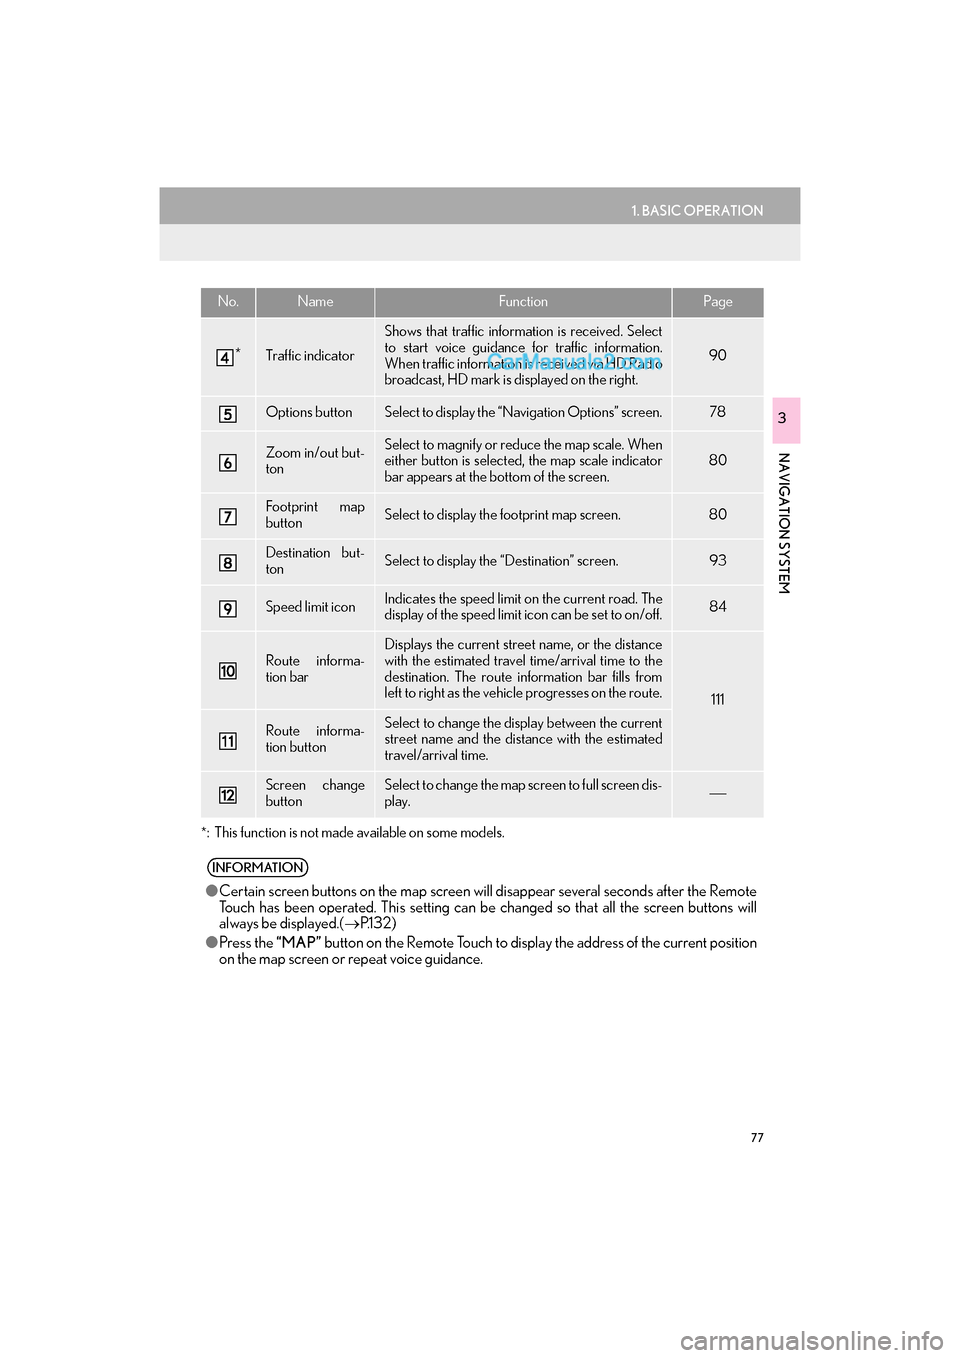
*Traffic indicator
Shows that traffic information is received. Select
to start voice guidance for traffic information.
When traffic information is received via HD Radio
broadcast, HD mark is displayed on the right.
90
Options buttonSelect to display the “Navigation Options” screen.78
Zoom in/out but-
tonSelect to magnify or reduce the map scale. When
either button is selected, the map scale indicator
bar appears at the bottom of the screen.80
Footprint map
buttonSelect to display the footprint map screen.80
Destination but-
tonSelect to display the “Destination” screen. 93
Speed limit iconIndicates the speed limit on the current road. The
display of the speed limit icon can be set to on/off.84
Route informa-
tion bar
Displays the current street name, or the distance
with the estimated travel time/arrival time to the
destination. The route information bar fills from
left to right as the vehicle progresses on the route.
111
Route informa-
tion buttonSelect to change the display between the current
street name and the distance with the estimated
travel/arrival time.
Screen change
buttonSelect to change the map screen to full screen dis-
play.
INFORMATION
● Certain screen buttons on the map screen wi ll disappear several seconds after the Remote
Touch has been operated. This setting can be changed so that all the screen buttons will
always be displayed.( →P.1 3 2 )
● Press the “MAP” button on the Remote Touch to display the address of the current position
on the map screen or repeat voice guidance.
No.NameFunctionPage