2017 KIA Sportage signal light
[x] Cancel search: signal lightPage 88 of 595
• Turn signals and lane change signals . . . . . . . . . . . 4-124
• Front fog light . . . . . . . . . . . . . . . . . . . . . . . . . . . . . . 4-124
• Check headlight . . . . . . . . . . . . . . . . . . . . . . . . . . . . 4-125
• AFLS (Adaptive Front Lighting System) . . . . . . . . 4-125
Wipers and washers . . . . . . . . . . . . . . . . . . . . . . . 4-126
• Windshield wipers . . . . . . . . . . . . . . . . . . . . . . . . . . 4-126
• Front windshield washers . . . . . . . . . . . . . . . . . . . . . 4-127
• Rear window wiper and washer switch. . . . . . . . . . 4-128
Interior lights . . . . . . . . . . . . . . . . . . . . . . . . . . . . 4-130
• Automatic turn off function . . . . . . . . . . . . . . . . . . . 4-130
• Room lamp . . . . . . . . . . . . . . . . . . . . . . . . . . . . . . . . . 4-130
• Map lamp . . . . . . . . . . . . . . . . . . . . . . . . . . . . . . . . . 4-131
• Liftgate room lamp . . . . . . . . . . . . . . . . . . . . . . . . . . 4-132
• Vanity mirror lamp . . . . . . . . . . . . . . . . . . . . . . . . . . 4-132
• Glove box lamp . . . . . . . . . . . . . . . . . . . . . . . . . . . . . 4-132
Welcome system . . . . . . . . . . . . . . . . . . . . . . . . . . 4-133
• Headlight (Headlamp) escort function . . . . . . . . . . 4-133
• Interior light . . . . . . . . . . . . . . . . . . . . . . . . . . . . . . . 4-133
• Pocket lamp . . . . . . . . . . . . . . . . . . . . . . . . . . . . . . . . 4-133
Defroster . . . . . . . . . . . . . . . . . . . . . . . . . . . . . . . . 4-134
• Rear window defroster . . . . . . . . . . . . . . . . . . . . . . . 4-134
Manual climate control system . . . . . . . . . . . . . . 4-135
• Heating and air conditioning . . . . . . . . . . . . . . . . . . 4-136
• System operation . . . . . . . . . . . . . . . . . . . . . . . . . . . . 4-141
• Climate control air filter. . . . . . . . . . . . . . . . . . . . . . 4-143
• Checking the amount of air conditioner refrigerantand compressor lubricant. . . . . . . . . . . . . . . . . . . . 4-143
Automatic climate control system . . . . . . . . . . . 4-145
• Automatic heating and air conditioning . . . . . . . . . 4-146
• Manual heating and air conditioning . . . . . . . . . . . 4-147
• System operation . . . . . . . . . . . . . . . . . . . . . . . . . . . . 4-153
• Climate control air filter. . . . . . . . . . . . . . . . . . . . . . 4-155
• Checking the amount of air conditioner refrigerant and compressor lubricant . . . . . . . . . . . . . . . . . . . . . . . 4-156
Windshield defrosting and defogging . . . . . . . . . 4-157
• Manual climate control system . . . . . . . . . . . . . . . . 4-157
• Automatic climate control system . . . . . . . . . . . . . . 4-158
• Defogging logic. . . . . . . . . . . . . . . . . . . . . . . . . . . . . . 4-159
Clean air . . . . . . . . . . . . . . . . . . . . . . . . . . . . . . . . 4-161
Storage compartments . . . . . . . . . . . . . . . . . . . . . 4-162
• Center console storage . . . . . . . . . . . . . . . . . . . . . . . 4-162
• Glove box . . . . . . . . . . . . . . . . . . . . . . . . . . . . . . . . . . 4-16\
2
• Sunglass holder . . . . . . . . . . . . . . . . . . . . . . . . . . . . . 4-163
• Luggage box . . . . . . . . . . . . . . . . . . . . . . . . . . . . . . . . 4-163
• Two types of luggage board use . . . . . . . . . . . . . . . . 4-164
4
Page 92 of 595
47
Features of your vehicle
Liftgate unlock (3)
The liftgate is unlocked if the button
is pressed for more than 1 second.
Also, once the liftgate is opened and
then closed, the liftgate will be locked
automatically.
For Power Liftgate Only:
The Power Liftgate will open if the
button is pressed for more than 1
second. Also, once the liftgate is
opened and then closed, the liftgate
will be locked again automatically.
For detailed information refer to the
"Power liftgate" in this chapter.
Panic (4)
The horn sounds and hazard warn-
ing lights flash for about 27 seconds
if this button is pressed for more than
0.5 second. To stop the horn and
lights, press any button on the trans-
mitter.
Transmitter precautions
The transmitter will not work if anyof following occur:
- The ignition key is in the ignitionswitch.
- You exceed the operating dis- tance limit (about 10 m [30 feet]).
- The battery in the transmitter is weak.
- Other vehicles or objects may be blocking the signal.
- The weather is extremely cold.
- The transmitter is close to a radio transmitter such as a radio sub-
station or an airport which can
interfere with normal operation of
the transmitter.
Page 147 of 595
Features of your vehicle
62
4
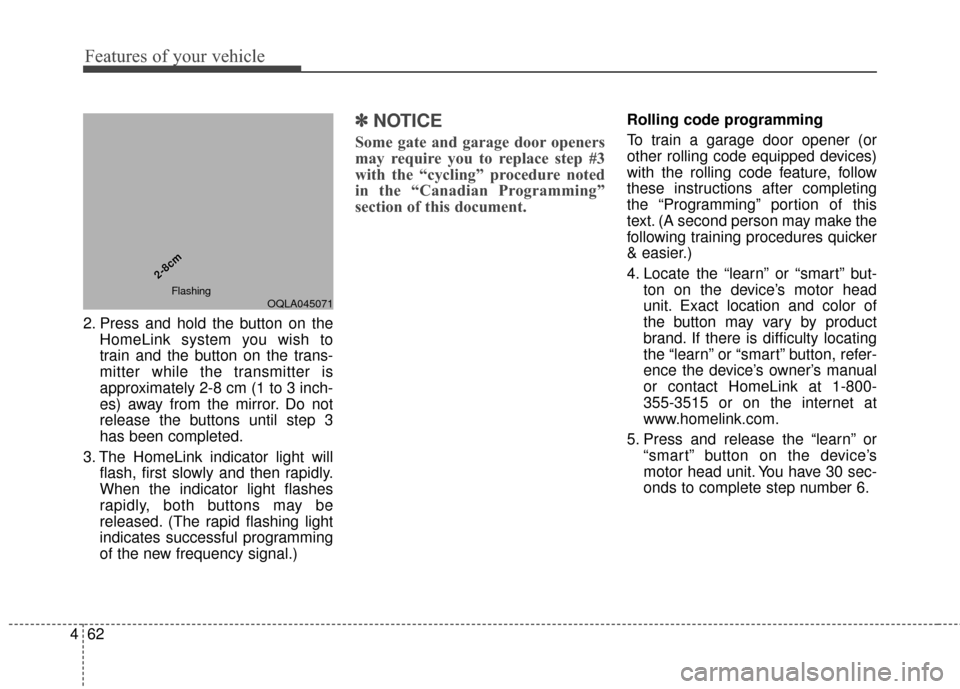
2. Press and hold the button on the
HomeLink system you wish to
train and the button on the trans-
mitter while the transmitter is
approximately 2-8 cm (1 to 3 inch-
es) away from the mirror. Do not
release the buttons until step 3
has been completed.
3. The HomeLink indicator light will flash, first slowly and then rapidly.
When the indicator light flashes
rapidly, both buttons may be
released. (The rapid flashing light
indicates successful programming
of the new frequency signal.)
✽ ✽NOTICE
Some gate and garage door openers
may require you to replace step #3
with the “cycling” procedure noted
in the “Canadian Programming”
section of this document.
Rolling code programming
To train a garage door opener (or
other rolling code equipped devices)
with the rolling code feature, follow
these instructions after completing
the “Programming” portion of this
text. (A second person may make the
following training procedures quicker
& easier.)
4. Locate the “learn” or “smart” but-
ton on the device’s motor head
unit. Exact location and color of
the button may vary by product
brand. If there is difficulty locating
the “learn” or “smart” button, refer-
ence the device’s owner’s manual
or contact HomeLink at 1-800-
355-3515 or on the internet at
www.homelink.com.
5. Press and release the “learn” or “smart” button on the device’s
motor head unit. You have 30 sec-
onds to complete step number 6.
OQLA045071
2-8cm
2-8cmFlashing
Page 148 of 595
463
Features of your vehicle
6. Return to the vehicle and firmlypress and release the pro-
grammed HomeLink button up to
three times. The rolling code
equipped device should now rec-
ognize the HomeLink signal and
activate when the HomeLink but-
ton is pressed. The remaining two
buttons may now be programmed
if this has not previously been
done. Refer to the “Programming”
portion of this text. Operating HomeLink
To operate, simply press the
programmed HomeLink button.
Activation will now occur for the
trained product (garage door, securi-
ty system, entry door lock, estate
gate, or home or office lighting). For
convenience, the hand-held trans-
mitter of the device may also be used
at any time. The HomeLink Wireless
Controls System (once programmed)
or the original hand-held transmitter
may be used to activate the device
(e.g. garage door, entry door lock,
etc.). In the event that there are still
programming difficulties, contact
HomeLink at 1-800-355-3515 or on
the internet at www.homelink.com. Erasing programmed HomeLink
buttons
To erase the three programmed but-
tons (individual buttons cannot be
erased):
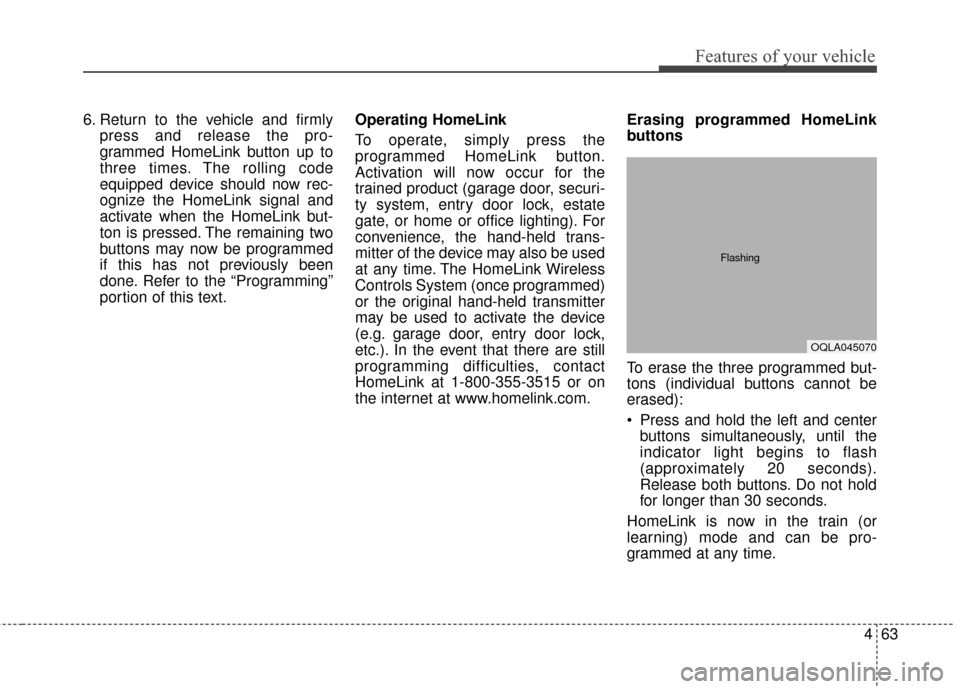
Press and hold the left and center
buttons simultaneously, until the
indicator light begins to flash
(approximately 20 seconds).
Release both buttons. Do not hold
for longer than 30 seconds.
HomeLink is now in the train (or
learning) mode and can be pro-
grammed at any time.
OQLA045070
Flashing
Page 149 of 595
Features of your vehicle
64
4
Reprogramming a single
HomeLink button
To program a device to HomeLink
using a HomeLink button previously
trained, follow these steps:
1. Press and hold the desired
HomeLink button. Do NOT release
until step 4 has been completed.
2. When the indicator light begins to flash slowly (after 20 seconds),
position the hand-held transmitter
2-8 cm (1 to 3 inches) away from
the HomeLink surface.
3. Press and hold the hand-held transmitter button (or press and
“cycle” - as described in “Canadian
Programming”).
4. The HomeLink indicator light will flash, first slowly and then rapidly.
When the indicator light begins to
flash rapidly, release both buttons.
The previous device has now been
erased and the new device can be
activated by pushing the HomeLink
button that has just been pro-
grammed. This procedure will not
affect any other programmed
HomeLink buttons. Canadian Programming
Garage & gate openers
During programming, your hand-held
transmitter may automatically stop
transmitting. Continue to press and
hold the HomeLink button (note
steps 2 through 4 in the
“Programming” portion of this text)
while you press and re-press
(“cycle”) your handheld transmitter
every two seconds until the frequen-
cy signal has been learned. The indi-
cator light will flash slowly and then
rapidly after several seconds upon
successful training.
Accessories
If you would like additional informa-
tion on the HomeLink Wireless
Control System, HomeLink compati-
ble products, or to purchase other
accessories such as the HomeLink
®
Lighting Package, please contact
HomeLink at 1-800-355-3515 or on
the internet at www.homelink.com.
Page 166 of 595
481
Features of your vehicle
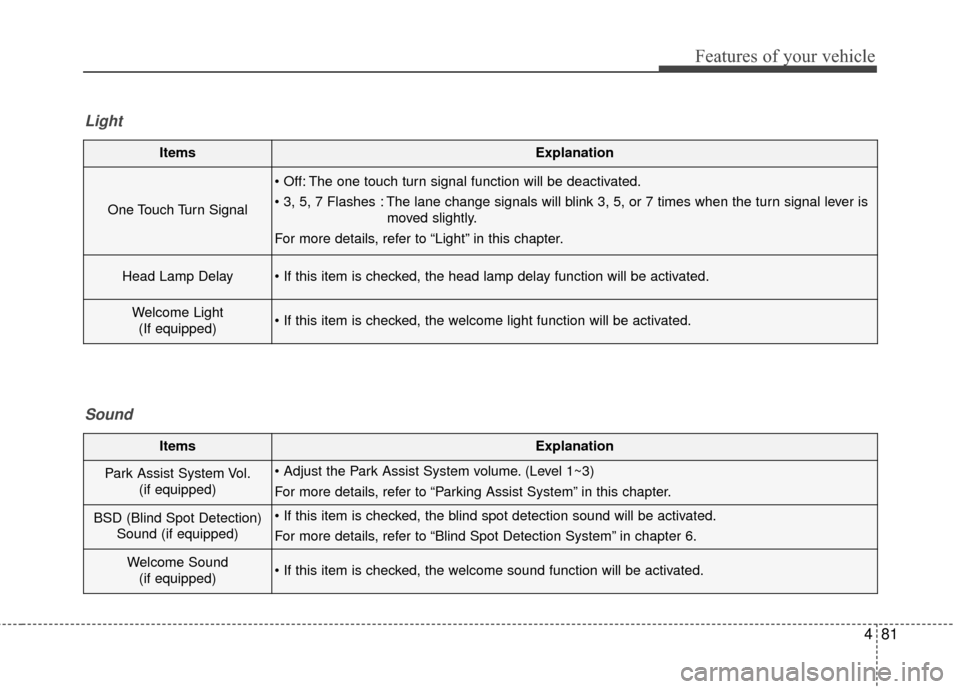
ItemsExplanation
One Touch Turn Signal
The one touch turn signal function will be deactivated.
The lane change signals will blink 3, 5, or 7 times when the turn signal lever ismoved slightly.
For more details, refer to “Light” in this chapter.
Head Lamp Delay
Welcome Light (If equipped)
Light
ItemsExplanation
Park Assist System Vol. (if equipped) (Level 1~3)
For more details, refer to “Parking Assist System” in this chapter.
BSD (Blind Spot Detection)Sound (if equipped)
For more details, refer to “Blind Spot Detection System” in chapter 6.
Welcome Sound(if equipped)
Sound
Page 191 of 595
Features of your vehicle
106
4
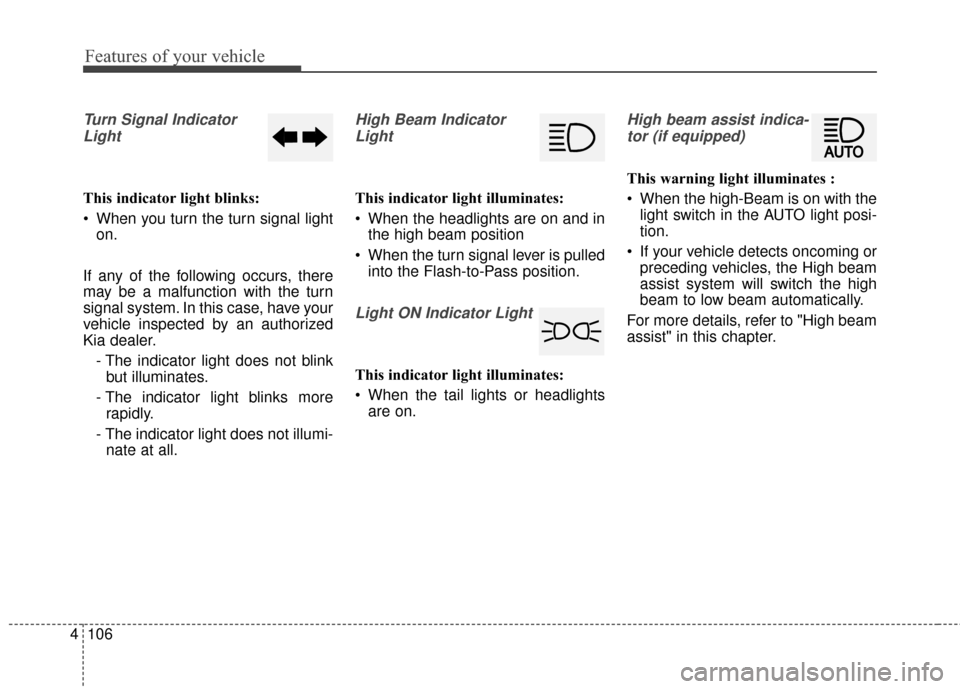
Turn Signal Indicator
Light
This indicator light blinks:
When you turn the turn signal light on.
If any of the following occurs, there
may be a malfunction with the turn
signal system. In this case, have your
vehicle inspected by an authorized
Kia dealer. - The indicator light does not blinkbut illuminates.
- The indicator light blinks more rapidly.
- The indicator light does not illumi- nate at all.
High Beam Indicator
Light
This indicator light illuminates:
When the headlights are on and in the high beam position
When the turn signal lever is pulled into the Flash-to-Pass position.
Light ON Indicator Light
This indicator light illuminates:
When the tail lights or headlightsare on.
High beam assist indica-
tor (if equipped)
This warning light illuminates :
When the high-Beam is on with the light switch in the AUTO light posi-
tion.
If your vehicle detects oncoming or preceding vehicles, the High beam
assist system will switch the high
beam to low beam automatically.
For more details, refer to "High beam
assist" in this chapter.
Page 209 of 595
Features of your vehicle
124
4
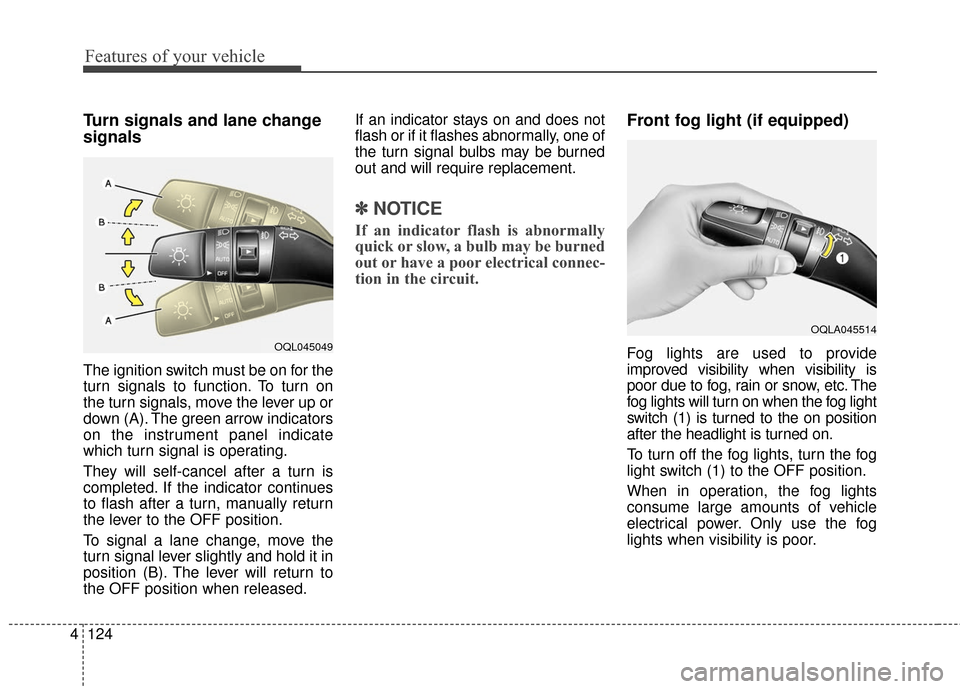
Turn signals and lane change
signals
The ignition switch must be on for the
turn signals to function. To turn on
the turn signals, move the lever up or
down (A). The green arrow indicators
on the instrument panel indicate
which turn signal is operating.
They will self-cancel after a turn is
completed. If the indicator continues
to flash after a turn, manually return
the lever to the OFF position.
To signal a lane change, move the
turn signal lever slightly and hold it in
position (B). The lever will return to
the OFF position when released. If an indicator stays on and does not
flash or if it flashes abnormally, one of
the turn signal bulbs may be burned
out and will require replacement.
✽ ✽
NOTICE
If an indicator flash is abnormally
quick or slow, a bulb may be burned
out or have a poor electrical connec-
tion in the circuit.
Front fog light (if equipped)
Fog lights are used to provide
improved visibility when visibility is
poor due to fog, rain or snow, etc. The
fog lights will turn on when the fog light
switch (1) is turned to the on position
after the headlight is turned on.
To turn off the fog lights, turn the fog
light switch (1) to the OFF position.
When in operation, the fog lights
consume large amounts of vehicle
electrical power. Only use the fog
lights when visibility is poor.OQL045049
OQLA045514