2017 KIA Sportage warning
[x] Cancel search: warningPage 86 of 595
Features of your vehicle
Folding key . . . . . . . . . . . . . . . . . . . . . . . . . . . . . . . . 4-5
• Record your key number . . . . . . . . . . . . . . . . . . . . . . . 4-5
• Key operations . . . . . . . . . . . . . . . . . . . . . . . . . . . . . . . . 4-5
• Transmitter precautions . . . . . . . . . . . . . . . . . . . . . . . . 4-7
• Battery replacement . . . . . . . . . . . . . . . . . . . . . . . . . . . 4-8
• Immobilizer system . . . . . . . . . . . . . . . . . . . . . . . . . . . . 4-9
Smart key . . . . . . . . . . . . . . . . . . . . . . . . . . . . . . . . 4-12
• Record your key number . . . . . . . . . . . . . . . . . . . . . . 4-12
• Smart key function . . . . . . . . . . . . . . . . . . . . . . . . . . . 4-12
• Loss of the smart key . . . . . . . . . . . . . . . . . . . . . . . . . 4-16
• Smart key precautions . . . . . . . . . . . . . . . . . . . . . . . . 4-16
• Battery replacement . . . . . . . . . . . . . . . . . . . . . . . . . . 4-17
• Smart key immobilizer system . . . . . . . . . . . . . . . . . . 4-18
Theft-alarm system . . . . . . . . . . . . . . . . . . . . . . . . 4-19
• Armed stage . . . . . . . . . . . . . . . . . . . . . . . . . . . . . . . . . 4-19
• Theft-alarm stage . . . . . . . . . . . . . . . . . . . . . . . . . . . . 4-20
• Disarmed stage. . . . . . . . . . . . . . . . . . . . . . . . . . . . . . . 4-20
Door locks . . . . . . . . . . . . . . . . . . . . . . . . . . . . . . . . 4-22
• Operating door locks from outside the vehicle . . . . 4-22
• Operating door locks from inside the vehicle . . . . . . 4-23
• Impact sensing door unlock system . . . . . . . . . . . . . . 4-25
• Child-protector rear door lock. . . . . . . . . . . . . . . . . . 4-25
Liftgate (for manual liftgate) . . . . . . . . . . . . . . . . 4-26
• Opening the liftgate . . . . . . . . . . . . . . . . . . . . . . . . . . . 4-26
• Closing the liftgate. . . . . . . . . . . . . . . . . . . . . . . . . . . . 4-26
• Emergency liftgate safety release. . . . . . . . . . . . . . . . 4-27
Power liftgate . . . . . . . . . . . . . . . . . . . . . . . . . . . . . 4-28
• Opening the liftgate . . . . . . . . . . . . . . . . . . . . . . . . . . 4-29
• Closing the liftgate . . . . . . . . . . . . . . . . . . . . . . . . . . . 4-30
• Smart Power Liftgate . . . . . . . . . . . . . . . . . . . . . . . . . 4-33
Windows . . . . . . . . . . . . . . . . . . . . . . . . . . . . . . . . . 4-38
• Power windows . . . . . . . . . . . . . . . . . . . . . . . . . . . . . . 4-39
Hood. . . . . . . . . . . . . . . . . . . . . . . . . . . . . . . . . . . . \
. 4-43
• Opening the hood . . . . . . . . . . . . . . . . . . . . . . . . . . . . 4-43
• Closing the hood . . . . . . . . . . . . . . . . . . . . . . . . . . . . . 4-44
Fuel filler lid . . . . . . . . . . . . . . . . . . . . . . . . . . . . . . 4-45
• Opening the fuel filler lid . . . . . . . . . . . . . . . . . . . . . . 4-45
• Closing the fuel filler lid . . . . . . . . . . . . . . . . . . . . . . . 4-45
Panoramic sunroof . . . . . . . . . . . . . . . . . . . . . . . . . 4-48
• Sunroof open warning. . . . . . . . . . . . . . . . . . . . . . . . . 4-49
• Sunshade . . . . . . . . . . . . . . . . . . . . . . . . . . . . . . . . . . . 4-\
49
• Sliding the sunroof . . . . . . . . . . . . . . . . . . . . . . . . . . . 4-50
• Tilting the sunroof . . . . . . . . . . . . . . . . . . . . . . . . . . . 4-52
• Closing the sunroof . . . . . . . . . . . . . . . . . . . . . . . . . . . 4-52
• Resetting the sunroof . . . . . . . . . . . . . . . . . . . . . . . . . 4-52
4
Page 87 of 595
Steering wheel . . . . . . . . . . . . . . . . . . . . . . . . . . . . . 4-54
• Electronic power steering (EPS) . . . . . . . . . . . . . . . . 4-54
• Tilt and telescopic steering . . . . . . . . . . . . . . . . . . . . 4-55
• Heated steering wheel . . . . . . . . . . . . . . . . . . . . . . . . . 4-56
• Horn . . . . . . . . . . . . . . . . . . . . . . . . . . . . . . . . . . . . \
. . . 4-57
Mirrors . . . . . . . . . . . . . . . . . . . . . . . . . . . . . . . . . . 4-58\
• Inside rearview mirror . . . . . . . . . . . . . . . . . . . . . . . . 4-58
• Outside rearview mirror . . . . . . . . . . . . . . . . . . . . . . 4-65
Instrument cluster . . . . . . . . . . . . . . . . . . . . . . . . . 4-69
• Instrument Cluster Control . . . . . . . . . . . . . . . . . . . . 4-70
• LCD Display Control . . . . . . . . . . . . . . . . . . . . . . . . . 4-70
• Gauges . . . . . . . . . . . . . . . . . . . . . . . . . . . . . . . . . . . . \
. 4-71
• Transaxle Shift Indicator . . . . . . . . . . . . . . . . . . . . . . 4-74
LCD Display . . . . . . . . . . . . . . . . . . . . . . . . . . . . . . 4-75
• LCD Modes . . . . . . . . . . . . . . . . . . . . . . . . . . . . . . . . . 4-75
• Service Mode . . . . . . . . . . . . . . . . . . . . . . . . . . . . . . . . 4-76
• User Settings Mode . . . . . . . . . . . . . . . . . . . . . . . . . . . 4-78
Trip modes (Trip computer) . . . . . . . . . . . . . . . . . 4-84
• Trip Modes . . . . . . . . . . . . . . . . . . . . . . . . . . . . . . . . . . 4-84\
• Fuel Economy . . . . . . . . . . . . . . . . . . . . . . . . . . . . . . . 4-84
• Trip A/B . . . . . . . . . . . . . . . . . . . . . . . . . . . . . . . . . . . . \
4-86
• Digital speedometer . . . . . . . . . . . . . . . . . . . . . . . . . . . 4-87
• One time driving information mode . . . . . . . . . . . . . 4-87
• Turn By Turn Mode . . . . . . . . . . . . . . . . . . . . . . . . . . 4-88• LDWS Mode . . . . . . . . . . . . . . . . . . . . . . . . . . . . . . . . 4-88
• A/V Mode . . . . . . . . . . . . . . . . . . . . . . . . . . . . . . . . . . . 4-\
88
• Warning Messages . . . . . . . . . . . . . . . . . . . . . . . . . . . . 4-89
Warning and indicator lights . . . . . . . . . . . . . . . . 4-97
• Warning lights . . . . . . . . . . . . . . . . . . . . . . . . . . . . . . . 4-97
• Indicator Lights . . . . . . . . . . . . . . . . . . . . . . . . . . . . . 4-104
Rear parking assist system . . . . . . . . . . . . . . . . . 4-109
• Operation of the rear parking assist system . . . . . . 4-109
• Non-operational conditions of
rear parking assist system . . . . . . . . . . . . . . . . . . . 4-110
• Rear parking assist system precautions . . . . . . . . . 4-111
• Self-diagnosis . . . . . . . . . . . . . . . . . . . . . . . . . . . . . . . 4-112
Parking assist system . . . . . . . . . . . . . . . . . . . . . . 4-113
• Operation of the parking assist system . . . . . . . . . . 4-113
• Non-operational conditions of parking assist system. . 4-115
• Self-diagnosis . . . . . . . . . . . . . . . . . . . . . . . . . . . . . . . 4-117
Rearview camera . . . . . . . . . . . . . . . . . . . . . . . . . 4-118
Lighting . . . . . . . . . . . . . . . . . . . . . . . . . . . . . . . . . 4-119
• Battery saver function . . . . . . . . . . . . . . . . . . . . . . . . 4-119
• Daytime running light . . . . . . . . . . . . . . . . . . . . . . . . 4-119
• Lighting control . . . . . . . . . . . . . . . . . . . . . . . . . . . . . 4-119
• High beam operation. . . . . . . . . . . . . . . . . . . . . . . . . 4-121
• High Beam Assist . . . . . . . . . . . . . . . . . . . . . . . . . . . . 4-122
4
Page 90 of 595
45
Features of your vehicle
Record your key number
The key code num-
ber is stamped on
the key code tag
attached to the key
set. Should you
lose your keys, this number will
enable an authorized Kia dealer to
duplicate the keys easily. Remove
the key code tag and store it in a safe
place. Also, record the key code
number and keep it in a safe place,
but not in the vehicle.
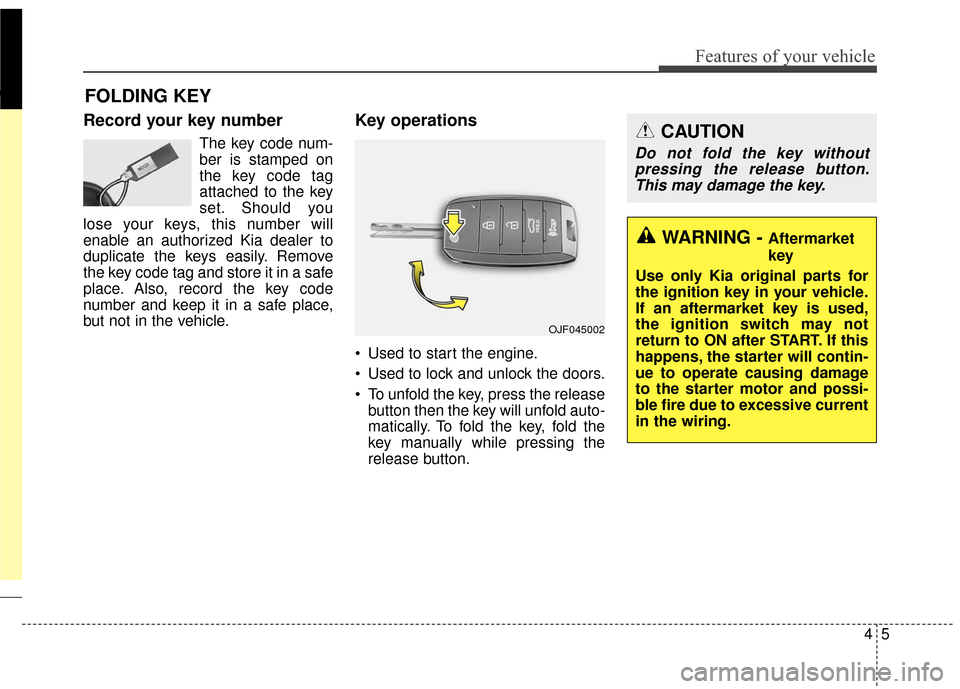
Key operations
• Used to start the engine.
Used to lock and unlock the doors.
To unfold the key, press the release button then the key will unfold auto-
matically. To fold the key, fold the
key manually while pressing the
release button.
FOLDING KEY
OJF045002
CAUTION
Do not fold the key withoutpressing the release button.This may damage the key.
WARNING - Aftermarket
key
Use only Kia original parts for
the ignition key in your vehicle.
If an aftermarket key is used,
the ignition switch may not
return to ON after START. If this
happens, the starter will contin-
ue to operate causing damage
to the starter motor and possi-
ble fire due to excessive current
in the wiring.
Page 91 of 595
Features of your vehicle
64
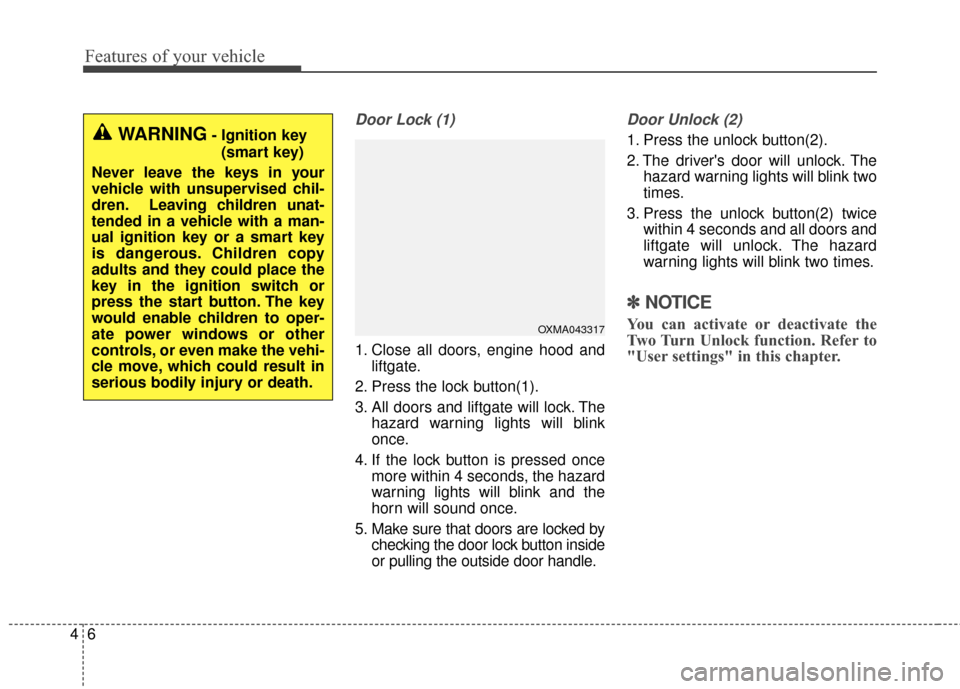
Door Lock (1)
1. Close all doors, engine hood andliftgate.
2. Press the lock button(1).
3. All doors and liftgate will lock. The hazard warning lights will blink
once.
4. If the lock button is pressed once more within 4 seconds, the hazard
warning lights will blink and the
horn will sound once.
5. Make sure that doors are locked by checking the door lock button inside
or pulling the outside door handle.
Door Unlock (2)
1. Press the unlock button(2).
2. The driver's door will unlock. Thehazard warning lights will blink two
times.
3. Press the unlock button(2) twice within 4 seconds and all doors and
liftgate will unlock. The hazard
warning lights will blink two times.
✽ ✽NOTICE
You can activate or deactivate the
Two Turn Unlock function. Refer to
"User settings" in this chapter.
WARNING- Ignition key
(smart key)
Never leave the keys in your
vehicle with unsupervised chil-
dren. Leaving children unat-
tended in a vehicle with a man-
ual ignition key or a smart key
is dangerous. Children copy
adults and they could place the
key in the ignition switch or
press the start button. The key
would enable children to oper-
ate power windows or other
controls, or even make the vehi-
cle move, which could result in
serious bodily injury or death.
OXMA043317
Page 94 of 595
49
Features of your vehicle
For replacement transmitters, see an
authorized Kia dealer for transmitter
reprogramming.
The transmitter is designed to giveyou years of trouble-free use, how-
ever it can malfunction if exposed to
moisture or static electricity. If you
are unsure how to use your trans-
mitter or replace the battery, contact
an authorized Kia dealer.
Using the wrong battery can cause the transmitter to malfunction. Be
sure to use the correct battery.
To avoid damaging the transmitter, don't drop it, get it wet, or expose it
to heat or sunlight.
An inappropriately dis- posed battery can be
harmful to the environment
and may cause harm to
human health. Dispose the
battery according to your
local law(s) or regulation.Immobilizer system
Your vehicle is equipped with an
electronic engine immobilizer system
to reduce the risk of unauthorized
vehicle use.
Your immobilizer system is com-
prised of a small transponder in the
ignition key and electronic devices
inside the vehicle.
With the immobilizer system, when-
ever you insert your ignition key into
the ignition switch and turn it to ON,
verifies if the ignition key is valid.
If the key is determined to be valid,
the engine will start.
If the key is determined to be invalid,
the engine will not start.CAUTION - Transmitter
damage
Do not drop, wet or expose the keyless entry system transmit-ter to heat or sunlight.
IC WARNING
This device complies with
Industry Canada licence-
exempt RSS standard(s).
Operation is subject to the fol-
lowing two conditions: (1) this
device may not cause interfer-
ence, and (2) this device must
accept any interference, includ-
ing interference that may cause
undesired operation of the
device.
Page 97 of 595
Features of your vehicle
12
4
Record your key number
The key code number
is stamped on the bar
code tag attached to
the key set. Should
you lose your keys,
this number will enable an author-
ized Kia dealer to duplicate the keys
easily. Remove the bar code tag and
store it in a safe place. Also, record
the code number and keep it in a
safe and handy place, but not in the
vehicle.
Smart key function
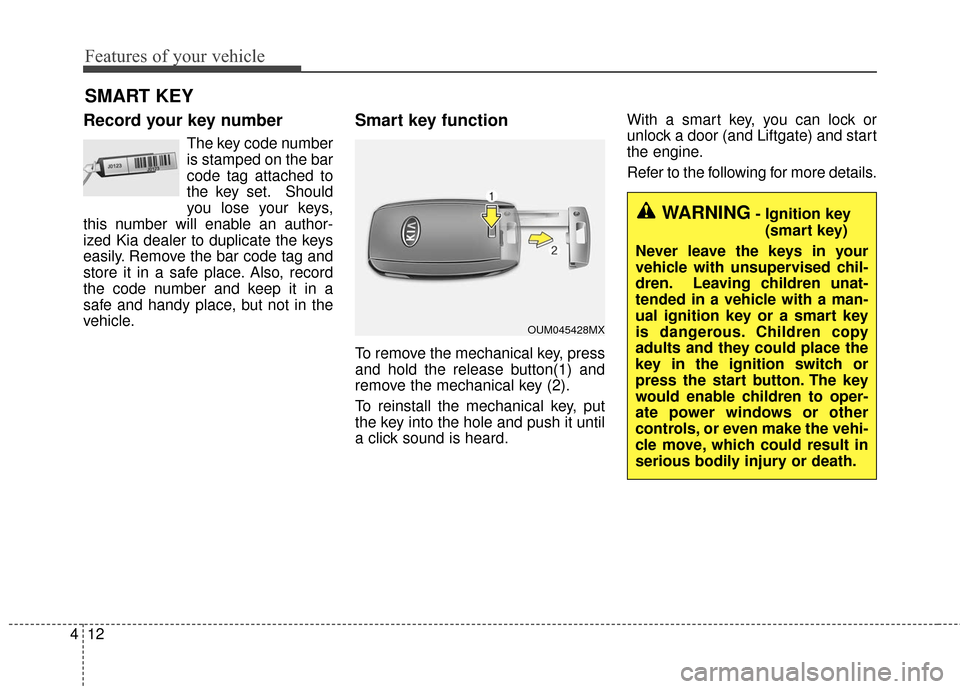
To remove the mechanical key, press
and hold the release button(1) and
remove the mechanical key (2).
To reinstall the mechanical key, put
the key into the hole and push it until
a click sound is heard. With a smart key, you can lock or
unlock a door (and Liftgate) and start
the engine.
Refer to the following for more details.
SMART KEY
OUM045428MX
WARNING- Ignition key
(smart key)
Never leave the keys in your
vehicle with unsupervised chil-
dren. Leaving children unat-
tended in a vehicle with a man-
ual ignition key or a smart key
is dangerous. Children copy
adults and they could place the
key in the ignition switch or
press the start button. The key
would enable children to oper-
ate power windows or other
controls, or even make the vehi-
cle move, which could result in
serious bodily injury or death.
Page 98 of 595
413
Features of your vehicle
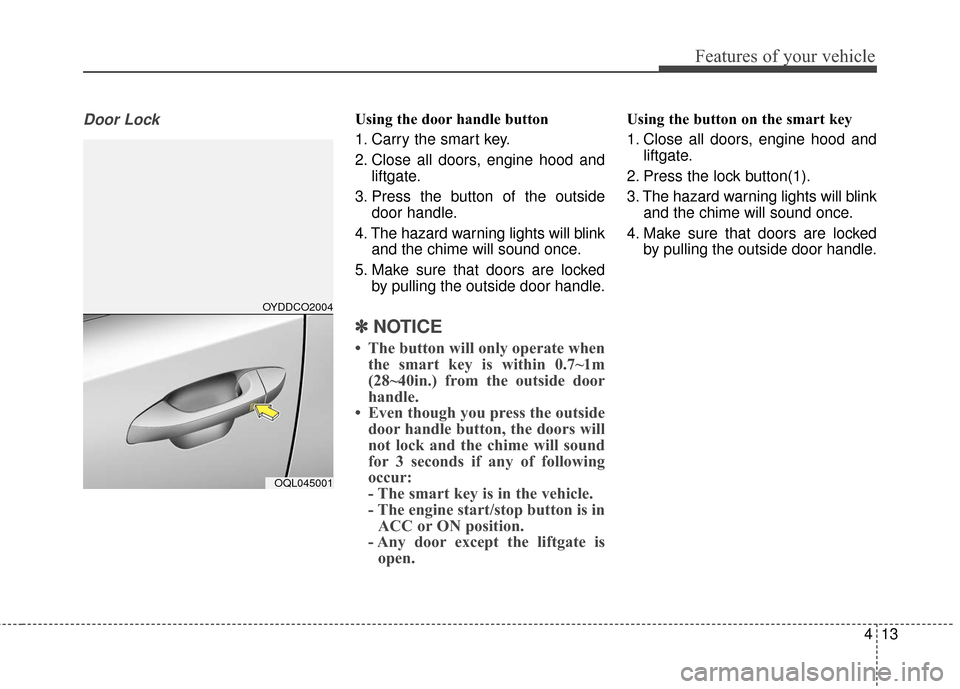
Door LockUsing the door handle button
1. Carry the smart key.
2. Close all doors, engine hood andliftgate.
3. Press the button of the outside door handle.
4. The hazard warning lights will blink and the chime will sound once.
5. Make sure that doors are locked by pulling the outside door handle.
✽ ✽NOTICE
• The button will only operate when
the smart key is within 0.7~1m
(28~40in.) from the outside door
handle.
• Even though you press the outside door handle button, the doors will
not lock and the chime will sound
for 3 seconds if any of following
occur:
- The smart key is in the vehicle.
- The engine start/stop button is inACC or ON position.
- Any door except the liftgate is open.
Using the button on the smart key
1. Close all doors, engine hood and
liftgate.
2. Press the lock button(1).
3. The hazard warning lights will blink and the chime will sound once.
4. Make sure that doors are locked by pulling the outside door handle.
OYDDCO2004
OQL045001
Page 99 of 595
Features of your vehicle
14
4
Unlocking
Using the door handle button
1. Carry the smart key.
2. Press the button of the driver's
outside door handle.
3. The driver’s door will unlock. The hazard warning lights will blink and
the chime will sound two times.
4. Press the button twice within 4 seconds and all doors and the lift-
gate will unlock and the hazard
warning lights will blink and the
chime will sound two times.
✽ ✽NOTICE
• The button will only operate when
the smart key is within 0.7~1m
(28~40in.) from the outside door
handle.
• When the smart key is recognized in the area of 0.7~1m (28~40in.) from
the front outside door handle, other
people can also open the doors.
• After unlocking the driver’s door or all doors, the door(s) will lock
automatically unless the door is
opened.
Using the button on the smart key
1. Press the unlock button(2) of the
smart key.
2. The driver’s door will unlock. The hazard warning lights will blink and
the chime will sound two times.
3. Press the unlock button(2) twice within 4 seconds and all doors and
the liftgate will unlock. The hazard
warning lights will blink and the
chime will sound two times.
✽ ✽NOTICE
After pressing the button, the doors
will lock automatically unless any
door is opened within 30 seconds.
✽ ✽NOTICE
You can activate or deactivate the
Two Turn Unlock function. Refer to
"User settings" in this chapter.
Liftgate unlocking
Using the liftgate handle button
1. Carry the smart key.
2. Press the liftgate handle button.
3. When all doors are locked, the
hazard warning lights will blink two
times.
Once the liftgate is opened and
then closed, the liftgate will lock
automatically.
✽ ✽ NOTICE
The button will only operate when
the smart key is within 0.7~1m
(28~40in.) from the liftgate handle.