Page 33 of 595
317
Safety features of your vehicle
3. Insert the rear seat belt buckle inthe pocket between the rear seat-
back and cushion, and insert the
rear seat belt webbing in the guide
to prevent the seat belt from being
damaged. 4. Lift up the front portion of the seat-
back folding lever, then fold the
seat toward the front of the vehicle.
When you return the seatback to
its upright position, always be sure
it has locked into position by push-
ing on the top of the seatback. 5. To use the rear seat, lift and push
the seatback rearward by lifting up
the front portion of the folding lever.
Push the seatback firmly until it
clicks into place. Make sure the
seatback is locked in place.
OQL035030
OQLA035022
OQL035023OQL035024
Page 34 of 595
Safety features of your vehicle
18
3
When returning the rear seatbacks to
the upright position, remember to
return the rear shoulder belts to their
proper position.
CAUTION - Damaging
rear seat belt buckles
When you fold the rear seat- back, insert the buckle betweenthe rear seatback and cushion.Doing so can prevent the bucklefrom being damaged by the rearseatback.
WARNING - Cargo loading
Make sure the engine is off, the
automatic transaxle is in P (Park)
and the parking brake is secure-
ly applied whenever loading or
unloading cargo. Failure to take
these steps may allow the vehi-
cle to move if the shift lever is
inadvertently moved to another
position.
WARNING- Cargo
Do not place objects in the rear
seats, since they cannot be
properly secured and may hit
vehicle occupants in a collision.WARNING - Rear
Seatback
When returning the rear seat to
the upright position:
Be careful not to damage the seat belt webbing or buckle.
Ensure the seatback is com- pletely locked into its upright
position by pushing on the
top of the seatback.
Failure to adhere to any of
these instructions could
result in serious injury or
death in the event of a crash.
Page 37 of 595
321
Safety features of your vehicle
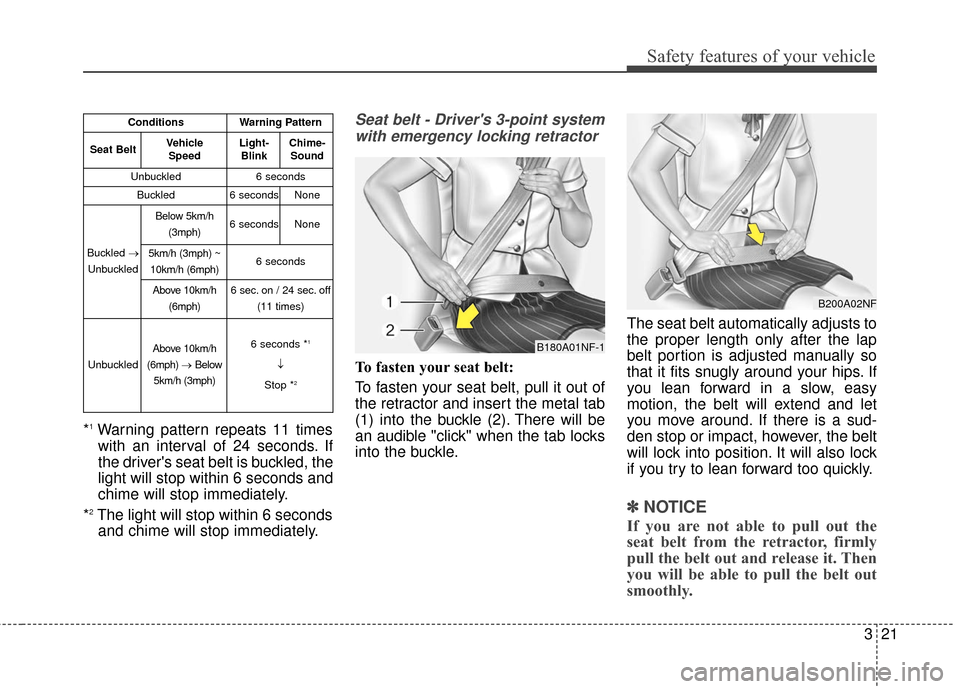
*1Warning pattern repeats 11 timeswith an interval of 24 seconds. If
the driver's seat belt is buckled, the
light will stop within 6 seconds and
chime will stop immediately.
*
2The light will stop within 6 seconds and chime will stop immediately.
Seat belt - Driver's 3-point system
with emergency locking retractor
To fasten your seat belt:
To fasten your seat belt, pull it out of
the retractor and insert the metal tab
(1) into the buckle (2). There will be
an audible "click" when the tab locks
into the buckle. The seat belt automatically adjusts to
the proper length only after the lap
belt portion is adjusted manually so
that it fits snugly around your hips. If
you lean forward in a slow, easy
motion, the belt will extend and let
you move around. If there is a sud-
den stop or impact, however, the belt
will lock into position. It will also lock
if you try to lean forward too quickly.
✽ ✽
NOTICE
If you are not able to pull out the
seat belt from the retractor, firmly
pull the belt out and release it. Then
you will be able to pull the belt out
smoothly.
ConditionsWarning Pattern
Seat BeltVehicle
SpeedLight-BlinkChime-Sound
Unbuckled6 seconds
Buckled6 secondsNone
Buckled →
Unbuckled
Below 5km/h (3mph)6 secondsNone
5km/h (3mph) ~10km/h (6mph)6 seconds
Above 10km/h (6mph)6 sec. on / 24 sec. off (11 times)
Unbuckled
Above 10km/h
(6mph) →Below
5km/h (3mph)6 seconds *1
↓
Stop *
2
B180A01NF-1
B200A02NF
Page 38 of 595
Safety features of your vehicle
22
3
Height adjustment
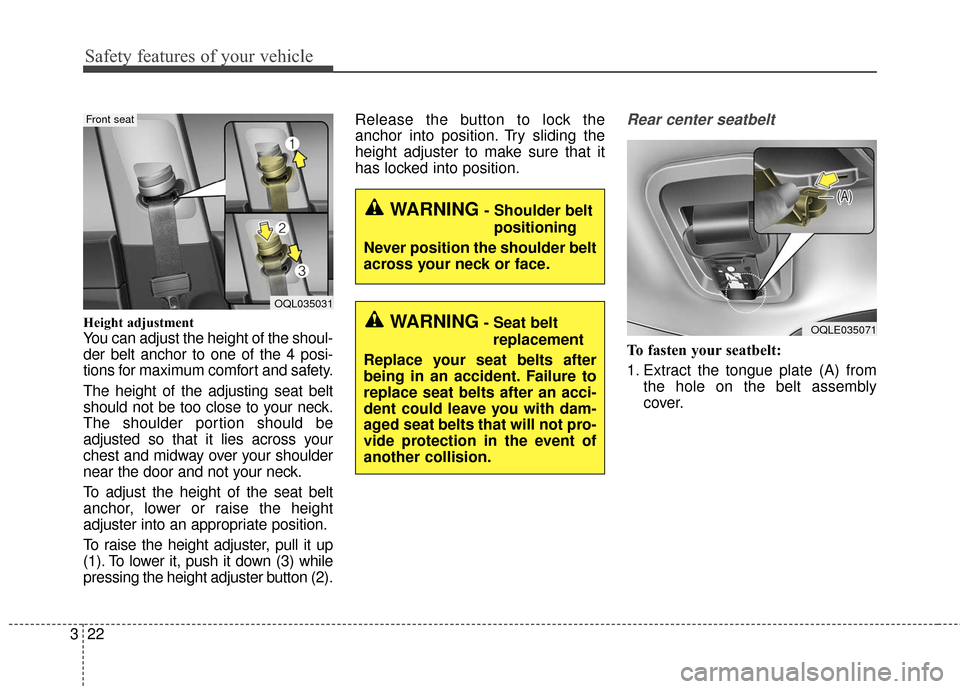
You can adjust the height of the shoul-
der belt anchor to one of the 4 posi-
tions for maximum comfort and safety.
The height of the adjusting seat belt
should not be too close to your neck.
The shoulder portion should be
adjusted so that it lies across your
chest and midway over your shoulder
near the door and not your neck.
To adjust the height of the seat belt
anchor, lower or raise the height
adjuster into an appropriate position.
To raise the height adjuster, pull it up
(1). To lower it, push it down (3) while
pressing the height adjuster button (2). Release the button to lock the
anchor into position. Try sliding the
height adjuster to make sure that it
has locked into position.
Rear center seatbelt
To fasten your seatbelt:
1. Extract the tongue plate (A) from
the hole on the belt assembly
cover.
OQL035031
Front seat
WARNING- Shoulder belt
positioning
Never position the shoulder belt
across your neck or face.
WARNING- Seat belt replacement
Replace your seat belts after
being in an accident. Failure to
replace seat belts after an acci-
dent could leave you with dam-
aged seat belts that will not pro-
vide protection in the event of
another collision.OQLE035071
Page 39 of 595
323
Safety features of your vehicle
2. Insert the tongue plate (A) into thebuckle (A’) until an audible “click"
is heard, indicating the latch is
locked. Make sure the belt is not
twisted. 3. Pull out the tongue plate (B) from
the pocket (C). 4. Pull the tongue plate (B) and
insert it into the buckle (B’) until an
audible “click” is heard, indicating
the latch is locked. Make sure the
belt is not twisted.
When using the rear center seat belt,
the buckle with the “CENTER” mark
must be used.
OQL035072OQLE035027OQL035073
Page 42 of 595
Safety features of your vehicle
26
3
Pre-tensioner seat belt
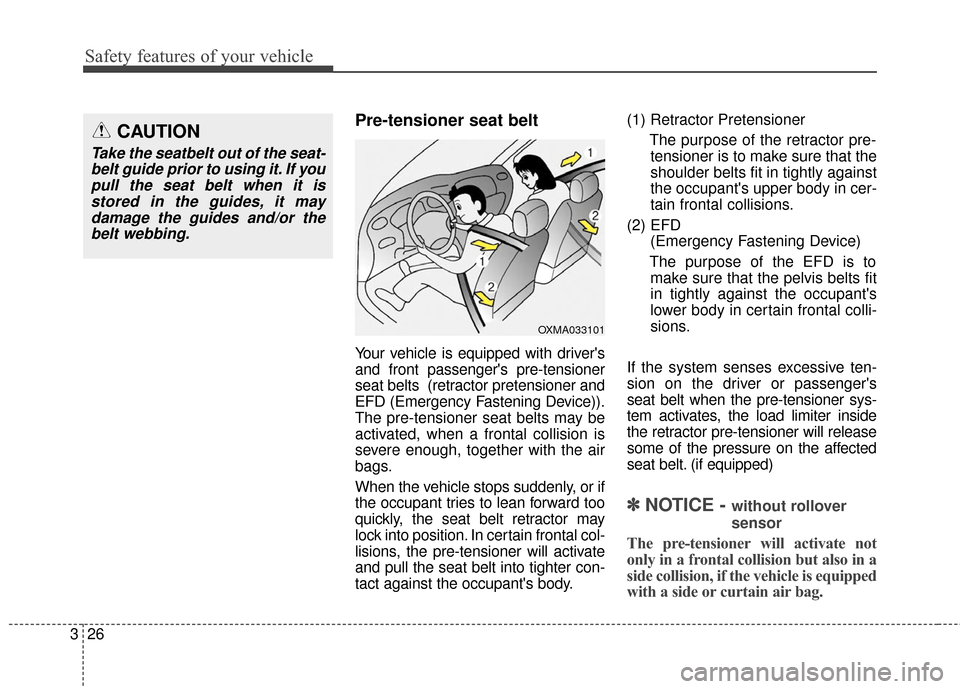
Your vehicle is equipped with driver's
and front passenger's pre-tensioner
seat belts (retractor pretensioner and
EFD (Emergency Fastening Device)).
The pre-tensioner seat belts may be
activated, when a frontal collision is
severe enough, together with the air
bags.
When the vehicle stops suddenly, or if
the occupant tries to lean forward too
quickly, the seat belt retractor may
lock into position. In certain frontal col-
lisions, the pre-tensioner will activate
and pull the seat belt into tighter con-
tact against the occupant's body. (1) Retractor Pretensioner
The purpose of the retractor pre-tensioner is to make sure that the
shoulder belts fit in tightly against
the occupant's upper body in cer-
tain frontal collisions.
(2) EFD (Emergency Fastening Device)
The purpose of the EFD is to make sure that the pelvis belts fit
in tightly against the occupant's
lower body in certain frontal colli-
sions.
If the system senses excessive ten-
sion on the driver or passenger's
seat belt when the pre-tensioner sys-
tem activates, the load limiter inside
the retractor pre-tensioner will release
some of the pressure on the affected
seat belt. (if equipped)
✽ ✽ NOTICE - without rollover
sensor
The pre-tensioner will activate not
only in a frontal collision but also in a
side collision, if the vehicle is equipped
with a side or curtain air bag.
CAUTION
Take the seatbelt out of the seat-
belt guide prior to using it. If youpull the seat belt when it isstored in the guides, it maydamage the guides and/or thebelt webbing.
OXMA033101
Page 56 of 595
Safety features of your vehicle
40
3
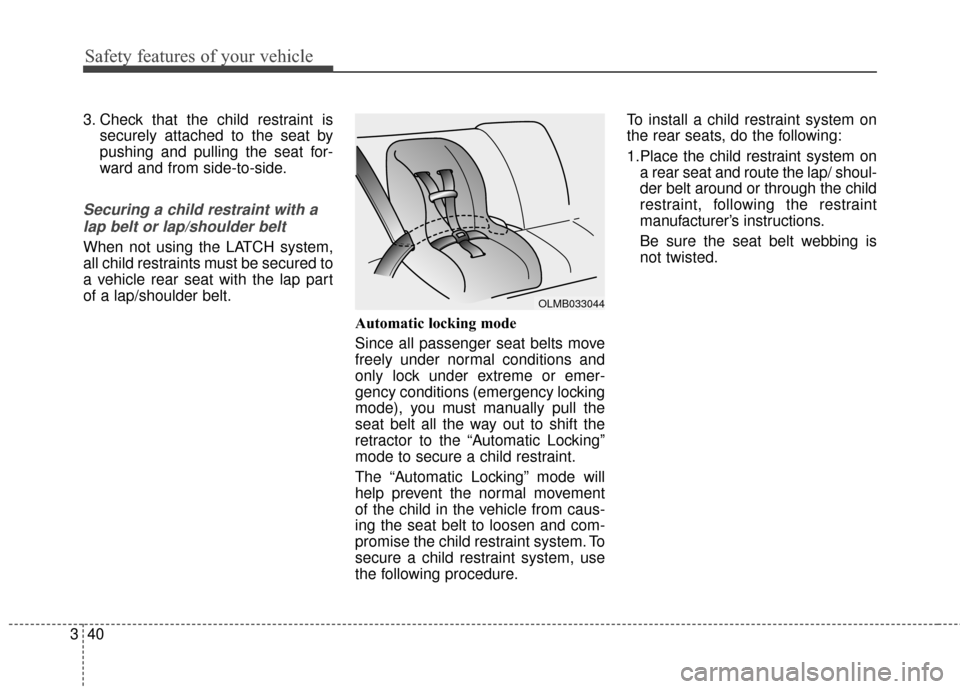
3. Check that the child restraint is
securely attached to the seat by
pushing and pulling the seat for-
ward and from side-to-side.
Securing a child restraint with a
lap belt or lap/shoulder belt
When not using the LATCH system,
all child restraints must be secured to
a vehicle rear seat with the lap part
of a lap/shoulder belt.
Automatic locking mode
Since all passenger seat belts move
freely under normal conditions and
only lock under extreme or emer-
gency conditions (emergency locking
mode), you must manually pull the
seat belt all the way out to shift the
retractor to the “Automatic Locking”
mode to secure a child restraint.
The “Automatic Locking” mode will
help prevent the normal movement
of the child in the vehicle from caus-
ing the seat belt to loosen and com-
promise the child restraint system. To
secure a child restraint system, use
the following procedure.To install a child restraint system on
the rear seats, do the following:
1.Place the child restraint system on
a rear seat and route the lap/ shoul-
der belt around or through the child
restraint, following the restraint
manufacturer’s instructions.
Be sure the seat belt webbing is
not twisted.
OLMB033044
Page 57 of 595
341
Safety features of your vehicle
2. Fasten the lap/shoulder belt latchinto the buckle. Listen for the dis-
tinct "click" sound.
Position the release button so that
it is easy to access in case of an
emergency. 3. Pull the shoulder portion of the
seat belt all the way out. When the
shoulder portion of the seat belt is
fully extended, it will shift the
retractor to the "Automatic
Locking" (child restraint) mode. 4. Slowly allow the shoulder portion
of the seat belt to retract and listen
for an audible "clicking" or "ratchet-
ing" sound. This indicates that the
retractor is in the "Automatic
Locking" mode. If no distinct sound
is heard, repeat steps 3 and 4.
OEN036101OEN036102OEN036103