Page 264 of 595
✽ ✽NOTICE
If you install an after market HID
head lamp, your vehicle’s audio and
electronic device may malfunction.
Antenna
Shark fin antenna
The shark fin antenna will receive the
AM, FM broadcast signals and
transmit data.
Steering Wheel Audio Controls
(If equipped)
The steering wheel may incorporate
audio control buttons.
Audio system
25
AUDIO SYSTEM
OQL045447OJF045127
CAUTION
To avoid damaging the audio
controls, do not operate thesteering wheel control buttonssimultaneously.
Page 265 of 595
 (1)
• Press the lever upward ( ) toincrease the volume.
Press the lever downward ( ) to decrease the volume.
SEEK/PRESET ( / ) (2)
The SEEK/PRESET button has dif-
ferent functions ba")
VOLUME ( / ) (1)
• Press the lever upward ( ) toincrease the volume.
Press the lever downward ( ) to decrease the volume.
SEEK/PRESET ( / ) (2)
The SEEK/PRESET button has dif-
ferent functions based on the system
mode. For the following functions the
button should be pressed for 0.8 sec-
onds or more.
RADIO mode
It will function as the AUTO SEEK
select button.
CD/USB/ iPod
®mode
It will function as the FF/REW button.
If the SEEK/PRESET button is
pressed for less than 0.8 seconds, it
will work as follows in each mode. RADIO mode
It will function as the PRESET STA-
TION buttons.
CD/USB/ iPod
®mode
It will function as TRACK UP/DOWN
button.
MODE (3)
Press the button to change audio
source.
FM(1~2)
➟ AM ➟ SAT(1~3) ➟ CD ➟
USB (iPod®) ➟AUX ➟ MY MUSIC ➟
BT Audio ➟ FM...
In addition to mode change, Power
on/off can be made by pressing this
button when the ignition switch is on
ACC or ON.
- Power ON: Press the button when the audio is off
- Power OFF: Press the button for more than 0.8 seconds when the
audio is on.
MUTE (4)
Press the button to mute the sound.
Press the button to turn off the microphone during a telephone
call.
Detailed information for audio control
buttons are described in the following
pages in this section.
Audio system
53
Page 281 of 595
Audio system
519
Radio Mode
Radio Mode Display Controls
(1) Mode Display
Displays current operating mode.
(2) Frequency
Displays the current frequency.
(3) Preset
Displays current preset number [1] ~
[6].
(4) Preset Display
Displays preset buttons.
(5) A.Store
Automatically saves frequencies with
superior reception to Preset buttons.With the Radio Mode Button
Pressing the [RADIO]button will
change the operating mode in the
order of FM1
➟ FM2 ➟ AM ➟ SAT1 ➟
SAT2 ➟ SAT3
If [Mode Pop up] is turned on within
[SETUP] �[Display], then pressing
the [RADIO] button will display the
Radio Mode Pop up screen.
Turn the TUNE knob to move the
focus. Press the knob to select.
Page 282 of 595
Audio system
20
5 Seek
Press the [SEEK TRACK]
button to
play the previous/next frequency.
Tu n e
Turn the TUNE knob to select the
desired frequency.
Selecting Presets/Saving Presets
Press the [Preset] button to display
the broadcast information for the fre-
quency saved to each button.
Press the [1] ~ [6] buttons to play the
desired preset.
While listening to a frequency you
want to save as a preset, press and
hold one of the [1] ~ [6] preset but-
tons to save the current frequency to
the selected preset.A.Store(Auto Store)
Press the [A.Store] button to auto-
matically save receivable frequen-
cies to Preset buttons.
Scan
Press the [SCAN]
button to preview
frequencies with superior reception
for 5 seconds each.
Press and hold the [SCAN] button to
preview presets for 5 seconds each.
Once scan is complete, the previous
frequency will be restored. While
Scan is operating, pressing the
[SCAN] button will cancel the scan-
ning.
Page 285 of 595
![KIA Sportage 2017 QL / 4.G Owners Manual Audio system
523
Seek
Press the [SEEK TRACK]button to
play the previous/next channel.
❈ If the “Category” icon is displayed,
channels are changed within the
current category.
Tu n e
Turn the TUN](/manual-img/2/2985/w960_2985-284.png "KIA Sportage 2017 QL / 4.G Owners Manual Audio system
523
Seek
Press the [SEEK TRACK]button to
play the previous/next channel.
❈ If the “Category” icon is displayed,
channels are changed within the
current category.
Tu n e
Turn the TUN")
Audio system
523
Seek
Press the [SEEK TRACK]button to
play the previous/next channel.
❈ If the “Category” icon is displayed,
channels are changed within the
current category.
Tu n e
Turn the TUNE knob to select the
desired channel.
Scan
Press the [SCAN] button to scan all
channels with superior reception for
5 seconds each.
Once scan is complete, the previous-
ly played channel will be restored.
During Scan, pressing the [SCAN]
button again will cancel the scan
operation and restore the previously
played channel.
If the “Category” icon is displayed,
channels are changed within the cur-
rent category. Searching Categories
Select the category by using the
[CAT/FOLDER]
button and press the
TUNE knob to select.
Channels for the selected category
are played.
✽ ✽ Troubleshooting
1. Antenna Error
If this message is displayed, the
antenna or antenna cable is bro-
ken or unplugged. Please consult
with your Kia dealership.
2. No Signal If this message is displayed, it
means that the antenna is covered
and that the SiriusXM Satellite
Radio signal is not available.
Ensure the antenna is uncovered
and has a clear view of the sky.
Selecting Presets/Saving Presets
Press the [Preset] button to display
the broadcast information for the
channel saved to each button.
Press the [1] ~ [6] buttons to play the
desired preset.
While listening to a channel you want
to save as a preset, press and hold
one of the [1] ~ [6] preset buttons to
save the current channel to the
selected preset.
Page 318 of 595
Audio system
56
5 Media Display
This feature is used to change the
information displayed within USB
and MP3 CD modes.
Folder File : Displays file name and
folder name.
Album Artist Song : Displays album name/ a r tist name/ song name.
With the Sound Button
Press the [SETUP] button �Select
[Sound]
You can select and control options
related to [Sound Settings], [Speed
Dependent Vol.], [Voice Recognition
Vol.] and [Touch Screen Beep].
Sound Settings
Use the [Up/Down/Left/Right] but-
tons to adjust the Fader/Balance set-
tings.
Use the [Left/Right] buttons to adjust
the Bass/Middle/Treble settings.
Press the [Default] button to reset.
Page 319 of 595
Audio system
557
SDVC (Speed Dependent Volume
Control)
The volume level is controlled auto-
matically according to the vehicle
speed. SDVC can be set by selecting
from On/Off.Voice Recognition Volume
Use the [-], [+] buttons to adjust the
Voice Recognition volume.
Touch Screen Beep
This feature is used to turn the touch
screen beep on/off.
Page 320 of 595
Audio system
58
5
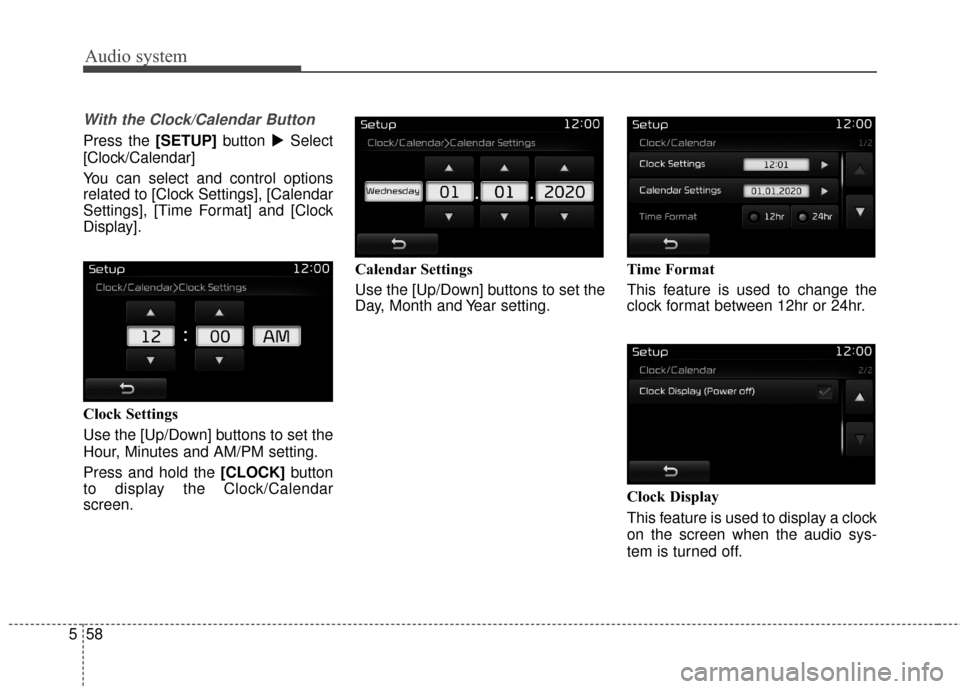
With the Clock/Calendar Button
Press the [SETUP] button �Select
[Clock/Calendar]
You can select and control options
related to [Clock Settings], [Calendar
Settings], [Time Format] and [Clock
Display].
Clock Settings
Use the [Up/Down] buttons to set the
Hour, Minutes and AM/PM setting.
Press and hold the [CLOCK] button
to display the Clock/Calendar
screen. Calendar Settings
Use the [Up/Down] buttons to set the
Day, Month and Year setting.
Time Format
This feature is used to change the
clock format between 12hr or 24hr.
Clock Display
This feature is used to display a clock
on the screen when the audio sys-
tem is turned off.

![KIA Sportage 2017 QL / 4.G Owners Manual Audio system
519
Radio Mode
Radio Mode Display Controls
(1) Mode Display
Displays current operating mode.
(2) Frequency
Displays the current frequency.
(3) Preset
Displays current preset number [1] ~](/manual-img/2/2985/w960_2985-280.png "KIA Sportage 2017 QL / 4.G Owners Manual Audio system
519
Radio Mode
Radio Mode Display Controls
(1) Mode Display
Displays current operating mode.
(2) Frequency
Displays the current frequency.
(3) Preset
Displays current preset number [1] ~")
![KIA Sportage 2017 QL / 4.G Owners Manual Audio system
20
5 Seek
Press the [SEEK TRACK]
button to
play the previous/next frequency.
Tu n e
Turn the TUNE knob to select the
desired frequency.
Selecting Presets/Saving Presets
Press the [Preset]](/manual-img/2/2985/w960_2985-281.png "KIA Sportage 2017 QL / 4.G Owners Manual Audio system
20
5 Seek
Press the [SEEK TRACK]
button to
play the previous/next frequency.
Tu n e
Turn the TUNE knob to select the
desired frequency.
Selecting Presets/Saving Presets
Press the [Preset]")


The volume level is controlled auto-
matically according to the vehicle
speed. SDVC can be set by selecting
from On/Off.Voice Recognition Volume")