Page 507 of 589
Maintenance
66
8
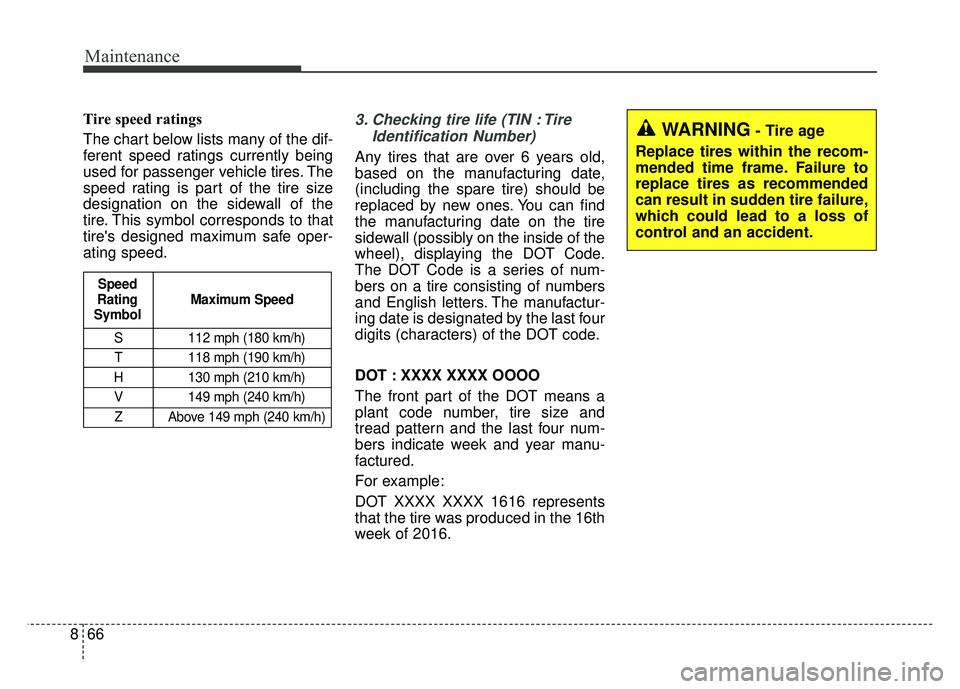
Tire speed ratings
The chart below lists many of the dif-
ferent speed ratings currently being
used for passenger vehicle tires. The
speed rating is part of the tire size
designation on the sidewall of the
tire. This symbol corresponds to that
tire's designed maximum safe oper-
ating speed.3. Checking tire life (TIN : Tire
Identification Number)
Any tires that are over 6 years old,
based on the manufacturing date,
(including the spare tire) should be
replaced by new ones. You can find
the manufacturing date on the tire
sidewall (possibly on the inside of the
wheel), displaying the DOT Code.
The DOT Code is a series of num-
bers on a tire consisting of numbers
and English letters. The manufactur-
ing date is designated by the last four
digits (characters) of the DOT code.
DOT : XXXX XXXX OOOO
The front part of the DOT means a
plant code number, tire size and
tread pattern and the last four num-
bers indicate week and year manu-
factured.
For example:
DOT XXXX XXXX 1616 represents
that the tire was produced in the 16th
week of 2016.
S 112 mph (180 km/h)
T 118 mph (190 km/h)
H 130 mph (210 km/h) V 149 mph (240 km/h)Z Above 149 mph (240 km/h)
Maximum Speed
Speed
Rating
Symbol
WARNING- Tire age
Replace tires within the recom-
mended time frame. Failure to
replace tires as recommended
can result in sudden tire failure,
which could lead to a loss of
control and an accident.
Page 515 of 589
Maintenance
74
8
FUSES
A vehicle’s electrical system is pro-
tected from electrical overload dam-
age by fuses.
This vehicle has 2 (or 3) fuse panels,
one located in the driver’s side panel
bolster, the other in the engine com-
partment near the battery.
If any of your vehicle’s lights, acces-
sories, or controls do not work, check
the appropriate circuit fuse. If a fuse
has blown, the element inside the
fuse will melt.
If the electrical system does not
work, first check the driver’s side
fuse panel.
Always replace a blown fuse with
one of the same rating.
If the replacement fuse blows, this
indicates an electrical problem. Avoid
using the system involved and imme-
diately consult an authorized Kia
dealer.
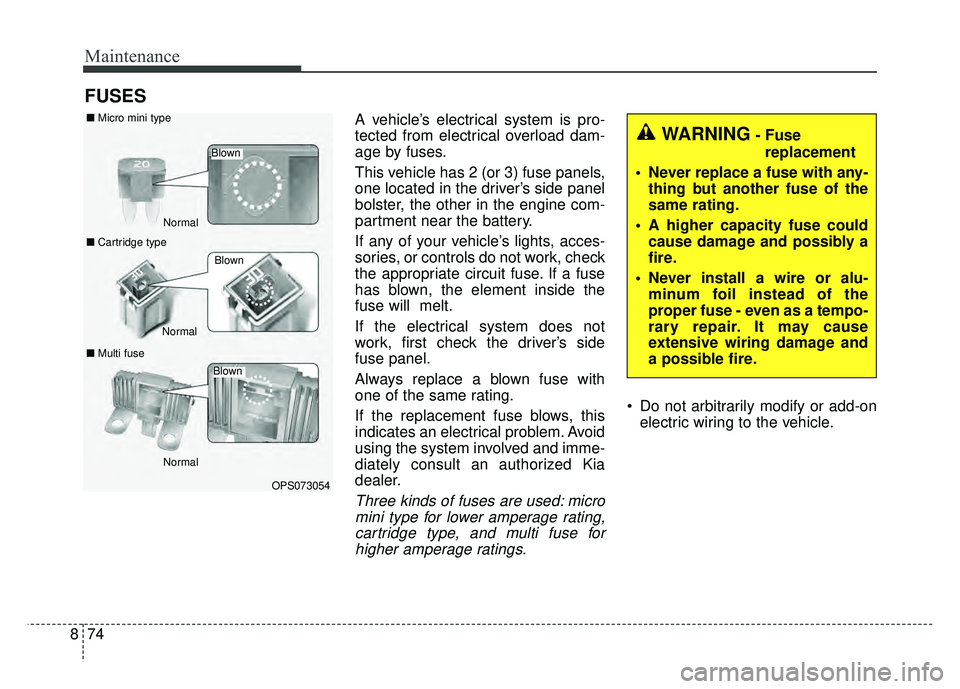
Three kinds of fuses are used: micro
mini type for lower amperage rating,cartridge type, and multi fuse forhigher amperage ratings.
Do not arbitrarily modify or add-on electric wiring to the vehicle.
WARNING- Fuse
replacement
Never replace a fuse with any- thing but another fuse of the
same rating.
A higher capacity fuse could cause damage and possibly a
fire.
Never install a wire or alu- minum foil instead of the
proper fuse - even as a tempo-
rary repair. It may cause
extensive wiring damage and
a possible fire.
OPS073054
Normal
Normal
■
Micro mini type
■ Cartridge type
■ Multi fuse
Blown
Blown
Normal
Blown
Page 516 of 589
875
Maintenance
✽
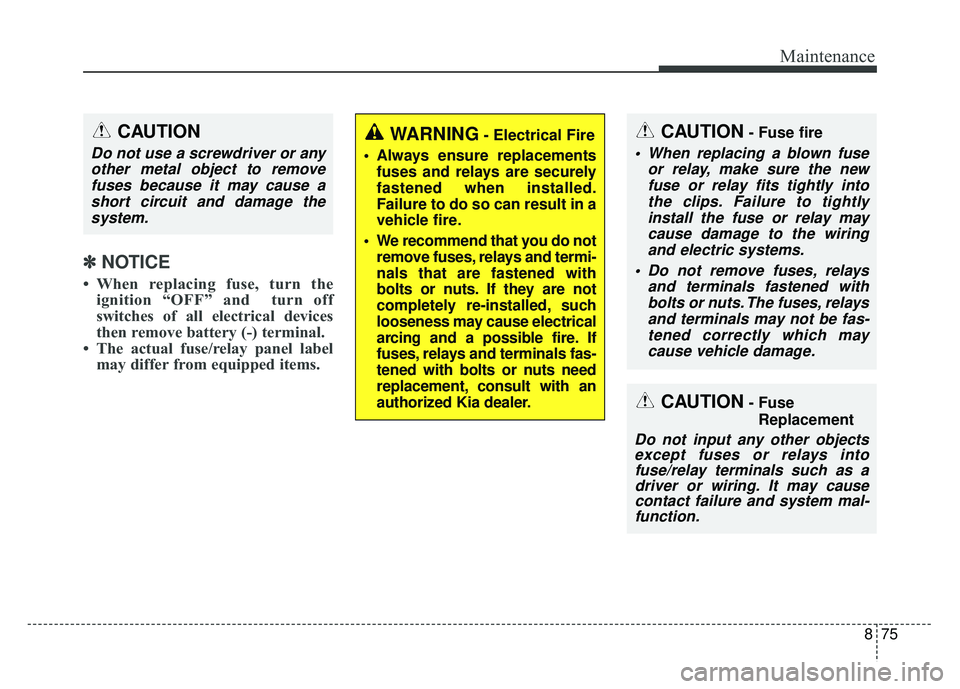
✽NOTICE
• When replacing fuse, turn the
ignition “OFF” and turn off
switches of all electrical devices
then remove battery (-) terminal.
• The actual fuse/relay panel label may differ from equipped items.
CAUTION
Do not use a screwdriver or any
other metal object to removefuses because it may cause ashort circuit and damage thesystem.
CAUTION- Fuse fire
When replacing a blown fuse or relay, make sure the newfuse or relay fits tightly intothe clips. Failure to tightlyinstall the fuse or relay maycause damage to the wiringand electric systems.
Do not remove fuses, relays and terminals fastened withbolts or nuts. The fuses, relaysand terminals may not be fas-tened correctly which maycause vehicle damage.
CAUTION- Fuse
Replacement
Do not input any other objectsexcept fuses or relays intofuse/relay terminals such as adriver or wiring. It may causecontact failure and system mal-function.
WARNING- Electrical Fire
Always ensure replacements fuses and relays are securely
fastened when installed.
Failure to do so can result in a
vehicle fire.
We recommend that you do not remove fuses, relays and termi-
nals that are fastened with
bolts or nuts. If they are not
completely re-installed, such
looseness may cause electrical
arcing and a possible fire. If
fuses, relays and terminals fas-
tened with bolts or nuts need
replacement, consult with an
authorized Kia dealer.
Page 523 of 589
Maintenance
82
8
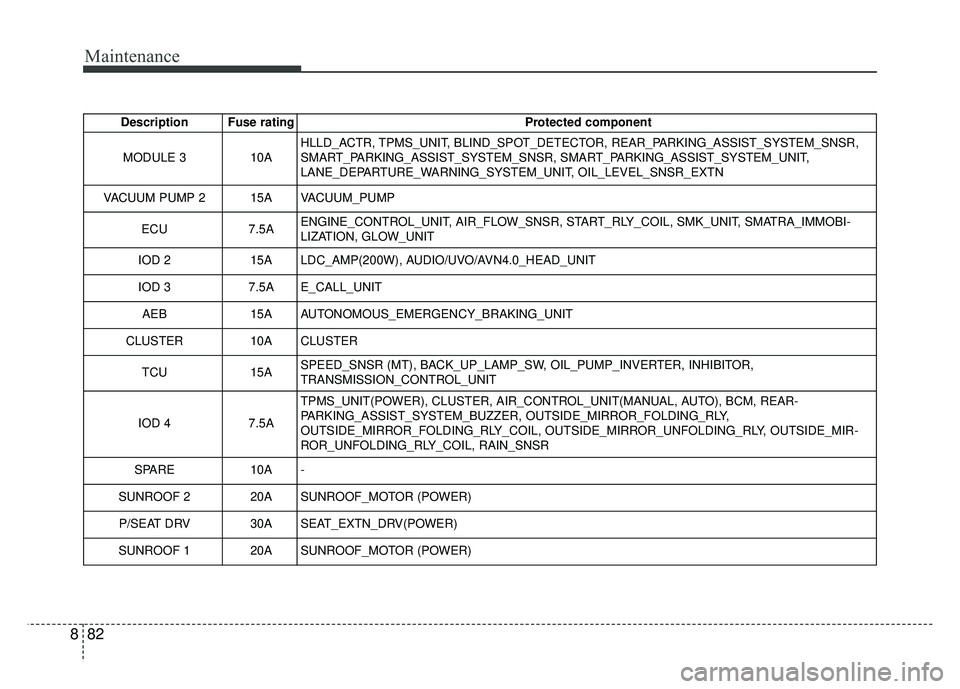
Description Fuse rating Protected component
MODULE 3 10AHLLD_ACTR, TPMS_UNIT, BLIND_SPOT_DETECTOR, REAR_PARKING_ASSIST_SYSTEM_SNSR,
SMART_PARKING_ASSIST_SYSTEM_SNSR, SMART_PARKING_ASSIST_SYSTEM_UNIT,
LANE_DEPARTURE_WARNING_SYSTEM_UNIT, OIL_LEVEL_SNSR_EXTN
VACUUM PUMP 2 15A VACUUM_PUMP
ECU 7.5AENGINE_CONTROL_UNIT, AIR_FLOW_SNSR, START_RLY_COIL, SMK_UNIT, SMATRA_IMMOBI-
LIZATION, GLOW_UNIT
IOD 2 15A LDC_AMP(200W), AUDIO/UVO/AVN4.0_HEAD_UNIT
IOD 3 7.5A E_CALL_UNIT
AEB 15A AUTONOMOUS_EMERGENCY_BRAKING_UNIT
CLUSTER 10A CLUSTER
TCU 15ASPEED_SNSR (MT), BACK_UP_LAMP_SW, OIL_PUMP_INVERTER, INHIBITOR,
TRANSMISSION_CONTROL_UNIT
IOD 4 7.5ATPMS_UNIT(POWER), CLUSTER, AIR_CONTROL_UNIT(MANUAL, AUTO), BCM, REAR-
PARKING_ASSIST_SYSTEM_BUZZER, OUTSIDE_MIRROR_FOLDING_RLY,
OUTSIDE_MIRROR_FOLDING_RLY_COIL, OUTSIDE_MIRROR_UNFOLDING_RLY, OUTSIDE_MIR-
ROR_UNFOLDING_RLY_COIL, RAIN_SNSR
SPARE 10A -
SUNROOF 2 20A SUNROOF_MOTOR (POWER) P/SEAT DRV 30A SEAT_EXTN_DRV(POWER)
SUNROOF 1 20A SUNROOF_MOTOR (POWER)
Page 524 of 589
883
Maintenance
Description Fuse ratingProtected component
MDPS 7.5A MDPS_UNIT
A/CON 2 7.5A AIR_CONTROL_UNIT_MANUAL(MAX_BLOWER), AIR_CONTROL_UNIT_AUTO(BLOWER_MOTOR)
START 7.5A E/R_FUSE & RELAY_BOX(RELAY - START / SUB START), PDM
IOD 1 7.5AGLOVE_BOX_LAMP, DOOR_WARNING_SW, OVER_HEAD_CONSOLE_LAMP, PERSONAL_LAMP,
SUNVISOR_LAMP, LUGGAGE_LAMP, PORTABLE_LAMP(DOOR)
PDM 2 7.5A SMK_UNIT(BATT_CPU), SMATRA_IMMOBILIZATION(BATT)
P/SEAT PASS 30A SEAT_EXTN_PASS(POWER) PDM 1 20A SMK_UNIT(POWER)
BRAKE SWITCH 10A STOP_LAMP_SW(NORMAL_OPEN), SMK_UNIT
Page 529 of 589
Maintenance
88
8
LIGHT BULBS
Bulb replacement precaution
Please keep extra bulbs on hand
with appropriate wattage ratings in
case of emergencies.
Refer to “Bulb Wattage” in chapter 9.
When changing lamps, first turn off
the engine at a safe place, firmly
apply the parking brake and detach
the battery’s negative (-) terminal.
Use only bulbs of the specified
wattage.✽ ✽ NOTICE
• If the light bulb or lamp connector
is removed while the lamp is still
on, the fuse box's electronic sys-
tem may log it as a malfunction.
Therefore, a lamp malfunction
incident may be recorded as a
Diagnostic Trouble Code (DTC) in
the fuse box.
• It is normal for an operating lamp to flicker momentarily. This is due
to a stabilization function of the
vehicle’s electronic control device.
If the lamp lights up normally
after momentarily blinking, then
it is functioning as normal.
However, if the lamp continues to
flicker several times or turns off
completely, there may be an error
in the vehicle’s electronic control
device. Please have the vehicle
checked by an authorized Kia
dealer immediately.
WARNING- Working on
the lights
Prior to working on the light,
firmly apply the parking brake,
ensure that the ignition switch
is turned to the LOCK position
and turn off the lights to avoid
sudden movement of the vehi-
cle and burning your fingers or
receiving an electric shock.
CAUTION -Light replace-
ment
Be sure to replace the burned- out bulb with one of the samewattage rating. Otherwise, itmay cause damage to the fuseor electric wiring system.
CAUTION -Headlamp
Lens
To prevent damage, do notclean the headlamp lens withchemical solvents or strongdetergents.
Page 531 of 589
Maintenance
90
8
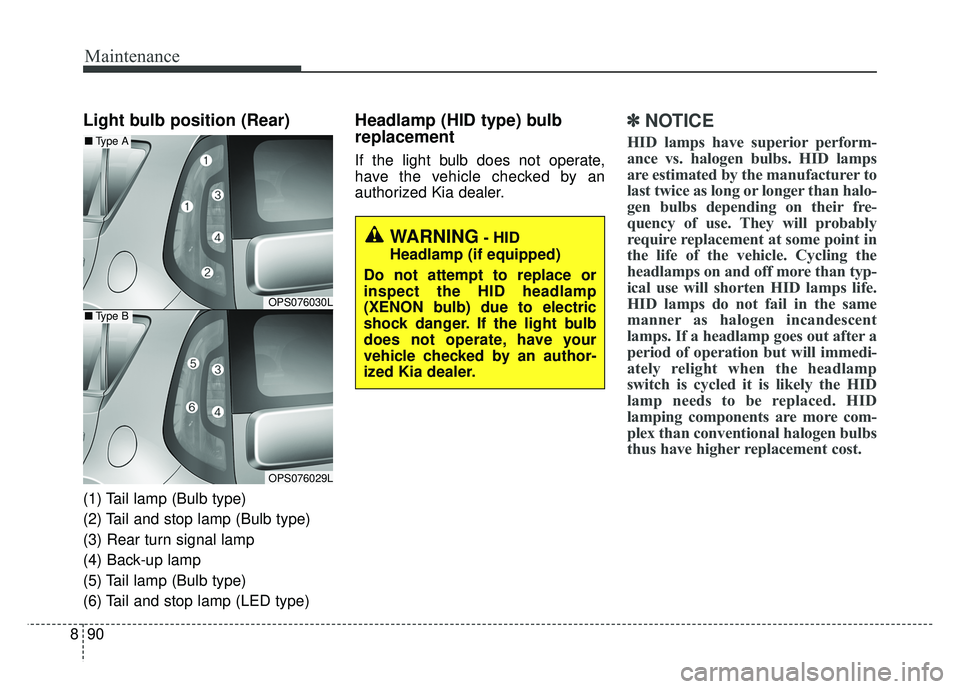
Light bulb position (Rear)
(1) Tail lamp (Bulb type)
(2) Tail and stop lamp (Bulb type)
(3) Rear turn signal lamp
(4) Back-up lamp
(5) Tail lamp (Bulb type)
(6) Tail and stop lamp (LED type)
Headlamp (HID type) bulb
replacement
If the light bulb does not operate,
have the vehicle checked by an
authorized Kia dealer.
✽ ✽
NOTICE
HID lamps have superior perform-
ance vs. halogen bulbs. HID lamps
are estimated by the manufacturer to
last twice as long or longer than halo-
gen bulbs depending on their fre-
quency of use. They will probably
require replacement at some point in
the life of the vehicle. Cycling the
headlamps on and off more than typ-
ical use will shorten HID lamps life.
HID lamps do not fail in the same
manner as halogen incandescent
lamps. If a headlamp goes out after a
period of operation but will immedi-
ately relight when the headlamp
switch is cycled it is likely the HID
lamp needs to be replaced. HID
lamping components are more com-
plex than conventional halogen bulbs
thus have higher replacement cost.
OPS076030L
OPS076029L
■ Type A
■Type B
WARNING- HID
Headlamp (if equipped)
Do not attempt to replace or
inspect the HID headlamp
(XENON bulb) due to electric
shock danger. If the light bulb
does not operate, have your
vehicle checked by an author-
ized Kia dealer.
Page 533 of 589
Maintenance
92
8
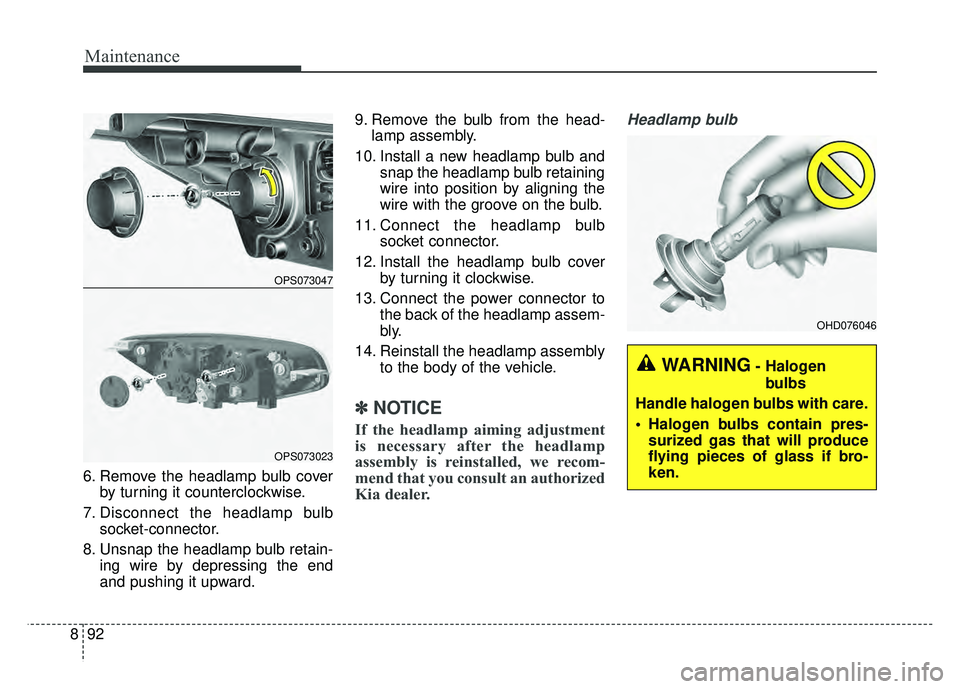
6. Remove the headlamp bulb cover
by turning it counterclockwise.
7. Disconnect the headlamp bulb socket-connector.
8. Unsnap the headlamp bulb retain- ing wire by depressing the end
and pushing it upward. 9. Remove the bulb from the head-
lamp assembly.
10. Install a new headlamp bulb and snap the headlamp bulb retaining
wire into position by aligning the
wire with the groove on the bulb.
11. Connect the headlamp bulb socket connector.
12. Install the headlamp bulb cover by turning it clockwise.
13. Connect the power connector to the back of the headlamp assem-
bly.
14. Reinstall the headlamp assembly to the body of the vehicle.
✽ ✽NOTICE
If the headlamp aiming adjustment
is necessary after the headlamp
assembly is reinstalled, we recom-
mend that you consult an authorized
Kia dealer.
Headlamp bulb
OPS073047
OPS073023
WARNING- Halogen
bulbs
Handle halogen bulbs with care.
Halogen bulbs contain pres- surized gas that will produce
flying pieces of glass if bro-
ken.
OHD076046