2017 KIA Soul EV ignition
[x] Cancel search: ignitionPage 301 of 470
65
What to do in an emergency
EMERGENCY STARTING
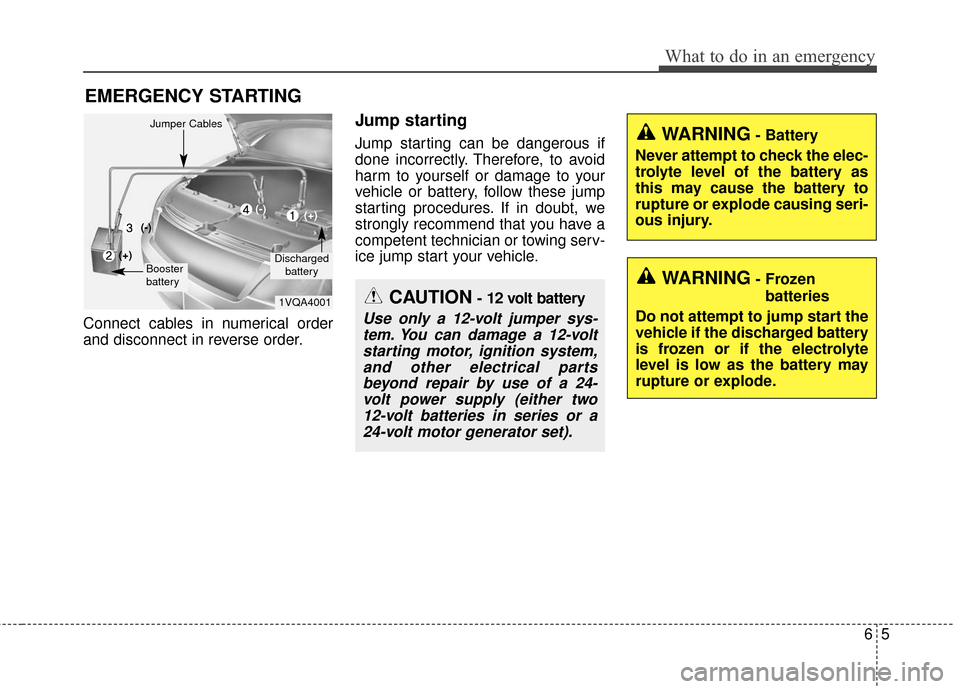
Connect cables in numerical order
and disconnect in reverse order.
Jump starting
Jump starting can be dangerous if
done incorrectly. Therefore, to avoid
harm to yourself or damage to your
vehicle or battery, follow these jump
starting procedures. If in doubt, we
strongly recommend that you have a
competent technician or towing serv-
ice jump start your vehicle.
CAUTION- 12 volt battery
Use only a 12-volt jumper sys-tem. You can damage a 12-voltstarting motor, ignition system,and other electrical partsbeyond repair by use of a 24-volt power supply (either two12-volt batteries in series or a24-volt motor generator set).
WARNING- Battery
Never attempt to check the elec-
trolyte level of the battery as
this may cause the battery to
rupture or explode causing seri-
ous injury.
1VQA4001
Discharged battery
Jumper Cables
Booster
battery
(-)
(+)
(+)(-)
WARNING- Frozenbatteries
Do not attempt to jump start the
vehicle if the discharged battery
is frozen or if the electrolyte
level is low as the battery may
rupture or explode.
Page 306 of 470
What to do in an emergency
10
6
Always check the TPMS malfunction
telltale after replacing one or more
tires or wheels on your vehicle to
ensure that the replacement or alter-
nate tires and wheels allow the TPMS
to continue to function properly.
✽ ✽
NOTICE
If the TPMS, Low Tire Pressure
indicator do not illuminate for 3 sec-
onds when the ignition switch is
turned to the ON position or vehicle
is running, or if they remain illumi-
nated after coming on for approxi-
mately 3 seconds, take your vehicle
to your nearest authorized Kia deal-
er and have the system checked.
Low tire pressure
telltale
When the tire pressure monitoring
system warning indicators are illumi-
nated, one or more of your tires is
significantly under-inflated.
If the telltale illuminates, immediately
reduce your speed, avoid hard cor-
nering and anticipate increased stop-
ping distances. You should stop and
check your tires as soon as possible.
Inflate the tires to the proper pres-
sure as indicated on the vehicle’s
placard or tire inflation pressure label
located on the driver’s side center pil-
lar outer panel. If you cannot reach a
service station or if the tire cannot
hold the newly added air, replace the
low pressure tire with the spare tire. Then the Low Tire Pressure telltale
may flash for approximately one
minute and then remain continuously
illuminated after restarting and about
10 minutes of continuous driving at
speed above 25 km/h (15.5 mph)
before you have the low pressure tire
repaired and replaced on the vehicle.
In winter or cold weather, the low tire
pressure telltale may be illuminated if
the tire pressure was adjusted to the
recommended tire inflation pressure
in warm weather. It does not mean
your TPMS is malfunctioning because
the decreased temperature leads to a
proportional lowering of tire pressure.
When you drive your vehicle from a
warm area to a cold area or from a
cold area to a warm area, or the out-
side temperature is greatly higher or
lower, you should check the tire infla-
tion pressure and adjust the tires to
the recommended tire inflation pres-
sure.
Page 314 of 470

What to do in an emergency
18
6
8. With the vehicle start/stop button
position on or ignition switch posi-
tion on, switch on the compressor
and let it run for approximately
5~7 minutes to fill the sealant up
to proper pressure. (refer to the
Tire and Wheels, chapter 8). The
inflation pressure of the tire after
filling is unimportant and will be
checked/corrected later.
Be careful not to overinflate the
tire and stay away from the tire
when filling it. 9. Switch off the compressor.
10. Detach the hoses from the
sealant bottle connector and
from the tire valve.
Return the Tire Mobility Kit to its stor-
age location in the vehicle.Distributing the sealant
11. Immediately drive approximately 7~10km (4~6miles or, about
10min) to evenly distribute the
sealant in the tire.
Do not exceed a speed of 80 km/h
(50 mph). If possible, do not fall
below a speed of 20 km/h (12 mph).
While driving, if you experience any
unusual vibration, ride disturbance or
noise, reduce your speed and drive
with caution until you can safely pull
off of the side of the road.
Call for road side service or towing.
When you use the Tire Mobility Kit,
the tire pressure sensors and wheel
may be stained by sealant.
Therefore, remove the tire pressure
sensors and wheel stained by
sealant and we recommend that
inspect at an authorized Kia dealer.
WARNING - Carbon monoxide
Do not leave your vehicle run-
ning in a poorly ventilated area
for extended periods of time.
Carbon monoxide poisoning
and suffocation can occur.
WARNING- Tire pressure
Do not attempt to drive your
vehicle if the tire pressure is
below 200 kPa (29 psi).
This could result in an accident
due to sudden tire failure.
Page 315 of 470

619
What to do in an emergency
Checking the tire inflation pres-
sure
1. After driving approximately 7~10km(4~6miles or about 10min), stop at
a safety location.
2. Connect connection hose (9) of the compressor directly to the tire
valve.
3. Plug the compressor power cord into the vehicle power outlet.
4. Adjust the tire inflation pressure to the recommended tire inflation.
With the ignition switched on, pro- ceed as follows.
- To increase the inflation pres- sure : Switch on the compres-
sor, position I. To check the cur-
rent inflation pressure setting,
briefly switch off the compressor.✽ ✽ NOTICE
The pressure gauge may show high-
er than actual reading when the
compressor is running. To get an
accurate tire pressure, the compres-
sor needs to be turned off.
- To reduce the inflation pres-
sure: Loosen the screw cap (8)
on the compressor hose. Technical Data
System voltage: DC 12 V
Working voltage: DC 10 - 15 V
Amperage rating: max. 15 A
Suitable for use at temperatures:
-30 ~ +70°C (-22 ~ +158°F)
Max. working pressure: 6 bar (87 psi)
Size
Compressor: 170 x 150 x 60 mm (6.7 x 5.9 x 2.4 in.)
Sealant bottle: 85 x 70 ø mm (3.3 x 2.8 ø in.)
Compressor weight: 0.8 kg (1.77 lbs)
Sealant volume: 200 ml (12.2 cu. in.)
CAUTION - Tire pressuresensor
When you use the Tire MobilityKit including sealant notapproved by Kia, the tire pres-sure sensors may be damagedby sealant. The sealant on thetire pressure sensor and wheelshould be removed when youreplace the tire with a new oneand inspect the tire pressuresensors in authorized dealer.
Page 316 of 470

What to do in an emergency
20
6
TOWING
Towing service
If emergency towing is necessary,
we recommend having it done by an
authorized Kia dealer or a commer-
cial tow-truck service. Proper lifting
and towing procedures are neces-
sary to prevent damage to the vehi-
cle. The use of wheel dollies or
flatbed is recommended.
For trailer towing guidelines informa-
tion, refer to “Trailer towing” in chap-ter 5.
If towing is required, lift all four wheels
off the ground and tow the vehicle. If
you must tow the vehicle using only
two wheels, lift the front wheels off the
ground and tow the vehicle.
OPSE064003 dolly
dolly
WARNING- Towing EV
Never tow the vehicle with the
front wheels on the ground (for-
ward or backward), as this may
cause damage to the motor or
fire.
OPSE064005
CAUTION- Towing
Do not tow the vehicle back- wards with the front wheels onthe ground as this may causedamage to the vehicle.
Do not tow with sling-type equipment. Use wheel lift orflatbed equipment.
WARNING - Side and cur-
tain air bag
If your vehicle is equipped with
side and curtain air bags, set
the ignition switch to LOCK or
ACC position when the vehicle
is being towed. The side and
curtain air bag may deploy
when the ignition is ON and the
rollover sensor detects the situ-
ation as a rollover.
Page 317 of 470
621
What to do in an emergency
When towing your vehicle in an
emergency without wheel dollies :
1. Set the ignition switch in the ACCposition.
2. Place the transaxle shift lever in N (Neutral).
3. Release the parking brake.Removable towing hook
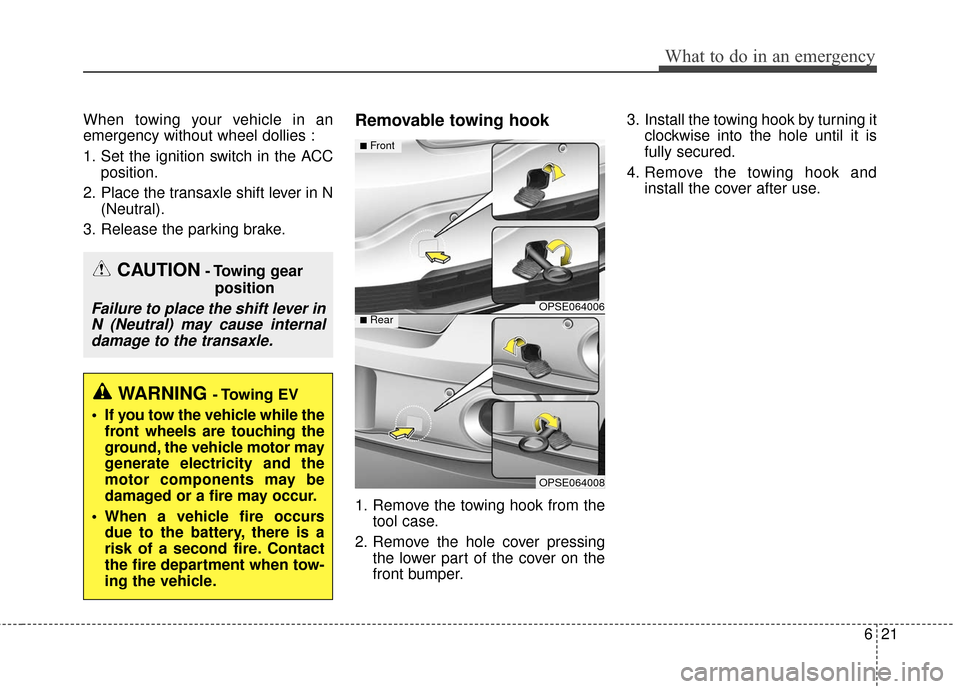
1. Remove the towing hook from the tool case.
2. Remove the hole cover pressing the lower part of the cover on the
front bumper. 3. Install the towing hook by turning it
clockwise into the hole until it is
fully secured.
4. Remove the towing hook and install the cover after use.
CAUTION- Towing gear
position
Failure to place the shift lever inN (Neutral) may cause internaldamage to the transaxle.
WARNING - Towing EV
If you tow the vehicle while the front wheels are touching the
ground, the vehicle motor may
generate electricity and the
motor components may be
damaged or a fire may occur.
When a vehicle fire occurs due to the battery, there is a
risk of a second fire. Contact
the fire department when tow-
ing the vehicle.
OPSE064006
OPSE064008
■Front
■Rear
Page 319 of 470
623
What to do in an emergency
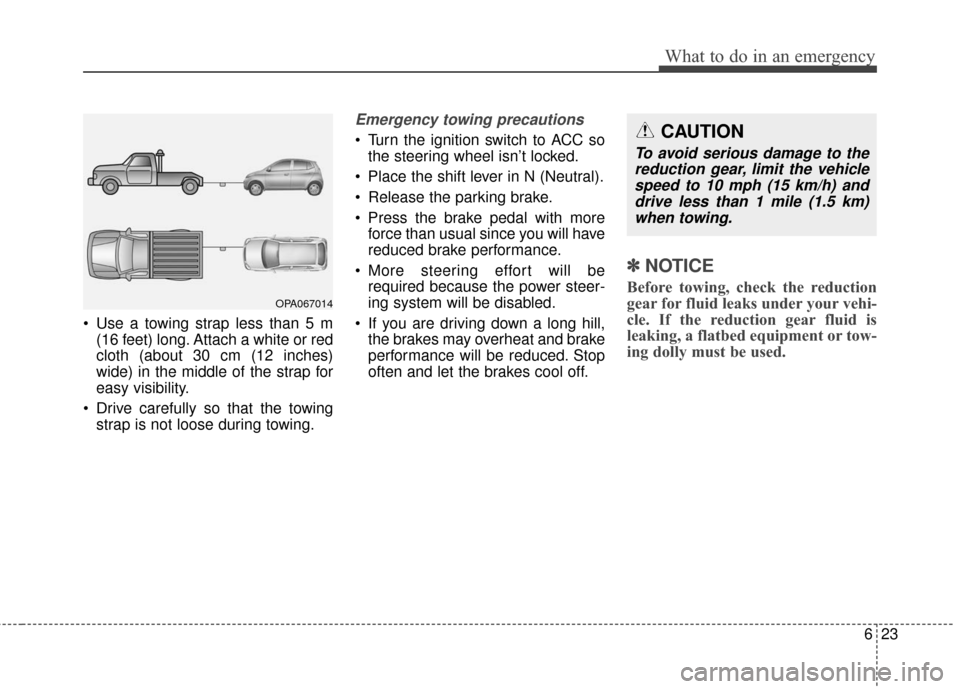
Use a towing strap less than 5 m(16 feet) long. Attach a white or red
cloth (about 30 cm (12 inches)
wide) in the middle of the strap for
easy visibility.
Drive carefully so that the towing strap is not loose during towing.
Emergency towing precautions
Turn the ignition switch to ACC sothe steering wheel isn’t locked.
Place the shift lever in N (Neutral).
Release the parking brake.
Press the brake pedal with more force than usual since you will have
reduced brake performance.
More steering effort will be required because the power steer-
ing system will be disabled.
If you are driving down a long hill, the brakes may overheat and brake
performance will be reduced. Stop
often and let the brakes cool off.
✽ ✽ NOTICE
Before towing, check the reduction
gear for fluid leaks under your vehi-
cle. If the reduction gear fluid is
leaking, a flatbed equipment or tow-
ing dolly must be used.OPA067014
CAUTION
To avoid serious damage to the
reduction gear, limit the vehiclespeed to 10 mph (15 km/h) anddrive less than 1 mile (1.5 km)when towing.
Page 366 of 470
747
Maintenance
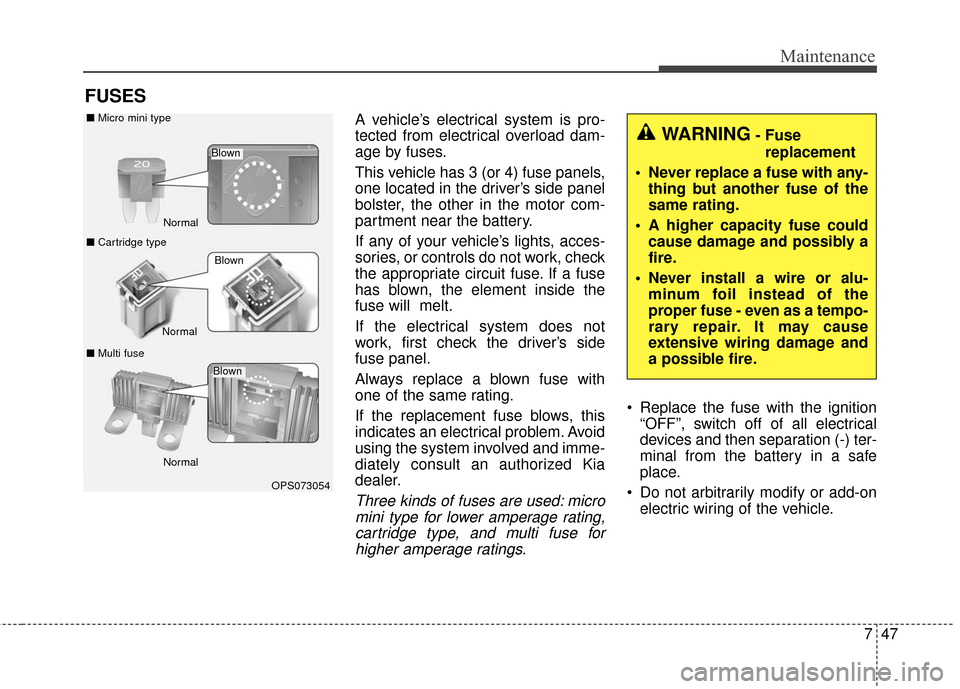
FUSES
A vehicle’s electrical system is pro-
tected from electrical overload dam-
age by fuses.
This vehicle has 3 (or 4) fuse panels,
one located in the driver’s side panel
bolster, the other in the motor com-
partment near the battery.
If any of your vehicle’s lights, acces-
sories, or controls do not work, check
the appropriate circuit fuse. If a fuse
has blown, the element inside the
fuse will melt.
If the electrical system does not
work, first check the driver’s side
fuse panel.
Always replace a blown fuse with
one of the same rating.
If the replacement fuse blows, this
indicates an electrical problem. Avoid
using the system involved and imme-
diately consult an authorized Kia
dealer.
Three kinds of fuses are used: micromini type for lower amperage rating,cartridge type, and multi fuse forhigher amperage ratings.
Replace the fuse with the ignition “OFF”, switch off of all electrical
devices and then separation (-) ter-
minal from the battery in a safe
place.
Do not arbitrarily modify or add-on electric wiring of the vehicle.
WARNING- Fuse
replacement
Never replace a fuse with any- thing but another fuse of the
same rating.
A higher capacity fuse could cause damage and possibly a
fire.
Never install a wire or alu- minum foil instead of the
proper fuse - even as a tempo-
rary repair. It may cause
extensive wiring damage and
a possible fire.
OPS073054
Normal
Normal
■
Micro mini type
■ Cartridge type
■ Multi fuse
Blown
Blown
Normal
Blown