Page 531 of 576
779
Maintenance
DescriptionFuse ratingProtected component
ABS 3 7.5AESC Control Module, Multipurpose Check Connector
ECU 1 10APCM, [G6DH] IDB (Injector Driver Box)
IG 2 40ARLY. 4 (Start Relay), PDM (IG2) Relay, Ignition Switch
POWER
OUTLET 1 20AFront Power Outlet & Cigarette Lighter
SENSOR 6 7.5A[G4KH] Brake Vacuum Switch, Vacuum Pump
POWER
OUTLET 2 20AFront Power Outlet
CRUISE 7.5ASmart Cruise Control Radar
ECU 4 20A[G4KJ/G4KH] PCM (E-CVVT Relay)
WIPER 25AWiper Low Relay
DEICER 15AFront Deicer Relay
ECU 5 20A[G4KJ/G4KH] PCM (E-CVVT Relay)
IG 1 40APDM (IG1) Relay, PDM (ACC) Relay, Ignition Switch
SENSOR 4 10A[G4KJ/G4KH] Oxygen Sensor (Up/Down)
[G6DH] PCM, Oxygen Sensor #1/#2/#3/#4
SENSOR 5 15A[G4KJ/G4KH]PCM
[G6DH] IDB (Injector Driver Box)
Page 534 of 576

Maintenance
82
7
LIGHT BULBS
Please prepare lamps with appropri-
ate standards in case of emergen-
cies. (Refer to chapter 8 for further
information)
When changing lamps and sorts,
first turn off the engine at a safe
place, firmly apply the side brake and
take out the battery’s negative (-) ter-
minal.Use only the bulbs of the specified
wattage.✽ ✽ NOTICE
• If the light bulb or lamp connector
is removed from an operating
lamp activated by electricity, the
fuse box’s electronic device may
scan it as a malfunction.
Therefore, a lamp malfunction
history may be recorded in
Diagnostic Trouble Code (DTC) in
the fuse box.
• It is normal for an operating lamp may blink temporarily. Since this
occurrence is due stabilization
function of the vehicle’s electronic
control device, if the lamp lights
up normally after temporary
blinking, there is no problem in
the vehicle.
However, if the lamp continues to
blink several times or turn off
completely, there may be an error
in the vehicle’s electronic control
device. So please have the vehicle
checked by an authorized Kia
dealer immediately.
WARNING - Working on
the lights
Prior to working on the light,
firmly apply the parking brake,
ensure that the ignition switch
is turned to the LOCK position
and turn off the lights to avoid
sudden movement of the vehi-
cle and burning your fingers or
receiving an electric shock.
CAUTION -Light replace-
ment
Be sure to replace the burned-
out bulb with one of the samewattage rating. Otherwise, itmay cause damage to the fuseor electric wiring system.
CAUTION -Headlamp
Lens
To prevent damage, do notclean headlamp lens with chem-ical solvents or strong deter-gents.
Page 535 of 576

783
Maintenance
If you don’t have necessary tools, the
correct bulbs and the expertise, con-
sult an authorized Kia dealer. In
many cases, it is difficult to replace
vehicle light bulbs because other
parts of the vehicle must be removed
before you can get to the bulb. This is
especially true if you have to remove
the headlamp assembly to get to the
bulb(s).
Removing/installing the headlamp
assembly can result in damage to
the vehicle.
If unauthentic parts or substandard
lights are used when changing lights,
it may lead to fuse disconnection and
malfunction, and other wiring dam-
ages.
Do not install extra lamps or LED to
the vehicle. If supplementary lights
are installed, it may lead to lamp mal-
function and flickering of the lights. In
addition, the fuse box and other writ-
ing may be damaged.Front lamp bulb replacement(1) Headlamp (High and DRL)
(2) Headlamp (Low)
(3) Turn signal lamp
(4) Side marker lamp
(5) Position lamp
(6) Fog lamp (if equipped)
OUMA074027
OUMA074114
■Type A
■Type B
Page 536 of 576
Maintenance
84
7
Headlamp bulb Always handle them carefully, and
avoid scratches and abrasions. If
the bulbs are lit, avoid contact with
liquids. Never touch the glass with
bare hands. Residual oil may
cause the bulb to overheat and
burst when lit. A bulb should be
operated only when installed in a
headlamp.
If a bulb becomes damaged or cracked, replace it immediately
and carefully dispose of it.
Wear eye protection when chang- ing a bulb. Allow the bulb to cool
down before handling it.
WARNING - HID
Headlamp low beam
(if equipped)
Do not attempt to replace or
inspect the low beam (XENON
bulb) due to electric shock dan-
ger. If the light bulb does not
operate, have your vehicle
checked by an authorized Kia
dealer.
OXM079200N
WARNING- Halogen
bulbs
Handle halogen bulbs with care.
Halogen bulbs contain pres- surized gas that will produce
flying pieces of glass if bro-
ken.
Page 539 of 576

787
Maintenance
Headlamp low (HID), Positionlamp (LED)/Side markerlamp(LED) replacement
If the light bulb does not operate,
have the vehicle checked by an
authorized Kia dealer.
✽ ✽ NOTICE
HID lamps have superior perform-
ance vs. halogen bulbs. HID lamps
are estimated by the manufacturer
to last twice as long or longer than
halogen bulbs depending on their
frequency of use. They will probably
require replacement at some point
in the life of the vehicle. Cycling the
headlamps on and off more than
typical use will shorten HID lamps
life. HID lamps do not fail in the
same manner as halogen incandes-
cent lamps. If a headlamp goes out
after a period of operation but will
immediately relamp when the head-
lamp switch is cycled it is likely the
HID lamp needs to be replaced. HID
lamping components are more com-
plex than conventional halogen
bulbs thus have higher replacement
cost.
Side repeater lamp replace-
ment
If the light bulb does not
operate,have the vehicle checked by
an authorized Kia dealer. A skilled
technician should check or repair the
side repeater lamp, for it may dam-
age related out side mirror parts of
the vehicle.
OUM074028
Page 541 of 576

789
Maintenance
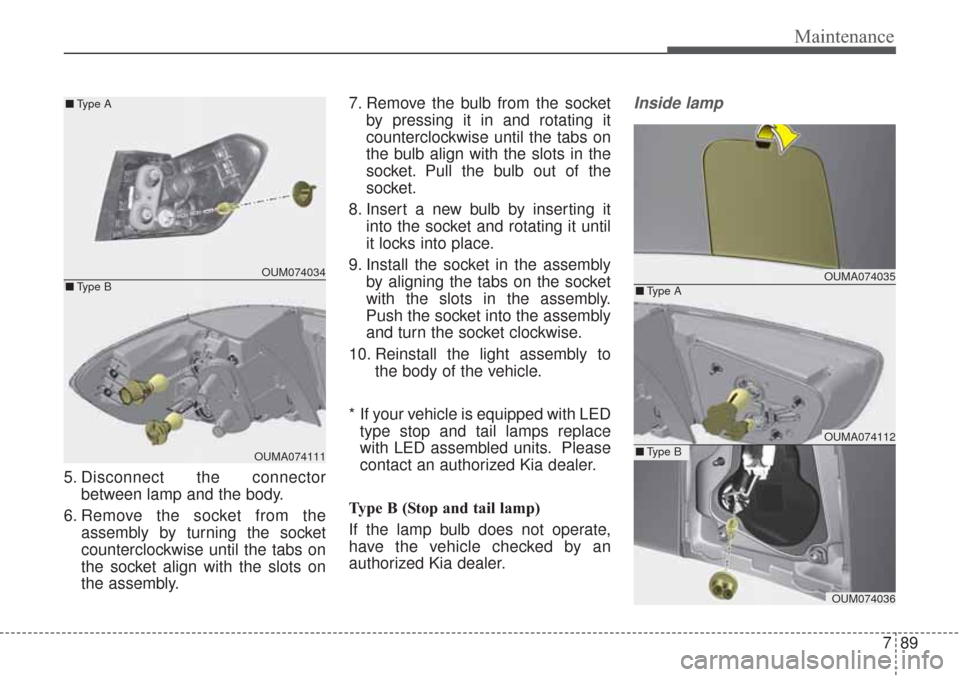
5. Disconnect the connectorbetween lamp and the body.
6. Remove the socket from the assembly by turning the socket
counterclockwise until the tabs on
the socket align with the slots on
the assembly. 7. Remove the bulb from the socket
by pressing it in and rotating it
counterclockwise until the tabs on
the bulb align with the slots in the
socket. Pull the bulb out of the
socket.
8. Insert a new bulb by inserting it into the socket and rotating it until
it locks into place.
9. Install the socket in the assembly by aligning the tabs on the socket
with the slots in the assembly.
Push the socket into the assembly
and turn the socket clockwise.
10. Reinstall the light assembly to the body of the vehicle.
* If your vehicle is equipped with LED type stop and tail lamps replace
with LED assembled units. Please
contact an authorized Kia dealer.
Type B (Stop and tail lamp)
If the lamp bulb does not operate,
have the vehicle checked by an
authorized Kia dealer.
Inside lamp
OUMA074035
OUMA074112
OUM074036
■ Type A
■Type B
OUM074034
OUMA074111
■
Type A
■ Type B
Page 544 of 576
Maintenance
92
7
Interior lamp bulb replacement
1. Using a flat-blade screwdriver,
gently pry the lens from the interi-
or light housing.
2. Remove the bulb by pulling it straight out.
3. Install a new bulb in the socket.
4. Align the lens tabs with the interior light housing notches and snap
the lens into place.
✽ ✽NOTICE
If the LED lamp does not operate,
we recommend that you checked on
authorized Kia dealer.
WARNING - Interior
lamps
Prior to working on the Interior
Lights, ensure that the “OFF”
button is depressed to avoid
burning your fingers or receiv-
ing an electric shock.
■Room lamp
■Map lamp
■Glove box lamp
■Luggage lamp
■Vanity mirror lamp
OUM074039/OUM074040/OUM074041/ OYP074032K/OXM079041
Page 545 of 576

793
Maintenance
APPEARANCE CARE
Exterior care
Exterior general caution
It is very important to follow the label
directions when using any chemical
cleaner or polish. Read all warning
and caution statements that appear
on the label.
Finish maintenance
Washing
To help protect your vehicle’s finish
from rust and deterioration, wash it
thoroughly and frequently at least
once a month with lukewarm or cold
water.
If you use your vehicle for off-road
driving, you should wash it after each
off-road trip. Pay special attention to
the removal of any accumulation of
salt, dirt, mud, and other foreign
materials. Make sure the drain holes
in the lower edges of the doors and
rocker panels are kept clear and
clean.
Insects, tar, tree sap, bird droppings,
industrial pollution and similar
deposits can damage your vehicle’s
finish if not removed immediately.
Even prompt washing with plain
water may not completely remove all
these deposits. A mild soap, safe for
use on painted surfaces, may be
used.
After washing, rinse the vehicle thor-
oughly with lukewarm or cold water.
Do not allow soap to dry on the fin-
ish.After washing the vehicle, test the
brakes while driving slowly to see if
they have been affected by water. If
braking performance is impaired, dry
the brakes by applying them lightly
while maintaining a slow forward
speed.
CAUTION - Headlight Lens
To prevent damage, do not
clean headlight lens with chem-ical solvents or strong deter-gents.