2017 KIA SEDONA display
[x] Cancel search: displayPage 396 of 586
Driving your vehicle
52
5
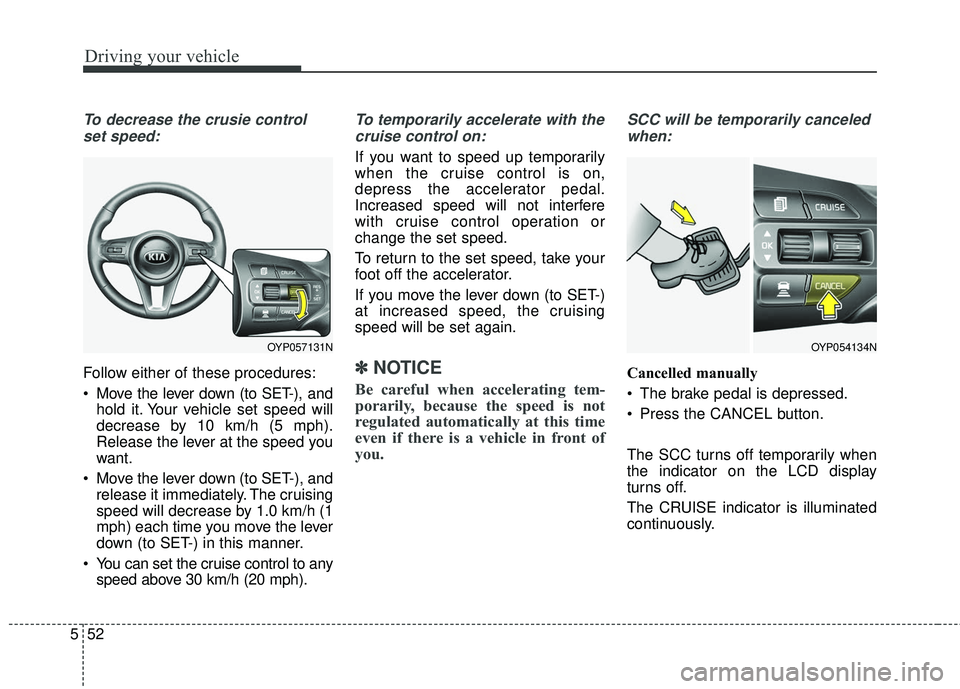
To decrease the crusie control
set speed:
Follow either of these procedures:
Move the lever down (to SET-), and hold it. Your vehicle set speed will
decrease by 10 km/h (5 mph).
Release the lever at the speed you
want.
Move the lever down (to SET-), and release it immediately. The cruising
speed will decrease by 1.0 km/h (1
mph) each time you move the lever
down (to SET-) in this manner.
You can set the cruise control to any speed above 30 km/h (20 mph).
To temporarily accelerate with the
cruise control on:
If you want to speed up temporarily
when the cruise control is on,
depress the accelerator pedal.
Increased speed will not interfere
with cruise control operation or
change the set speed.
To return to the set speed, take your
foot off the accelerator.
If you move the lever down (to SET-)
at increased speed, the cruising
speed will be set again.
✽ ✽ NOTICE
Be careful when accelerating tem-
porarily, because the speed is not
regulated automatically at this time
even if there is a vehicle in front of
you.
SCC will be temporarily canceled
when:
Cancelled manually
The brake pedal is depressed.
Press the CANCEL button.
The SCC turns off temporarily when
the indicator on the LCD display
turns off.
The CRUISE indicator is illuminated
continuously.
OYP054134NOYP057131N
Page 400 of 586
Driving your vehicle
56
5
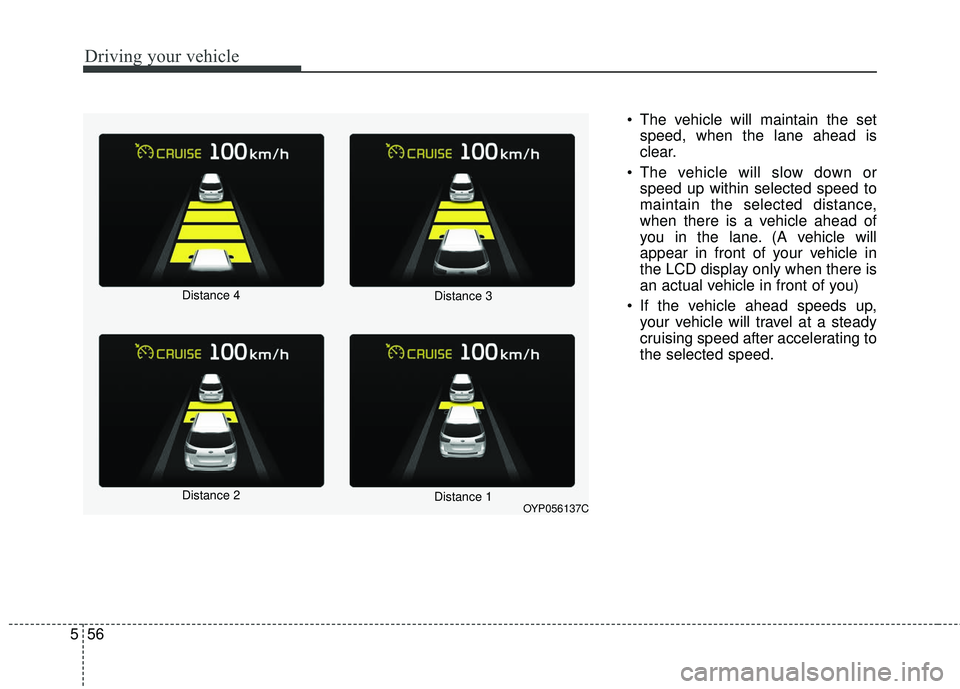
The vehicle will maintain the set
speed, when the lane ahead is
clear.
The vehicle will slow down or speed up within selected speed to
maintain the selected distance,
when there is a vehicle ahead of
you in the lane. (A vehicle will
appear in front of your vehicle in
the LCD display only when there is
an actual vehicle in front of you)
If the vehicle ahead speeds up, your vehicle will travel at a steady
cruising speed after accelerating to
the selected speed.
OYP056137C
Distance 4
Distance 2
Distance 3
Distance 1
Page 401 of 586

557
Driving your vehicle
The warning chime sounds andLCD display blinks if it is hard to
maintain the selected distance to
the vehicle ahead.
If the warning chime sounds, actively adjust the vehicle speed by
depressing the brake pedal
according to the road condition
ahead and driving condition.
Even if the warning chime is not activated, always pay attention to
the driving conditions to prevent
dangerous situations from occur-
ring. If the vehicle ahead (vehicle speed:
less than 30 km/h (20 mph)) moves
to the next lane, the warning chime
will sound and a message will
appear.
If a vehicle enters into your lane
moving less than the designated
speed, you can adjust your vehicle
speed by depressing the brake
pedal.Sensor to detect distance to the
vehicle ahead
The sensor detects distance to the
vehicle ahead.
If the sensor is covered with dirt or
other foreign matter, the vehicle to
vehicle distance control may not
operate correctly.
Always keep the sensor clean.
OUMA057169
OYP054140N
Page 411 of 586
567
Driving your vehicle
DRIVE mode
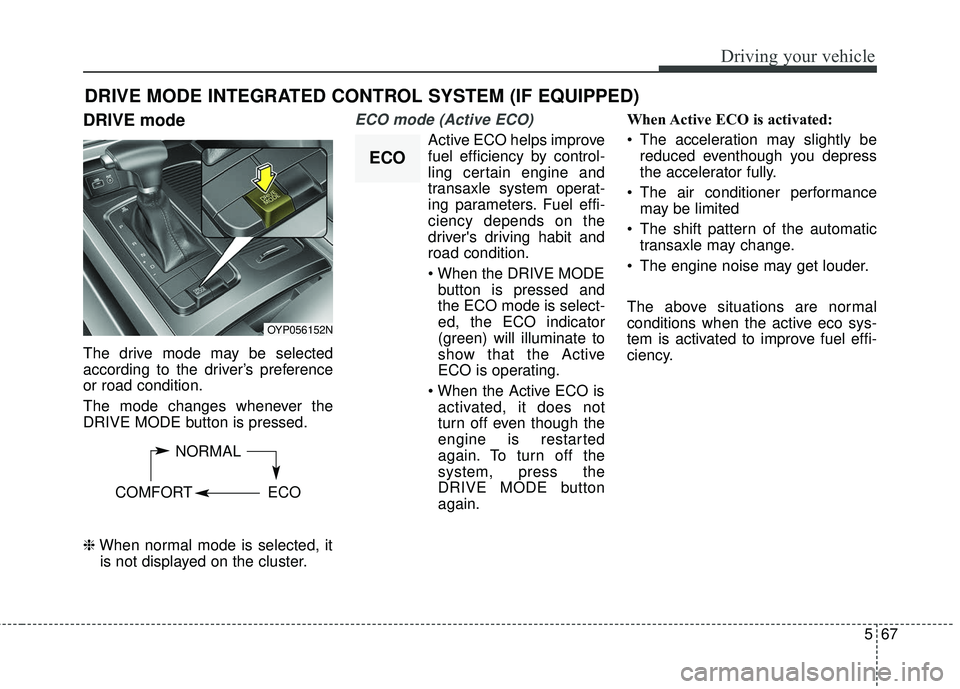
The drive mode may be selected
according to the driver’s preference
or road condition.
The mode changes whenever the
DRIVE MODE button is pressed.
\bWhen normal mode is selected, it
is not displayed on the cluster.
ECO mode (Active ECO)
Active ECO helps improve
fuel efficiency by control-
ling certain engine and
transaxle system operat-
ing parameters. Fuel effi-
ciency depends on the
driver's driving habit and
road condition.
button is pressed and
the ECO mode is select-
ed, the ECO indicator
(green) will illuminate to
show that the Active
ECO is operating.
activated, it does not
turn off even though the
engine is restarted
again. To turn off the
system, press the
DRIVE MODE button
again. When Active ECO is activated:
The acceleration may slightly be
reduced eventhough you depress
the accelerator fully.
The air conditioner performance may be limited
The shift pattern of the automatic transaxle may change.
The engine noise may get louder.
The above situations are normal
conditions when the active eco sys-
tem is activated to improve fuel effi-
ciency.
DRIVE MODE INTEGRATED CONTROL SYSTEM (IF EQUIPPED)
OYP056152N
NORMAL
COMFORT ECO
ECO
Page 422 of 586

Driving your vehicle
78
5
To operate the LDWS, press the but-
ton with the engine start/stop button
in the ON position. The indicator
(green) illuminates on the cluster. To
cancel the LDWS, press the button
again.
If the system detects that your vehi-
cle is leaving the lane when the
LDWS is operating and vehicle
speed exceeds 70 km/h (44 mph),
the warning operates as follows:1.Visual warning
If you leave the lane, the lane you
leave on the LCD display blinks yel-
low.
2.Auditory warning
If you leave the lane, the warning
sound operates.
OYP054127N
OYP054110N
OYP054111N
OYP054112N
OYP054113N
■Lane departure warning (Right)
■
When the sensor detects the lane line■ Lane departure warning (Left)
■When the sensor doesn’t detect the lane line
Page 526 of 586
Maintenance
56
7
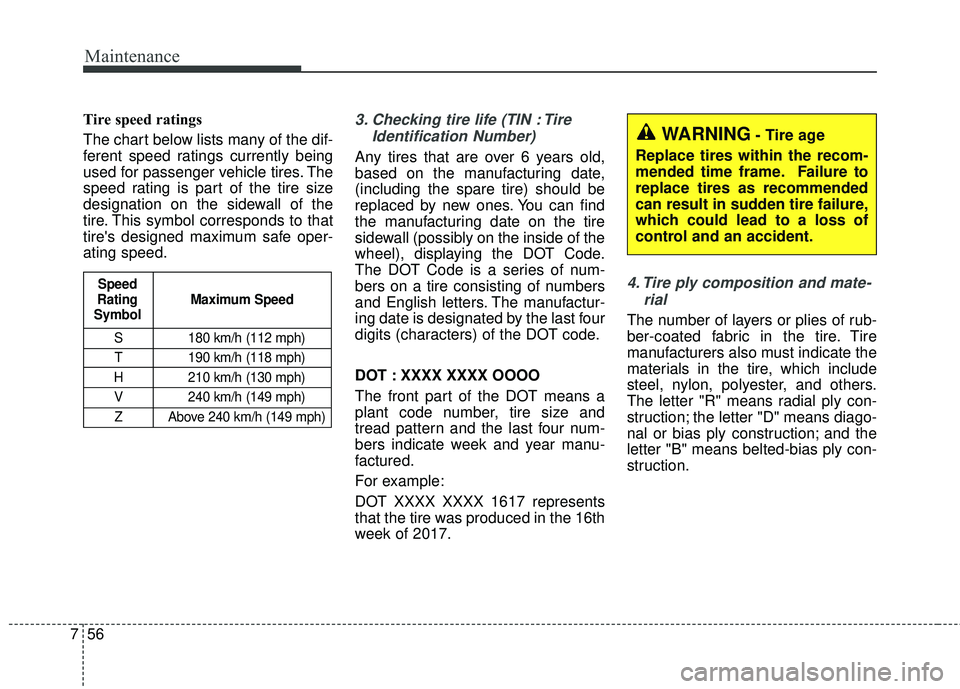
Tire speed ratings
The chart below lists many of the dif-
ferent speed ratings currently being
used for passenger vehicle tires. The
speed rating is part of the tire size
designation on the sidewall of the
tire. This symbol corresponds to that
tire's designed maximum safe oper-
ating speed.3. Checking tire life (TIN : Tire
Identification Number)
Any tires that are over 6 years old,
based on the manufacturing date,
(including the spare tire) should be
replaced by new ones. You can find
the manufacturing date on the tire
sidewall (possibly on the inside of the
wheel), displaying the DOT Code.
The DOT Code is a series of num-
bers on a tire consisting of numbers
and English letters. The manufactur-
ing date is designated by the last four
digits (characters) of the DOT code.
DOT : XXXX XXXX OOOO
The front part of the DOT means a
plant code number, tire size and
tread pattern and the last four num-
bers indicate week and year manu-
factured.
For example:
DOT XXXX XXXX 1617 represents
that the tire was produced in the 16th
week of 2017.
4. Tire ply composition and mate-rial
The number of layers or plies of rub-
ber-coated fabric in the tire. Tire
manufacturers also must indicate the
materials in the tire, which include
steel, nylon, polyester, and others.
The letter "R" means radial ply con-
struction; the letter "D" means diago-
nal or bias ply construction; and the
letter "B" means belted-bias ply con-
struction.
S 180 km/h (112 mph)
T 190 km/h (118 mph)
H 210 km/h (130 mph) V 240 km/h (149 mph)Z Above 240 km/h (149 mph)
Maximum Speed
Speed
Rating
Symbol
WARNING- Tire age
Replace tires within the recom-
mended time frame. Failure to
replace tires as recommended
can result in sudden tire failure,
which could lead to a loss of
control and an accident.
Page 536 of 586

Maintenance
66
7
If you do not have a spare, use a
fuse of the same rating from a circuityou may not need for operating thevehicle, such as the power outletfuse.
If the headlights or other electrical
components do not work and the
fuses are OK, check the fuse panel
in the engine compartment. If a fuse
is blown, it must be replaced.
Fuse switch
Always, put the fuse switch at the ON
position.
If you move the switch to the OFF
position, some items such as audio
and digital clock must be reset and
transmitter (or smart key) may not
work properly. When the switch is
Off, the caution will be displayed on
the instrument cluster.
Always place the fuse switch in the
ON position while driving the vehicle.
Engine compartment fuse
replacement
1. Turn the ignition switch and all other switches off.
2. Remove the fuse panel cover by pressing the tab and pulling the
cover up.
When the blade type fuse is dis- connected, remove it by using the
clip designed for changing fuses
located in the engine room fuse
box. Upon removal, securely
insert reserve fuse of equal quan-
tity.
OYP076011
OYP074012N
Page 581 of 586
I5
Index
Gross vehicle weight. . . . . . . . . . . . . . . . . . . . . . . . . . . . 8-5
Hood . . . . . . . . . . . . . . . . . . . . . . . . . . . . . . . . . . . . \
. . . 4-56Closing the hood . . . . . . . . . . . . . . . . . . . . . . . . . . . 4-57
Opening the hood . . . . . . . . . . . . . . . . . . . . . . . . . . 4-56
How to use this manual . . . . . . . . . . . . . . . . . . . . . . . . . 1-2
If the engine does not start . . . . . . . . . . . . . . . . . . . . . . . 6-4 If engine doesn't turn over or turns over slowly . . . . 6-4
If engine turns over normally but does not start . . . . 6-4
If the engine overheats . . . . . . . . . . . . . . . . . . . . . . . . . . 6-7
If you have a flat tire . . . . . . . . . . . . . . . . . . . . . . . . . . . 6-8 Changing tires . . . . . . . . . . . . . . . . . . . . . . . . . . . . . 6-11
Jack and tools . . . . . . . . . . . . . . . . . . . . . . . . . . . . . . . 6-8
Removing the spare tire . . . . . . . . . . . . . . . . . . . . . . . 6-9
Storing the spare tire . . . . . . . . . . . . . . . . . . . . . . . . 6-10
In case of an emergency while driving . . . . . . . . . . . . . . 6-3 If the engine stalls at a crossroad or crossing . . . . . . 6-3
If the engine stalls while driving . . . . . . . . . . . . . . . . 6-3
If you have a flat tire while driving . . . . . . . . . . . . . . 6-3
Instrument cluster . . . . . . . . . . . . . . . . . . . . . . . . . . . . . 4-82 Gauges . . . . . . . . . . . . . . . . . . . . . . . . . . . . . . . . . . . 4-\
84 Instrument Cluster Control. . . . . . . . . . . . . . . . . . . . 4-83
LCD Display Control . . . . . . . . . . . . . . . . . . . . . . . . 4-83
Transaxle Shift Indicator . . . . . . . . . . . . . . . . . . . . . 4-88
Instrument panel overview . . . . . . . . . . . . . . . . . . . . . . . 2-5
Interior features. . . . . . . . . . . . . . . . . . . . . . . . . . . . . . 4-189 AC inverter . . . . . . . . . . . . . . . . . . . . . . . . . . . . . . . 4-193
Bottle holder . . . . . . . . . . . . . . . . . . . . . . . . . . . . . . 4-190
Clock . . . . . . . . . . . . . . . . . . . . . . . . . . . . . . . . . . . 4-\
196
Coat hook . . . . . . . . . . . . . . . . . . . . . . . . . . . . . . . . 4-196
Cup holder . . . . . . . . . . . . . . . . . . . . . . . . . . . . . . . 4-189
Floor mat anchor (s) . . . . . . . . . . . . . . . . . . . . . . . . 4-197
Power outlet . . . . . . . . . . . . . . . . . . . . . . . . . . . . . . 4-192
Seat cooler (Air ventilation seat) . . . . . . . . . . . . . . 4-191
Seat warmer . . . . . . . . . . . . . . . . . . . . . . . . . . . . . . 4-190
Side curtain (if equipped). . . . . . . . . . . . . . . . . . . . 4-197
Sunvisor . . . . . . . . . . . . . . . . . . . . . . . . . . . . . . . . . 4-192
USB charger . . . . . . . . . . . . . . . . . . . . . . . . . . . . . . 4-195
Interior lights . . . . . . . . . . . . . . . . . . . . . . . . . . . . . . . 4-141 Automatic turn off function . . . . . . . . . . . . . . . . . . 4-141
Battery replacement . . . . . . . . . . . . . . . . . . . . . . . . 4-144
Luggage lamp . . . . . . . . . . . . . . . . . . . . . . . . . . . . . 4-143
Map lamp . . . . . . . . . . . . . . . . . . . . . . . . . . . . . . . 4-142
Portable lamp usage . . . . . . . . . . . . . . . . . . . . . . . . 4-143
Room lamp . . . . . . . . . . . . . . . . . . . . . . . . . . . . . . . 4-141
Vanity mirror lamp . . . . . . . . . . . . . . . . . . . . . . . . . 4-143
Interior overview. . . . . . . . . . . . . . . . . . . . . . . . . . . . . . . 2-4
G
H
I