2017 KIA RIO belt
[x] Cancel search: beltPage 363 of 449
727
Maintenance
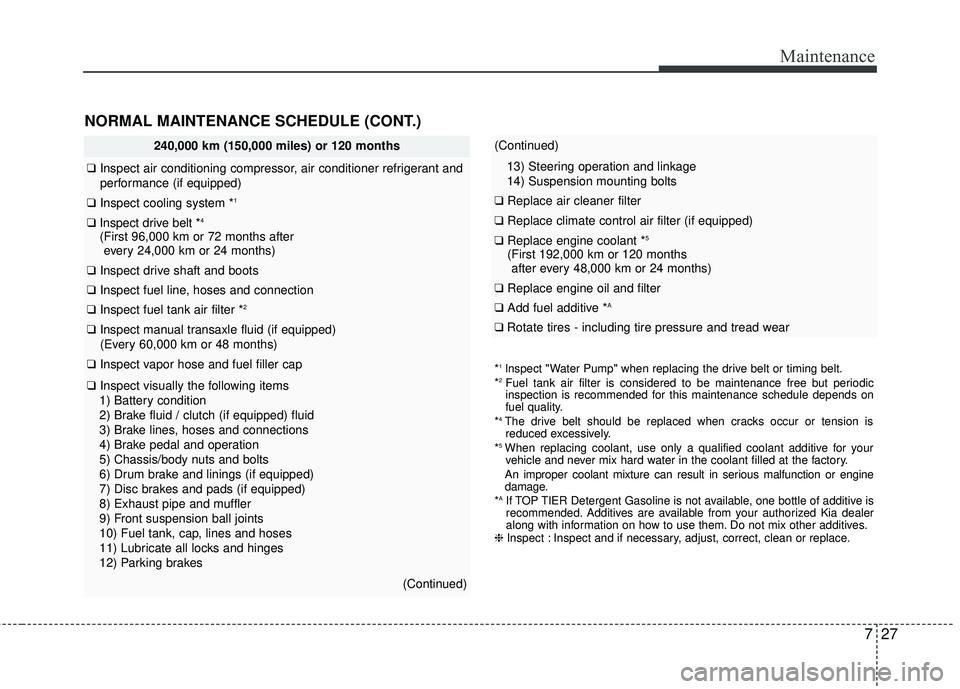
240,000 km (150,000 miles) or 120 months
❑Inspect air conditioning compressor, air conditioner refrigerant and
performance (if equipped)
❑ Inspect cooling system *1
❑Inspect drive belt *4
(First 96,000 km or 72 months after
every 24,000 km or 24 months)
❑ Inspect drive shaft and boots
❑ Inspect fuel line, hoses and connection
❑Inspect fuel tank air filter *2
❑Inspect manual transaxle fluid (if equipped)
(Every 60,000 km or 48 months)
❑ Inspect vapor hose and fuel filler cap
❑Inspect visually the following items
1) Battery condition
2) Brake fluid / clutch (if equipped) fluid
3) Brake lines, hoses and connections
4) Brake pedal and operation
5) Chassis/body nuts and bolts
6) Drum brake and linings (if equipped)
7) Disc brakes and pads (if equipped)
8) Exhaust pipe and muffler
9) Front suspension ball joints
10) Fuel tank, cap, lines and hoses
11) Lubricate all locks and hinges
12) Parking brakes
(Continued)
(Continued)
13) Steering operation and linkage
14) Suspension mounting bolts
❑ Replace air cleaner filter
❑Replace climate control air filter (if equipped)
❑Replace engine coolant *5
(First 192,000 km or 120 months
after every 48,000 km or 24 months)
❑ Replace engine oil and filter
❑Add fuel additive *A
❑Rotate tires - including tire pressure and tread wear
NORMAL MAINTENANCE SCHEDULE (CONT.)
*1lnspect "Water Pump" when replacing the drive belt or timing belt.
*2Fuel tank air filter is considered to be maintenance free but periodic
inspection is recommended for this maintenance schedule depends on
fuel quality.
*
4The drive belt should be replaced when cracks occur or tension is reduced excessively.
*
5When replacing coolant, use only a qualified coolant additive for your vehicle and never mix hard water in the coolant filled at the factory.
An improper coolant mixture can result in serious malfunction or engine
damage.
*
AIf TOP TIER Detergent Gasoline is not available, one bottle of additive is
recommended. Additives are available from your authorized Kia dealer
along with information on how to use them. Do not mix other additives.
❈ Inspect : Inspect and if necessary, adjust, correct, clean or replace.
Page 367 of 449

731
Maintenance
EXPLANATION OF SCHEDULED MAINTENANCE ITEMS
Engine oil and filter
The engine oil and filter should be
changed at the intervals specified in the
maintenance schedule. If the vehicle is
being driven in severe conditions, more
frequent oil and filter changes are
required.
Drive belts
Inspect all drive belts for evidence of
cuts, cracks, excessive wear or oil satu-
ration and replace if necessary. Drive
belts should be checked periodically for
proper tension and adjusted as neces-
sary.
Fuel filter (cartridge)
A clogged filter can limit the speed at
which the vehicle may be driven, damage
the emission system and cause multiple
issues such as hard starting. If an exces-
sive amount of foreign matter accumu-
lates in the fuel tank, the filter may
require replacement more frequently.
After installing a new filter, run the engine
for several minutes, and check for leaks
at the connections. Fuel filters should be
installed by an authorized Kia dealer.
Fuel filter (for gasoline)
Kia gasoline vehicle is equipped a life-
time fuel filter that integrated with the fuel
tank. Regular maintenance or replace-
ment is not needed but depends on fuel
quality. If there are some important safe-
ty matters like fuel flow restriction, surg-
ing, loss of power, hard starting problem
etc, fuel filter inspection or replace is
needed.
The fuel filter be Inspected or replaced
by an authorized Kia dealer.
Fuel lines, fuel hoses and con-
nections
Check the fuel lines, fuel hoses and con-
nections for leakage and damage. Have
an authorized Kia dealer replace any
damaged or leaking parts immediately.
Vapor hose and fuel filler cap
The vapor hose and fuel filler cap should
be inspected at those intervals specified
in the maintenance schedule. Make sure
that a new vapor hose or fuel filler cap is
correctly replaced.
Vacuum crankcase ventilation
hoses (if equipped)
Inspect the surface of hoses for evidence
of heat and/or mechanical damage. Hard
and brittle rubber, cracking, tears, cuts,
abrasions, and excessive swelling indi-
cate deterioration. Particular attention
should be paid to examine those hose
surfaces nearest to high heat sources,
such as the exhaust manifold.
Inspect the hose routing to assure that
the hoses do not come in contact with
any heat source, sharp edges or moving
component which might cause heat dam-
age or mechanical wear. Inspect all hose
connections, such as clamps and cou-
plings, to make sure they are secure, and
that no leaks are present. Hoses should
be replaced immediately if there is any
evidence of deterioration or damage.
Page 390 of 449
Maintenance
54
7
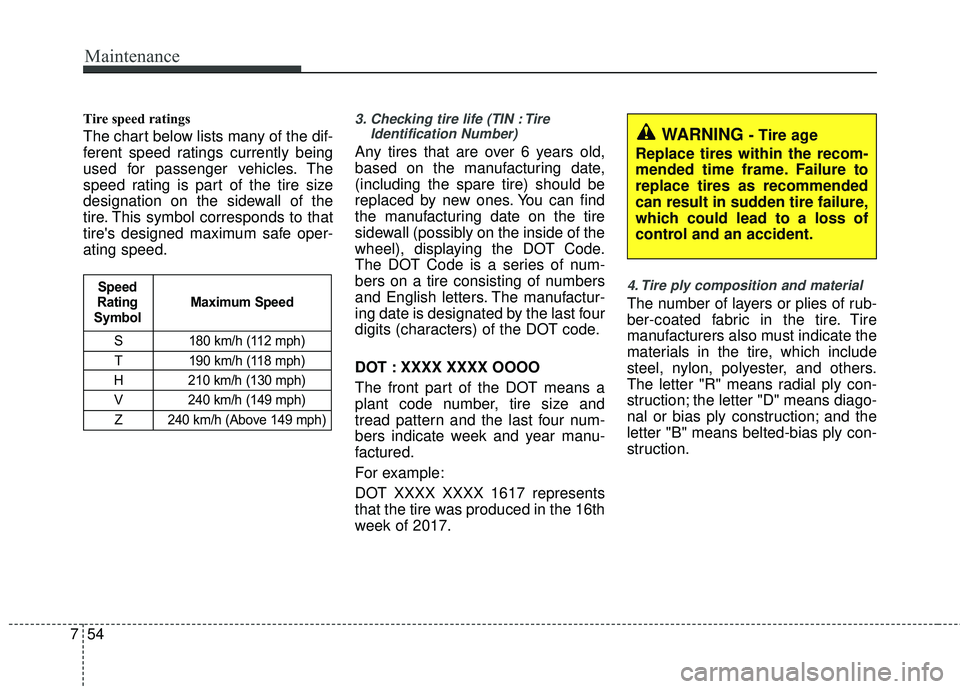
Tire speed ratings
The chart below lists many of the dif-
ferent speed ratings currently being
used for passenger vehicles. The
speed rating is part of the tire size
designation on the sidewall of the
tire. This symbol corresponds to that
tire's designed maximum safe oper-
ating speed.
3. Checking tire life (TIN : Tire
Identification Number)
Any tires that are over 6 years old,
based on the manufacturing date,
(including the spare tire) should be
replaced by new ones. You can find
the manufacturing date on the tire
sidewall (possibly on the inside of the
wheel), displaying the DOT Code.
The DOT Code is a series of num-
bers on a tire consisting of numbers
and English letters. The manufactur-
ing date is designated by the last four
digits (characters) of the DOT code.
DOT : XXXX XXXX OOOO
The front part of the DOT means a
plant code number, tire size and
tread pattern and the last four num-
bers indicate week and year manu-
factured.
For example:
DOT XXXX XXXX 1617 represents
that the tire was produced in the 16th
week of 2017.
4. Tire ply composition and material
The number of layers or plies of rub-
ber-coated fabric in the tire. Tire
manufacturers also must indicate the
materials in the tire, which include
steel, nylon, polyester, and others.
The letter "R" means radial ply con-
struction; the letter "D" means diago-
nal or bias ply construction; and the
letter "B" means belted-bias ply con-
struction.
S 180 km/h (112 mph)
T 190 km/h (118 mph)
H 210 km/h (130 mph) V 240 km/h (149 mph)Z 240 km/h (Above 149 mph)
Maximum Speed
Speed
Rating
Symbol
WARNING - Tire age
Replace tires within the recom-
mended time frame. Failure to
replace tires as recommended
can result in sudden tire failure,
which could lead to a loss of
control and an accident.
Page 392 of 449

Maintenance
56
7
Temperature -A, B & C
The temperature grades are A (the
highest), B and C representing the
tire’s resistance to the generation of
heat and its ability to dissipate heat
when tested under controlled condi-
tions on a specified indoor laboratory
test wheel.
Sustained high temperature can
cause the material of the tire to
degenerate and reduce tire life, and
excessive temperature can lead to
sudden tire failure. Grades B and A
represent higher levels of perform-
ance on the laboratory test wheel
than the minimum required by law. Tire terminology and definitions
Air Pressure:
The amount of air
inside the tire pressing outward on
the tire. Air pressure is expressed in
kilopascal (kPa) or pounds per
square inch (psi).
Accessory Weight: This means the
combined weight of optional acces-
sories. Some examples of optional
accessories are, automatic
transaxle, power seats, and air con-
ditioning.
Aspect Ratio: The relationship of a
tire's height to its width.
Belt: A rubber coated layer of cords
that is located between the plies and
the tread. Cords may be made from
steel or other reinforcing materials.
Bead: The tire bead contains steel
wires wrapped by steel cords that
hold the tire onto the rim.
Bias Ply Tire: A pneumatic tire in
which the plies are laid at alternate
angles less than 90 degrees to the
centerline of the tread. Cold Tire Pressure:
The amount of
air pressure in a tire, measured in
kilopascals (kPa) or pounds per
square inch (psi) before a tire has
built up heat from driving.
Curb Weight: This means the weight
of a motor vehicle with standard and
optional equipment including the
maximum capacity of fuel, oil and
coolant, but without passengers and
cargo.
DOT Markings: The DOT code
includes the Tire Identification
Number (TIN), an alphanumeric des-
ignator which can also identify the
tire manufacturer, production plant,
brand and date of production.
GVWR: Gross Vehicle Weight Rating
GAWR FRT: Gross Axle Weight
Rating for the Front Axle.
GAWR RR: Gross Axle Weight
Rating for the Rear axle.
Intended Outboard Sidewall: The
side of an asymmetrical tire, that
must always face outward when
mounted on a vehicle.
Kilopascal (kPa): The metric unit for
air pressure.
Page 395 of 449
759
Maintenance
Snow tires
If you equip your car with snow tires,
they should be the same size and
have the same load capacity as the
original tires. Snow tires should be
installed on all four wheels; other-
wise, poor handling may result.
Snow tires should carry 28 kPa (4
psi) more air pressure than the pres-
sure recommended for the standard
tires on the tire label on the driver's
side of the center pillar, or up to the
maximum pressure shown on the tire
sidewall, whichever is less.
Do not drive faster than 120 km/h (75
mph) when your vehicle is equipped
with snow tires.Radial-ply tires
Radial-ply tires provide improved
tread life, road hazard resistance and
smoother high speed ride. The radi-
al-ply tires used on this vehicle are of
belted construction, and are selected
to complement the ride and handling
characteristics of your vehicle.
Radial-ply tires have the same load
carrying capacity as bias-ply or bias
belted tires of the same size and use
the same recommended inflation
pressure. Mixing of radial-ply tires
with bias-ply or bias belted tires is
not recommended. Any combina-
tions of radial-ply and bias-ply or bias
belted tires when used on the same
vehicle will seriously deteriorate
vehicle handling. The best rule to fol-
low is: Identical radial-ply tires should
always be used as a set of four.
Longer wearing tires can be more
susceptible to irregular tread wear. It
is very important to follow the tire
rotation interval shown in this section
to achieve the tread life potential of
these tires. Cuts and punctures in
radial-ply tires are repairable only in
the tread area, because of sidewall
flexing. Consult your tire dealer for
radial-ply tire repairs.Low aspect ratio tire
(if equipped)
Low aspect ratio tires, whose aspect ratio
is lower than 50, are provided for sporty
looks.
Because the low aspect ratio tires are
optimized for handling and braking, it
may be more uncomfortable to ride in
and there is more noise compare with
normal tires.
Page 427 of 449
791
Maintenance
Fabric seat cover usingprecautions (If equipped)
Please clean the fabric seats regularly
with a vacuum cleaner in consideration of
fabric material characteristics. If they are
heavily soiled with beverage stains, etc.,
use a suitable interior cleaner. To prevent
damage to seat covers, wipe off the seat
covers down to the seams with a large
wiping motion and moderate pressure
using a soft sponge or microfiber cloth.
Velcro closures on clothing or sharp
objects may cause snagging or scratch-
es on the surface of the seats.
Make sure not to rub such objects
against the surface.
Cleaning the upholstery and interiortrim
Vinyl
Remove dust and loose dirt from vinyl
with a whisk broom or vacuum cleaner.
Clean vinyl surfaces with a vinyl cleaner.
Fabric
Remove dust and loose dirt from fabric
with a whisk broom or vacuum cleaner.
Clean with a mild soap solution recom-
mended for upholstery or carpets.
Remove fresh spots immediately with a
fabric spot cleaner. If fresh spots do not
receive immediate attention, the fabric
can be stained and its color can be
affected. Also, its fire-resistant properties
can be reduced if the material is not
properly maintained.
Using anything but recommended clean-
ers and procedures may affect the fab-
ric’s appearance and fire-resistant prop-
erties.
Cleaning the lap/shoulder belt web-bing
Clean the belt webbing with any mild
soap solution recommended for cleaning
upholstery or carpet. Follow the instruc-
tions provided with the soap. Do not
bleach or re-dye the webbing because
this may weaken it.
Cleaning the interior window glass
If the interior glass surfaces of the vehi-
cle become fogged (that is, covered with
an oily, greasy or waxy film), they should
be cleaned with glass cleaner. Follow the
directions on the glass cleaner container.
CAUTION - Rear windows
Do not scrape or scratch the insideof the rear window. This may result in damage to the rear windowdefroster grid.
Page 447 of 449
I7
Index
Scheduled maintenance service ··················\
··················\
···7-7
Seat··················\
··················\
··················\
··················\
···········3-2Driver’s seat ··················\
··················\
··················\
·············3-2
Front passenger’s seat··················\
··················\
················3-2
Front seat adjustment·············\
··················\
··················\
····3-4
Rear seat ··················\
··················\
··················\
··················\
3-2
Rear seat adjustment··················\
··················\
················3-10
Seat belts ··················\
··················\
··················\
··················\
3-14 Care of seat belts ··················\
··················\
··················\
···3-23
Pre-tensioner seat belt ··················\
··················\
·············3-20
Seat belt precautions··················\
··················\
················3-22
Seat belt restraint system ··················\
··················\
·········3-14
Smart key ··················\
··················\
··················\
··················\
·4-5 Smart key functions ··················\
··················\
··················\
·4-5
Smart key precautions ··················\
··················\
···············4-7
Special driving conditions ··················\
··················\
·········5-46 Driving at night ··················\
··················\
··················\
·····5-47
Driving in flooded areas ··················\
··················\
··········5-48
Driving in the rain ··················\
··················\
··················\
·5-48
Driving off-road ··················\
··················\
··················\
·····5-49
Hazardous driving conditions ··················\
··················\
··5-46
Highway driving ··················\
··················\
··················\
····5-49
Rocking the vehicle ··················\
··················\
·················5-46\
Smooth cornering ··················\
··················\
··················\
··5-47 Starting the engine ··················\
··················\
··················\
···5-10
Starting the engine with a smart key ··················\
·········5-11
Starting the engine with an ignition key ··················\
···5-10
Steering wheel ··················\
··················\
··················\
·········4-37 Electric power steering ··················\
··················\
············4-37
Heated steering wheel ··················\
··················\
·············4-38
Horn ··················\
··················\
··················\
··················\
·····4-39
Tilt and telescoping steering··················\
··················\
····4-38
Storage compartment ··················\
··················\
···············4-110 Center console storage·············\
··················\
················4-110
Cool box ··················\
··················\
··················\
··············4-111
Glove box ··················\
··················\
··················\
············4-110
Increase cargo space ··················\
··················\
··············4-113
Luggage net holder ··················\
··················\
················4-111
Luggage tray (5 Door) ··················\
··················\
···········4-112
Sunroof··················\
··················\
··················\
··················\
···4-33 Resetting the sunroof ··················\
··················\
···············4-36
Sliding the sunroof ··················\
··················\
·················4-34\
Sunshade ··················\
··················\
··················\
················4-36
Tilting the sunroof ··················\
··················\
··················\
·4-35
Tailgate··················\
··················\
··················\
··················\
···4-22 Closing the tailgate ··················\
··················\
··················\
4-23
Emergency tailgate safety release ··················\
·············4-23
Opening the tailgate··················\
··················\
·················4-22\
S
T