2017 KIA RIO power steering
[x] Cancel search: power steeringPage 292 of 449

545
Driving your vehicle
Remember, your vehicle does notrequire extended warm-up. After the
engine has started, allow the engine to
run for 10 to 20 seconds prior to plac-
ing the vehicle in gear. In very cold
weather, however, give your engine a
slightly longer warm-up period.
Don't "lug" or "over-rev" the engine. Lugging is driving too slowly in a very
high gear resulting in engine bucking. If
this happens, shift to a lower gear.
Over-revving is racing the engine
beyond its safe limit. This can be avoid-
ed by shifting at the recommended
speed. Use your air conditioning sparingly.
The air conditioning system is operat-
ed by engine power so your fuel econ-
omy is reduced when you use it.
Open windows at high speeds can reduce fuel economy.
Fuel economy is less in crosswinds and headwinds. To help offset some of
this loss, slow down when driving in
these conditions.
Keeping a vehicle in good operating con-
dition is important both for economy and
safety. Therefore, have an authorized Kia
dealer perform scheduled inspections
and maintenance.
WARNING - Engine off dur- ing motion
Never turn the engine off to coast
down hills or anytime the vehicle is
in motion. The power steering and
power brakes will not function
properly without the engine run-
ning. In addition, turning off the
ignition while driving could engage
the steering wheel lock resulting in
loss of vehicle steering. Keep the
engine on and downshift to an
appropriate gear for engine braking
effect.
Page 330 of 449

625
What to do in an emergency
Using the Tire Mobility Kit
1. Detach the speed restriction label(0) from the sealant bottle (1), and
place it in a highly visible place
inside the vehicle such as on the
steering wheel to remind the driv-
er not to drive too fast.
2. Screw connection hose (9) onto the connector of the sealant bottle.
3. Ensure that screw cap (8) is closed.
4. Unscrew the valve cap from the valve of the defective wheel and
screw filling hose (2) of the sealant
bottle onto the valve.
5. Insert the sealant bottle into the housing (4) of the compressor so
that the bottle is upright. 6. Ensure that the compressor is
switched off, position 0.
7. Plug the compressor power cord into the vehicle power outlet.
8. With the engine start/stop button position on or ignition switch posi-
tion on, switch on the compressor
and let it run for approximately 5~7
minutes to fill the sealant up to
proper pressure. (refer to the Tire
and Wheels, chapter 8). The infla-
tion pressure of the tire after filling
is unimportant and will be
checked/corrected later.
Be careful not to overinflate the
tire and stay away from the tire
when filling it. 9. Switch off the compressor.
10. Detach the hoses from the
sealant bottle connector and
from the tire valve.
Return the Tire Mobility Kit to its stor-
age location in the vehicle.
WARNING - Carbon monoxide
Do not leave your vehicle run-
ning in a poorly ventilated area
for extended periods of time.
Carbon monoxide poisoning
and suffocation can occur.
WARNING - Tire pressure
Do not attempt to drive your
vehicle if the tire pressure is
below 200kpa (29 PSI). This
could result in an accident due
to sudden tire failure.
OUB065010L
Page 335 of 449

What to do in an emergency
30
6
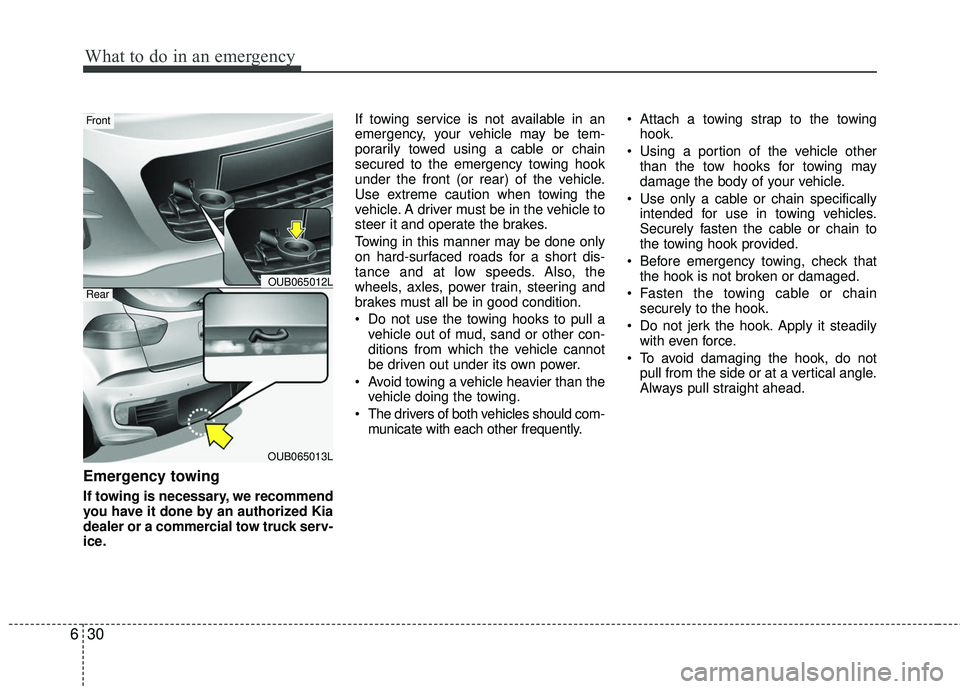
Emergency towing
If towing is necessary, we recommend
you have it done by an authorized Kia
dealer or a commercial tow truck serv-
ice. If towing service is not available in an
emergency, your vehicle may be tem-
porarily towed using a cable or chain
secured to the emergency towing hook
under the front (or rear) of the vehicle.
Use extreme caution when towing the
vehicle. A driver must be in the vehicle to
steer it and operate the brakes.
Towing in this manner may be done only
on hard-surfaced roads for a short dis-
tance and at low speeds. Also, the
wheels, axles, power train, steering and
brakes must all be in good condition.
Do not use the towing hooks to pull a
vehicle out of mud, sand or other con-
ditions from which the vehicle cannot
be driven out under its own power.
Avoid towing a vehicle heavier than the vehicle doing the towing.
The drivers of both vehicles should com- municate with each other frequently. Attach a towing strap to the towing
hook.
Using a portion of the vehicle other than the tow hooks for towing may
damage the body of your vehicle.
Use only a cable or chain specifically intended for use in towing vehicles.
Securely fasten the cable or chain to
the towing hook provided.
Before emergency towing, check that the hook is not broken or damaged.
Fasten the towing cable or chain securely to the hook.
Do not jerk the hook. Apply it steadily with even force.
To avoid damaging the hook, do not pull from the side or at a vertical angle.
Always pull straight ahead.
OUB065013L
Front
RearOUB065012L
Page 336 of 449

631
What to do in an emergency
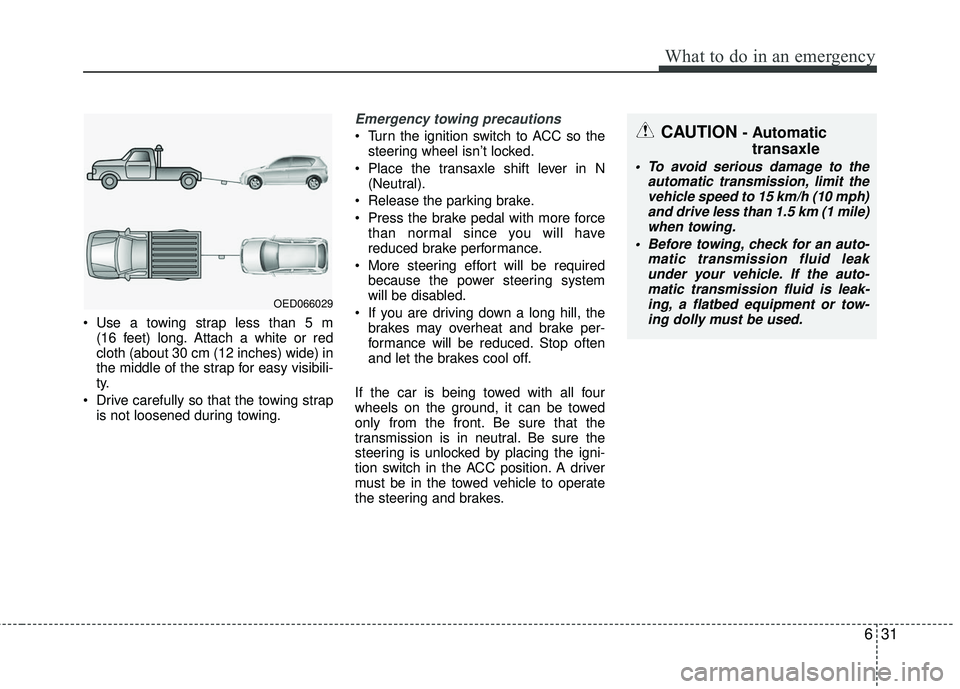
Use a towing strap less than 5 m (16 feet) long. Attach a white or red
cloth (about 30 cm (12 inches) wide) in
the middle of the strap for easy visibili-
ty.
Drive carefully so that the towing strap is not loosened during towing.
Emergency towing precautions
Turn the ignition switch to ACC so thesteering wheel isn’t locked.
Place the transaxle shift lever in N (Neutral).
Release the parking brake.
Press the brake pedal with more force than normal since you will have
reduced brake performance.
More steering effort will be required because the power steering system
will be disabled.
If you are driving down a long hill, the brakes may overheat and brake per-
formance will be reduced. Stop often
and let the brakes cool off.
If the car is being towed with all four
wheels on the ground, it can be towed
only from the front. Be sure that the
transmission is in neutral. Be sure the
steering is unlocked by placing the igni-
tion switch in the ACC position. A driver
must be in the towed vehicle to operate
the steering and brakes.CAUTION - Automatic transaxle
To avoid serious damage to the
automatic transmission, limit thevehicle speed to 15 km/h (10 mph)and drive less than 1.5 km (1 mile)when towing.
Before towing, check for an auto- matic transmission fluid leakunder your vehicle. If the auto- matic transmission fluid is leak-ing, a flatbed equipment or tow- ing dolly must be used.
OED066029
Page 342 of 449

Maintenance
67
At least monthly:
Check the coolant level in the enginecoolant reservoir.
Check the operation of all exterior lights, including the stoplights, turn sig-
nals and hazard warning flashers.
Check the inflation pressures of all tires including the spare.
At least twice a year (i.e., every Spring and Fall) :
Check the radiator, heater and air con- ditioning hoses for leaks or damage.
Check the windshield washer spray and wiper operation. Clean the wiper
blades with clean cloth dampened with
washer fluid.
Check the headlight alignment.
Check the muffler, exhaust pipes, shields and clamps.
Check the lap/shoulder belts for wear and function.
Check for worn tires and loose wheel lug nuts.
At least once a year :
Clean the body and door drain holes.
Lubricate the door hinges and checks,and hood hinges.
Lubricate the door and hood locks and latches.
Lubricate the door rubber weather- strips.
Check the air conditioning system.
Check the power steering fluid level.
Inspect and lubricate automatic transaxle linkage and controls.
Clean the battery and terminals.
Check the brake/clutch fluid level.
Page 404 of 449

Maintenance
68
7
Instrument panel fuse panel
Fuse Name Fuse rating Circuit Protected
POWER OUTLET 15A Power Outlet
C/LIGHTER 20A Cigarette Lighter
ACC 10AFront Map Lamp, Power Outside Mirror Switch, BCM,
Low DC-DC Convertor, Smart Key Control Module, Audio,
A/V & Navigation Head Unit, Digital Clock
A/BAG IND 10A Instrument Cluster
A/BAG 10ASBR PAB Indicator, SRS Control Module
Passenger Weight Classification Sensor
MODULE 2 10A BCM
MDPS 10A EPS Control Module
WIPER RR 15A Multifunction Switch, Rear Wiper Relay, Rear Wiper Motor
HTD STRG 15A Steering Wheel Heater
FOG LAMP RR 10A -
FOG LAMP FRT 15A Front Fog Lamp Relay
MODULE 1 10A ATM Shift Lever Switch, Door Warning Switch
STOP LAMP 15AData Link Connector, Smart Key Control Module, Stop Lamp Switch
Stop Lamp Relay, PCB Fuse & Relay Box (HAC Relay)
CLUSTER 10AAudio, BCM, ATM Shift Lever ILL., Crash Pad Switch
Instrument Cluster, Tire Pressure Monitoring Module
IG1 1 10AMultipurpose Check Connector, Driver CCS Seat Warmer Module
Passenger Seat Warmer Module
With ISG : Crash Pad Switch, Low DC-DC Convertor
ABS 10ACrash Pad Switch, ESC Module
PCB Fuse & Relay Box (HAC Relay)
B/UP LAMP 10A Back-Up Lamp Switch
Page 447 of 449

I7
Index
Scheduled maintenance service ··················\
··················\
···7-7
Seat··················\
··················\
··················\
··················\
···········3-2Driver’s seat ··················\
··················\
··················\
·············3-2
Front passenger’s seat··················\
··················\
················3-2
Front seat adjustment·············\
··················\
··················\
····3-4
Rear seat ··················\
··················\
··················\
··················\
3-2
Rear seat adjustment··················\
··················\
················3-10
Seat belts ··················\
··················\
··················\
··················\
3-14 Care of seat belts ··················\
··················\
··················\
···3-23
Pre-tensioner seat belt ··················\
··················\
·············3-20
Seat belt precautions··················\
··················\
················3-22
Seat belt restraint system ··················\
··················\
·········3-14
Smart key ··················\
··················\
··················\
··················\
·4-5 Smart key functions ··················\
··················\
··················\
·4-5
Smart key precautions ··················\
··················\
···············4-7
Special driving conditions ··················\
··················\
·········5-46 Driving at night ··················\
··················\
··················\
·····5-47
Driving in flooded areas ··················\
··················\
··········5-48
Driving in the rain ··················\
··················\
··················\
·5-48
Driving off-road ··················\
··················\
··················\
·····5-49
Hazardous driving conditions ··················\
··················\
··5-46
Highway driving ··················\
··················\
··················\
····5-49
Rocking the vehicle ··················\
··················\
·················5-46\
Smooth cornering ··················\
··················\
··················\
··5-47 Starting the engine ··················\
··················\
··················\
···5-10
Starting the engine with a smart key ··················\
·········5-11
Starting the engine with an ignition key ··················\
···5-10
Steering wheel ··················\
··················\
··················\
·········4-37 Electric power steering ··················\
··················\
············4-37
Heated steering wheel ··················\
··················\
·············4-38
Horn ··················\
··················\
··················\
··················\
·····4-39
Tilt and telescoping steering··················\
··················\
····4-38
Storage compartment ··················\
··················\
···············4-110 Center console storage·············\
··················\
················4-110
Cool box ··················\
··················\
··················\
··············4-111
Glove box ··················\
··················\
··················\
············4-110
Increase cargo space ··················\
··················\
··············4-113
Luggage net holder ··················\
··················\
················4-111
Luggage tray (5 Door) ··················\
··················\
···········4-112
Sunroof··················\
··················\
··················\
··················\
···4-33 Resetting the sunroof ··················\
··················\
···············4-36
Sliding the sunroof ··················\
··················\
·················4-34\
Sunshade ··················\
··················\
··················\
················4-36
Tilting the sunroof ··················\
··················\
··················\
·4-35
Tailgate··················\
··················\
··················\
··················\
···4-22 Closing the tailgate ··················\
··················\
··················\
4-23
Emergency tailgate safety release ··················\
·············4-23
Opening the tailgate··················\
··················\
·················4-22\
S
T